Page 4 of 341
Table of Contents
Windows
Keys and Door Locks
Remote Keyless Entry System (If Equipped)
Remote Trunk Release
Automatic Transaxle (If Equipped)
Manual Transaxle (If Equipped)
Parking Brake
Tilt Wheel
Turn Signal/Multifunction LeverWindshield Wipers
Cruise Control (If Equipped)
Exterior and Interior Lamps
Mirrors
Storage Compartments
Convenience Net (If Equipped)
Sunroof (Option)
Instrument Panel, Warning Lights and Gages Seats and Seat Controls
Safety BeltsSupplemental Restraint System (SRS)
Restraint Systems for Children
Section
1
Section
2
Seats and Restraint Systems
Features and Controls
ii
Page 11 of 341

ix
For example,
these symbols
are used on an
original battery:
CAUTION
POSSIBLE
INJURY
PROTECT
EYES BY
SHIELDING
CAUSTIC
BATTERY
ACID COULD
CAUSE
BURNS
AVOID
SPARKS OR
FLAMES
SPARK OR
FLAME
COULD
EXPLODE
BATTERY
These symbols
are important for
you and your
passengers
whenever your
vehicle is driven:
CHILD
RESTRAINT
TOP STRAP
ANCHOR
DOOR LOCK
UNLOCK
FASTEN
SEAT
BELTS
POWER
WINDOW
AIR BAG
These symbols
have to do with
your lamps:
MASTER
LIGHTING
SWITCH
TURN
SIGNALS
PARKING
LAMPS
HAZARD
WARNING
FLASHER
DAYTIME
RUNNING
LAMPS
FOG LAMPS
These symbols
are on some of
your controls:
WINDSHIELD
WIPER
WINDSHIELD
WASHER
WINDSHIELD
DEFROSTER
REAR
WINDOW
DEFOGGER
VENTILATING
FAN
These symbols
are used on
warning and
indicator lights:
ENGINE
COOLANT
TEMP
BATTERY
CHARGING
SYSTEM
BRAKE
COOLANT
ENGINE OIL
PRESSURE
ANTI-LOCK
BRAKES
Here are some
other symbols
you may see:
FUSE
LIGHTER
HORN
FUEL
Vehicle Symbols
These are some of the symbols you may find on your vehicle. Also see ªWarning Lights and Gagesº in the Index.
Page 18 of 341
1-6 Head Restraints
Slide the head restraint up or down so that the top of the
restraint is closest to the top of your ears. This position
reduces the chance of a neck injury in a crash.
Seatback Latches (2-Door Models)
The front seatbacks fold forward to let people get into
the back seat. The seatback latch is designed for
one
-handed operation.
To fold a front seatback forward, lift the seatback latch
fully without pushing forward on the seatback to unlock
it. Then fold the seatback forward.
Push the seatback to its original position, and the
seatback will lock.
CAUTION:
If the seatback isn't locked, it could move
forward in a sudden stop or crash. That could
cause injury to the person sitting there. Always
press rearward on the seatback to be sure it
is locked.
Page 19 of 341

1-7 Easy Entry Seat (2-Door Models)
The right front seat of your vehicle makes it easy for
people to get in and out of the rear seat.
1. Fold the right front seatback forward by lifting the
seatback latch fully.
2. The seat will slide forward to allow someone to get
into the rear seat area.
3. Push the seatback upright to lock and slide the seat
fully rearward to lock.
4. The front passenger should try to move the seat to
make sure the seat is locked into place.
CAUTION:
If an easy entry right front seat isn't locked, it
can move. In a sudden stop or crash, the person
sitting there could be injured. After you've used
it, be sure to push rearward on an easy entry seat
to be sure it is locked.
Rear Seats
Folding the Rear Seat (If Equipped)
To fold down the rear seat, do the following:
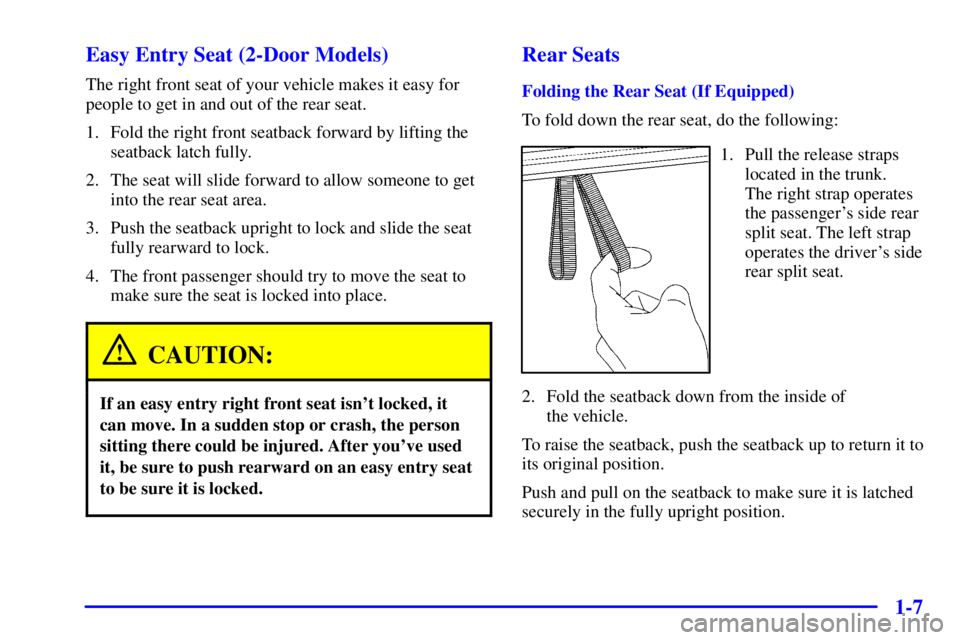
1. Pull the release straps
located in the trunk.
The right strap operates
the passenger's side rear
split seat. The left strap
operates the driver's side
rear split seat.
2. Fold the seatback down from the inside of
the vehicle.
To raise the seatback, push the seatback up to return it to
its original position.
Push and pull on the seatback to make sure it is latched
securely in the fully upright position.
Page 26 of 341
1-14
Driver Position
This part describes the driver's restraint system.
Lap-Shoulder Belt
The driver has a lap-shoulder belt. Here's how to wear
it properly.
1. Close and lock the door.
2. Adjust the seat so you can sit up straight. To see
how, see ªSeatsº in the Index.
3. Pick up the latch plate and pull the belt across you.
Don't let it get twisted.
The shoulder belt may lock if you pull the belt across
you very quickly. If this happens, let the belt go back
slightly to unlock it. Then pull the belt across you
more slowly.
4. Push the latch plate into the buckle until it clicks.
Pull up on the latch plate to make sure it is secure.
If the belt isn't long enough, see ªSafety Belt
Extenderº at the end of this section.
Make sure the release button on the buckle is
positioned so you would be able to unbuckle the
safety belt quickly if you ever had to.
Page 28 of 341
1-16
Shoulder Belt Height Adjuster (4-Door Models)
Before you begin to drive, move the shoulder belt
adjuster to the height that is right for you.To move it down, squeeze the release button and move
the height adjuster to the desired position. You can move
the adjuster up just by pushing on the shoulder belt
guide. After you move the adjuster to where you want it,
try to move it down without squeezing the release button
to make sure it has locked into position.
Adjust the height so that the shoulder portion of the
belt is centered on your shoulder. The belt should be
away from your face and neck, but not falling off
your shoulder.
Page 71 of 341

2-
2-1
Section 2 Features and Controls
Here you can learn about the many standard and optional features on your vehicle, and information on starting,
shifting and braking. Also explained are the instrument panel and the warning systems that tell you if everything is
working properly
-- and what to do if you have a problem.
2
-2 Windows
2
-4 Keys
2
-6 Door Locks
2
-11 Remote Keyless Entry System (If Equipped)
2
-14 Trunk
2
-17 Theft
2
-18 Passlock�
2-19 New Vehicle ªBreak-Inº
2
-19 Ignition Positions
2
-20 Starting Your Engine
2
-22 Engine Coolant Heater (Option)
2
-23 Automatic Transaxle Operation
2
-27 Manual Transaxle Operation
2
-29 Parking Brake
2
-30 Shifting Into PARK (P)
(Automatic Transaxle Only)
2
-32 Shifting Out of PARK (P)
(Automatic Transaxle Only)2
-33 Parking Your Vehicle/Key Removal
(Manual Transaxle Models Only)
2
-33 Parking Over Things That Burn
2
-34 Engine Exhaust
2
-34 Running Your Engine While You're Parked
(Automatic Transaxle)
2
-35 Tilt Wheel
2
-36 Turn Signal/Multifunction Lever
2
-43 Exterior Lamps
2
-46 Interior Lamps
2
-48 Mirrors
2
-49 Storage Compartments
2
-50 Ashtray and Cigarette Lighter (If Equipped)
2
-50 Sun Visors
2
-51 Sunroof (Option)
2
-52 The Instrument Panel -- Your
Information System
2
-56 Warning Lights, Gages and Indicators
Page 73 of 341

2-3 Manual Windows
On a vehicle with manual windows, use the window
crank to open and close each window.
Power Windows (If Equipped)
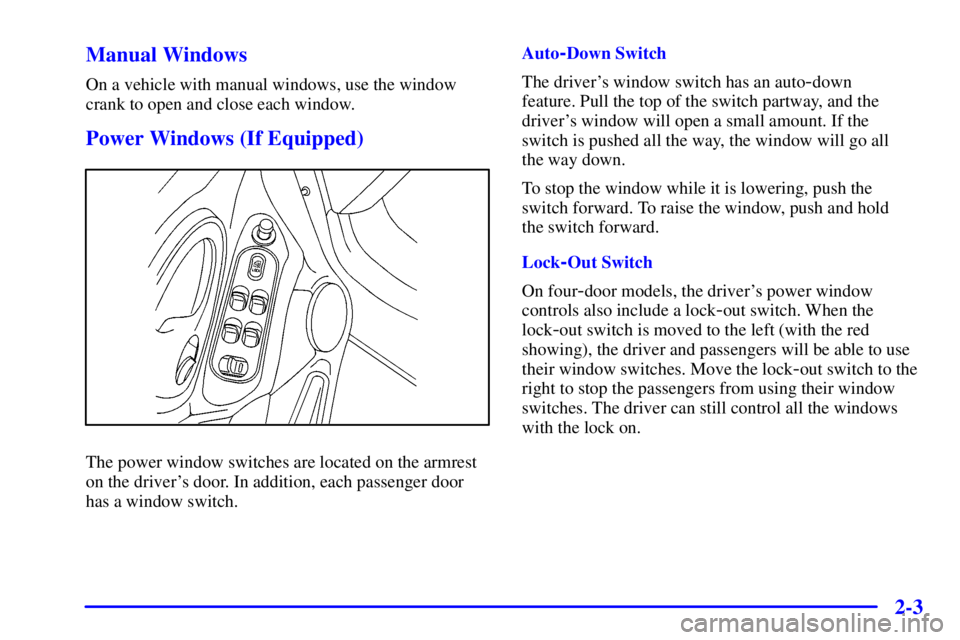
The power window switches are located on the armrest
on the driver's door. In addition, each passenger door
has a window switch.Auto
-Down Switch
The driver's window switch has an auto
-down
feature. Pull the top of the switch partway, and the
driver's window will open a small amount. If the
switch is pushed all the way, the window will go all
the way down.
To stop the window while it is lowering, push the
switch forward. To raise the window, push and hold
the switch forward.
Lock
-Out Switch
On four
-door models, the driver's power window
controls also include a lock
-out switch. When the
lock
-out switch is moved to the left (with the red
showing), the driver and passengers will be able to use
their window switches. Move the lock
-out switch to the
right to stop the passengers from using their window
switches. The driver can still control all the windows
with the lock on.