Page 163 of 413

2-96
Be aware that metal objects are sometimes buried in the
ground. They can affect accuracy and you may not know
they are there. As an example, many concrete roads
have metal reinforcements inside.
Also, if you drive with the trunk open, this could affect
accuracy and could decalibrate the compass.
Driver Identifier DIC Display
This feature allows two different drivers to store and recall
their own preferred display mode. The personalization
settings displayed on the DIC are determined by the
transmitter used to enter the vehicle. After the unlock
button of a remote keyless entry transmitter (if equipped)
is pressed and the ignition is in ON, the DIC will display
the identified driver. The settings can also be changed by
briefly pressing one of the MEMORY buttons located on
the driver's door.
The DIC is used to program information for DRIVER #1
and DRIVER #2. The DIC will identify a person as
UNKNOWN DRIVER if they are neither DRIVER #1 nor
DRIVER #2.
DIC Personalization Programming
The DIC can be used to program the following
personalization features available with your vehicle:
�Automatic Door Locks
�Window Lockout
�Security Feedback
�Delayed Locking
�Perimeter Lighting
�Memory Seats
�Parallel Park Assist Mirror (Tilt Mirror)
�Driver ID
The DIC is used to program the personal choices of two
drivers. The drivers are recognized as DRIVER #1 and
DRIVER #2. You will let the DIC know which driver you
are by using your remote keyless entry transmitter or by
pressing the appropriate memory seat control button
located on the driver's door or by choosing the driver with
the DIC. Each remote keyless entry transmitter was
preprogrammed to belong to DRIVER #1 or DRIVER #2.
Each transmitter may be programmed differently for
each driver.
Page 174 of 413

3-
3-1
Section 3 Comfort Controls and Audio Systems
In this section, you'll find out how to operate the comfort control and audio systems offered with your vehicle.
Be sure to read about the particular systems supplied with your vehicle.
3
-2 Comfort Controls
3
-8 Air Conditioning
3
-9 Heating
3
-9 Defogging and Defrosting
3
-10 Rear Window Defogger
3
-10 Ventilation System
3
-12 Audio Systems
3
-12 Setting the Clock for Systems with
Radio Data System
3
-13 AM-FM Stereo with Cassette Tape Player
with Programmable Equalization and Radio
Data System (RDS) (If Equipped)
3
-20 AM-FM Stereo with Compact Disc Player
with Programmable Equalization and Radio
Data System (RDS) (If Equipped)3
-27 AM-FM Stereo with Cassette Tape
and Compact Disc Player with
Programmable Equalization and
Radio Data System (RDS) (If Equipped)
3
-36 Trunk-Mounted CD Changer (Option)
3
-40 Theft-Deterrent Feature RDS Radios
3
-40 Audio Steering Wheel Controls (If Equipped)
3
-41 Understanding Radio Reception
3
-42 Tips About Your Audio System
3
-42 Care of Your Cassette Tape Player
3
-43 Care of Your Compact Discs
3
-43 Care of Your Compact Disc Player
3
-44 Diversity Antenna System
3
-44 Chime Level Adjustment
Page 209 of 413

3-36
AM FM: Press this button to play the radio when a disc
is in the player.
CD TAPE: With a cassette tape in the player and the
radio playing, press this button to play a cassette tape.
Press AM FM to return to the radio when a cassette tape is
playing. Press CD TAPE to switch between the tape and
compact disc if both are loaded. The inactive tape or
CD will remain safely inside the radio for future listening.
The display will show tape and CD icons. If you have the
optional CD changer and the CD changer is loaded, the
CD TAPE button will activate the changer and an icon will
be lit in the display.
: Press this button to remove the disc. The radio will
play. Eject may be activated with either the ignition or
radio off. CDs may be loaded with the radio and ignition
off if this button is pressed first.
Radio Calibration
Your audio system has been calibrated for your vehicle
from the factory. If CALIBRATE appears on the display
it means that your radio has not been configured
properly for your vehicle and must be returned to the
dealership for service.
Trunk-Mounted CD Changer (Option)
With the optional compact disc changer, you can play up
to 12 discs continuously. Normal size discs may be
played using the trays supplied in the magazine.
Page 242 of 413
4-25
Winter Driving
Here are some tips for winter driving:
�Have your vehicle in good shape for winter.
�You may want to put winter emergency supplies in
your trunk.
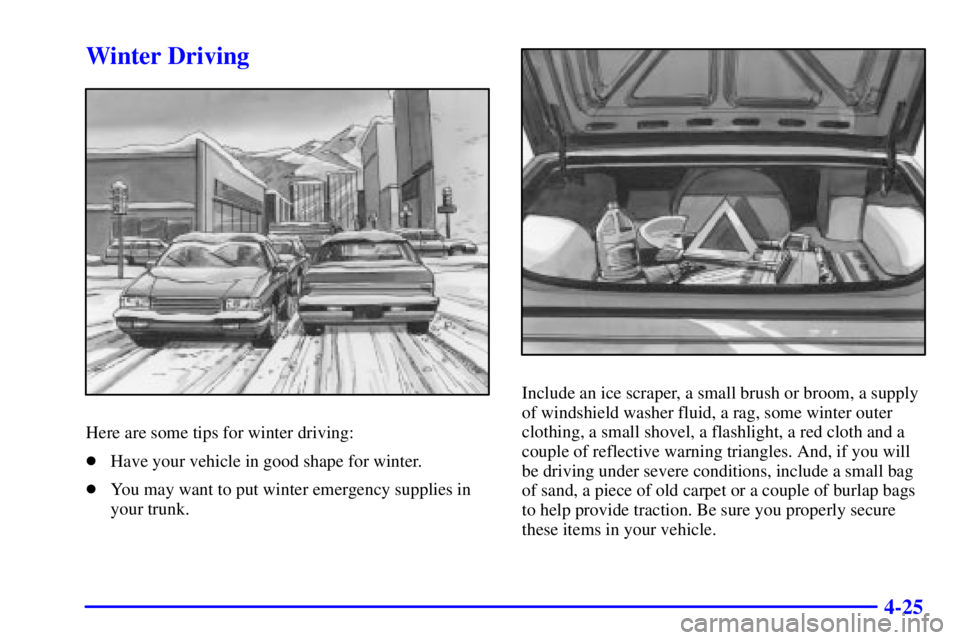
Include an ice scraper, a small brush or broom, a supply
of windshield washer fluid, a rag, some winter outer
clothing, a small shovel, a flashlight, a red cloth and a
couple of reflective warning triangles. And, if you will
be driving under severe conditions, include a small bag
of sand, a piece of old carpet or a couple of burlap bags
to help provide traction. Be sure you properly secure
these items in your vehicle.
Page 248 of 413

4-31
CAUTION:
Do not load your vehicle any heavier than the
GVWR, or either the maximum front or rear
GAWR. If you do, parts on your vehicle can
break, and it can change the way your vehicle
handles. These could cause you to lose control
and crash. Also, overloading can shorten the life
of your vehicle.
NOTICE:
Your warranty does not cover parts or
components that fail because of overloading.
If you put things inside your vehicle, like suitcases,
tools, packages, or anything else, they will go as fast as
the vehicle goes. If you have to stop or turn quickly, or
if there is a crash, they'll keep going.
CAUTION:
Things you put inside your vehicle can strike and
injure people in a sudden stop or turn, or in
a crash.
�Put things in the trunk of your vehicle. In a
trunk, put them as far forward as you can.
Try to spread the weight evenly.
�Never stack heavier things, like suitcases,
inside the vehicle so that some of them are
above the tops of the seats.
�Don't leave an unsecured child restraint in
your vehicle.
�When you carry something inside the
vehicle, secure it whenever you can.
Electronic Level Control
This feature keeps the rear of your vehicle level as the
load changes. It is automatic
-- you do not need to
adjust anything.
Page 252 of 413

4-35 Hitches
It's important to have the correct hitch equipment.
Crosswinds, large trucks going by and rough roads are a
few reasons why you'll need the right hitch. Here are
some rules to follow:
�The rear bumper on your vehicle is not intended
for hitches. Do not attach rental hitches or other
bumper
-type hitches to it. Use only a frame-mounted
hitch that does not attach to the bumper.
�Will you have to make any holes in the body of your
vehicle when you install a trailer hitch? If you do, then be
sure to seal the holes later when you remove the hitch. If
you don't seal them, deadly carbon monoxide (CO) from
your exhaust can get into your vehicle. See ªCarbon
Monoxideº in the Index. Dirt and water can, too.
Safety Chains
You should always attach chains between your vehicle
and your trailer. Cross the safety chains under the tongue
of the trailer so that the tongue will not drop to the road
if it becomes separated from the hitch. Instructions
about safety chains may be provided by the hitch
manufacturer or by the trailer manufacturer. Follow the
manufacturer's recommendation for attaching safety
chains and do not attach them to the bumper. Always
leave just enough slack so you can turn with your rig.
And, never allow safety chains to drag on the ground.
Trailer Brakes
Does your trailer have its own brakes? Be sure to read and
follow the instructions for the trailer brakes so you'll be
able to install, adjust and maintain them properly.
Because you have anti
-lock brakes, do not try to tap into
your vehicles brake system. If you do, both brake
systems won't work well, or at all.
Trailer Wiring Harness
All of the electrical circuits required for your trailer
lighting system can be accessed at the driver's side rear
lamp connector. This connector is located under the
carpet on the rear corner of your trunk compartment.
Driving with a Trailer
Towing a trailer requires a certain amount of experience.
Before setting out for the open road, you'll want to get
to know your rig. Acquaint yourself with the feel of
handling and braking with the added weight of the
trailer. And always keep in mind that the vehicle you are
driving is now a good deal longer and not nearly as
responsive as your vehicle is by itself.
Page 254 of 413

4-37 Turn Signals When Towing a Trailer
When you tow a trailer, your vehicle may need a
different turn signal flasher and/or extra wiring. Check
with your dealer. All of the electrical circuits required
for your trailer lighting system can be accessed at the
left rear lamp connector. This connector is located under
the carpet on the driver's side in the rear corner of your
trunk compartment. The arrows on your instrument
panel will flash whenever you signal a turn or lane
change. Properly hooked up, the trailer lamps will also
flash, telling other drivers you're about to turn, change
lanes or stop.
When towing a trailer, the arrows on your instrument
panel will flash for turns even if the bulbs on the trailer
are burned out. Thus, you may think drivers behind
you are seeing your signal when they are not.
It's important to check occasionally to be sure
the trailer bulbs are still working.Your vehicle has bulb warning lights. When you plug a
trailer lighting system into your vehicle's lighting
system, its bulb warning lights may not let you know if
one of your lamps goes out. So, when you have a trailer
lighting system plugged in, be sure to check your
vehicle and trailer lamps from time to time to be sure
they're all working. Once you disconnect the trailer
lamps, the bulb warning lights again can tell you if one
of your vehicle lamps is out.
Driving On Grades
Reduce speed and shift to a lower gear before you start
down a long or steep downgrade. If you don't shift
down, you might have to use your brakes so much that
they would get hot and no longer work well.
On a long uphill grade, shift down to THIRD (3) and
reduce your speed to around 45 mph (70 km/h) to reduce
the possibility of the engine and transaxle overheating.
Page 274 of 413
5-19
The following steps will tell you how to use the jack and
change a tire.
Removing the Spare Tire and Tools
The equipment you'll need is in the trunk.
1. Pull the carpeting from the floor of the trunk.
2. Remove the retainer then lift and remove the cover.
3. Remove the spare tire. See ªCompact Spare Tireº
later in this section for more information about the
compact spare.