2001 PEUGEOT 206 CC DAG brake light
[x] Cancel search: brake lightPage 2 of 123

1Bonnet opening control
2 Fuse box
3 Storage
4 Steering wheel height adjust- ment control
5 Headlamp height adjustment
6 Lights and fog lamps stalk
7 Adjustable side vent
8 Heated seats switch*
9 Side windows demisting vents
10 Passenger air bag disarmingswitch*
11 Driver's air bag / horn
12 Instrument panel lighting rheostat
13 Windscreen wash/wipe stalk 14
Radio steering column stalk
15 Steering lock
16 Central adjustable vents
17 Hazard warning lights switch
18 Multifunction display
19 Audio equipment
20 Windscreen demisting vents
21 Passenger air bag
22 Glove box
23 Controls for heating, ventila-tion, air conditioning and rearscreen and mirrors demisting
24 Front ashtray
25 Gear lever
26 Lighter
27 Electric mirrors switch 28
Electric windows switch
29 Handbrake
30 Retractable roof switch
* According to specification.
3YOUR AT A GLANCE
Page 19 of 123

PEUGEOT SERVICING23
- Engine oil��
Level
Operations Operation descriptions 1st
service
AC
Intermediate visit
- Oil filter��- Fuel filter�- Air filter element�- Spark plugs�
- Engine oil (check + top-up)��- Manual gearbox oil (check + top-up)��- Battery (check + top-up) if removable cap��- Coolant level (check + top-up)����- Front windscreen wash (check + top-up)����- Brake fluid (check + top-up)���- Power steering fluid (check + top-up according to specification)���
- Operation of lights and indicators���- Condition of glass, headlamp and light lenses and mirrors��- Horn��- Condition of wiper blades��- Windscreen jets��- Condition and tension of the ancillary drive belts��- Handbrake��- Condition of hydraulic circuits (hoses and covers) and check for leaks��- Condition of rubber boots and gaiters���- Brake pad wear�� o- Play in hubs, link rods, ball joints, flexible mountings�- Shock absorbers: check for leaks�- Rear drum brake lining wear�- Condition and pressure of tyres (including spare tyre)���- Emission control check according to current legislation���- Pollen filter (according to specification)��o- Visual check of the whole vehicle by a PEUGEOT dealer��
- Courtesy vehicle�
��
� All driving conditions. oIf there are specific conditions.
DRAIN AND REFILL
REPLACE
LEVELS
CHECK
SERVICE
ROAD TEST
TYPE A AND C SERVICES AND THE INTERMEDIATE VISIT
Page 22 of 123
INSTRUMENTS AND CONTROLS
26
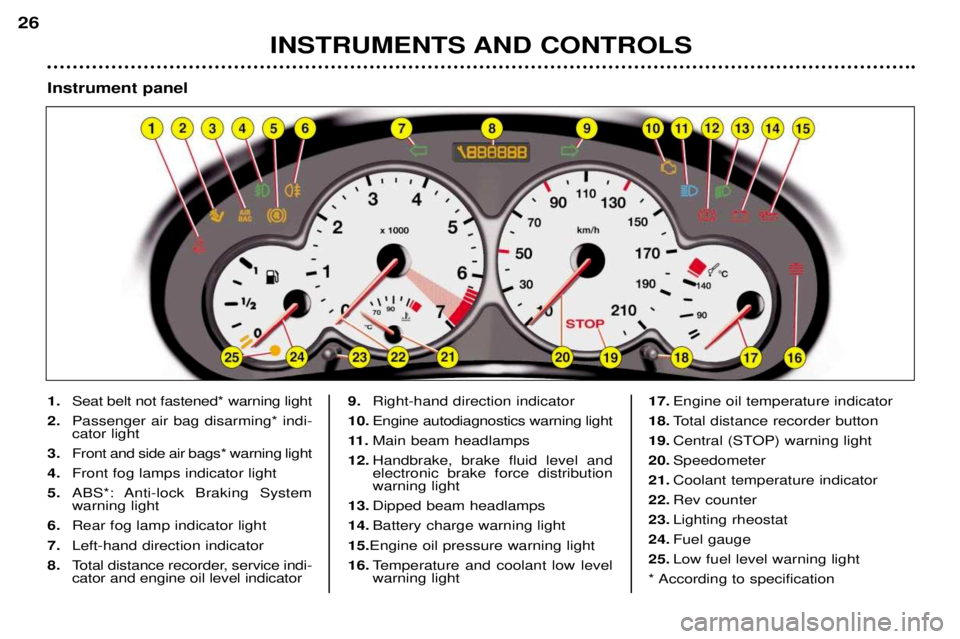
1.Seat belt not fastened* warning light
2. Passenger air bag disarming* indi- cator light
3. Front and side air bags* warning light
4. Front fog lamps indicator light
5. ABS*: Anti-lock Braking Systemwarning light
6. Rear fog lamp indicator light
7. Left-hand direction indicator
8. Total distance recorder, service indi-cator and engine oil level indicator 9.
Right-hand direction indicator
10. Engine autodiagnostics warning light
11 . Main beam headlamps
12. Handbrake, brake fluid level andelectronic brake force distributionwarning light
13. Dipped beam headlamps
14. Battery charge warning light
15. Engine oil pressure warning light
16. Temperature and coolant low levelwarning light 17.
Engine oil temperature indicator
18. Total distance recorder button
19. Central (STOP) warning light
20. Speedometer
21. Coolant temperature indicator
22. Rev counter
23. Lighting rheostat
24. Fuel gauge
25. Low fuel level warning light
* According to specification
Instrument panel
Page 23 of 123
INSTRUMENTS AND CONTROLS27
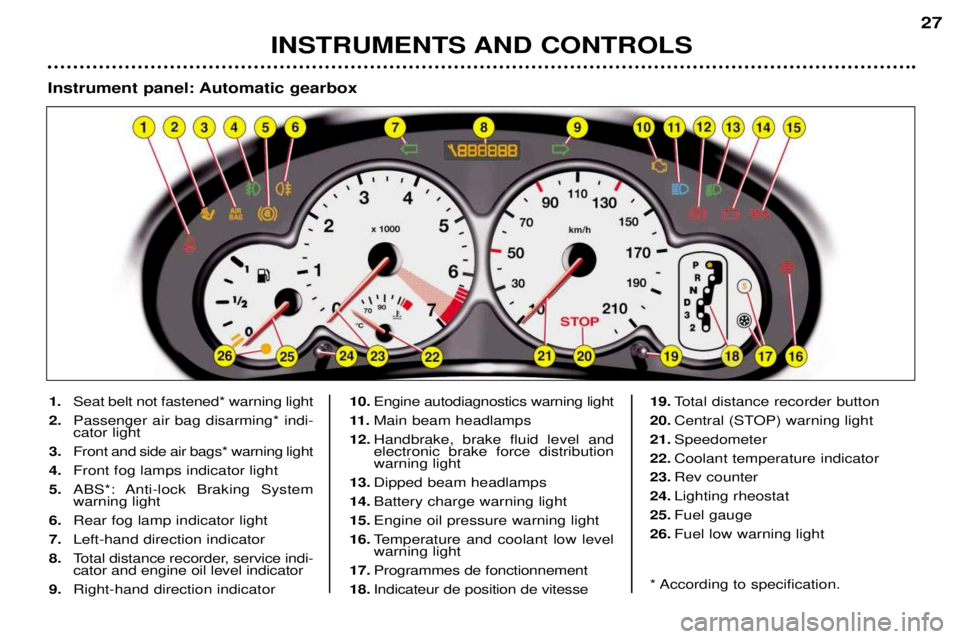
1. Seat belt not fastened* warning light
2. Passenger air bag disarming* indi- cator light
3. Front and side air bags* warning light
4. Front fog lamps indicator light
5. ABS*: Anti-lock Braking Systemwarning light
6. Rear fog lamp indicator light
7. Left-hand direction indicator
8. Total distance recorder, service indi-cator and engine oil level indicator
9. Right-hand direction indicator 10.
Engine autodiagnostics warning light
11 . Main beam headlamps
12. Handbrake, brake fluid level andelectronic brake force distributionwarning light
13. Dipped beam headlamps
14. Battery charge warning light
15. Engine oil pressure warning light
16. Temperature and coolant low levelwarning light
17. Programmes de fonctionnement
18. Indicateur de position de vitesse 19.
Total distance recorder button
20. Central (STOP) warning light
21. Speedometer
22. Coolant temperature indicator
23. Rev counter
24. Lighting rheostat
25. Fuel gauge
26. Fuel low warning light
* According to specification.
Instrument panel: Automatic gearbox
Page 24 of 123
INSTRUMENTS AND CONTROLS
28
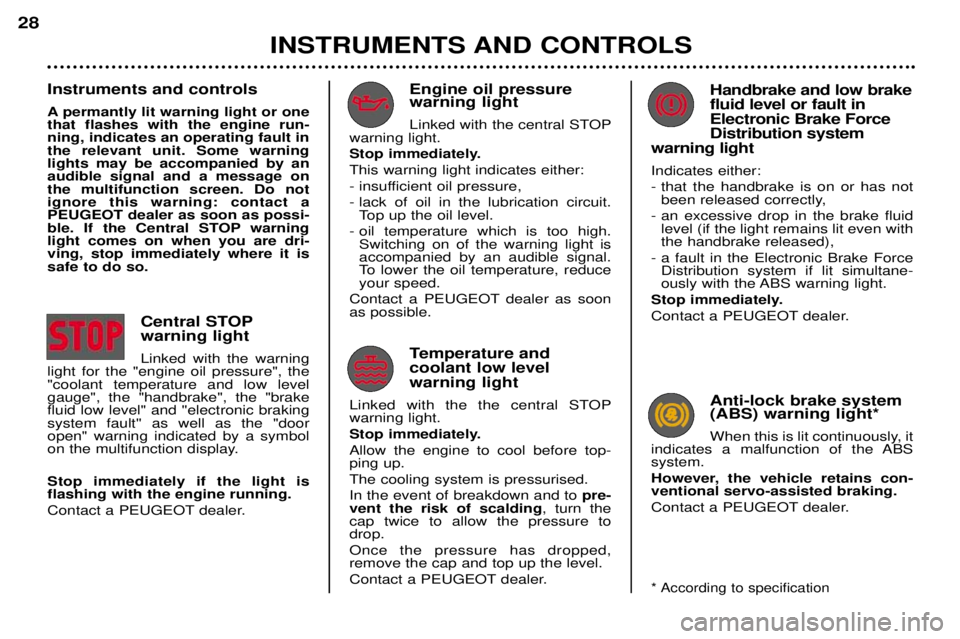
Handbrake and low brake fluid level or fault inElectronic Brake ForceDistribution system
warning light
Indicates either:
- that the handbrake is on or has not been released correctly,
- an excessive drop in the brake fluid level (if the light remains lit even with the handbrake released),
- a fault in the Electronic Brake Force Distribution system if lit simultane-
ously with the ABS warning light.
Stop immediately.
Contact a PEUGEOT dealer.
Instruments and controls
A permantly lit warning light or one that flashes with the engine run-ning, indicates an operating fault inthe relevant unit. Some warninglights may be accompanied by anaudible signal and a message onthe multifunction screen. Do notignore this warning: contact a PEUGEOT dealer as soon as possi-
ble. If the Central STOP warninglight comes on when you are dri-ving, stop immediately where it issafe to do so.
Anti-lock brake system (ABS) warning light*
When this is lit continuously, it
indicates a malfunction of the ABS system.
However, the vehicle retains con- ventional servo-assisted braking.
Contact a PEUGEOT dealer.
* According to specification
Engine oil pressure warning light
Linked with the central STOP
warning light.
Stop immediately.This warning light indicates either:
- insufficient oil pressure,
- lack of oil in the lubrication circuit. Top up the oil level.
- oil temperature which is too high. Switching on of the warning light is accompanied by an audible signal.
To lower the oil temperature, reduceyour speed.
Contact a PEUGEOT dealer as soonas possible.
Temperature and coolant low level warning light
Linked with the the central STOP warning light.
Stop immediately.Allow the engine to cool before top- ping up. The cooling system is pressurised.In the event of breakdown and to pre-
vent the risk of scalding , turn the
cap twice to allow the pressure to drop. Once the pressure has dropped, remove the cap and top up the level.
Contact a PEUGEOT dealer.
Central STOP warning light Linked with the warning
light for the "engine oil pressure", the "coolant temperature and low levelgauge", the "handbrake", the "brakefluid low level" and ''electronic brakingsystem fault'' as well as the "dooropen" warning indicated by a symbol
on the multifunction display. Stop immediately if the light is flashing with the engine running.
Contact a PEUGEOT dealer.
Page 86 of 123
YOUR 206 CC IN DETAIL
86
Operating programmes
You have a choice of three operating pro- grammes:
Ð Autoadaptive (normal).
Ð Sport.
Ð Snow.One press on button
Aor Bwill select
Sport or Snow respectively. The selec- tion is displayed on the instrumentpanel. Pressing the button a secondtime will return to the autoadaptive(normal) programme. Autoadaptive programme (normal) Gear changes are carried out on the basis of various parameters, such as:
Ð driving style,
Ð road characteristics,
Ð vehicle load.The gearbox continuously scans the
different programmes in the memoryand selects the one most suitable forthe driving conditions at any givenmoment. Sport programme The Sport programme automatically favours more dynamic driving. Snow Programme In position
D, the Snow programme
provides smooth driving suited to slip- pery roads in order to improve traction
and stability. Starting is in 2nd gear
and changing down is at low enginespeeds. Special operating features
Ð During prolonged braking, the gearbox changes down automatically, so as to
provide efficient engine braking.
Ð If you take your foot off the accele- rator suddenly (when you are takenby surprise, for example), the gear-box will not change up, so as to
improve safety.
Ð When the engine is cold, the gear- box automatically selects a specialprogramme that enables the engineto reach its ideal temperature more quickly in order to decrease pollu-tion.
Kickdown For immediate maximum acceleration
without touching the gear lever, press theaccelerator pedal down as far as it will go.The gearbox will change down automati-cally or stay in the gear selected, up tomaximum engine speed.Any disruption of the system is signalled by the simulta-neous flashing of the Sportand Snow lights on the ins-
trument panel. In such a case, thegearbox will operate in downgrade
mode. You may feel a substantialknock when reverse is selected from P
to Ror Nto R(without any risk of
damage to the gearbox). Do not exceed 60 m.p.h. (100km/h).Contact a PEUGEOT dealer without
delay. When the engine is idling with the car
in gear, the car will move even withoutyou accelerating. Do not accelerate while a gear is being selected, when the vehicle is stationa-
ry.
When stationary, have your foot on the
brake pedal when selecting a gear. Do not accelerate in gear with the brakes on. If work needs to be done with the engi- ne running, apply the handbrake andselect position P.
Do not change down to brake on slip-pery roads. Never select position Nwhen the
vehicle is moving.Never engage Por Rif the vehicle is
not stationary.Do not leave children inside the vehicle unsupervised when the engineis running.
Page 87 of 123
YOUR 206 CC IN DETAIL87
The normal operation of the ABS may make itself felt by slight vibra-tions of the brake pedal. In emergency braking, press very firmly without releasing thepressure.
The ABS Anti-lock Braking System*
When used with approved tyres in
good condition, the ABS increases thestability and manoeuvrability of yourvehicle, particularly on poor or slipperyroad surfaces. The anti-lock braking system comes into operation automatically whenthere is a risk of wheel lock.
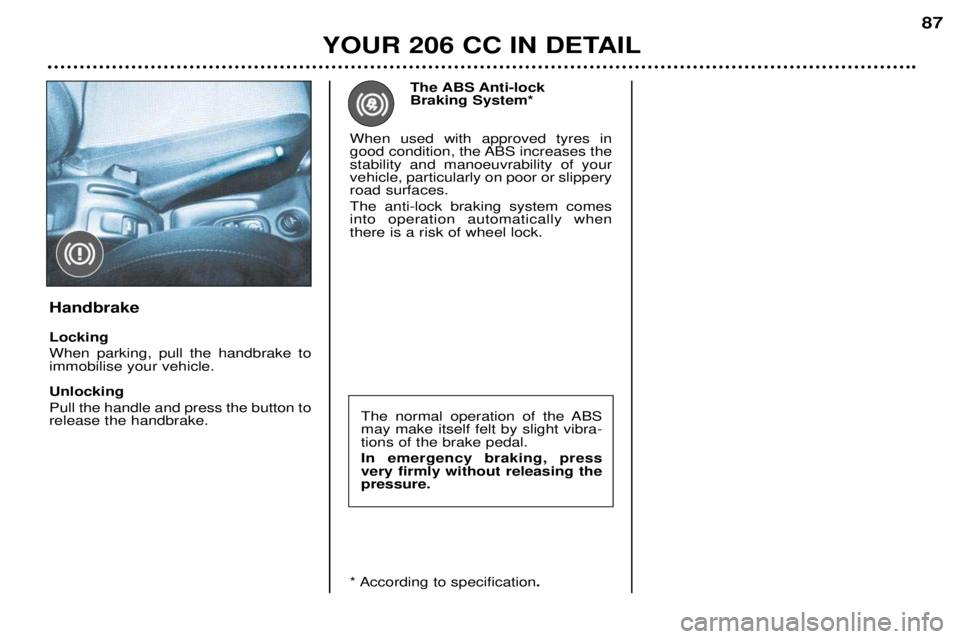
Handbrake Locking When parking, pull the handbrake to immobilise your vehicle. Unlocking Pull the handle and press the button to release the handbrake.
* According to specification .
Page 103 of 123
PRACTICAL ASPECTS OF YOUR VEHICLE101
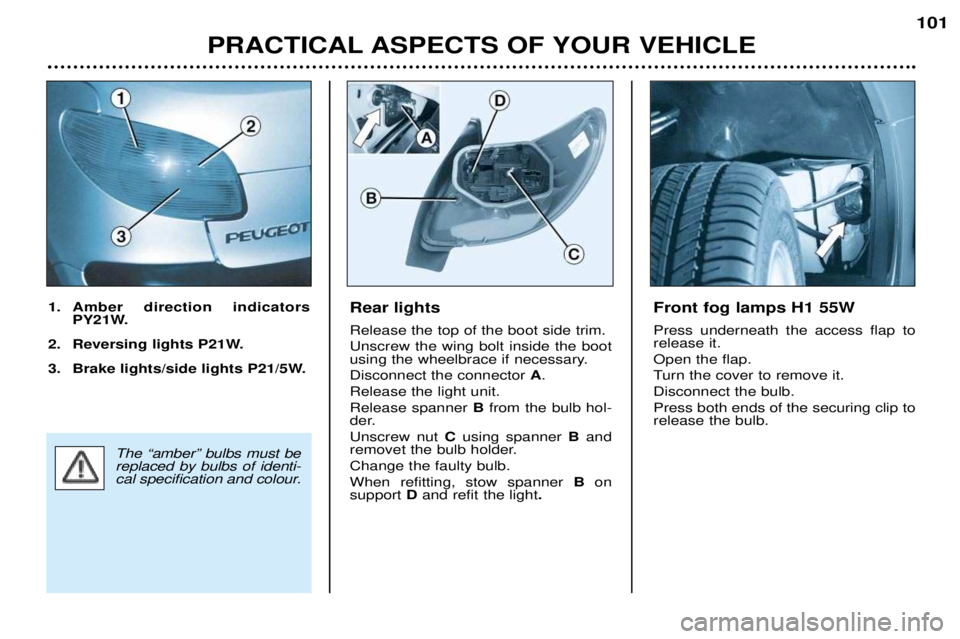
Rear lights Release the top of the boot side trim. Unscrew the wing bolt inside the boot
using the wheelbrace if necessary. Disconnect the connector
A.
Release the light unit.Release spanner B from the bulb hol-
der.Unscrew nut Cusing spanner B and
removet the bulb holder.Change the faulty bulb.When refitting, stow spanner B on
support D and refit the light .
1. Amber direction indicators
PY21W.
2. Reversing lights P21W.
3. Brake lights/side lights P21/5W.Front fog lamps H1 55W Press underneath the access flap to release it. Open the flap.
Turn the cover to remove it.Disconnect the bulb.Press both ends of the securing clip to release the bulb.
The ÒamberÓ bulbs must be replaced by bulbs of identi-
cal specification and colour.