Page 283 of 340

6-45 Wheel Alignment and Tire Balance
The wheels on your vehicle were aligned and balanced
carefully at the factory to give you the longest tire life
and best overall performance.
Scheduled wheel alignment and wheel balancing are not
needed. However, if you notice unusual tire wear or
your vehicle pulling one way or the other, the alignment
may need to be reset. If you notice your vehicle
vibrating when driving on a smooth road, your wheels
may need to be rebalanced.
Wheel Replacement
Replace any wheel that is bent, cracked, or badly rusted or
corroded. If wheel nuts keep coming loose, the wheel,
wheel bolts and wheel nuts should be replaced. If the
wheel leaks air, replace it (except some aluminum wheels,
which can sometimes be repaired). See your dealer if any
of these conditions exist.
Your dealer will know the kind of wheel you need.
Each new wheel should have the same load
-carrying
capacity, diameter, width, offset and be mounted the
same way as the one it replaces.
If you need to replace any of your wheels, wheel bolts
or wheel nuts, replace them only with new GM original
equipment parts. This way, you will be sure to have the
right wheel, wheel bolts and wheel nuts for your vehicle.
CAUTION:
Using the wrong replacement wheels, wheel bolts
or wheel nuts on your vehicle can be dangerous.
It could affect the braking and handling of your
vehicle, make your tires lose air and make you lose
control. You could have a collision in which you or
others could be injured. Always use the correct
wheel, wheel bolts and wheel nuts for replacement.
NOTICE:
The wrong wheel can also cause problems with
bearing life, brake cooling, speedometer or
odometer calibration, headlamp aim, bumper
height, vehicle ground clearance and tire or tire
chain clearance to the body and chassis.
See ªChanging a Flat Tireº in the Index for
more information.
Page 297 of 340
6-59
Engine Compartment Fuse Block
The engine compartment fuse block is located on the
driver's side of the engine compartment, near the battery.
Maxifuses Usage
1 Ignition Switch
2 Right Electrical Center
-Fog
Lamps, Radio, Body Function
Control Module, Interior Lamps
3 Left Electrical Center
-Stop
Lamps, Hazard Lamps, Body
Function Control Module, Cluster,
Climate Control System
4 Anti
-Lock Brakes
Page 298 of 340
6-60
Maxifuses Usage
5 Ignition Switch
6 Not Used
7 Left Electrical Center
-Power
Seats, Power Mirrors, Door Locks,
Trunk Release, Audio Amplifier,
Remote Lock Control
8 Cooling Fan #1
Mini Relays Usage
9 Rear Defog
10 Not Used
11 Not Used
12 Cooling Fan #1
13 HVAC Blower (Climate Control)
14 Cooling Fan #2
15 Cooling FanMicro Relays Usage
16 Air Conditioning Compressor
17 Not Used
18 Fuel Pump
19 Automatic Light Control
20 Automatic Light Control
21 Horn
22 Daytime Running Lamps
Minifuses Usage
23
- 32 Spare Fuse Holder
33 Rear Defog
34 Accessory Power Outlets,
Cigarette Lighter
35 Not Used
36 Not Used
37 Air Conditioning Compressor,
Body Function Control Module
38 Automatic Transaxle
39 Powertrain Control Module
40 Anti
-Lock Brakes, Variable
Effort Steering
Page 299 of 340
6-61
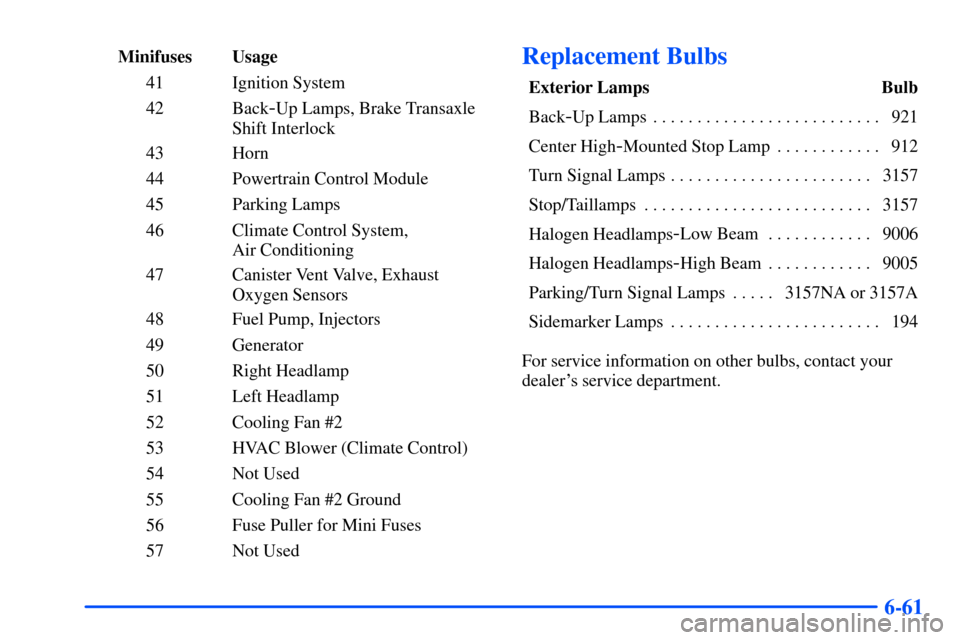
Minifuses Usage
41 Ignition System
42 Back
-Up Lamps, Brake Transaxle
Shift Interlock
43 Horn
44 Powertrain Control Module
45 Parking Lamps
46 Climate Control System,
Air Conditioning
47 Canister Vent Valve, Exhaust
Oxygen Sensors
48 Fuel Pump, Injectors
49 Generator
50 Right Headlamp
51 Left Headlamp
52 Cooling Fan #2
53 HVAC Blower (Climate Control)
54 Not Used
55 Cooling Fan #2 Ground
56 Fuse Puller for Mini Fuses
57 Not Used
Replacement Bulbs
Exterior Lamps Bulb
Back
-Up Lamps 921. . . . . . . . . . . . . . . . . . . . . . . . . .
Center High
-Mounted Stop Lamp 912. . . . . . . . . . . .
Turn Signal Lamps 3157. . . . . . . . . . . . . . . . . . . . . . .
Stop/Taillamps 3157. . . . . . . . . . . . . . . . . . . . . . . . . .
Halogen Headlamps
-Low Beam 9006. . . . . . . . . . . .
Halogen Headlamps
-High Beam 9005. . . . . . . . . . . .
Parking/Turn Signal Lamps 3157NA or 3157A. . . . .
Sidemarker Lamps 194. . . . . . . . . . . . . . . . . . . . . . . .
For service information on other bulbs, contact your
dealer's service department.
Page 306 of 340
Scheduled Maintenance
7-5
The services shown in this schedule up to 100,000 miles
(166 000 km) should be performed after 100,000 miles
(166 000 km) at the same intervals. The services shown
at 150,000 miles (240 000 km) should be performed at
the same interval after 150,000 miles (240 000 km).
See ªOwner Checks and Servicesº and ªPeriodic
Maintenance Inspectionsº following.Footnotes
� The U.S. Environmental Protection Agency or the
California Air Resources Board has determined that the
failure to perform this maintenance item will not nullify
the emission warranty or limit recall liability prior to
the completion of the vehicle's useful life. We, however,
urge that all recommended maintenance services be
performed at the indicated intervals and the
maintenance be recorded.
@ Whenever the tires are rotated, the Tire Pressure
Monitor System (if your vehicle is so equipped) must
be reset.
+ A good time to check your brakes is during tire
rotation. See ªBrake System Inspectionº under
ªPeriodic Maintenance Inspectionsº in Part C of
this schedule.
Page 318 of 340
7-17
Hydraulic Clutch System Check
Check the fluid level in the clutch reservoir. See
ªHydraulic Clutch Fluidº in the Index. A fluid loss in
this system could indicate a problem. Have the system
inspected and repaired at once.
At Least Once a Year
Key Lock Cylinders Service
Lubricate the key lock cylinders with the lubricant
specified in Part D.
Body Lubrication Service
Lubricate all the door hinges and latches, including
those for the hood and trunk lid. Part D tells you what
to use. More frequent lubrication may be required when
exposed to a corrosive environment.Starter Switch Check
CAUTION:
When you are doing this check, the vehicle could
move suddenly. If it does, you or others could be
injured. Follow the steps below.
1. Before you start, be sure you have enough room
around the vehicle.
2. Firmly apply both the parking brake and the regular
brake. See ªParking Brakeº in the Index if necessary.
NOTE: Do not use the accelerator pedal, and be
ready to turn off the engine immediately if it starts.
3. Try to start the engine in each gear. The starter
should work only in PARK (P) or NEUTRAL (N).
If the starter works in any other position, your
vehicle needs service.
Page 319 of 340
7-18
Automatic Transaxle Shift Lock Control
System Check
CAUTION:
When you are doing this check, the vehicle could
move suddenly. If it does, you or others could be
injured. Follow the steps below.
1. Before you start, be sure you have enough
room around the vehicle. It should be parked on a
level surface.
2. Firmly apply the parking brake. See ªParking Brakeº
in the Index if necessary.
NOTE: Be ready to apply the regular brake
immediately if the vehicle begins to move.3. With the engine off, turn the key to the ON position,
but don't start the engine. Without applying the
regular brake, try to move the shift lever out of
PARK (P) with normal effort. If the shift lever
moves out of PARK (P), your vehicle needs service.
Ignition Transaxle Lock Check
While parked, and with the parking brake set, try to turn
the ignition key to OFF in each shift lever position.
With a manual transaxle, the key should turn to OFF
only when the shift lever is in reverse.
On all vehicles, the key should come out only in OFF.
Page 320 of 340
7-19
Parking Brake and Automatic Transaxle PARK (P)
Mechanism Check
CAUTION:
When you are doing this check, your vehicle
could begin to move. You or others could be
injured and property could be damaged. Make
sure there is room in front of your vehicle in case
it begins to roll. Be ready to apply the regular
brake at once should the vehicle begin to move.
Park on a fairly steep hill, with the vehicle facing
downhill. Keeping your foot on the regular brake, set
the parking brake.
�To check the parking brake's holding ability: With
the engine running and transaxle in NEUTRAL (N),
slowly remove foot pressure from the regular brake
pedal. Do this until the vehicle is held by the parking
brake only.
�To check the PARK (P) mechanism's holding
ability: With the engine running, shift to PARK (P).
Then release the parking brake followed by the
regular brake.
Underbody Flushing Service
At least every spring, use plain water to flush any
corrosive materials from the underbody. Take care to
clean thoroughly any areas where mud and other debris
can collect.