Page 64 of 340

1-52 Securing a Child Restraint in the Right
Front Seat Position
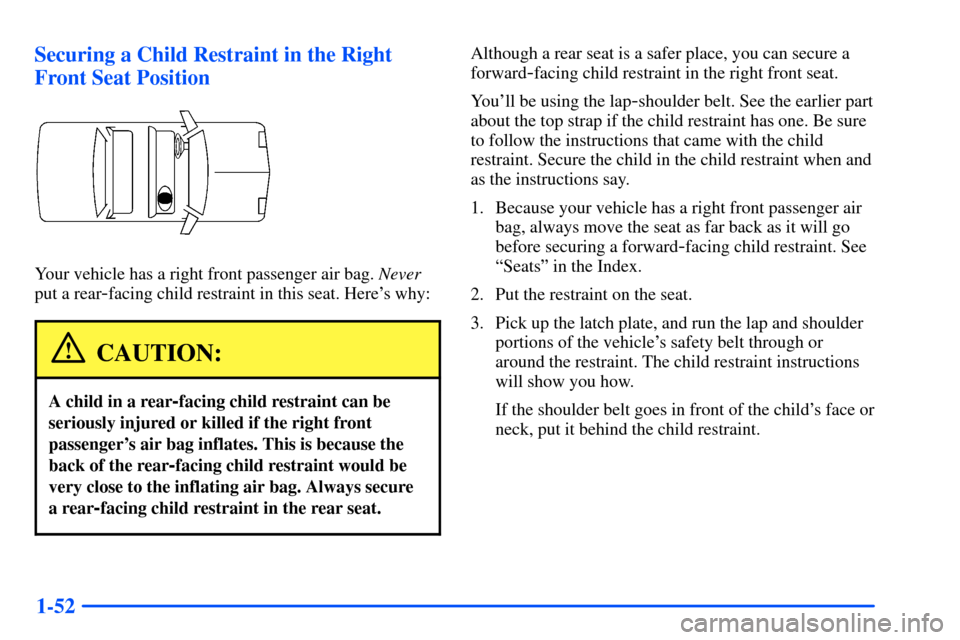
Your vehicle has a right front passenger air bag. Never
put a rear
-facing child restraint in this seat. Here's why:
CAUTION:
A child in a rear-facing child restraint can be
seriously injured or killed if the right front
passenger's air bag inflates. This is because the
back of the rear
-facing child restraint would be
very close to the inflating air bag. Always secure
a rear
-facing child restraint in the rear seat.
Although a rear seat is a safer place, you can secure a
forward
-facing child restraint in the right front seat.
You'll be using the lap
-shoulder belt. See the earlier part
about the top strap if the child restraint has one. Be sure
to follow the instructions that came with the child
restraint. Secure the child in the child restraint when and
as the instructions say.
1. Because your vehicle has a right front passenger air
bag, always move the seat as far back as it will go
before securing a forward
-facing child restraint. See
ªSeatsº in the Index.
2. Put the restraint on the seat.
3. Pick up the latch plate, and run the lap and shoulder
portions of the vehicle's safety belt through or
around the restraint. The child restraint instructions
will show you how.
If the shoulder belt goes in front of the child's face or
neck, put it behind the child restraint.
Page 66 of 340
1-54
6. To tighten the belt, feed the shoulder belt back into the
retractor while you push down on the child restraint.
You may find it helpful to use your knee to push down
on the child restraint as you tighten the belt.
7. Push and pull the child restraint in different
directions to be sure it is secure.
To remove the child restraint, just unbuckle the vehicle's
safety belt and let it go back all the way. The safety belt
will move freely again and be ready to work for an adult
or larger child passenger.
Older Children
Older children who have outgrown booster seats should
wear the vehicle's safety belts.
If you have the choice, a child should sit next to a
window so the child can wear a lap
-shoulder belt and
get the additional restraint a shoulder belt can provide.
Page 96 of 340
2-26
Automatic Transaxle Operation
Your automatic transaxle
has a shift lever located
on the console between
the seats.
PARK (P): This position locks your front wheels.
It's the best position to use when you start your engine
because your vehicle can't move easily.CAUTION:
It is dangerous to get out of your vehicle if the
shift lever is not fully in PARK (P) with the
parking brake firmly set. Your vehicle can roll.
Don't leave your vehicle when the engine is
running unless you have to. If you have left the
engine running, the vehicle can move suddenly.
You or others could be injured. To be sure your
vehicle won't move, even when you're on fairly
level ground, always set your parking brake and
move the shift lever to PARK (P).
See ªShifting Into PARK (P)º in the Index. If
you're pulling a trailer, see ªTowing a Trailerº
in the Index.
Page 146 of 340

3-4 Heating
On cold days, use FLOOR and the outside air button
with the temperature knob all the way in the red area.
The system will bring in outside air, heat it and send
it to the floor outlets.
Your vehicle has heat ducts that are directed toward the
rear seat. Keep the area under the front seats clear of
obstructions so that the heated air can reach the rear
seat passengers.
If your vehicle has an engine coolant heater, you can use
it to help your system provide warm air faster when it's
cold outside (0�F (
-18�C) or lower). An engine
coolant heater warms the coolant your engine and
heating system use to provide heat. See ªEngine
Coolant Heaterº in the Index.
Defogging and Defrosting Windows
Your system has two settings for clearing the front and
side windows. For each setting, adjust the temperature
knob as desired.
To defrost the front window quickly, turn the temperature
knob all the way in the red area. Use FRONT DEFROSTER
and adjust the fan to the highest speed. To warm passengers
while keeping the front window clean, use DEFOG.
Your vehicle is equipped with side window defogger
vents. The side window defogger vents are located
above the side instrument panel vents. To defrost the
side windows, turn the temperature knob all the way
in the red area. Use FLOOR and adjust the fan to
the highest speed.
To control fogging of the windows, turn the temperature
knob all the way in the red area. Use DEFOG and adjust
the fan to the highest speed.
To defog the side windows while using air conditioning,
use BI
-LEVEL and adjust the fan to the highest speed
and press the A/C button so that the indicator light is
glowing. For added airflow to the side windows aim
the side vents toward the windows and close the
center vents.
Page 148 of 340
3-6
You will find air outlets in the center and on the sides of
your instrument panel.
You can direct the airflow side to side by moving the
sliding levers. The outlet can be tilted up and down also.
To control the amount of airflow through the outlets,
turn the thumbwheel.Ventilation Tips
�Keep the hood and front air inlet free of ice, snow or
any other obstruction, such as leaves. The heater and
defroster will work far better, reducing the chance of
fogging the inside of your windows.
�When you enter a vehicle in cold weather, adjust the
mode knob to FLOOR and the fan to the highest
speed for a few moments before driving off. This
helps clear the intake ducts of snow and moisture
and reduces the chance of fogging the inside of
your windows.
�Keep the air path under the front seats clear of objects.
This helps air circulate throughout your vehicle.
�To prevent circulation of outside air, press the
recirculation button. This will close all outside vents.
Page 201 of 340
4-34
CAUTION: (Continued)
�Never stack heavier things, like suitcases,
inside the vehicle so that some of them are
above the tops of the seats.
�Don't leave an unsecured child restraint in
your vehicle.
�When you carry something inside the
vehicle, secure it whenever you can.
�Don't leave a seat folded down unless
you need to.
Towing a Trailer
CAUTION:
If you don't use the correct equipment and drive
properly, you can lose control when you pull a
trailer. For example, if the trailer is too heavy, the
brakes may not work well
-- or even at all. You
and your passengers could be seriously injured.
You may also damage your vehicle; the resulting
repairs would not be covered by your warranty.
Pull a trailer only if you have followed all the
steps in this section. Ask your dealer for advice
and information about towing a trailer with
your vehicle.
Do not tow a trailer if your vehicle is equipped with a
2.4L L4 (Code T) engine.
Page 292 of 340

6-54
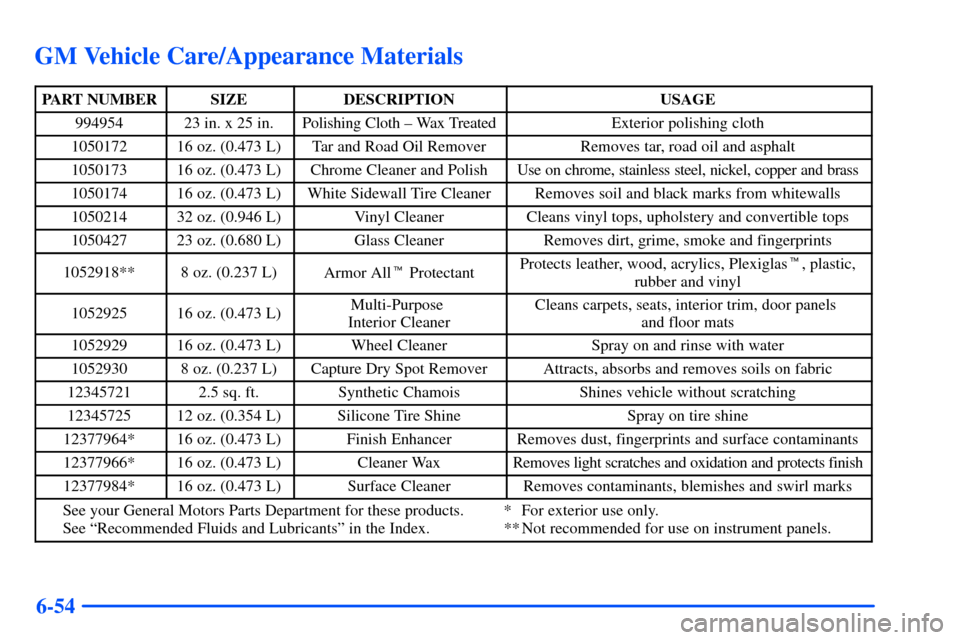
GM Vehicle Care/Appearance Materials
PART NUMBERSIZEDESCRIPTIONUSAGE
99495423 in. x 25 in.Polishing Cloth ± Wax TreatedExterior polishing cloth
105017216 oz. (0.473 L)Tar and Road Oil RemoverRemoves tar, road oil and asphalt
105017316 oz. (0.473 L)Chrome Cleaner and PolishUse on chrome, stainless steel, nickel, copper and brass
105017416 oz. (0.473 L)White Sidewall Tire CleanerRemoves soil and black marks from whitewalls
105021432 oz. (0.946 L)Vinyl CleanerCleans vinyl tops, upholstery and convertible tops
105042723 oz. (0.680 L)Glass CleanerRemoves dirt, grime, smoke and fingerprints
1052918**8 oz. (0.237 L)Armor All� ProtectantProtects leather, wood, acrylics, Plexiglas�, plastic,
rubber and vinyl
105292516 oz. (0.473 L)Multi-Purpose
Interior CleanerCleans carpets, seats, interior trim, door panels
and floor mats
105292916 oz. (0.473 L)Wheel CleanerSpray on and rinse with water
10529308 oz. (0.237 L)Capture Dry Spot RemoverAttracts, absorbs and removes soils on fabric
123457212.5 sq. ft.Synthetic ChamoisShines vehicle without scratching
1234572512 oz. (0.354 L)Silicone Tire ShineSpray on tire shine
12377964*16 oz. (0.473 L)Finish EnhancerRemoves dust, fingerprints and surface contaminants
12377966*16 oz. (0.473 L)Cleaner WaxRemoves light scratches and oxidation and protects finish
12377984*16 oz. (0.473 L)Surface CleanerRemoves contaminants, blemishes and swirl marks
See your General Motors Parts Department for these products. * For exterior use only.
See ªRecommended Fluids and Lubricantsº in the Index. ** Not recommended for use on instrument panels.
Page 295 of 340
6-57
Instrument Panel Fuse Block -- Driver's Side
Fuse Usage
WIPER Windshield Wiper Motor,
Washer Pump
TRUNK REL/
RADIO AMPTrunk Release Relay/Motor,
Audio Amplifier
TURN LPS Turn Signal Lamps
PWR MIRROR Power MirrorsFuse Usage
AIR BAG Air Bags
BFC BATT Body Computer (BFC)
PCM ACC PCM
DR LOCK Door Lock Motors
IPC/BFC ACC Cluster, Body Computer (BFC)
STOP LPS Stop Lamps
HAZARD LPS Hazard Lamps
IPC/
HVAC BATTHVAC Head, Cluster,
Data Link Connector
Circuit Breaker Usage
PWR SEAT Power Seats
Relay Usage
TRUNK REL Trunk Relay
DR UNLOCK Door Unlock Relay
DR LOCK Door Lock Relay
DRIVER DR
UNLOCKDriver's Door Unlock Relay