2001 NISSAN XTERRA heating
[x] Cancel search: heatingPage 93 of 263

OFF position (indicator light off):
Outside air is drawn into the passenger
compartment and distributed through the
selected outlets.
Use the OFF position for normal heater or
air conditioner operation.
ON position (indicator light on):
Interior air is recirculated inside the vehicle.
Push the
button to the on position
when:
Odriving on a dusty road.
Oto prevent traffic fumes from entering the
passenger compartment.
Ofor maximum cooling when using the air
conditioner.
Air conditioner button
(if so equipped)
Start the engine, move the fan control dial to
the desired (one to four) position, and push
the air conditioner button to turn on the air
conditioner. The indicator light comes on
when the air conditioner is operating. To turn
off the air conditioner, push the button
again.The air conditioner cooling function op-
erates only when the engine is running.
HEATER OPERATION
Heating
This mode is used to direct most of the hot
air to the front and rear floor outlets. Rear
passenger heat is provided by the front
system through floor outlets located under
both front seats. A small amount of air also
flows from the defrost outlets.
1. Push the
button (if so equipped) to
the off position for normal heating.
2. Turn the air control dial to the
posi-
tion.
3. Turn the fan control dial to the desired
position.
4. Turn the temperature control dial to the
desired position between the middle and
the hot position.
Ventilation
This mode directs outside air from the side
and center vents.
1. Push the
button (if so equipped) to
the off position.2. Turn the air control dial to the
posi-
tion.
3. Turn the fan control dial to the desired
position.
4. Turn the temperature control dial to the
desired position.
Defrosting or defogging
This mode directs the air to the defrost
outlets to defrost/defog the windows.
1. Turn the air control dial to the
posi-
tion.
2. Turn the fan control dial to the desired
position.
3. Turn the temperature control dial to the
desired position.
When the
position is selected, the air
conditioner automatically turns on (however
the indicator light will not illuminate) if the
outside temperature is more than
45ÉF(7ÉC). This dehumidifies the air which
helps defog the windshield. The
mode automatically turns off, allow-
ing outside air to be drawn into the passen-
ger compartment to further improve the
defogging performance.
4-4Heater, air conditioner and audio systems
ZX
Page 94 of 263

Bi-level heating
The bi-level mode directs warmed air to the
side and center vents and to the front and
rear floor outlets.
1. Push the
button (if so equipped) to
the off position.
2. Turn the air control dial to the
posi-
tion.
3. Turn the fan control dial to the desired
position.
4. Turn the temperature control dial to the
the desired position.
Heating and defogging
This mode directs a portion of the air to the
defrost outlets to defrost/defog the win-
dows, and also directs air to the front and
rear floor outlets to heat the cabin.
1. Turn the air control dial to the
posi-
tion.
2. Turn the fan control dial to the desired
position.
3. Turn the temperature control dial to the
desired position between the middle and
the hot position.When the
position is selected, the air
conditioner automatically turns on (however
the indicator light will not illuminate) if the
outside temperature is more than 45ÉF
(7ÉC). This dehumidifies the air which helps
defog the windshield. The
mode auto-
maticallly turns off, allowing outside air to be
drawn into the passenger compartment to
further improve the defogging performance.
Operating tips
Clear snow and ice from the wiper
blades and air inlet in front of the wind-
shield. This improves heater operation.
AIR CONDITIONER OPERATION
(if so equipped)
Start the engine, move the fan control dial to
the desired (one to four) position, and push
in the air conditioner button to activate the
air conditioner. When the air conditioner is
on, cooling and dehumidifying functions are
added to the heater operation.
The air conditioner cooling function op-
erates only when the engine is running.
Cooling
This mode directs cooled and dryed air to
the side and center vents to cool and dehu-
midify the cabin.
1. Push the
button to the off position.
2. Turn the air control dial to the
posi-
tion.
3. Turn the fan control dial to the desired
position.
4. Push on the air conditioner button. The
indicator light comes on.
5. Turn the temperature control dial to the
desired position.
For quick cooling when the outside tem-
perature is high, push the
button to
the ON position. Be sure to return the air
recirculation button to the OFF position for
normal cooling.
Dehumidified heating
This mode directs warmed and dryed air to
the front and rear floor outlets to heat and
dehumidify the cabin.
1. Push the
button to the off position.
Heater, air conditioner and audio systems
4-5
ZX
Page 95 of 263

2. Turn the air control dial to theposi-
tion.
3. Turn the fan control dial to the desired
position.
4. Push on the air conditioner button. The
indicator light comes on.
5. Turn the temperature control dial to the
desired position.
Dehumidified defogging
This mode directs warmed and dryed air to
the defrost outlets to defrost/defog the win-
dows.
1. Turn the air control dial to the
posi-
tion.
2. Turn the fan control dial to the desired
position.
3. Push on the air conditioner button. The
indicator light comes on.
4. Turn the temperature control dial to the
desired position.
When the
,or positions in between
are selected, the air conditioner automati-
cally turns on (however the indicator light
will not illuminate) if the outside temperatureis more than 45ÉF(7ÉC). This dehumidifies
the air which helps defog the windshield.
The
mode automatically turns off, al-
lowing outside air to be drawn into the
passenger compartment to further improve
the defogging performance.
Operating tips
OKeep windows and sunroof closed while
the air conditioner is in operation.
OAfter parking in the sun, drive for two or
three minutes with the windows open to
vent hot air from the passenger compart-
ment. Then, close the windows. This
allows the air conditioner to cool the
interior more quickly.
OThe air conditioning system should be
operated for approximately ten min-
utes at least once a month. This helps
prevent damage to the system due to
lack of lubrication.
OIf the engine coolant temperature
gauge indicates engine coolant tem-
perature over the normal range, turn
the air conditioner off. See ``If your
vehicle overheats'' in the ``In case of
emergency'' section of this manual.
AIR FLOW CHARTS
The following charts show the button and
dial positions forMAXIMUM AND QUICK
heating, cooling or defrosting.The air recir-
culation switch should always be in the
OFF position for heating and defrosting.
4-6Heater, air conditioner and audio systems
ZX
Page 150 of 263

verse) position. When parking on an up-
hill grade, place the gearshift lever in the
1st position.
Automatic transmission models:
Move the gearshift lever to the P (Park)
position.
3. To help prevent the vehicle from rolling
into the street when parked on an incline,
it is a good practice to turn the wheels as
illustrated.
O
HEADED DOWNHILL WITH CURB:Às1
Turn the wheels into the curb and move
the vehicle forward until the curb side
wheel gently touches the curb.
OHEADED UPHILL WITH CURB:
s2
Turn the wheels away from the curb and
move the vehicle back until the curb side
wheel gently touches the curb.
OHEADED UPHILL OR DOWNHILL, NO
CURB:
s3
Turn the wheels toward the side of the
road so the vehicle will move away from
the center of the road if it moves.
4. Turn the ignition key to the LOCK posi-
tion and remove the key.The power assisted steering is designed to
use a hydraulic pump, driven by the engine,
to assist steering.
If the engine stops or drive belt breaks, you
will still have control of the vehicle. How-
ever, much greater steering effort is needed,
especially in sharp turns and at low speeds.
WARNING
If the engine is not running or is turned
off while driving, the power assist for
the steering will not work. Steering will
be much harder to operate.The brake system has two separate hydrau-
lic circuits. If one circuit malfunctions, you
will still have braking at two wheels.
BRAKING PRECAUTIONS
Vacuum assisted brakes
The brake booster aids braking by using
engine vacuum. If the engine stops, you can
stop the vehicle by depressing the brake
pedal. However, greater foot pressure on
the brake pedal will be required to stop the
vehicle and stopping distance will be longer.
Using the brakes
Avoid resting your foot on the brake pedal
while driving. This will overheat the brakes,
wear out the brake linings and pads faster,
and reduce gas mileage.
To help reduce brake wear, and to prevent
the brakes from overheating, reduce speed
and downshift to a lower gear before going
down a slope or long grade.
POWER STEERING BRAKE SYSTEM
Starting and driving5-23
ZX
Page 165 of 263

CAUTION
OAutomatic transmission models can-
not be push or tow started. This may
cause transmission or other vehicle
damage.
ONever try to start the vehicle by tow-
ing it. When the engine starts, the
forward surge could cause the ve-
hicle to collide with the tow vehicle.If your vehicle is overheating (indicated by
an extremely high temperature gauge read-
ing), or if you feel a lack of engine power, or
detect abnormal noise, etc., take the follow-
ing steps:
WARNING
ODo not continue to drive if your ve-
hicle overheats. Doing so could
cause a vehicle fire.
OTo avoid the danger of being
scalded, never remove the radiator
cap while the engine is still hot.
When the radiator cap is removed,
pressurized hot water will spurt out,
possibly causing serious injury.
ODo not open the hood if steam is
coming out.
1. Move the vehicle safely off the road,
apply the parking brake and move the
gearshift lever to N (Neutral), or the au-
tomatic transmission into P (Park).
Do not stop the engine.
2. Turn off the air conditioner (if so
equipped). Open all of the windows,
move the heater or air conditioner tem-perature control to maximum hot and fan
control to high speed.
3. If engine overheating is caused by climb-
ing a long hill on a hot day, run the engine
at a fast idle (approximately 1,500 r/min)
until the temperature gauge indicator re-
turns to normal.
4. Get out of the vehicle. Look and listen for
steam or coolant escaping from the ra-
diator before opening the hood. Wait until
no steam or coolant can be seen before
proceeding.
5. Open the hood.
WARNING
If steam or water is coming from the
engine, stand clear to prevent getting
burned.
6. Visually check drive belts for damage or
looseness. Also check if the cooling fan is
running. The radiator hoses and radiator
should not leak water. If coolant is leak-
ing, or the water pump belt is missing or
loose, or the cooling fan does not run,
stop the engine.
PUSH STARTING IF YOUR VEHICLE
OVERHEATS
6-10In case of emergency
ZX
Page 181 of 263

If the cooling system frequently requires
coolant, have it checked by an autho-
rized NISSAN dealer.
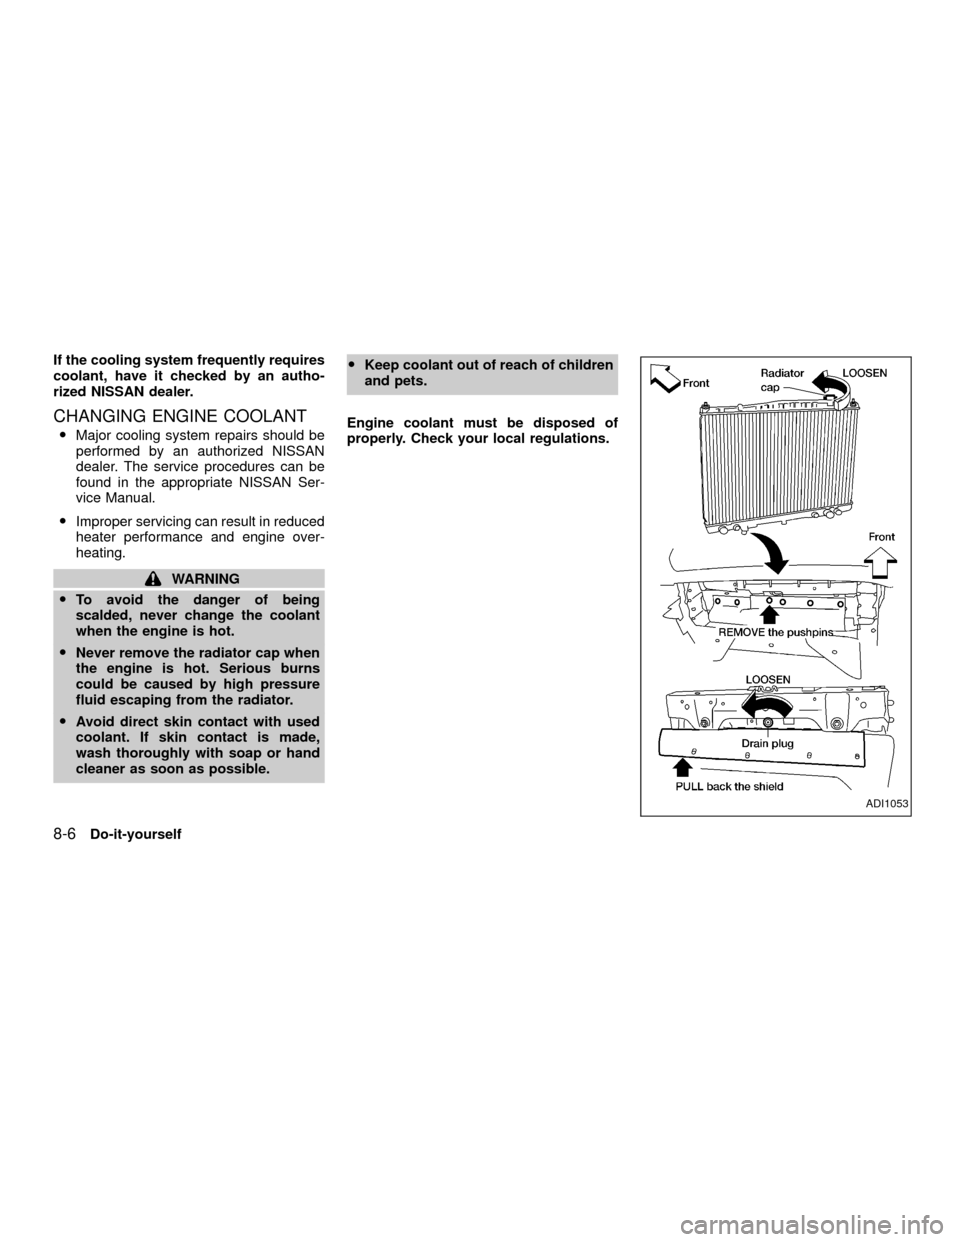
CHANGING ENGINE COOLANT
OMajor cooling system repairs should be
performed by an authorized NISSAN
dealer. The service procedures can be
found in the appropriate NISSAN Ser-
vice Manual.
OImproper servicing can result in reduced
heater performance and engine over-
heating.
WARNING
OTo avoid the danger of being
scalded, never change the coolant
when the engine is hot.
ONever remove the radiator cap when
the engine is hot. Serious burns
could be caused by high pressure
fluid escaping from the radiator.
OAvoid direct skin contact with used
coolant. If skin contact is made,
wash thoroughly with soap or hand
cleaner as soon as possible.OKeep coolant out of reach of children
and pets.
Engine coolant must be disposed of
properly. Check your local regulations.
ADI1053
8-6Do-it-yourself
ZX
Page 230 of 263
![NISSAN XTERRA 2001 WD22 / 1.G Owners Manual ever, you may use unleaded gasoline with
an octane rating as low as 85 AKI in high
altitude areas (over 4,000 ft [1,219 m]) such
as: Colorado, Montana, New Mexico, Utah,
Wyoming, northeastern Nevada, NISSAN XTERRA 2001 WD22 / 1.G Owners Manual ever, you may use unleaded gasoline with
an octane rating as low as 85 AKI in high
altitude areas (over 4,000 ft [1,219 m]) such
as: Colorado, Montana, New Mexico, Utah,
Wyoming, northeastern Nevada,](/manual-img/5/650/w960_650-229.png)
ever, you may use unleaded gasoline with
an octane rating as low as 85 AKI in high
altitude areas (over 4,000 ft [1,219 m]) such
as: Colorado, Montana, New Mexico, Utah,
Wyoming, northeastern Nevada, southern
Idaho, western South Dakota, western Ne-
braska, and the part of Texas which is
directly south of New Mexico.
Using unleaded gasoline with an octane
rating lower than stated above can cause
persistent, heavy ``spark knock.'' (``Spark
knock'' is a metallic rapping noise.) If
severe, this can lead to engine damage. If
you detect a persistent heavy spark
knock even when using gasoline of the
stated octane rating, or if you hear steady
spark knock while holding a steady speed
on level roads, have an authorized NIS-
SAN dealer correct the condition. Failure
to correct the condition is misuse of the
vehicle, for which NISSAN is not respon-
sible.
Incorrect ignition timing may result in spark
knock, after-run and/or overheating, which
may cause excessive fuel consumption or
engine damage. If any of the above symp-
toms are encountered, have your vehicle
checked at an authorized NISSAN dealer.However, now and then you may notice
light spark knock for a short time while
accelerating or driving up hills. This is
no cause for concern, because you get
the greatest fuel benefit when there is
light spark knock for a short time under
heavy engine load.
Technical and consumer information
10-5
ZX
Page 249 of 263

4) Connect the tow harness connector
(SAE J1239) to your trailer.
5) Confirm proper vehicle and trailer
stop/turn lamp operation.
6) When towing is completed, disconnect
the tow harness from the trailer and the
vehicle. Store the tow harness in the
glove box. Reinstall the connector cap to
the vehicle harness.
If you need further assistance in wiring
a trailer to your NISSAN, contact an autho-
rized NISSAN dealer.
Always confirm proper vehicle and
trailer stop/turn lamp operation every
time the trailer light circuits are con-
nected for use.
Trailer brakes
If your trailer is equipped with a braking
system, make sure it conforms to Federal
and/or local regulations and that it is prop-
erly installed.
WARNING
Never connect a trailer brake system
directly to the vehicle brake system.
Pre-towing tips
OBe certain your vehicle maintains a level
position when a loaded and/or unloaded
trailer is hitched. Do not drive the vehicle
if it has an abnormal nose-up or nose-
down condition; check for improper
tongue load, overload, worn suspension
or other possible causes of either condi-
tion.
OAlways secure items in the trailer to
prevent load shift while driving.
OBe certain your outside mirrors conform
to all federal, state or local regulations. If
not, install any mirrors required for towing
before driving the vehicle.
Trailer towing tips
In order to gain skill and an understanding
of the vehicle's behavior, you should prac-
tice turning, stopping and backing up in an
area which is free from traffic. Steering,
stability and braking performance will be
somewhat different than under normal driv-
ing conditions.
OAlways secure items in the trailer to
prevent load shift while driving.
O
Avoid abrupt starts, acceleration or stops.
OAvoid sharp turns or lane changes.
OAlways drive your vehicle at a moderate
speed.
OAlways block the wheels on both vehicle
and trailer when parking. Parking on a
slope is not recommended; however, if
you must do so, and if your vehicle is
equipped with automatic transmission,
first block the wheels and apply the park-
ing brake, and then move the transmis-
sion shift selector lever into the P (Park)
position. If you move the shift lever to the
P (Park) position before blocking the
wheels and applying the parking brake,
transmission damage could occur.
OWhen going down a hill, shift into a lower
gear and use the engine braking effect.
When ascending a long grade, downshift
the transmission to a lower gear and
reduce speed to reduce chances of en-
gine overloading and/or overheating.
However, for long steep grades, do not
stay in 1st or 2nd gear when driving
above 35 MPH (56 km/h).
OIf the engine coolant rises to an ex-
tremely high temperature when the air
conditioning system is on, turn off the air
conditioner. Coolant heat can be addi-
10-24Technical and consumer information
ZX