2001 NISSAN XTERRA brakes
[x] Cancel search: brakesPage 51 of 263
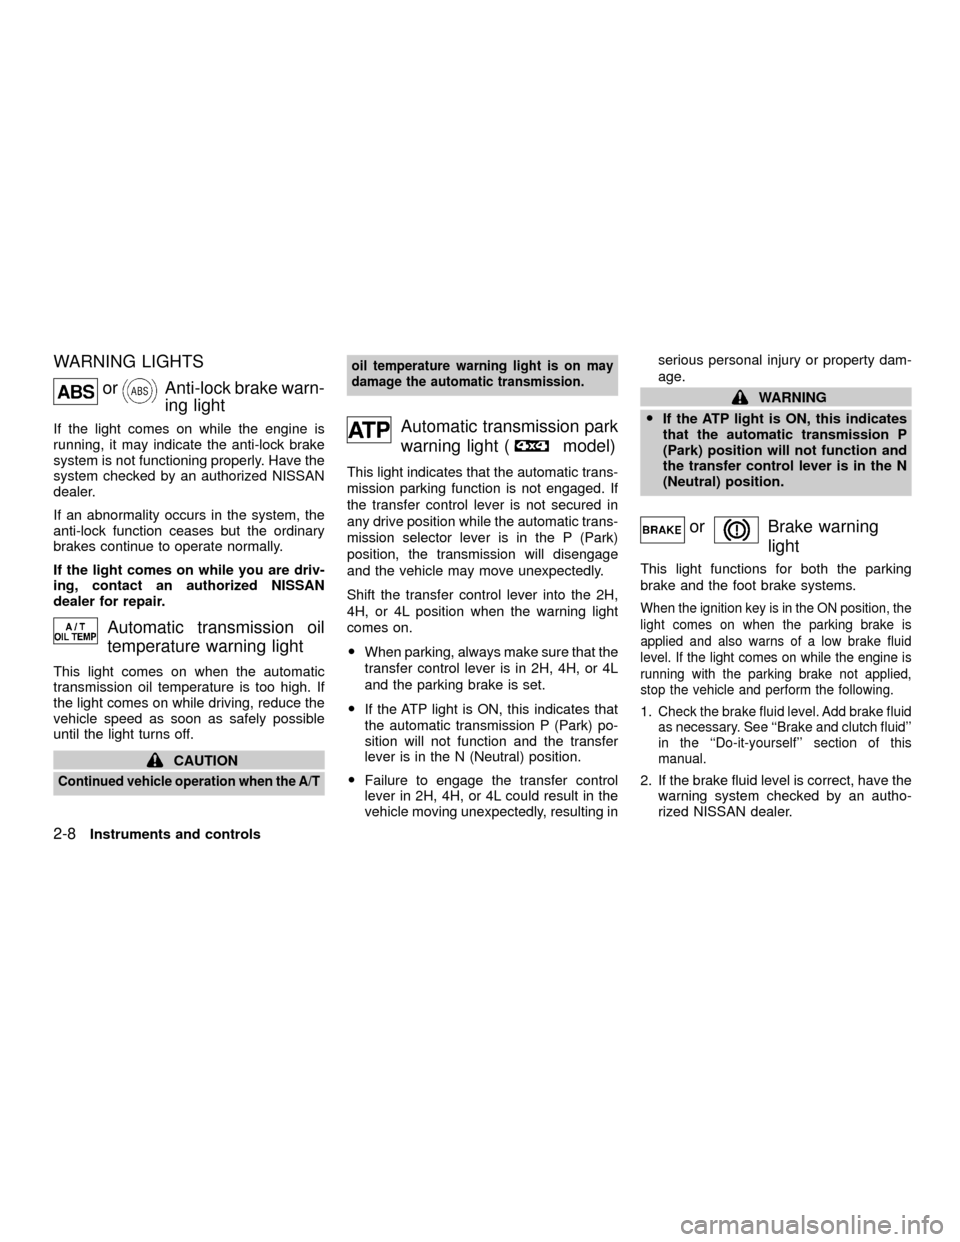
WARNING LIGHTS
orAnti-lock brake warn-
ing light
If the light comes on while the engine is
running, it may indicate the anti-lock brake
system is not functioning properly. Have the
system checked by an authorized NISSAN
dealer.
If an abnormality occurs in the system, the
anti-lock function ceases but the ordinary
brakes continue to operate normally.
If the light comes on while you are driv-
ing, contact an authorized NISSAN
dealer for repair.
Automatic transmission oil
temperature warning light
This light comes on when the automatic
transmission oil temperature is too high. If
the light comes on while driving, reduce the
vehicle speed as soon as safely possible
until the light turns off.
CAUTION
Continued vehicle operation when the A/Toil temperature warning light is on may
damage the automatic transmission.
Automatic transmission park
warning light (
model)
This light indicates that the automatic trans-
mission parking function is not engaged. If
the transfer control lever is not secured in
any drive position while the automatic trans-
mission selector lever is in the P (Park)
position, the transmission will disengage
and the vehicle may move unexpectedly.
Shift the transfer control lever into the 2H,
4H, or 4L position when the warning light
comes on.
OWhen parking, always make sure that the
transfer control lever is in 2H, 4H, or 4L
and the parking brake is set.
OIf the ATP light is ON, this indicates that
the automatic transmission P (Park) po-
sition will not function and the transfer
lever is in the N (Neutral) position.
OFailure to engage the transfer control
lever in 2H, 4H, or 4L could result in the
vehicle moving unexpectedly, resulting inserious personal injury or property dam-
age.
WARNING
OIf the ATP light is ON, this indicates
that the automatic transmission P
(Park) position will not function and
the transfer control lever is in the N
(Neutral) position.
orBrake warning
light
This light functions for both the parking
brake and the foot brake systems.
When the ignition key is in the ON position, the
light comes on when the parking brake is
applied and also warns of a low brake fluid
level. If the light comes on while the engine is
running with the parking brake not applied,
stop the vehicle and perform the following.
1.Check the brake fluid level. Add brake fluid
as necessary. See ``Brake and clutch fluid''
in the ``Do-it-yourself'' section of this
manual.
2. If the brake fluid level is correct, have the
warning system checked by an autho-
rized NISSAN dealer.
2-8Instruments and controls
ZX
Page 55 of 263

the brakes checked as soon as possible if
the warning sound is heard.
Key reminder chime
The chime sounds when the driver's door is
opened and the key is in the ignition switch.
Take the ignition key when you leave the
vehicle.
Light reminder chime
A chime sounds if the driver's door is
opened with the headlight switch on unless
the ignition key is in the ON position. Turn
the headlight switch off when you leave the
vehicle.
VEHICLE SECURITY SYSTEM
(if so equipped)
The vehicle security system provides visual
and audio alarm signals if parts of the
vehicle are disturbed.
Security indicator light
The security indicator light shows the status
of the vehicle security system.
The light operates whenever the ignition
switch is in the LOCK, OFF, or ACC posi-
tion.
The vehicle security system has four
phases. For each phase the operation of the
security indicator light is different.
IC0005WIC0072
SECURITY SYSTEM
2-12Instruments and controls
ZX
Page 132 of 263
OMany hills are too steep for any ve-
hicle. If you drive up them, you may
stall. If you drive down them, you may
not be able to control your speed. If
you drive across them, you may roll
over.
ODo not shift gears while driving on
downhill grades as this could cause
loss of control of the vehicle.
OStay alert when driving to the top of
a hill. At the top there could be a
drop-off or other hazard that could
cause an accident.
OIf your engine stalls or you cannot
make it to the top of a steep hill,
never attempt to turn around. Your
vehicle could tip or roll over. Always
back straight down in R (Reverse)
gear. Never back down in N (Neutral)
or with the clutch depressed
(manual transmission vehicles), us-
ing only the brake, as this could
cause loss of control.
OHeavy braking going down a hill-
could cause your brakes to over heatand fade, resulting in loss of control
and an accident. Apply brakes lightly
and use a low gear to control your
speed.
OUnsecured cargo can be thrown
around when driving over rough ter-
rain. Properly secure all cargo so it
will not be thrown forward and cause
injury to you or your passengers.
OTo avoid raising the center of gravity
excessively, do not exceed the rated
capactiy of the roof rack/gear bin (if
so equipped) and evenly distribute
the load. Secure heavy loads in the
cargo area as far forward and as low
as possible. Do not equip the vehicle
with tires larger than specified in this
manual. This could cause your ve-
hicle to roll over.
ODo not grip the inside or spokes of
the steering wheel when driving
offroad. The steering wheel could
move suddenly and injure your
hands. Instead drive with your fin-
gers and thumbs on the outside of
the rim.OBefore operating the vehicle, ensure
that the driver and all passengers
have their seat belts fastened.
OAlways drive with the floor mats in
place as the floor may become hot.
OLower your speed when encoutering
strong crosswinds. With a higher
center of gravity, your NISSAN is
more affected by strong side winds.
Slower speeds ensure better vehicle
control.
ODo not drive beyond the perfor-
mance of the tires, even with 4WD
engaged.
OAccelerating quickly, sharp steering
maneuvers or sudden braking may
cause loss of control.
OIf at all possible, avoid sharp turning
maneuvers, particularly at high
speeds. Your NISSAN four wheel
drive vehicle has a higher center of
gravity than a two-wheel drive ve-
hicle. The vehicle is not designed for
cornering at the same speeds as
conventional two-wheel drive ve-
hicles. Failure to operate this vehicle
Starting and driving
5-5
ZX
Page 133 of 263
correctly could result in loss of con-
trol and/or a rollover accident.
OAlways use tires of the same type,
size, brand, construction (bias, bias
belted or radial), and tread pattern
on all four wheels. Install tire chains
on the rear wheels when driving on
slippery roads and drive carefully.
OBe sure to check the brakes immedi-
ately after driving in mud or water.
See ``Brake system'' later in this sec-
tion for ``Wet brakes''.
OAvoid parking your vehicle on steep
hills. If you get out of the vehicle and
it rolls forward, backward or side-
ways, you could be injured.
OWhenever you drive off-road
through sand, mud or water as deep
as the wheel hub, more frequent
maintenance may be required. See
``Periodic maintenance'' in the
``Maintenance'' section of this
manual.
AUTOMATIC TRANSMISSION
On automatic transmission models, the ig-
nition lock is designed so the key cannot be
turned to LOCK and removed until the shift
selector lever is moved to the P (Park)
position.
When removing the key from the ignition,
make sure the shift selector lever is in the P
(Park) position.
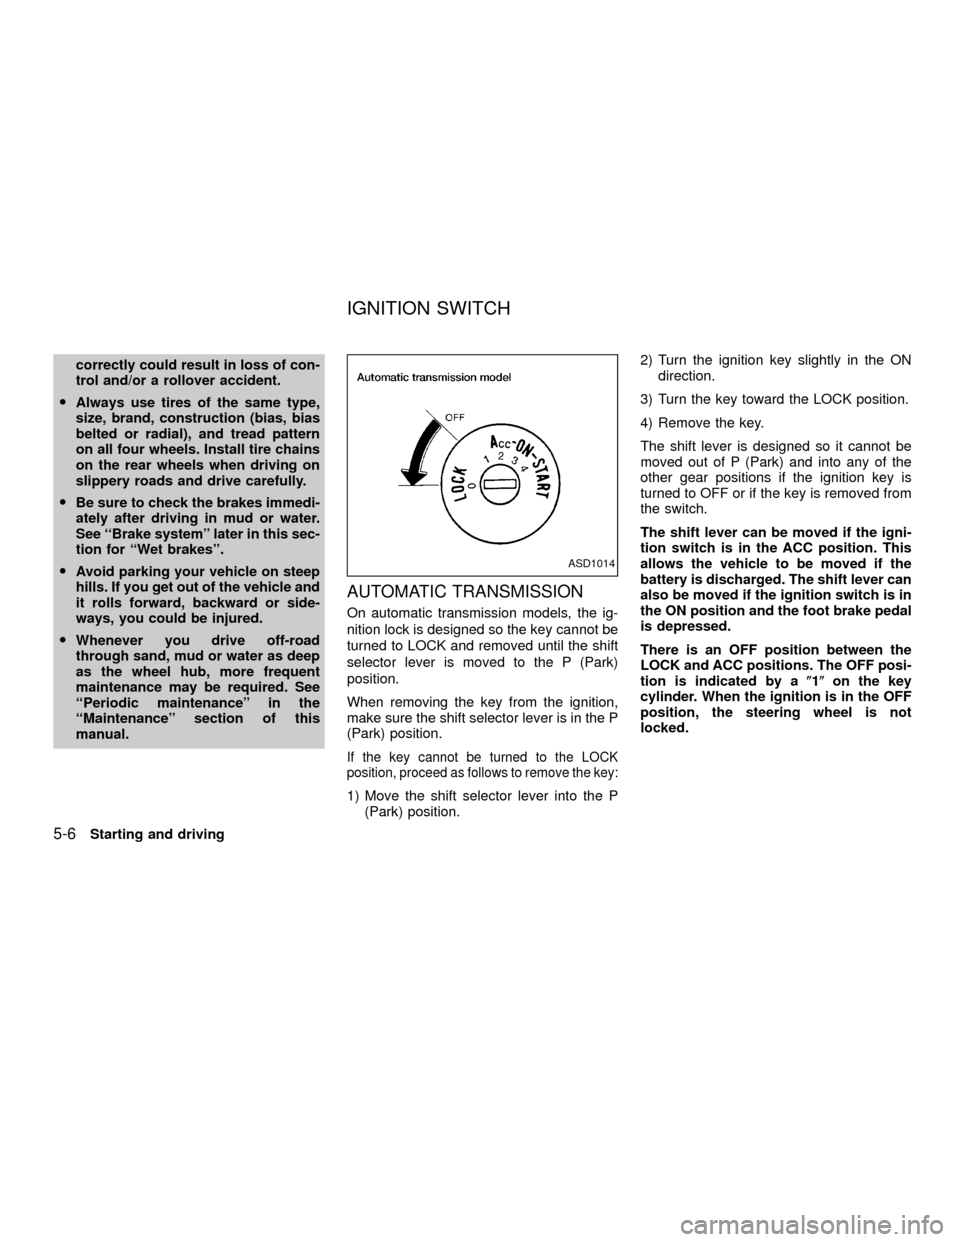
If the key cannot be turned to the LOCK
position, proceed as follows to remove the key:
1) Move the shift selector lever into the P
(Park) position.2) Turn the ignition key slightly in the ON
direction.
3) Turn the key toward the LOCK position.
4) Remove the key.
The shift lever is designed so it cannot be
moved out of P (Park) and into any of the
other gear positions if the ignition key is
turned to OFF or if the key is removed from
the switch.
The shift lever can be moved if the igni-
tion switch is in the ACC position. This
allows the vehicle to be moved if the
battery is discharged. The shift lever can
also be moved if the ignition switch is in
the ON position and the foot brake pedal
is depressed.
There is an OFF position between the
LOCK and ACC positions. The OFF posi-
tion is indicated by a(1(on the key
cylinder. When the ignition is in the OFF
position, the steering wheel is not
locked.
ASD1014
IGNITION SWITCH
5-6Starting and driving
ZX
Page 150 of 263
verse) position. When parking on an up-
hill grade, place the gearshift lever in the
1st position.
Automatic transmission models:
Move the gearshift lever to the P (Park)
position.
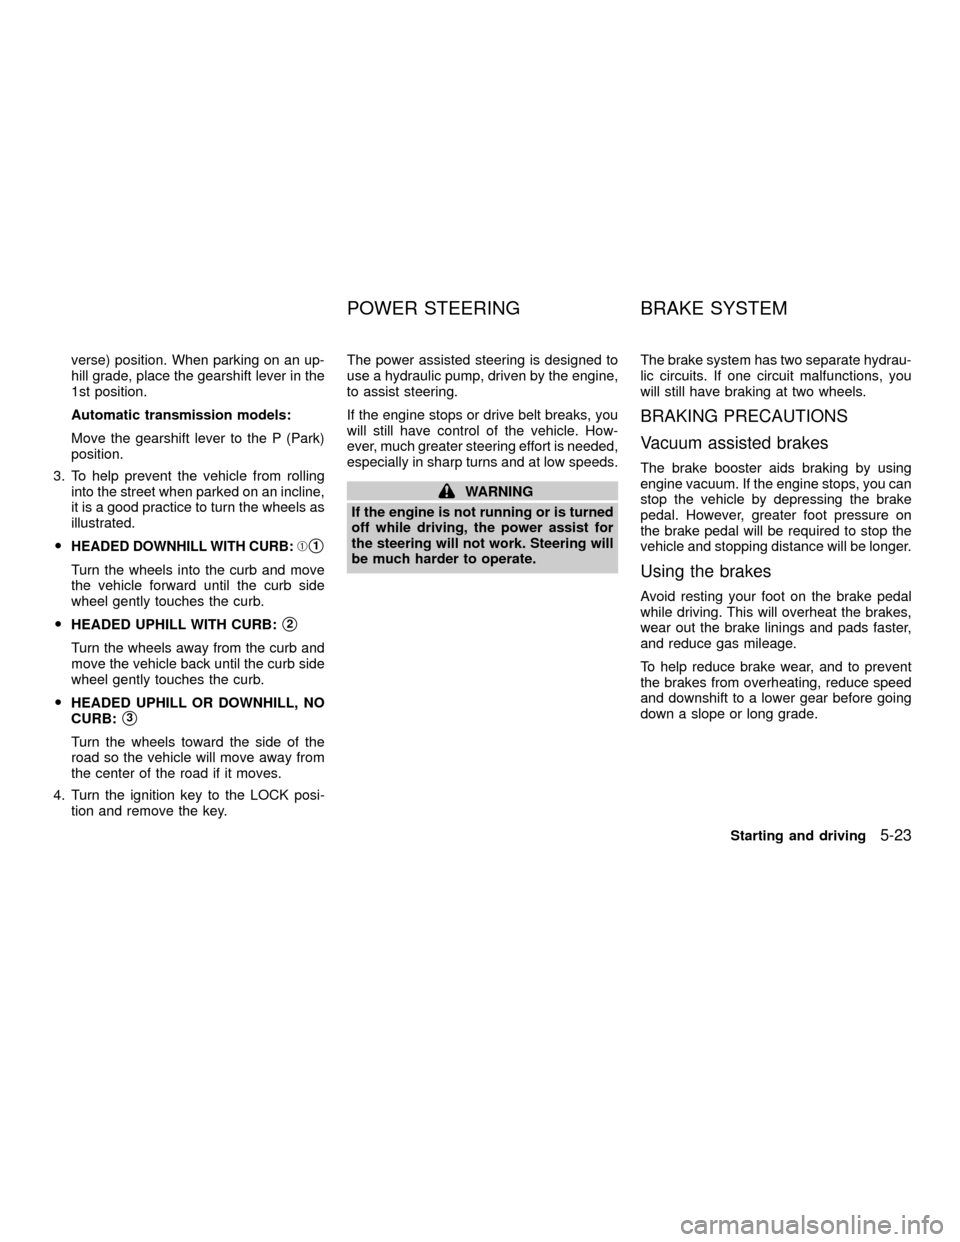
3. To help prevent the vehicle from rolling
into the street when parked on an incline,
it is a good practice to turn the wheels as
illustrated.
O
HEADED DOWNHILL WITH CURB:Às1
Turn the wheels into the curb and move
the vehicle forward until the curb side
wheel gently touches the curb.
OHEADED UPHILL WITH CURB:
s2
Turn the wheels away from the curb and
move the vehicle back until the curb side
wheel gently touches the curb.
OHEADED UPHILL OR DOWNHILL, NO
CURB:
s3
Turn the wheels toward the side of the
road so the vehicle will move away from
the center of the road if it moves.
4. Turn the ignition key to the LOCK posi-
tion and remove the key.The power assisted steering is designed to
use a hydraulic pump, driven by the engine,
to assist steering.
If the engine stops or drive belt breaks, you
will still have control of the vehicle. How-
ever, much greater steering effort is needed,
especially in sharp turns and at low speeds.
WARNING
If the engine is not running or is turned
off while driving, the power assist for
the steering will not work. Steering will
be much harder to operate.The brake system has two separate hydrau-
lic circuits. If one circuit malfunctions, you
will still have braking at two wheels.
BRAKING PRECAUTIONS
Vacuum assisted brakes
The brake booster aids braking by using
engine vacuum. If the engine stops, you can
stop the vehicle by depressing the brake
pedal. However, greater foot pressure on
the brake pedal will be required to stop the
vehicle and stopping distance will be longer.
Using the brakes
Avoid resting your foot on the brake pedal
while driving. This will overheat the brakes,
wear out the brake linings and pads faster,
and reduce gas mileage.
To help reduce brake wear, and to prevent
the brakes from overheating, reduce speed
and downshift to a lower gear before going
down a slope or long grade.
POWER STEERING BRAKE SYSTEM
Starting and driving5-23
ZX
Page 151 of 263
WARNING
OWhile driving on a slippery surface,
be careful when braking, accelerat-
ing or downshifting. Abrupt braking
or accelerating could cause the
wheels to skid and result in an acci-
dent.
OIf the engine is not running or is
turned off while driving, the power
assist for the brakes will not work.
Braking will be harder.
Wet brakes
When the vehicle is washed or driven
through water, the brakes may get wet. As a
result, your braking distance will be longer
and the vehicle may pull to one side during
braking.
To dry the brakes, drive the vehicle at a safe
speed while lightly pressing the brake pedal
to heat the brakes. Do this until the brakes
return to normal. Avoid driving the vehicle at
high speeds until the brakes function cor-
rectly.
ANTI-LOCK BRAKE SYSTEM (ABS)
Using the System
Depress the brake pedal and hold it down.
WARNING
Do not pump the brake pedal. Doing so
may result in increased stopping dis-
tances.
Normal operation
The anti-lock brake system does not oper-
ate at speeds below 3 to 6 MPH (5 to 10
km/h). (The speeds vary according to road
conditions.)
When driving, the anti-lock brake system
controls the wheels so they will not lock
when braking abruptly or when braking on a
slippery road. Thus, difficult steering and
swerving of the vehicle due to locked
wheels is minimized. The system detects
the wheel rotation rate and electronically
controls the pressure applied to each brake.
Slight vibration on the brake pedal accom-
panied by noise usually occurs while the
ABS system is operating. Such vibration
and noise encountered during abrupt brak-ing is not a problem, but indicates that the
system is functioning.
Self-test feature
The anti-lock brake system consists of elec-
tronic sensors and hydraulic solenoids con-
trolled by a computer. The computer has a
built-in diagnostic feature that tests the sys-
tem each time you start the engine and
move the vehicle at a low speed in forward
or reverse. When the self-test occurs, you
may hear a ``clunk'' noise and/or feel a
pulsation in the brake pedal. This is normal
and is not an indication of any malfunction. If
the computer senses any malfunction, it
switches the anti-lock brake system off and
turns on the ABS brake warning light in the
dashboard. The brake system then operates
normally, but without anti-lock assistance.
If an abnormality occurs in the system, the
anti-lock function will cease but the ordinary
brakes will continue to operate normally. The
ABS brake warning light will then come on.
If the light comes on while you are driving,
contact an authorized NISSAN dealer for
repair.
5-24Starting and driving
ZX
Page 200 of 263

Self-adjusting brakes
Your vehicle is equipped with self-adjusting
brakes.
The front disc-type brakes self-adjust every
time the brake pedal is applied. The rear
drum-type brakes on two-wheel drive trucks
self-adjust every time the parking brake is
applied. The rear drum-type brakes on four-
wheel drive trucks self-adjust every time the
brake pedal is applied. If the brake pedal
goes down farther than normal, it may be
due to a lack of adjustment of the rear drum
brakes. Apply the parking brake several
times.
WARNING
If the brake pedal height does not re-
turn to normal, see an authorized NIS-
SAN dealer and have it checked.
Brake pad wear indicators
The disc brake pads on your vehicle have
audible wear indicators. When a brake pad
requires replacement, it will make a high
pitched scraping or screeching sound when
the vehicle is in motion whether or not the
brake pedal is depressed. Have the brakeschecked as soon as possible if the wear
indicator sound is heard.
Under some driving or climate conditions,
occasional brake squeak, squeal or other
noise may be heard. Occasional brake
noise during light to moderate stops is nor-
mal and does not affect the function or
performance of the brake system.
The rear drum brakes (if so equipped) do
not have audible wear indicators. Should
you ever hear an unusually loud noise from
the rear drum brakes, have them inspected
as soon as possible by an authorized NIS-
SAN dealer.
Proper brake inspection intervals should
be followed.For more information regard-
ing brake inspections, see the appropriate
maintenance schedule information in the
``Maintenance Schedule'' section of this
manual.
BRAKE BOOSTER
Check the brake booster function with the
following steps:
1. With the engine off, press and release
the brake pedal several times. When
brake pedal movement (distance oftravel) remains the same from one pedal
application to the next, continue on to
next step.
2. While depressing the brake pedal, start
the engine. The pedal height should drop
a little.
3. With the brake pedal depressed, stop the
engine. Keeping the pedal depressed for
about 30 seconds, the pedal height
should not change.
4. Run the engine for one minute without
depressing the brake pedal, then turn it
off. Depress the brake pedal several
times. The pedal travel distance will de-
crease gradually with each depression
as the vacuum is released from the
booster.
If the brakes do not operate properly, have
the brakes checked by an authorized
NISSAN dealer.
Do-it-yourself
8-25
ZX
Page 216 of 263

cluding the spare, and adjust to the speci-
fied pressure if necessary. Check carefully
for damage, cuts or excessive wear.
Wheel nuts*When checking the tires, make
sure no wheel nuts are missing, and check for
any loose wheel nuts. Tighten if necessary.
Tire rotation*Tires should be rotated every
7,500 miles (12,000 km).
Wheel alignment and balanceIf the ve-
hicle should pull to either side while driving
on a straight and level road, or if you detect
uneven or abnormal tire wear, there may be
a need for wheel alignment.
If the steering wheel or seat vibrates at
normal highway speeds, wheel balancing
may be needed.
Windshield wiper blades*Check for
cracks or wear if they do not wipe properly.
Doors and hoodCheck that all doors and
the hood operate properly. Also ensure that
all latches lock securely. Lubricate hinges,
latches, rollers and links if necessary. Make
sure that the secondary latch keeps the
hood from opening when the primary latch
is released.
When driving in areas using road salt orother corrosive materials, check lubrication
frequently.
Lights*Make sure that the headlights, stop
lights, tail lights, turn signal lights, and other
lights are all operating properly and installed
securely. Also check headlight aim.INTERIOR MAINTENANCE
The maintenance items listed here should
be checked on a regular basis, such as
when performing periodic maintenance,
cleaning the vehicle, etc.
Additional information on the following
items with an ``*'' is found in the ``Do-it-
yourself'' section of this manual.
Warning lights and chimesMake sure all
warning lights and chimes are operating
properly.
Windshield wiper and washer*Check that
the wipers and washer operate properly and
that the wipers do not streak.
Windshield defrosterCheck that the air
comes out of the defroster outlets properly
and in sufficient quantity when operating the
heater or air conditioner.
Steering wheelCheck for changes in thesteering conditions, such as excessive free-
play, hard steering or strange noises.
SeatsCheck seat position controls such as
seat adjusters, seatback recliner, etc. to
ensure they operate smoothly and all
latches lock securely in every position.
Check that the head restraints move up and
down smoothly and the locks (if so
equipped) hold securely in all latched posi-
tions.
Seat beltsCheck that all parts of the seat
belt system (e.g., buckles, anchors, adjust-
ers and retractors) operate properly and
smoothly, and are installed securely. Check
the belt webbing for cuts, fraying, wear or
damage.
Accelerator pedalCheck the pedal for
smooth operation and make sure the pedal
does not catch or require uneven effort.
Keep the floor mat away from the pedal.
Clutch pedal*Make sure the pedal oper-
ates smoothly and check that it has the
proper free travel.
BrakesCheck that the brakes do not pull
the vehicle to one side when applied.
Brake pedal and booster*Check the pedal
Maintenance
9-3
ZX