Page 31 of 263
OFor a front-facing child restraint, if
the seat position where it is installed
has a 3-point type lap/shoulder belt,
check to make sure the shoulder belt
does not go in front of the child's
face or neck. If it does, put the shoul-
der belt behind the child restraint. If
you must install a front-facing child
restraint in the front seat, see ªInstal-
lation on front passenger seatº later
in this section for details.
OWhen your child restraint is not in
use, keep it secured with a seat belt
to prevent it from being thrown
around in case of a sudden stop or
accident.
CAUTION
ORemember that a child restraint left
in a closed vehicle can become very
hot. Check the seating surface and
buckles before placing your child in
the child restraint.
OThe three-point belt in your vehicle
is equipped with an automatic lock-
ing mode retractor which must be
used when installing a child re-
straint.
OFailure to use the retractor's locking
mode will result in the child restraint
not being properly secured. The re-
straint could tip over or otherwise be
unsecured and cause injury to the
child in a sudden stop or collision.
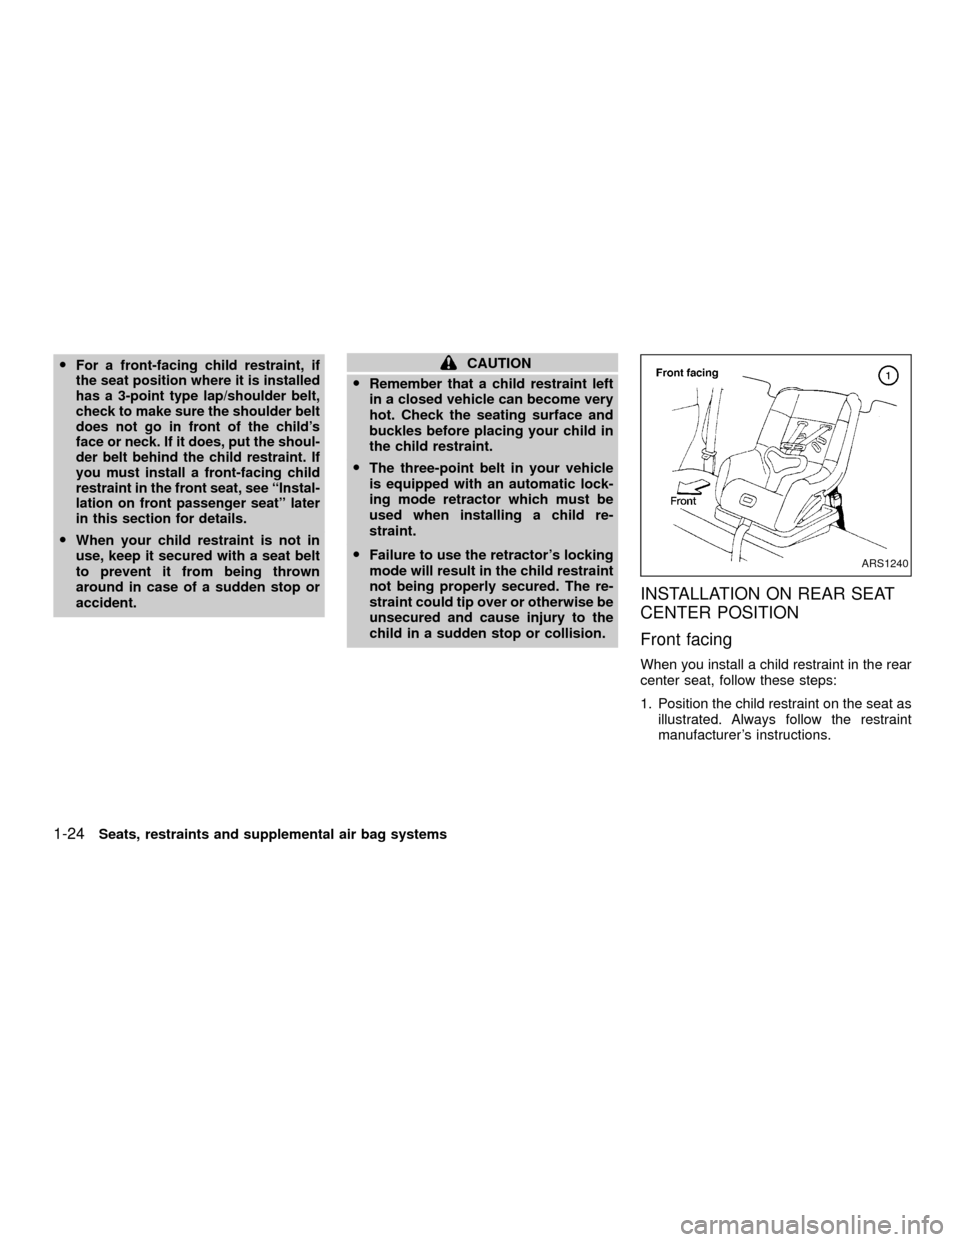
INSTALLATION ON REAR SEAT
CENTER POSITION
Front facing
When you install a child restraint in the rear
center seat, follow these steps:
1. Position the child restraint on the seat as
illustrated. Always follow the restraint
manufacturer's instructions.
ARS1240
1-24Seats, restraints and supplemental air bag systems
ZX
Page 41 of 263
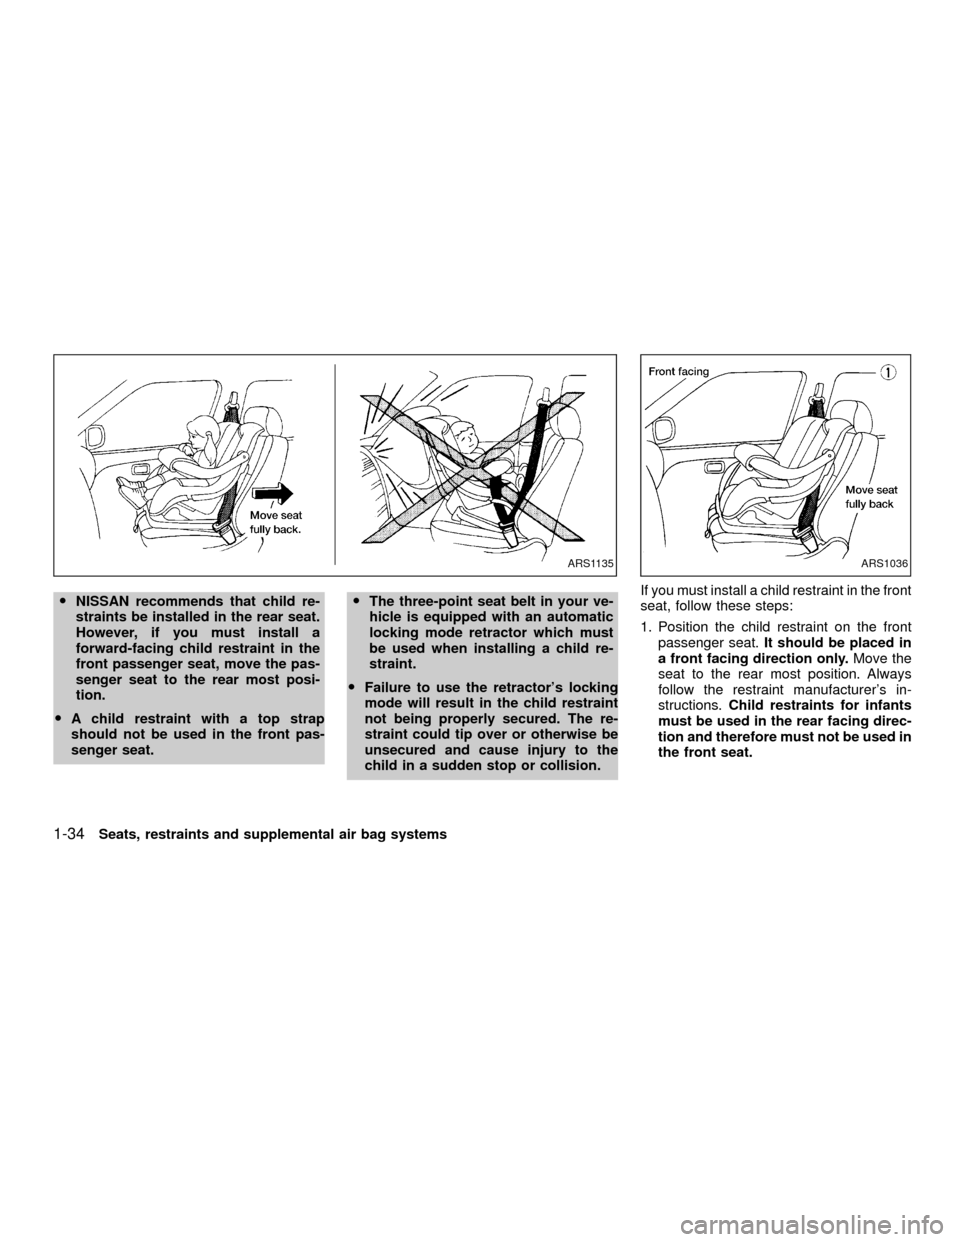
ONISSAN recommends that child re-
straints be installed in the rear seat.
However, if you must install a
forward-facing child restraint in the
front passenger seat, move the pas-
senger seat to the rear most posi-
tion.
OA child restraint with a top strap
should not be used in the front pas-
senger seat.OThe three-point seat belt in your ve-
hicle is equipped with an automatic
locking mode retractor which must
be used when installing a child re-
straint.
OFailure to use the retractor's locking
mode will result in the child restraint
not being properly secured. The re-
straint could tip over or otherwise be
unsecured and cause injury to the
child in a sudden stop or collision.If you must install a child restraint in the front
seat, follow these steps:
1. Position the child restraint on the front
passenger seat.It should be placed in
a front facing direction only.Move the
seat to the rear most position. Always
follow the restraint manufacturer's in-
structions.Child restraints for infants
must be used in the rear facing direc-
tion and therefore must not be used in
the front seat.
ARS1135ARS1036
1-34Seats, restraints and supplemental air bag systems
ZX
Page 75 of 263
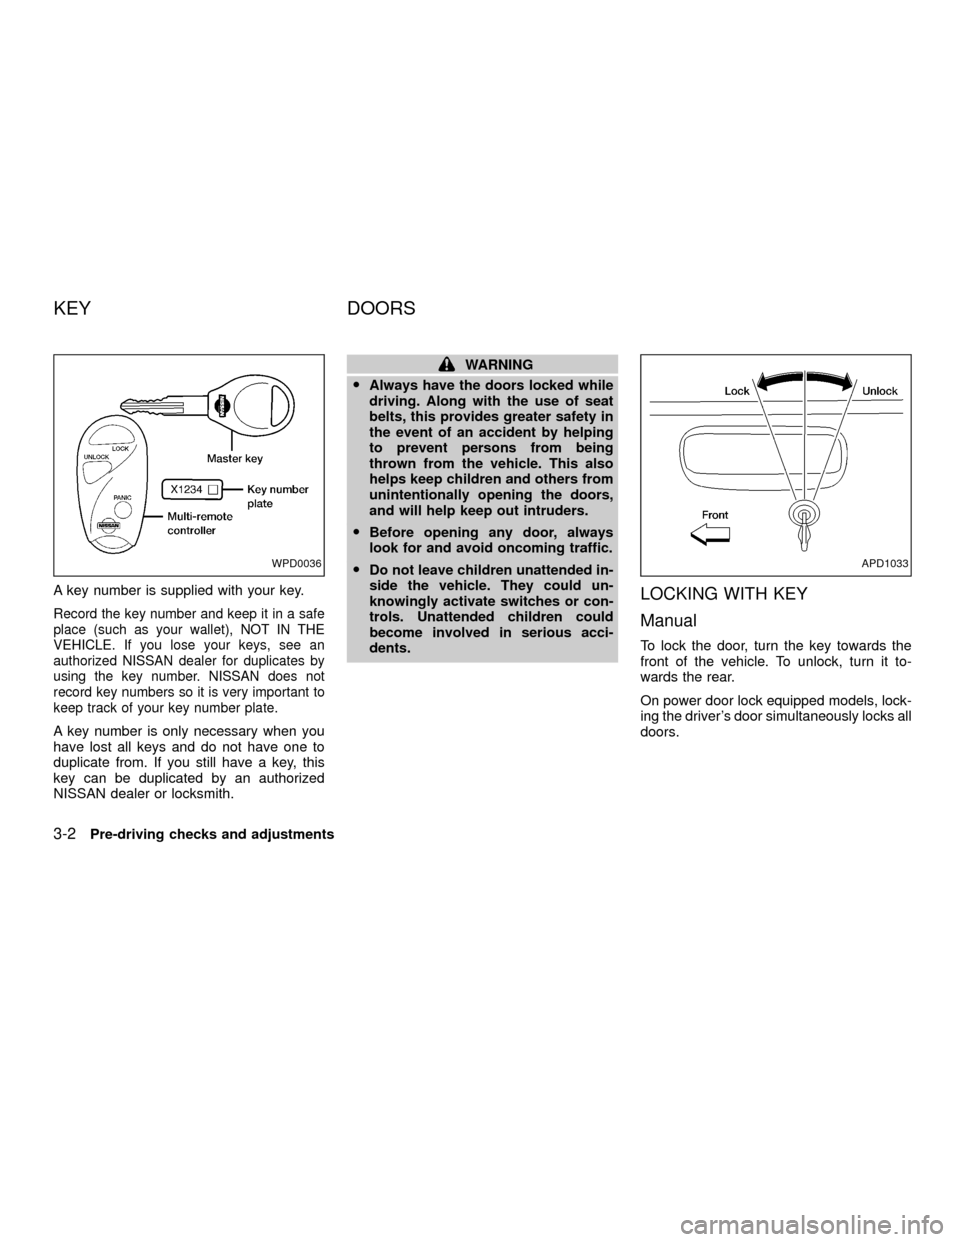
A key number is supplied with your key.
Record the key number and keep it in a safe
place (such as your wallet), NOT IN THE
VEHICLE. If you lose your keys, see an
authorized NISSAN dealer for duplicates by
using the key number. NISSAN does not
record key numbers so it is very important to
keep track of your key number plate.
A key number is only necessary when you
have lost all keys and do not have one to
duplicate from. If you still have a key, this
key can be duplicated by an authorized
NISSAN dealer or locksmith.
WARNING
OAlways have the doors locked while
driving. Along with the use of seat
belts, this provides greater safety in
the event of an accident by helping
to prevent persons from being
thrown from the vehicle. This also
helps keep children and others from
unintentionally opening the doors,
and will help keep out intruders.
OBefore opening any door, always
look for and avoid oncoming traffic.
ODo not leave children unattended in-
side the vehicle. They could un-
knowingly activate switches or con-
trols. Unattended children could
become involved in serious acci-
dents.
LOCKING WITH KEY
Manual
To lock the door, turn the key towards the
front of the vehicle. To unlock, turn it to-
wards the rear.
On power door lock equipped models, lock-
ing the driver's door simultaneously locks all
doors.
WPD0036APD1033
KEY DOORS
3-2Pre-driving checks and adjustments
ZX
Page 92 of 263
WARNING
OThe air conditioner cooling function
operates only when the engine is
running.
ODo not leave children, unreliable
adults, or pets alone in your vehicle.
On hot sunny days, temperatures in
a closed vehicle could quickly be-
come high enough to cause severe
or possibly fatal injuries to people or
animals.
ODo not use the recirculation mode
for long periods as it may cause theinterior air to become stale and the
windows to fog up.
OPositioning of the heater or air con-
ditioner controls should not be done
while driving so full attention may be
given to vehicle operation.
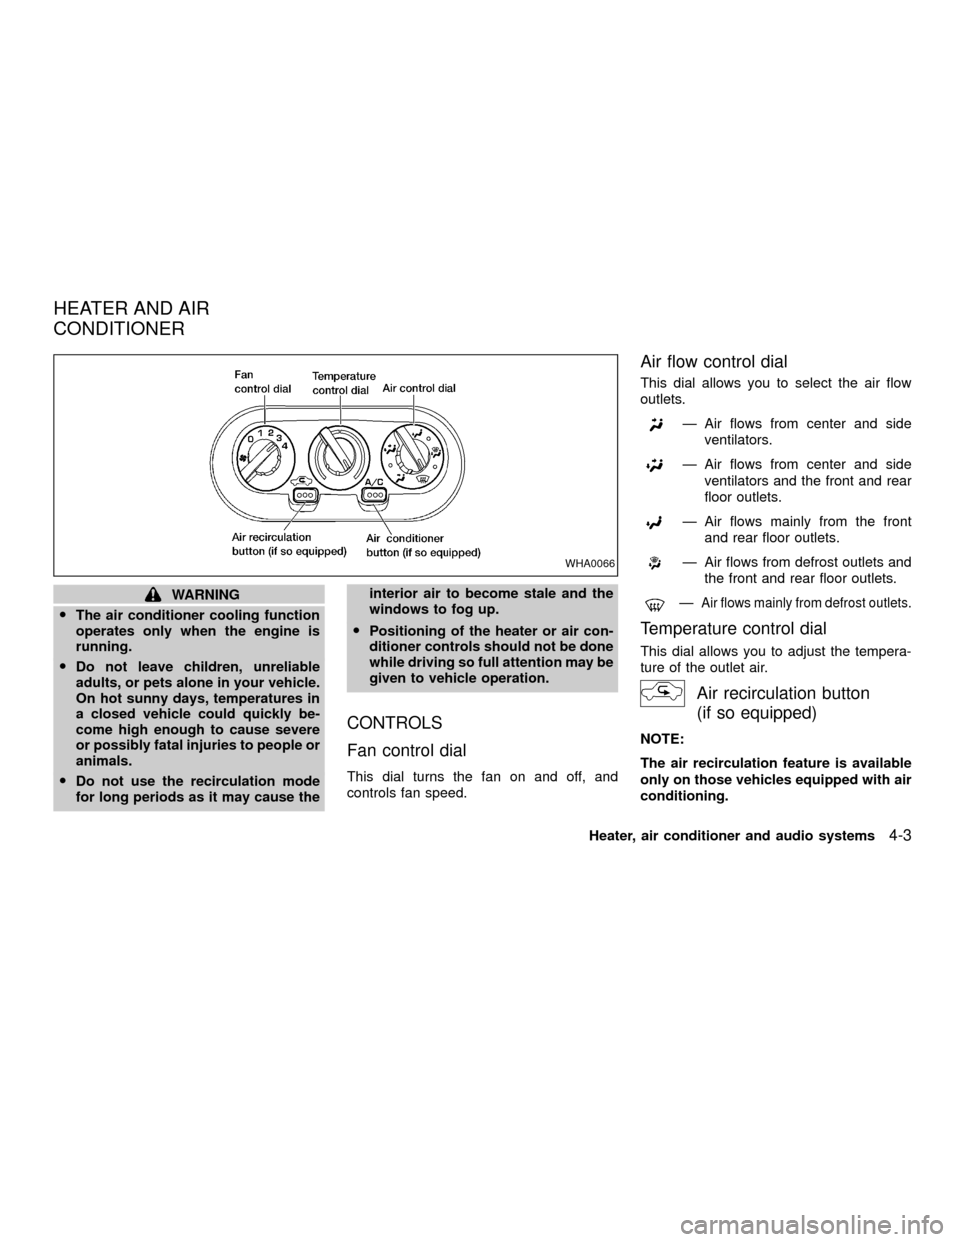
CONTROLS
Fan control dial
This dial turns the fan on and off, and
controls fan speed.
Air flow control dial
This dial allows you to select the air flow
outlets.
Ð Air flows from center and side
ventilators.
Ð Air flows from center and side
ventilators and the front and rear
floor outlets.
Ð Air flows mainly from the front
and rear floor outlets.
Ð Air flows from defrost outlets and
the front and rear floor outlets.
ÐAir flows mainly from defrost outlets.
Temperature control dial
This dial allows you to adjust the tempera-
ture of the outlet air.
Air recirculation button
(if so equipped)
NOTE:
The air recirculation feature is available
only on those vehicles equipped with air
conditioning.
WHA0066
HEATER AND AIR
CONDITIONER
Heater, air conditioner and audio systems4-3
ZX
Page 100 of 263

Turn the power/volume control knob to the
right to increase volume or to the left to
decrease volume.
Adjusting tone quality and speaker bal-
ance
To adjust Bass, Treble, Fader or Balance,
press the
knob for less than 1.5 sec-
onds. A beep signals entry into the audio
adjustment mode and BASS will appear in
the display. Rotate the
knob to adjust
Bass (BASS) to the desired level.
Press the
knob a second time and
TREB appears in the display. Rotate the
knob to adjust Treble (TREB) to the
desired level.
Press the
knob a third time and FAD
appears in the display. Fader (FAD) adjusts
the sound between the front and rear
speaker. Rotate the
knob to adjust
Fader (FAD) to the desired level.
Press the
knob a fourth time and BAL
appears in the display. Balance (BAL) ad-
justs the sound between the right and left
speakers. Rotate the
knob to adjust
Balance (BAL) to the desired level.
After 10 seconds, the radio or CD displaywill reappear. Once the sound quality is set
to the desired level, press the
knob
repeatedly until the radio or CD display
reappears.
Heater, air conditioner and audio systems
4-11
ZX
Page 101 of 263
Clock operation
The clock is on in the display regardless of
what mode, media, or function the radio is in
as long as the ignition is in ACC or ON.
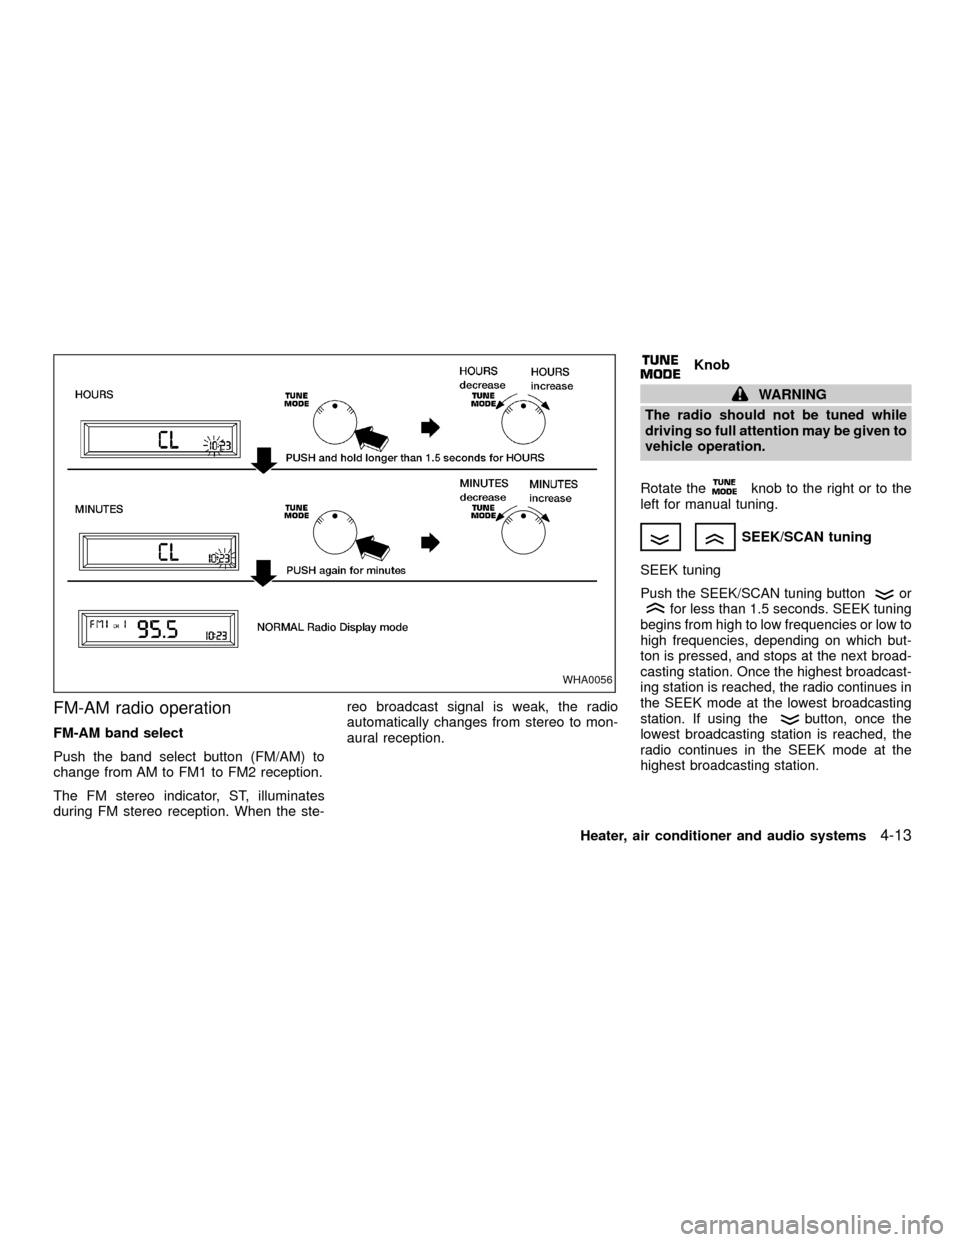
Clock set
To adjust the clock, press the
knob
for longer than 1.5 seconds. A beep signals
entry into the clock adjustment mode and
CL appears in the display. The hours will be
blinking. Rotate the
knob to adjust
the hours to the desired level.
Press the
knob a second time and
the minutes will start to blink. Rotate the
knob to adjust the minutes to the
desired level.
After 10 seconds, the radio or CD display
will reappear. Once the clock is set to the
desired level, press the
knob repeat-
edly until the radio or CD display reappears.
WHA0096
4-12Heater, air conditioner and audio systems
ZX
Page 102 of 263
FM-AM radio operation
FM-AM band select
Push the band select button (FM/AM) to
change from AM to FM1 to FM2 reception.
The FM stereo indicator, ST, illuminates
during FM stereo reception. When the ste-reo broadcast signal is weak, the radio
automatically changes from stereo to mon-
aural reception.
Knob
WARNING
The radio should not be tuned while
driving so full attention may be given to
vehicle operation.
Rotate the
knob to the right or to the
left for manual tuning.
SEEK/SCAN tuning
SEEK tuning
Push the SEEK/SCAN tuning buttonorfor less than 1.5 seconds. SEEK tuning
begins from high to low frequencies or low to
high frequencies, depending on which but-
ton is pressed, and stops at the next broad-
casting station. Once the highest broadcast-
ing station is reached, the radio continues in
the SEEK mode at the lowest broadcasting
station. If using the
button, once the
lowest broadcasting station is reached, the
radio continues in the SEEK mode at the
highest broadcasting station.
WHA0056
Heater, air conditioner and audio systems4-13
ZX
Page 107 of 263
Turn the ONzOFF/VOL control knob to the
right to increase volume or to the left to
decrease volume.
Adjusting tone quality and speaker bal-
ance
To adjust the audio levels for bass, treble,
fader, and balance, push the AUDIO button
and adjust the level with the TUNE/FF-REW
orbuttons. Press the audio button
once for BAS (bass), twice for TRE (treble),
three times for FAD (fader) and four times
for BAL (balance). Once the audio level is
set the display will return back to radio,
cassette or CD display mode after 7 sec-
onds or the AUDIO button can be pressed
again within 7 seconds to set the next audio
level. Pressing the AUDIO button a fifth time
will return the display back to radio, cassette
or CD display mode.
Fader adjusts the sound level between the
front and rear speakers, balance adjusts the
sound level between the right and left
speakers.
AHA1128
4-18Heater, air conditioner and audio systems
ZX