2001 NISSAN XTERRA parking brake
[x] Cancel search: parking brakePage 139 of 263

Shift lock release
If the battery charge is low, the selector
lever may not be moved from the P position
even with the brake pedal depressed and
the selector lever button pushed.
To move the selector lever, push the shift
lock release and selector lever button. The
selector lever can be moved to N (Neutral).
To push the shift lock release, complete the
following procedure:
1. Turn the ignition key to the lock position
and remove the key.
2. Apply the parking brake.
3. Remove the shift lock release cover.
4. Insert a small screwdriver in the shift lock
release slot, and push down.
5. Push the selector lever button and move
the selector lever to N (Neutral) position
while holding down the shift lock release.
6. Start the engine.
If the selector lever cannot be moved out of
P (Park), take your vehicle to an authorized
NISSAN dealership as soon as possible.
Accelerator downshift
In D position
For rapid passing or hill climbing while driv-
ing, fully depress the accelerator pedal to
the floor. This shifts the transmission down
into second gear or first gear, depending on
the vehicle speed.
Overdrive switch
ON: With the engine running and the se-
lector lever in the D (Drive) position,
the transmission upshifts into OVER-
DRIVE as vehicle speed increases.
OVERDRIVE does not engage until the
engine has reached operating tempera-
ture.
OFF: For driving up and down long slopes
where engine braking is necessary
push the OVERDRIVE switch once.
The O/D OFF indicator light in the
instrument panel comes on at this time.
ASD1023
5-12Starting and driving
ZX
Page 141 of 263
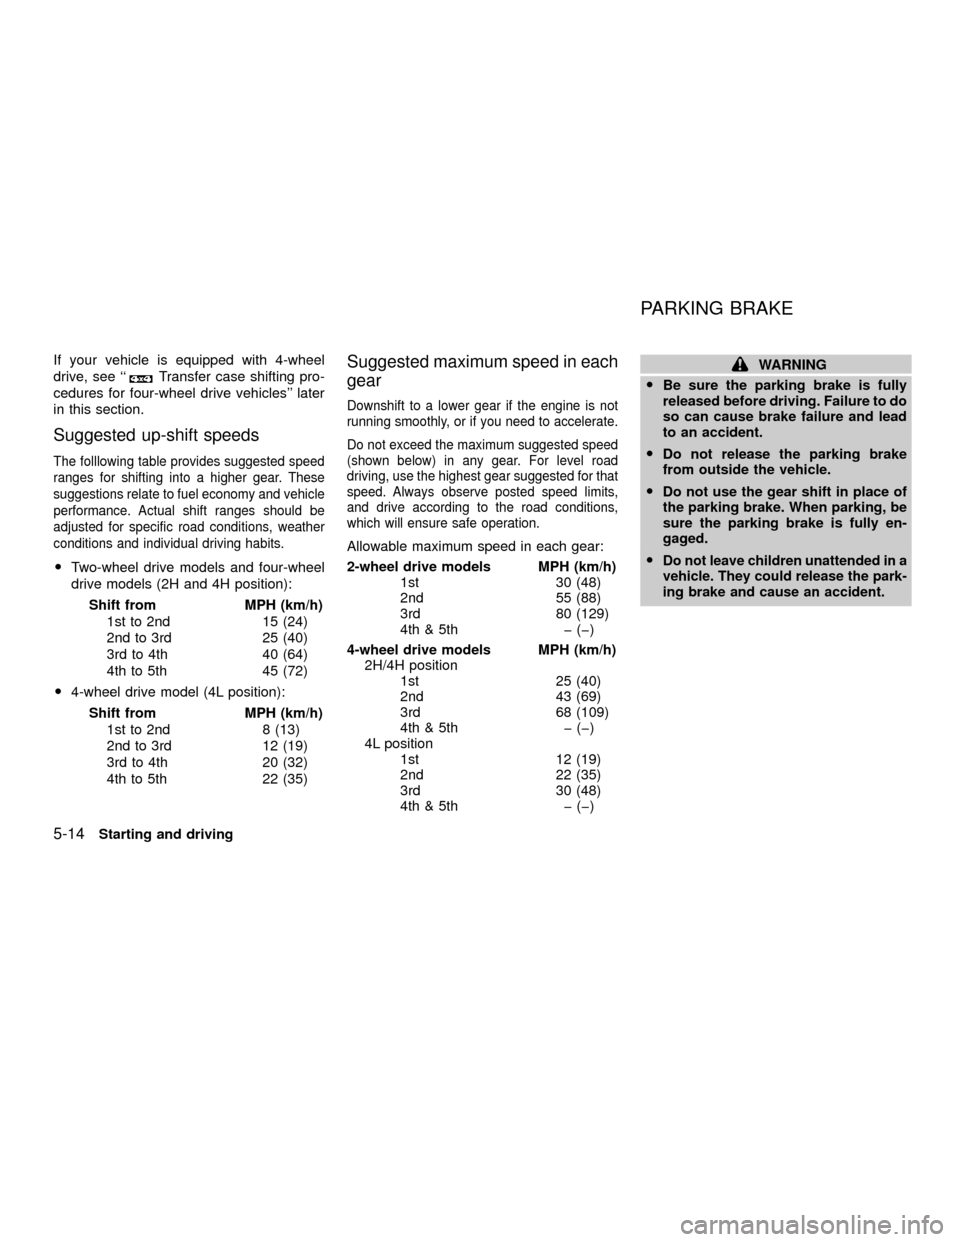
If your vehicle is equipped with 4-wheel
drive, see ``
Transfer case shifting pro-
cedures for four-wheel drive vehicles'' later
in this section.
Suggested up-shift speeds
The folllowing table provides suggested speed
ranges for shifting into a higher gear. These
suggestions relate to fuel economy and vehicle
performance. Actual shift ranges should be
adjusted for specific road conditions, weather
conditions and individual driving habits.
OTwo-wheel drive models and four-wheel
drive models (2H and 4H position):
Shift from MPH (km/h)
1st to 2nd 15 (24)
2nd to 3rd 25 (40)
3rd to 4th 40 (64)
4th to 5th 45 (72)
O4-wheel drive model (4L position):
Shift from MPH (km/h)
1st to 2nd 8 (13)
2nd to 3rd 12 (19)
3rd to 4th 20 (32)
4th to 5th 22 (35)
Suggested maximum speed in each
gear
Downshift to a lower gear if the engine is not
running smoothly, or if you need to accelerate.
Do not exceed the maximum suggested speed
(shown below) in any gear. For level road
driving, use the highest gear suggested for that
speed. Always observe posted speed limits,
and drive according to the road conditions,
which will ensure safe operation.
Allowable maximum speed in each gear:
2-wheel drive models MPH (km/h)
1st 30 (48)
2nd 55 (88)
3rd 80 (129)
4th & 5th þ (þ)
4-wheel drive models MPH (km/h)
2H/4H position
1st 25 (40)
2nd 43 (69)
3rd 68 (109)
4th & 5th þ (þ)
4L position
1st 12 (19)
2nd 22 (35)
3rd 30 (48)
4th & 5th þ (þ)
WARNING
OBe sure the parking brake is fully
released before driving. Failure to do
so can cause brake failure and lead
to an accident.
ODo not release the parking brake
from outside the vehicle.
ODo not use the gear shift in place of
the parking brake. When parking, be
sure the parking brake is fully en-
gaged.
O
Do not leave children unattended in a
vehicle. They could release the park-
ing brake and cause an accident.
PARKING BRAKE
5-14Starting and driving
ZX
Page 142 of 263

To apply:pull the lever out.
To release:
1. Firmly apply foot brake.
2. Manual transmission models:
Place the gearshift in the N (Neutral)
position.
Automatic transmission models:
Move the shift selector lever to the P
(Park) position.
3. While pulling out on the parking brake
lever slightly, push and hold the releasebutton, turn the lever and push it in
completely.
4. Before driving, be sure the brake warning
light goes out.PRECAUTIONS ON CRUISE
CONTROL
cThe cruise control system cancels auto-
matically if it is not functioning properly.
The SET indicator light in the instrument
panel then blinks to warn the driver.
cIf the SET indicator light blinks, turn the
cruise control main switch off and have
the system checked by an authorized
NISSAN dealer.
cThe SET indicator light may blink when
the cruise control main switch is turned
ON while pushing the RES/ACCEL,
ASD1010WSD0013
CRUISE CONTROL (if so
equipped)
Starting and driving5-15
ZX
Page 145 of 263

OKeep your engine tuned up.
OFollow the recommended periodic main-
tenance schedule.
OKeep the tires inflated to the correct
pressure. Low tire pressure increases
tire wear and wastes fuel.
OKeep the front wheels in correct align-
ment. Improper alignment increases tire
wear and lowers fuel economy.
OAir conditioner operation lowers fuel
economy. Use the air conditioner only
when necessary.
OWhen cruising at highway speeds, it is
more economical to use the air condi-
tioner and leave the windows closed to
reduce drag.
O
Use 4H or 4L position only when neces-
sary. Four-wheel drive operation lowers
fuel economy.
TRANSFER CASE SHIFTING
PROCEDURES
CAUTION
Do not drive on dry, hard surface roadsin four-wheel drive. Driving on dry
hardsurfaces in 4H or 4L may cause
unnecessary noise, tire wear and in-
creased fuel consumption. NISSAN
recommends driving in the 2H position
under these conditions.
WARNING
OWhen parking the vehicle, apply the
parking brake and shift the transfer
control lever into the 2H, 4H or 4L
position.
ODo not leave the transfer control le-
ver in the N (Neutral) position. Oth-
erwise, the vehicle could roll unex-
pectedly even if the manual
transmission is in any gear or the
automatic transmission is in the P
(Park) position. If the ATP light is on,
this indicates that the automatic
transmission P position will not
function and the transfer control le-
ver is in the N position.
ASD1022
USING FOUR-WHEEL DRIVE
5-18Starting and driving
ZX
Page 149 of 263
WARNING
ODo not park the vehicle over flam-
mable materials such as dry grass,
waste paper or rags. They may ignite
and cause a fire.
O
The transfer control lever
must be in the 2H, 4H or 4L position
and the parking brake set to prevent
the vehicle from rolling.
ONever place the transfer control le-
ver in the N (Neutral) position. Oth-
erwise, the vehicle could roll unex-pectedly even if the manual trans-
mission is in gear or the automatic
transmission is in the P (Park) posi-
tion. This could result in serious in-
jury or property damage.
OSafe parking procedures require that
both the parking brake be set and
the transmission placed into P (Park)
for automatic transmission models
or in an appropriate gear for manual
transmission models. Failure to do
so could cause the vehicle to move
unexpectedly or roll away and resultin an accident. Make sure the shift
lever has been pushed as far forward
as it can go and cannot be moved
without depressing the button at the
end of the lever.
ONever leave the engine running while
the vehicle is left unattended.
O
Do not leave children unattended in-
side the vehicle. They could unknow-
ingly activate switches or controls.
Unattended children could become
involved in serious accidents.
OIf the ATP lamp is ON, this indicates
that the automatic transmission P
(park) position will not function and
the transfer control lever is in the N
(neutral) position. Failure to engage
the transfer control lever in the 2H,
4H or 4L position could result in the
vehicle moving unexpectedly, result-
ing in serious personal injury or
property damage.
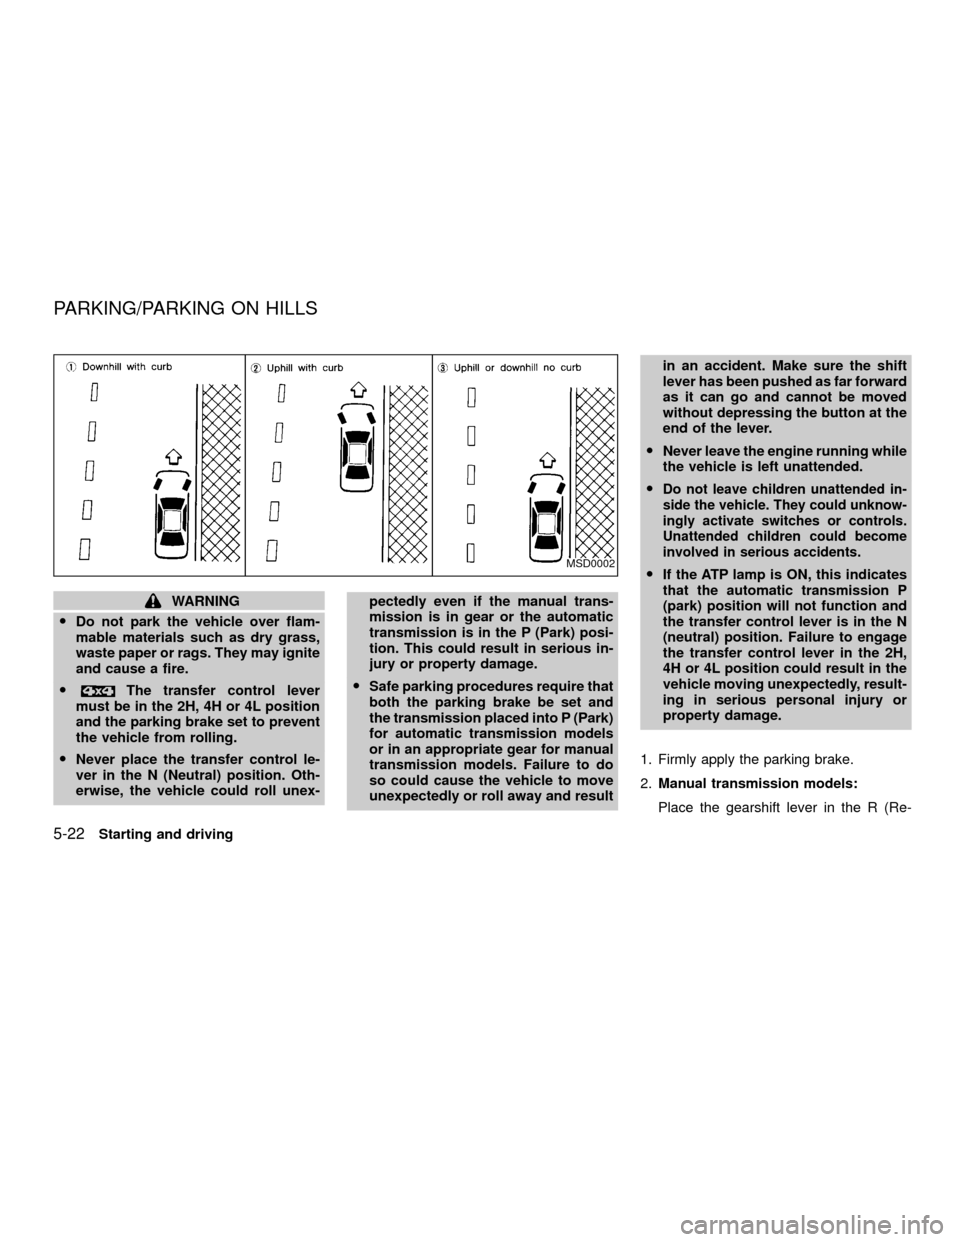
1. Firmly apply the parking brake.
2.Manual transmission models:
Place the gearshift lever in the R (Re-MSD0002
PARKING/PARKING ON HILLS
5-22Starting and driving
ZX
Page 150 of 263
verse) position. When parking on an up-
hill grade, place the gearshift lever in the
1st position.
Automatic transmission models:
Move the gearshift lever to the P (Park)
position.
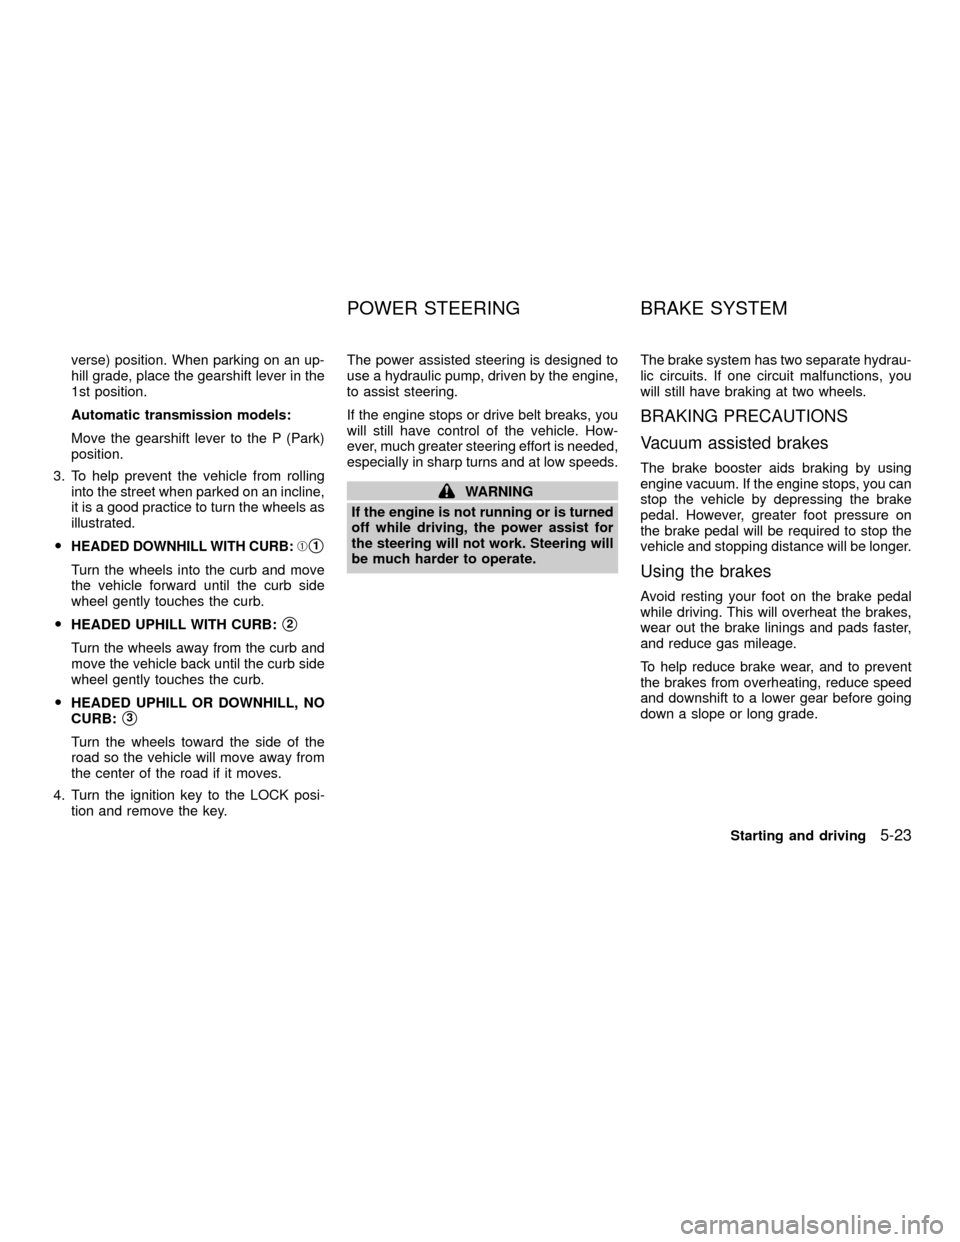
3. To help prevent the vehicle from rolling
into the street when parked on an incline,
it is a good practice to turn the wheels as
illustrated.
O
HEADED DOWNHILL WITH CURB:Às1
Turn the wheels into the curb and move
the vehicle forward until the curb side
wheel gently touches the curb.
OHEADED UPHILL WITH CURB:
s2
Turn the wheels away from the curb and
move the vehicle back until the curb side
wheel gently touches the curb.
OHEADED UPHILL OR DOWNHILL, NO
CURB:
s3
Turn the wheels toward the side of the
road so the vehicle will move away from
the center of the road if it moves.
4. Turn the ignition key to the LOCK posi-
tion and remove the key.The power assisted steering is designed to
use a hydraulic pump, driven by the engine,
to assist steering.
If the engine stops or drive belt breaks, you
will still have control of the vehicle. How-
ever, much greater steering effort is needed,
especially in sharp turns and at low speeds.
WARNING
If the engine is not running or is turned
off while driving, the power assist for
the steering will not work. Steering will
be much harder to operate.The brake system has two separate hydrau-
lic circuits. If one circuit malfunctions, you
will still have braking at two wheels.
BRAKING PRECAUTIONS
Vacuum assisted brakes
The brake booster aids braking by using
engine vacuum. If the engine stops, you can
stop the vehicle by depressing the brake
pedal. However, greater foot pressure on
the brake pedal will be required to stop the
vehicle and stopping distance will be longer.
Using the brakes
Avoid resting your foot on the brake pedal
while driving. This will overheat the brakes,
wear out the brake linings and pads faster,
and reduce gas mileage.
To help reduce brake wear, and to prevent
the brakes from overheating, reduce speed
and downshift to a lower gear before going
down a slope or long grade.
POWER STEERING BRAKE SYSTEM
Starting and driving5-23
ZX
Page 157 of 263
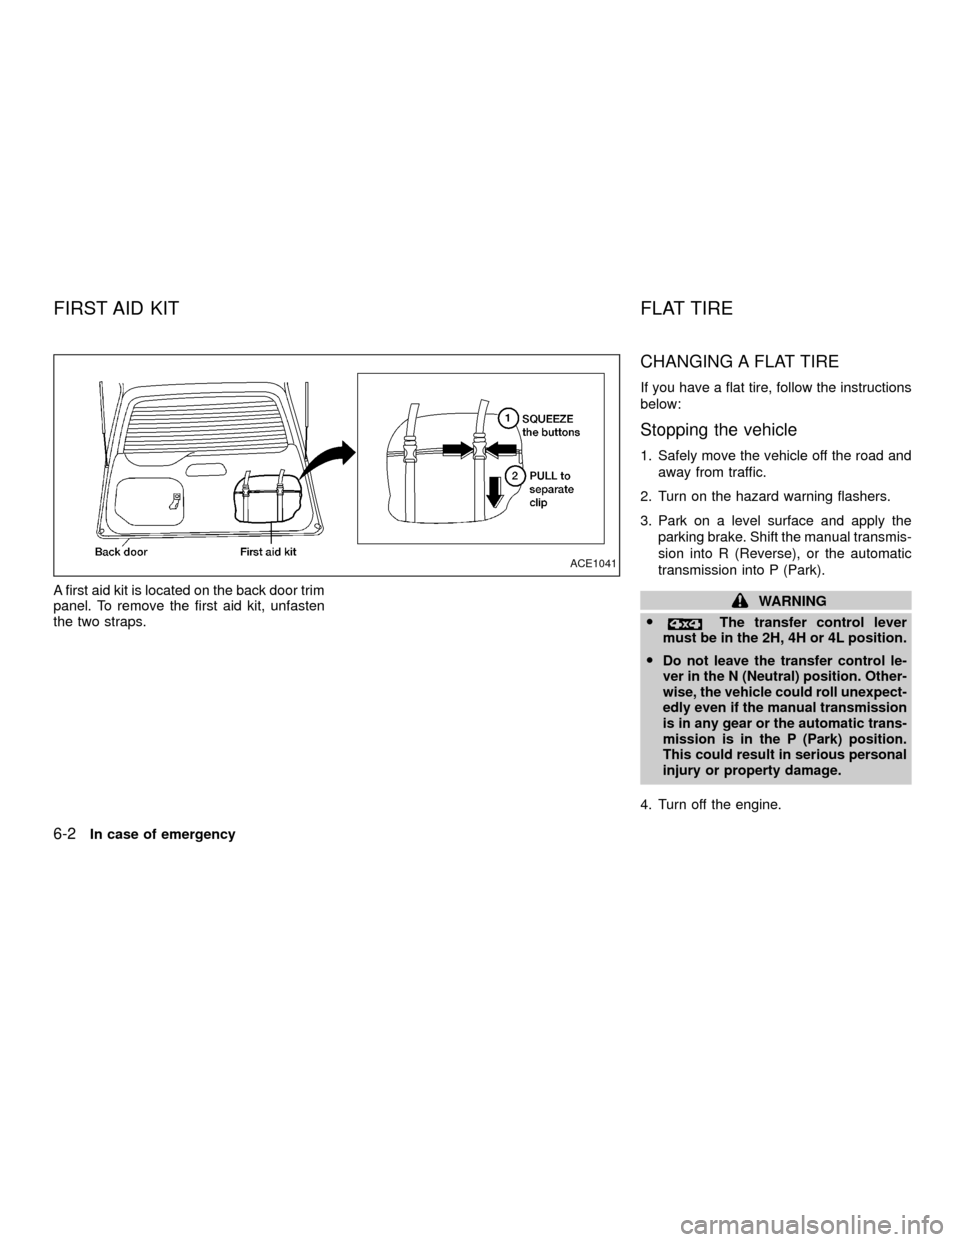
A first aid kit is located on the back door trim
panel. To remove the first aid kit, unfasten
the two straps.
CHANGING A FLAT TIRE
If you have a flat tire, follow the instructions
below:
Stopping the vehicle
1. Safely move the vehicle off the road and
away from traffic.
2. Turn on the hazard warning flashers.
3. Park on a level surface and apply the
parking brake. Shift the manual transmis-
sion into R (Reverse), or the automatic
transmission into P (Park).
WARNING
O
The transfer control lever
must be in the 2H, 4H or 4L position.
O
Do not leave the transfer control le-
ver in the N (Neutral) position. Other-
wise, the vehicle could roll unexpect-
edly even if the manual transmission
is in any gear or the automatic trans-
mission is in the P (Park) position.
This could result in serious personal
injury or property damage.
4. Turn off the engine.
ACE1041
FIRST AID KIT FLAT TIRE
6-2In case of emergency
ZX
Page 158 of 263
5. Raise the hood to warn other traffic and
to signal professional road assistance
personnel that you require assistance.
6. Have all passengers get out of the ve-
hicle and stand in a safe place away from
traffic and clear of the vehicle.
WARNING
OMake sure the parking brake is se-
curely applied and the manual trans-
mission is shifted into R (Reverse),
or the automatic transmission into P
(Park).
ONever change tires when the vehicle
is on a slope, ice or slippery areas.
This is hazardous.
ONever change tires if oncoming traf-
fic is close to your vehicle. Wait for
professional road assistance.
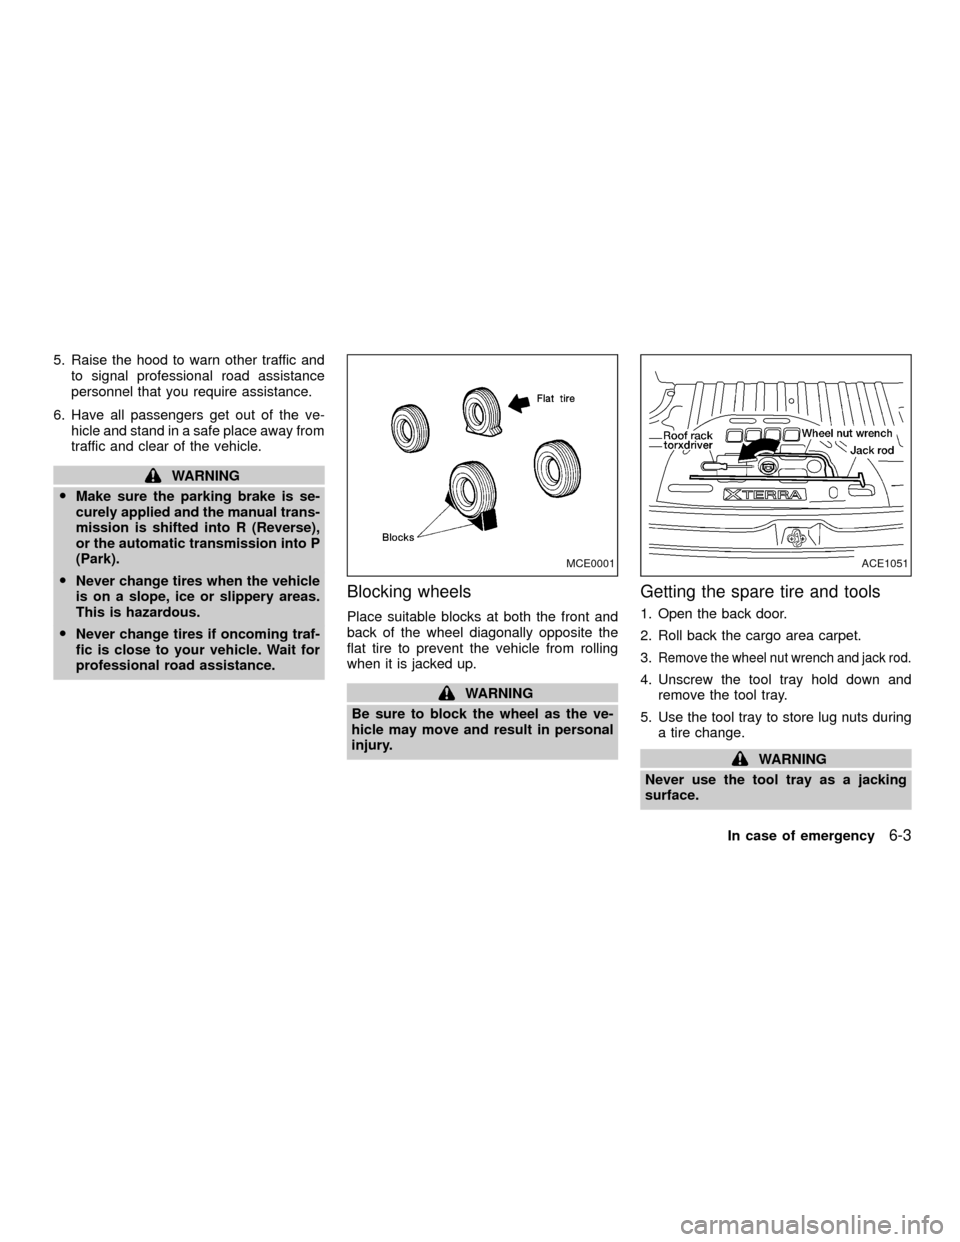
Blocking wheels
Place suitable blocks at both the front and
back of the wheel diagonally opposite the
flat tire to prevent the vehicle from rolling
when it is jacked up.
WARNING
Be sure to block the wheel as the ve-
hicle may move and result in personal
injury.
Getting the spare tire and tools
1. Open the back door.
2. Roll back the cargo area carpet.
3.
Remove the wheel nut wrench and jack rod.
4. Unscrew the tool tray hold down and
remove the tool tray.
5. Use the tool tray to store lug nuts during
a tire change.
WARNING
Never use the tool tray as a jacking
surface.
MCE0001ACE1051
In case of emergency6-3
ZX