2001 NISSAN XTERRA maintenance
[x] Cancel search: maintenancePage 176 of 263

8 Do-it-yourself
Maintenance precautions .......................................8-2
Engine compartment check locations ....................8-3
Engine cooling system ...........................................8-5
Checking engine coolant level ..........................8-5
Changing engine coolant ..................................8-6
Engine oil ...............................................................8-9
Checking engine oil level ..................................8-9
Changing engine oil ........................................8-10
Changing engine oil filter.................................8-12
Automatic transmission fluid ................................8-13
Temperature conditions for checking ..............8-13
Power steering fluid..............................................8-14
Brake and clutch fluid...........................................8-15
Window washer fluid ............................................8-16
Window washer fluid reservoir ........................8-16
Battery ..................................................................8-16
Jump starting ...................................................8-17
Drive belts ............................................................8-18
Spark plugs ..........................................................8-19
Replacing spark plugs .....................................8-19
Air cleaner ............................................................8-20Windshield wiper blades ......................................8-22
Cleaning ..........................................................8-22
Replacing .........................................................8-22
Parking brake and brake pedal ............................8-24
Checking parking brake...................................8-24
Checking brake pedal .....................................8-24
Brake booster ..................................................8-25
Clutch pedal .........................................................8-26
Checking clutch pedal .....................................8-26
Fuses ....................................................................8-27
Passenger compartment .................................8-27
Multi-remote controller battery replacement ........8-28
Lights ....................................................................8-29
Headlights ........................................................8-29
Fog lights (if so equipped)...............................8-31
Exterior and interior lights ...............................8-32
Wheels and tires ..................................................8-34
Tire pressure ...................................................8-34
Types of tires ...................................................8-34
Tire chains .......................................................8-35
Changing wheels and tires ..............................8-36
ZX
Page 177 of 263
When performing any inspection or mainte-
nance work on your vehicle, always take
care to prevent serious accidental injury to
yourself or damage to the vehicle. The
following are general precautions which
should be closely observed.
WARNING
OPark the vehicle on a level surface,
apply the parking brake securely and
block the wheels to prevent the ve-
hicle from moving. For manual trans-
mission models, move the shift lever
to N (Neutral). For automatic trans-
mission models, move the shift lever
to P (Park).
OBe sure the ignition key is in the OFF
or LOCK position when performing
any parts replacement or repairs.
ONever leave the engine or automatic
transmission related component
harnesses disconnected while the
ignition switch is in the ON position.
ONever connect or disconnect the bat-
tery or any transistorized compo-
nent while the ignition switch is in
the ON position.O
If you must work with the engine run-
ning, keep your hands, clothing, hair
and tools away from moving fans,
belts, and any other moving parts.
OIt is advisable to secure or remove
any loose clothing and remove any
jewelry, such as rings, watches, etc.
before working on your vehicle.
OAlways wear eye protection when-
ever you work on your vehicle.
OIf you must run the engine in an
enclosed space such as a garage, be
sure there is proper ventilation for
exhaust gases to escape.
ONever get under the vehicle while it
is supported only by a jack. If it is
necessary to work under the vehicle,
support it with safety stands.
OKeep smoking materials, flame and
sparks away from the fuel tank and
battery.
OOn gasoline engine models with the
multiport fuel injection (MFI) system,
the fuel filter or fuel lines should be
serviced by an authorized NISSAN
dealer because the fuel lines are
under high pressure even when the
engine is off.
CAUTION
ODo not work under the hood while
the engine is hot. Turn the engine off
and wait until it cools down.
ONever connect or disconnect either
the battery or any transistorized
component connector while the igni-
tion is on.
OAvoid contact with used engine oil
and coolant. Improperly disposed
engine oil, engine coolant and/or
other vehicle fluids can damage the
environment. Always conform to lo-
cal regulations for disposal of ve-
hicle fluid.
This ``Do-it-yourself'' section gives instruc-
tions regarding only those items which are
relatively easy for an owner to perform.
You should be aware that incomplete or
improper servicing may result in operating
difficulties or excessive emissions, and
could affect your warranty coverage.If in
doubt about any servicing, have it done
by an authorized NISSAN dealer.
MAINTENANCE
PRECAUTIONS
8-2Do-it-yourself
ZX
Page 185 of 263
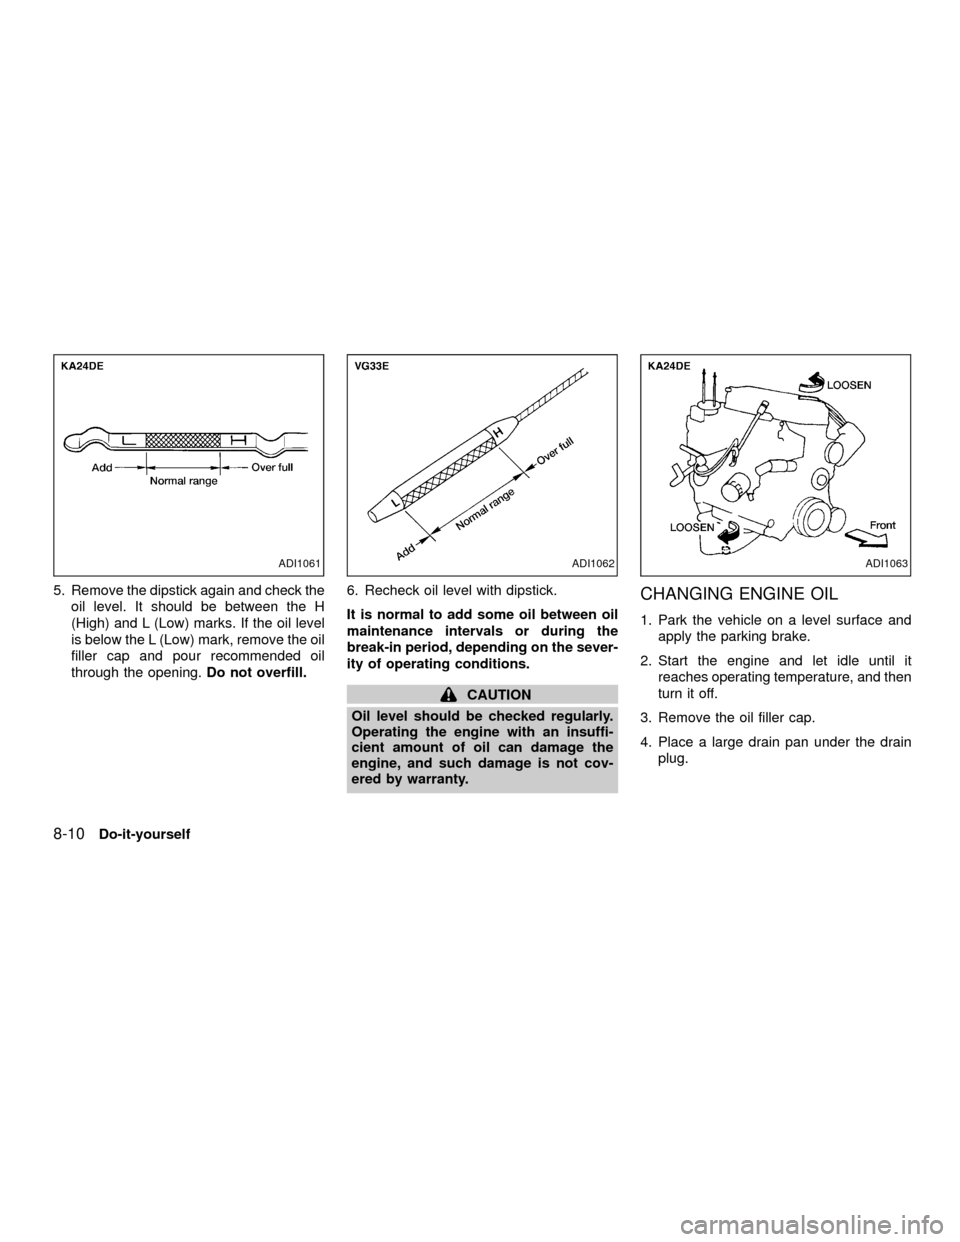
5. Remove the dipstick again and check the
oil level. It should be between the H
(High) and L (Low) marks. If the oil level
is below the L (Low) mark, remove the oil
filler cap and pour recommended oil
through the opening.Do not overfill.6. Recheck oil level with dipstick.
It is normal to add some oil between oil
maintenance intervals or during the
break-in period, depending on the sever-
ity of operating conditions.
CAUTION
Oil level should be checked regularly.
Operating the engine with an insuffi-
cient amount of oil can damage the
engine, and such damage is not cov-
ered by warranty.
CHANGING ENGINE OIL
1. Park the vehicle on a level surface and
apply the parking brake.
2. Start the engine and let idle until it
reaches operating temperature, and then
turn it off.
3. Remove the oil filler cap.
4. Place a large drain pan under the drain
plug.
ADI1061ADI1062ADI1063
8-10Do-it-yourself
ZX
Page 193 of 263
WARNING
Be sure the ignition key is in the OFF or
LOCK position. The engine could rotate
unexpectedly.
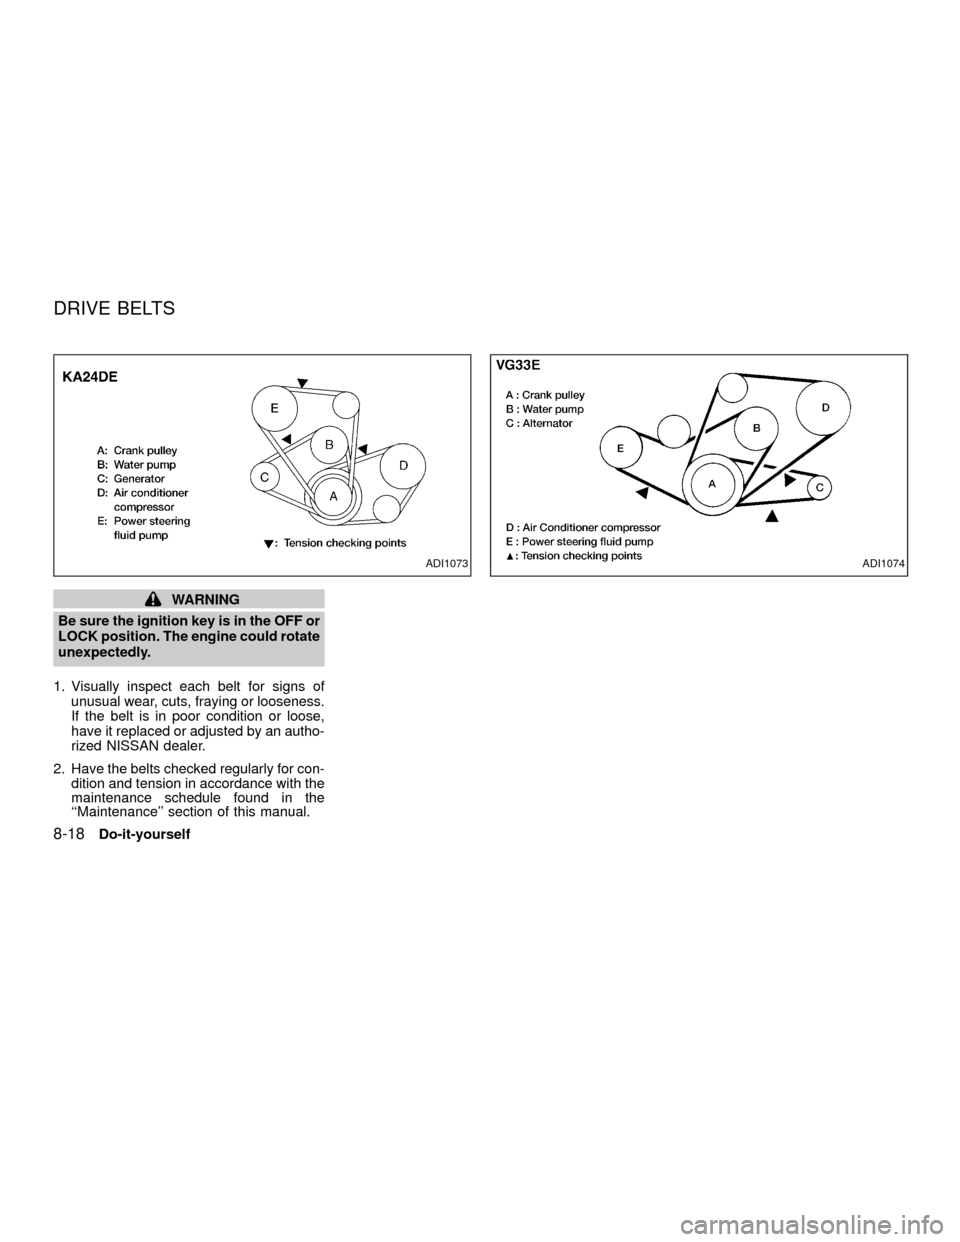
1. Visually inspect each belt for signs of
unusual wear, cuts, fraying or looseness.
If the belt is in poor condition or loose,
have it replaced or adjusted by an autho-
rized NISSAN dealer.
2. Have the belts checked regularly for con-
dition and tension in accordance with the
maintenance schedule found in the
``Maintenance'' section of this manual.
ADI1074ADI1073
DRIVE BELTS
8-18Do-it-yourself
ZX
Page 194 of 263
WARNING
Be sure the engine and ignition switch
are off and that the parking brake is
engaged securely.
CAUTION
Be sure to use the correct socket to
remove the spark plugs. An incorrect
socket can damage the spark plugs.
REPLACING SPARK PLUGS
Platinum-tipped spark plugs
It is not necessary to replace platinum-
tipped spark plugs as frequently as conven-
tional type spark plugs because they last
much longer. Follow the maintenance
schedule, but do not reuse the spark plugs
by cleaning or regapping.
OAlways replace spark plugs with rec-
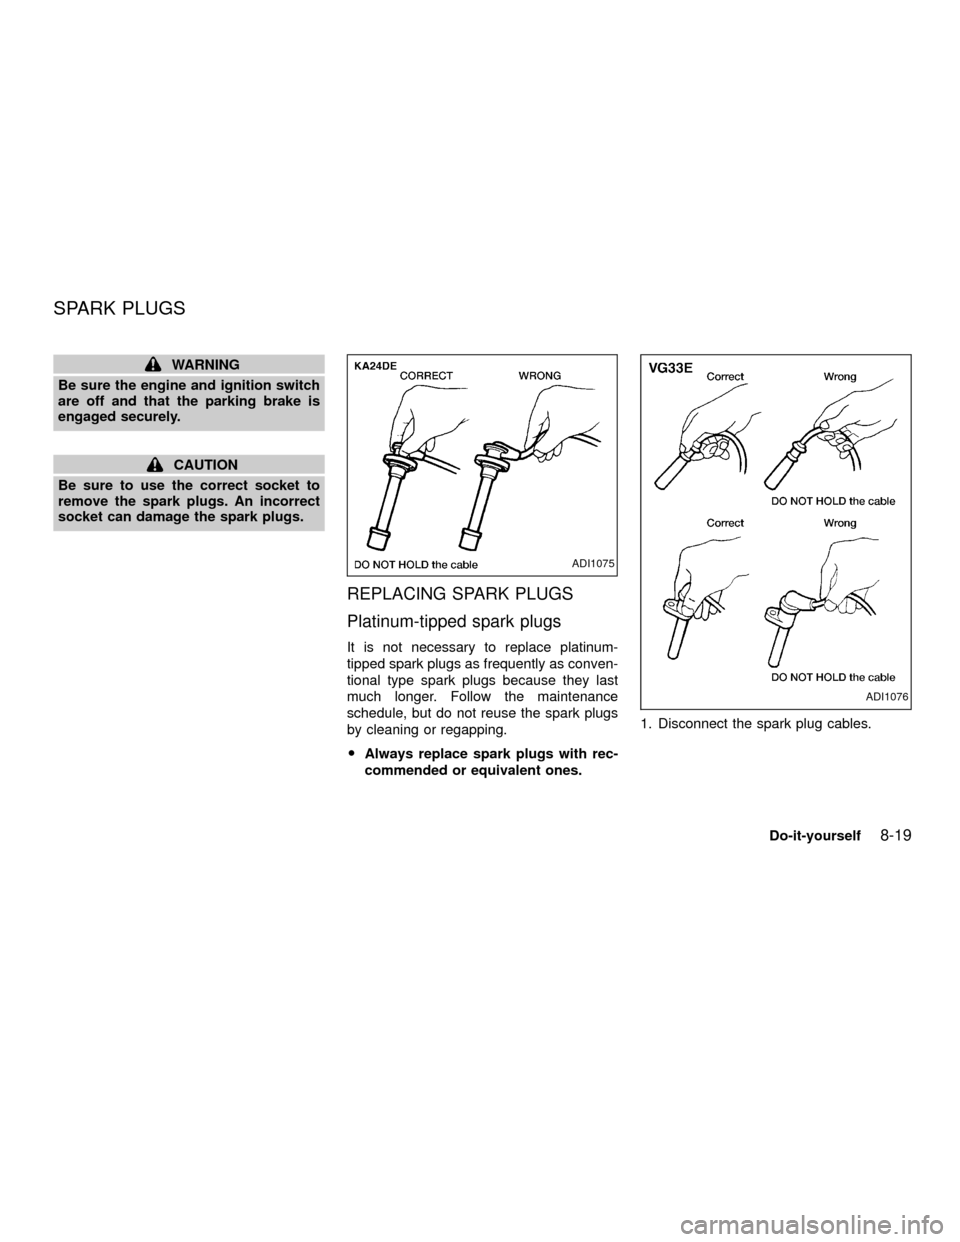
commended or equivalent ones.1. Disconnect the spark plug cables.
ADI1075
ADI1076
SPARK PLUGS
Do-it-yourself8-19
ZX
Page 195 of 263

When disconnecting, always hold the
boots Ð not the cables. Mark all cables
to identify their original location.
2. Remove the spark plugs with a spark
plug socket.
3. Fit the new spark plugs, one at a time,
into the spark plug socket and install
them.Use only the specified spark
plugs.Turn each plug several full turns
by hand, then tighten with the spark plug
socket to the correct torque. Do not over-
tighten.Spark plug tightening torque:
14 to 22 ft-lb (20 to 29 Nzm)
4. Reconnect the spark plug cables to their
original positions.
The filter element should not be cleaned
and reused as it is given a special treat-
ment. We recommend it be replaced ac-
cording to the maintenance intervals shown
in the ``Maintenance'' section of this manual.
When replacing the filter, wipe the inside of
the air cleaner housing and the cover with a
damp cloth.
WDI0005ADI1079
AIR CLEANER
8-20Do-it-yourself
ZX
Page 200 of 263
Self-adjusting brakes
Your vehicle is equipped with self-adjusting
brakes.
The front disc-type brakes self-adjust every
time the brake pedal is applied. The rear
drum-type brakes on two-wheel drive trucks
self-adjust every time the parking brake is
applied. The rear drum-type brakes on four-
wheel drive trucks self-adjust every time the
brake pedal is applied. If the brake pedal
goes down farther than normal, it may be
due to a lack of adjustment of the rear drum
brakes. Apply the parking brake several
times.
WARNING
If the brake pedal height does not re-
turn to normal, see an authorized NIS-
SAN dealer and have it checked.
Brake pad wear indicators
The disc brake pads on your vehicle have
audible wear indicators. When a brake pad
requires replacement, it will make a high
pitched scraping or screeching sound when
the vehicle is in motion whether or not the
brake pedal is depressed. Have the brakeschecked as soon as possible if the wear
indicator sound is heard.
Under some driving or climate conditions,
occasional brake squeak, squeal or other
noise may be heard. Occasional brake
noise during light to moderate stops is nor-
mal and does not affect the function or
performance of the brake system.
The rear drum brakes (if so equipped) do
not have audible wear indicators. Should
you ever hear an unusually loud noise from
the rear drum brakes, have them inspected
as soon as possible by an authorized NIS-
SAN dealer.
Proper brake inspection intervals should
be followed.For more information regard-
ing brake inspections, see the appropriate
maintenance schedule information in the
``Maintenance Schedule'' section of this
manual.
BRAKE BOOSTER
Check the brake booster function with the
following steps:
1. With the engine off, press and release
the brake pedal several times. When
brake pedal movement (distance oftravel) remains the same from one pedal
application to the next, continue on to
next step.
2. While depressing the brake pedal, start
the engine. The pedal height should drop
a little.
3. With the brake pedal depressed, stop the
engine. Keeping the pedal depressed for
about 30 seconds, the pedal height
should not change.
4. Run the engine for one minute without
depressing the brake pedal, then turn it
off. Depress the brake pedal several
times. The pedal travel distance will de-
crease gradually with each depression
as the vacuum is released from the
booster.
If the brakes do not operate properly, have
the brakes checked by an authorized
NISSAN dealer.
Do-it-yourself
8-25
ZX
Page 214 of 263

9 Maintenance
Maintenance precautions .......................................9-2
General maintenance .............................................9-2
Explanation of maintenance items ....................9-2
Exterior maintenance.........................................9-2
Interior maintenance ..........................................9-3Periodic maintenance schedules ...........................9-5
Schedule 1 ........................................................9-5
Schedule 2 ........................................................9-5
Explanation of maintenance items ..................9-10
ZX