2001 NISSAN XTERRA set clock
[x] Cancel search: set clockPage 101 of 263

Clock operation
The clock is on in the display regardless of
what mode, media, or function the radio is in
as long as the ignition is in ACC or ON.
Clock set
To adjust the clock, press the
knob
for longer than 1.5 seconds. A beep signals
entry into the clock adjustment mode and
CL appears in the display. The hours will be
blinking. Rotate the
knob to adjust
the hours to the desired level.
Press the
knob a second time and
the minutes will start to blink. Rotate the
knob to adjust the minutes to the
desired level.
After 10 seconds, the radio or CD display
will reappear. Once the clock is set to the
desired level, press the
knob repeat-
edly until the radio or CD display reappears.
WHA0096
4-12Heater, air conditioner and audio systems
ZX
Page 108 of 263

Clock operation
Pressing the clock button displays the clock.
Clock set
Press the CLOCK button for more than 2
seconds the radio beeps and the hours
flash, use the TUNE/FF-REW
but-
tons to set the hour, press the CLOCK
button again until the radio beeps and the
minutes flash, use the TUNE/FF-REW
buttons to set the minutes. The
display will return to regular clock display in
7 seconds or you may press the CLOCK
button again to return to the regular clock
display.
FM-AM radio operation
FM-AM band select
Push the
button to change from AM to
FM1 or FM2 reception.
The FM stereo indicator, ST, illuminates
during FM stereo reception. When the ste-
reo broadcast signal is weak, the radio
automatically changes from stereo to mon-
aural reception.
TUNE (Tuning)
WARNING
The radio should not be tuned while
driving so full attention may be given to
vehicle operation.
Use the
andbuttons for manual
tuning. To move quickly through the chan-
nels, hold either of the tuning buttons down.
SEEK/SCAN tuning
SEEK tuning
Push the SEEK/SCAN tuning button
or
for less than 1.5 seconds. SEEK tuning
begins from low to high frequencies or high
to low frequencies, depending on which
button is pressed, and stops at the next
broadcasting station. If using the
button
once the highest broadcasting station is
reached, the radio continues in the SEEK
mode at the lowest broadcasting station. If
using the
button once the lowest broad-
casting station is reached, the radio contin-
ues in the SEEK mode at the highest broad-
casting station.SCAN tuning
Push and hold the SEEK/SCAN tuning but-
ton
orfor more than 1.5 seconds.
SCAN illuminates in the display window,
and the radio station blinks. SCAN tuning
begins from low to high frequencies or from
high to low frequencies, depending on
which button is pressed. SCAN tuning stops
at each broadcasting station for five sec-
onds. When scanning, SCAN is solid and
the radio station blinks. When temporarily
stopped on a station, SCAN blinks and the
station display is solid. Pushing the button
again during this five second period stops
SCAN tuning and the radio remains tuned to
that station.
Heater, air conditioner and audio systems
4-19
ZX
Page 114 of 263

Adjusting tone quality and speaker bal-
ance
Press the AUDIO button to enter the audio
adjust mode:
Bass!Mid!Treb!Fade!Bal
Press the TUNE/FF-REV (
or)or
SEEK/TRACK (or) to adjust to the
desired levels. The display will return to the
regular radio display after 7 seconds, or you
may press the AUDIO button again to return
to the regular radio display.
Clock operation
Pressing the CLOCK button displays the
clock with the radio on or off. Press the
CLOCK button again to turn off the clock
display.
Clock set
1. Press and hold the CLOCK button until it
beeps (>2 seconds).
2. The hours will start flashing. Press
TUNE/FF-REV (
or)or
SEEK/TRACK (or) to adjust the
hours.
3. Press the CLOCK button to switch to the
minute adjustment.
WHA0065
Heater, air conditioner and audio systems4-25
ZX
Page 115 of 263

4. Press TUNE/FF-REV (or)or
SEEK/TRACK (or) to adjust the
minutes.
5. Press the CLOCK button again to exit the
clock set mode.
The display will return to the regular clock
display after 7 seconds, or you may press
the CLOCK button again to return to the
regular clock display.
FM-AM radio operation
FM-AM band select
Push the AM or the FM button to change
from AM to FM reception.
The FM stereo indicator, ST, illuminates
during FM stereo reception. When the ste-
reo broadcast signal is weak, the radio
automatically changes from stereo to mon-
aural reception.
Station signal strength, distance from radio
transmitter, buildings, bridges, mountains,
and other external influences affect radio
reception. Intermittent changes in reception
quality normally are caused by these exter-
nal influences.Using a cellular phone in or near the
vehicle may influence radio reception
quality.
TUNE/FF-REV
WARNING
The radio should not be tuned while
driving so full attention may be given to
vehicle operation.
Use the
orbuttons for manual tun-
ing. To move quickly through the channels,
hold the tuning buttons down.
SEEK tuning
Push SEEK/TRACK (or). SEEK tuning
begins from low to high frequencies or high
to low frequencies, depending on which but-
ton is pressed, and stops at the next broad-
casting station. If using the up button, once
the highest broadcasting station is reached,
the radio continues in the SEEK mode at the
lowest broadcasting station. If using the
down button, once the lowest broadcasting
station is reached, the radio continues in theSEEK mode at the highest broadcasting sta-
tion.
SCAN tuning
Push the SCAN button. SCAN illuminates in
the display window. Scan tuning begins
from low to high frequencies or from high to
low frequencies. Scan tuning stops at each
broadcasting station that has sufficient sig-
nal strength for 5 seconds. When scanning,
SCAN blinks in the display. Pushing the
SCAN button again during this 5 second
period stops Scan tuning and the radio
remains tuned to that station.
4-26Heater, air conditioner and audio systems
ZX
Page 119 of 263

All Preset Scan
Pressing the Preset Scan button (>1.5 sec-
onds) scans all the permanent preset
memory banks (A, B or C) from 1-6 for 5
seconds. If the Travel Preset is ON, all the
travel preset memory banks (A, B, or C)
from 1-6 are scanned for 5 seconds.
Canceling preset scan mode
Pressing any button except CLOCK, EJECT
and PTY cancels the Preset Scan mode.
RDS (Radio Data System)
RDS stands for Radio Data System, and is
a data information service transmitted by
some radio stations on the FM band (not AM
band) encoded within a regular radio broad-
cast. Currently, most RDS stations are in
large cities, but many stations are now
considering broadcasting RDS data.
RDS can display:
OStation call sign, such as ªWHFR 98.3º.
OStation name, such as ªThe Grooveº.
OMusic or programming type such as
ªClassicalº, ªCountryº, or ªRockº.
OTraffic reports about delays or construc-
tion.
If the station broadcasts RDS information,
the RDS icon is displayed. The RDS infor-
mation will be displayed according to the
option chosen in the RDS setup mode. (FM
& RDS is the default.) Press the RDS button
again to display the frequency for 3 sec-
onds. The radio will then return to the nor-
mal display. If the station does not broad-
cast RDS information, the RDS icon will not
be displayed.Setting RDS Mode
Press the RDS button (>3 seconds) until the
display showsªRDS SET MODEº. This
display will last 2 seconds and then change
toªTRAFFIC-OFFº. Press TUNE/FF-REV
(
or) to toggle the RDS traffic mode
from ªOFFº to ªONº. Press the RDS button
again to set your traffic mode selection.
The display changes toªSHOWºfor the
second part of the RDS mode selection.
Press TUNE/FF-REV (
or) to switch
between the following RDS display modes:
OªFM & RDSº: the radio display will show
the station's broadcast frequency and the
station's name.
OªRDS ONLYº: the radio display will show
the station's name only.
OªRDS TEMPº: the radio display will show
the station's name for 5 seconds and
then display only the radio station's
broadcast frequency.
PTY (Program Type)
PTY can be used to search for a certain
program type. Certain areas have a limited
number of stations that transmit RDS. Many
stations transmit call letters and frequencies
LHA0086
4-30Heater, air conditioner and audio systems
ZX
Page 126 of 263

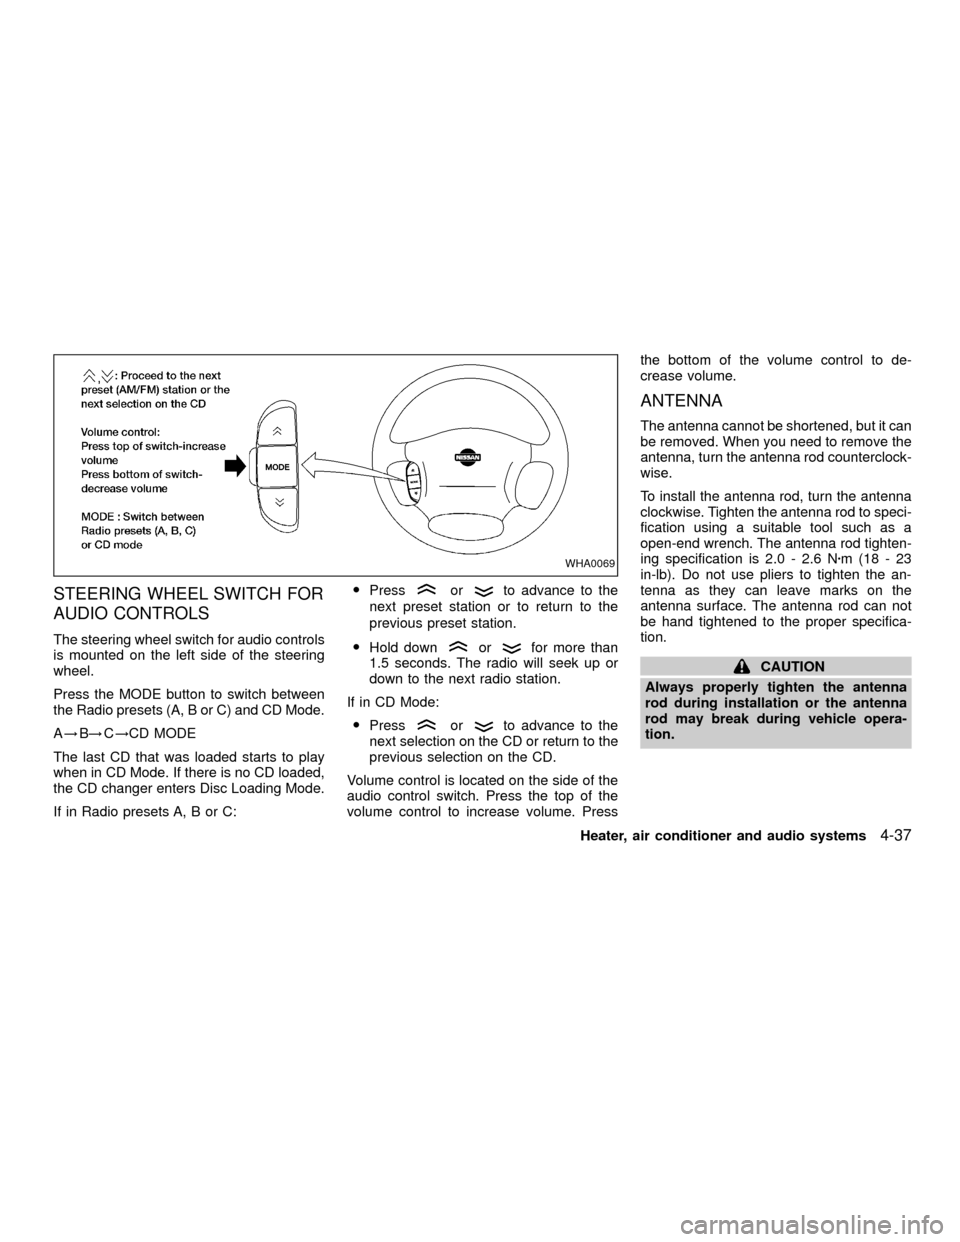
STEERING WHEEL SWITCH FOR
AUDIO CONTROLS
The steering wheel switch for audio controls
is mounted on the left side of the steering
wheel.
Press the MODE button to switch between
the Radio presets (A, B or C) and CD Mode.
A!B!C!CD MODE
The last CD that was loaded starts to play
when in CD Mode. If there is no CD loaded,
the CD changer enters Disc Loading Mode.
If in Radio presets A, B or C:OPress
orto advance to the
next preset station or to return to the
previous preset station.
OHold down
orfor more than
1.5 seconds. The radio will seek up or
down to the next radio station.
If in CD Mode:
OPress
orto advance to the
next selection on the CD or return to the
previous selection on the CD.
Volume control is located on the side of the
audio control switch. Press the top of the
volume control to increase volume. Pressthe bottom of the volume control to de-
crease volume.
ANTENNA
The antenna cannot be shortened, but it can
be removed. When you need to remove the
antenna, turn the antenna rod counterclock-
wise.
To install the antenna rod, turn the antenna
clockwise. Tighten the antenna rod to speci-
fication using a suitable tool such as a
open-end wrench. The antenna rod tighten-
ing specification is 2.0 - 2.6 Nzm(18-23
in-lb). Do not use pliers to tighten the an-
tenna as they can leave marks on the
antenna surface. The antenna rod can not
be hand tightened to the proper specifica-
tion.
CAUTION
Always properly tighten the antenna
rod during installation or the antenna
rod may break during vehicle opera-
tion.
WHA0069
Heater, air conditioner and audio systems4-37
ZX
Page 256 of 263

11 Index
A
Air bag (See supplemental restraint
system) ........................................................ 1-9
Air bag warning light .................................. 1-13
Air cleaner housing filter ............................ 8-20
Air conditioner
Air conditioner operation ........................ 4-5
Air conditioner service ............................ 4-9
Air conditioner specification label ....... 10-14
Air conditioner system refrigerant and
lubrication recommendations ................ 10-8
Heater and air conditioner controls ........ 4-3
Air flow charts .............................................. 4-6
Alarm system (See theft warning) ............. 2-12
Anchor point locations ............................... 1-33
Antenna...................................................... 4-37
Anti-lock brake system (ABS).................... 5-24
Anti-lock brake warning light ....................... 2-8
Ashtray (See cigarette lighter and
ashtray) ...................................................... 2-20
Audio system
FM-AM radio with cassette player and
compact disc (CD) player ..................... 4-17
FM-AM radio with compact disc (CD)
changer ................................................. 4-24
FM-AM radio with compact disc (CD)
player .................................................... 4-10
Steering wheel audio control switch ..... 4-37Auto-lock free-running hubs ...................... 5-19
Automatic
Automatic power window switch .......... 2-27
Automatic transmission fluid (ATF)....... 8-13
Driving with automatic transmission ....... 5-9
Transmission selector lever lock
release .................................................. 5-12
B
Battery........................................................ 8-16
Battery replacement (See multi-remote
control system) ............................................ 3-7
Before starting the engine ........................... 5-8
Belts (See drive belts) ............................... 8-18
Brake
Anti-lock brake system (ABS) .............. 5-24
Brake booster ....................................... 8-25
Brake fluid ................................... 10-3, 8-15
Brake pedal .......................................... 8-24
Brake system ........................................ 5-23
Brake warning light ................................. 2-8
Brake wear indicators .................. 2-11, 8-25
Parking brake check ............................. 8-24
Parking brake operation ....................... 5-14
Break-in schedule ...................................... 5-17
Bulb check/instrument panel ....................... 2-7C
Capacities and recommended fuel/
lubricants.................................................... 10-2
Car phone or CB radio .............................. 4-38
Cargo (See vehicle loading
information) .............................................. 10-15
Check engine indicator light
(See malfunction indicator light) ................ 2-11
Child restraint with top tether strap ........... 1-32
Child restraints ........................................... 1-22
Child safety rear door lock .......................... 3-4
Cigarette lighter (accessory) and
ashtray ....................................................... 2-20
Cleaning exterior and interior ...................... 7-2
Clock .......................................................... 4-12
Clutch
Clutch fluid ............................................ 8-15
Clutch pedal.......................................... 8-26
Cold weather driving .................................. 5-25
Controls
Audio controls (steering wheel) ............ 4-37
Heater and air conditioner controls ........ 4-3
Coolant
Capacities and recommended fuel/
lubricants .............................................. 10-2
Changing engine coolant........................ 8-6
Checking engine coolant level ............... 8-5
ZX