2001 NISSAN XTERRA battery
[x] Cancel search: batteryPage 128 of 263

5 Starting and driving
Precautions when starting and driving ...................5-2
Exhaust gas (carbon monoxide) .......................5-2
Three-way catalyst ............................................5-3
On-pavement and off-road driving
precautions ........................................................5-3
Avoiding collision and rollover ...........................5-3
Drinking alcohol/drugs and driving ....................5-4
Driving safety precautions .................................5-4
Ignition switch .........................................................5-6
Automatic transmission .....................................5-6
Manual transmission..........................................5-7
Key positions .....................................................5-7
Before starting the engine ......................................5-8
Starting the engine .................................................5-8
Driving the vehicle ..................................................5-9
Automatic transmission (if so equipped) ...........5-9
Manual transmission........................................5-13
Parking brake .......................................................5-14
Cruise control (if so equipped) .............................5-15
Precautions on cruise control ..........................5-15
Cruise control operations ................................5-16Break-in schedule ................................................5-17
Increasing fuel economy ......................................5-17
Using four-wheel drive .........................................5-18........................5-18
Transfer case shifting procedures ...................5-18
Auto-lock free-running hubs ............................5-19
Parking/parking on hills ........................................5-22
Power steering .....................................................5-23
Brake system........................................................5-23
Braking precautions .........................................5-23
Anti-lock brake system (ABS) .........................5-24
Cold weather driving ............................................5-25
Freeing a frozen door lock ..............................5-25
Anti-freeze .......................................................5-25
Battery .............................................................5-25
Draining of coolant water ................................5-25
Tire equipment.................................................5-26
Special winter equipment ................................5-26
Driving on snow or ice.....................................5-26
Engine block heater (if so equipped) ..............5-27
ZX
Page 133 of 263

correctly could result in loss of con-
trol and/or a rollover accident.
OAlways use tires of the same type,
size, brand, construction (bias, bias
belted or radial), and tread pattern
on all four wheels. Install tire chains
on the rear wheels when driving on
slippery roads and drive carefully.
OBe sure to check the brakes immedi-
ately after driving in mud or water.
See ``Brake system'' later in this sec-
tion for ``Wet brakes''.
OAvoid parking your vehicle on steep
hills. If you get out of the vehicle and
it rolls forward, backward or side-
ways, you could be injured.
OWhenever you drive off-road
through sand, mud or water as deep
as the wheel hub, more frequent
maintenance may be required. See
``Periodic maintenance'' in the
``Maintenance'' section of this
manual.
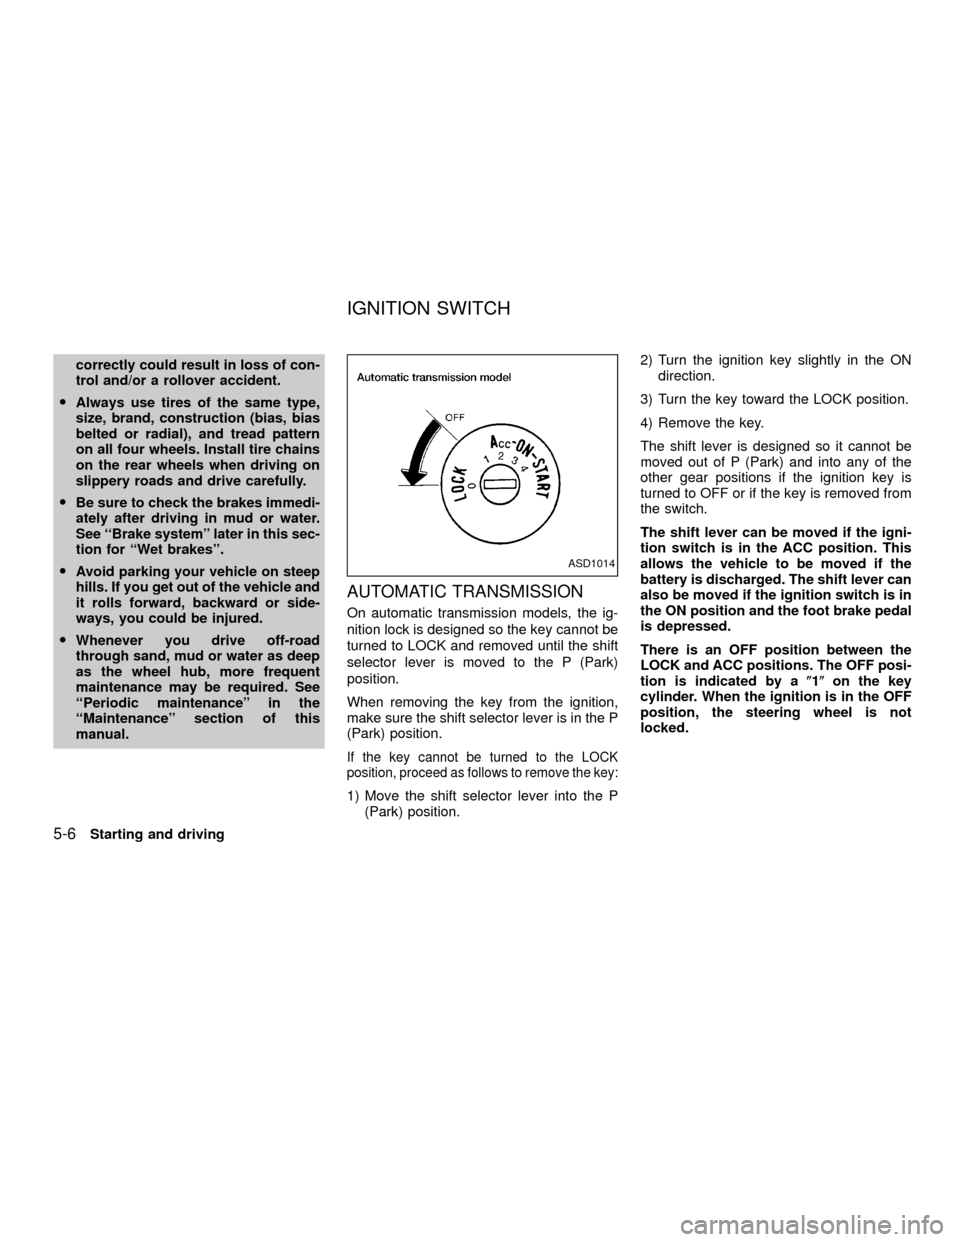
AUTOMATIC TRANSMISSION
On automatic transmission models, the ig-
nition lock is designed so the key cannot be
turned to LOCK and removed until the shift
selector lever is moved to the P (Park)
position.
When removing the key from the ignition,
make sure the shift selector lever is in the P
(Park) position.
If the key cannot be turned to the LOCK
position, proceed as follows to remove the key:
1) Move the shift selector lever into the P
(Park) position.2) Turn the ignition key slightly in the ON
direction.
3) Turn the key toward the LOCK position.
4) Remove the key.
The shift lever is designed so it cannot be
moved out of P (Park) and into any of the
other gear positions if the ignition key is
turned to OFF or if the key is removed from
the switch.
The shift lever can be moved if the igni-
tion switch is in the ACC position. This
allows the vehicle to be moved if the
battery is discharged. The shift lever can
also be moved if the ignition switch is in
the ON position and the foot brake pedal
is depressed.
There is an OFF position between the
LOCK and ACC positions. The OFF posi-
tion is indicated by a(1(on the key
cylinder. When the ignition is in the OFF
position, the steering wheel is not
locked.
ASD1014
IGNITION SWITCH
5-6Starting and driving
ZX
Page 137 of 263

The shift lever cannot be moved out of P
(Park) and into any of the other gear
positions if the ignition key is turned to
LOCK or if the key is removed.
The shift lever can be moved if the igni-
tion switch is in the ACC or OFF position
without depressing the foot brake pedal.
This allows the vehicle to be moved if the
battery is discharged.
Shifting
Push the button to shift into P (Park), R
(Reverse) or from D (Drive) to 2. All other
positions can be selected without pushing
the button.
P (Park)
Use this selector position when the vehicle
is parked or when starting the engine. Al-
ways be sure the vehicle is at a complete
stop. For maximum safety, depress the
brake pedal, then push in the shift lever
button and move the lever to the P (Park)
position. Apply the parking brake. Whenparking on a hill, apply the parking brake
first, then shift the lever into the P (Park)
position.
Shifting from P (Park)
If the ignition switch is in the ON position
and the foot brake pedal is depressed, but
the shift selector lever still cannot be moved
out of P (Park), follow these instructions.
1. Turn the ignition key to the LOCK posi-
tion.
2. Apply the parking brake.
ASD1024
5-10Starting and driving
ZX
Page 139 of 263

Shift lock release
If the battery charge is low, the selector
lever may not be moved from the P position
even with the brake pedal depressed and
the selector lever button pushed.
To move the selector lever, push the shift
lock release and selector lever button. The
selector lever can be moved to N (Neutral).
To push the shift lock release, complete the
following procedure:
1. Turn the ignition key to the lock position
and remove the key.
2. Apply the parking brake.
3. Remove the shift lock release cover.
4. Insert a small screwdriver in the shift lock
release slot, and push down.
5. Push the selector lever button and move
the selector lever to N (Neutral) position
while holding down the shift lock release.
6. Start the engine.
If the selector lever cannot be moved out of
P (Park), take your vehicle to an authorized
NISSAN dealership as soon as possible.
Accelerator downshift
In D position
For rapid passing or hill climbing while driv-
ing, fully depress the accelerator pedal to
the floor. This shifts the transmission down
into second gear or first gear, depending on
the vehicle speed.
Overdrive switch
ON: With the engine running and the se-
lector lever in the D (Drive) position,
the transmission upshifts into OVER-
DRIVE as vehicle speed increases.
OVERDRIVE does not engage until the
engine has reached operating tempera-
ture.
OFF: For driving up and down long slopes
where engine braking is necessary
push the OVERDRIVE switch once.
The O/D OFF indicator light in the
instrument panel comes on at this time.
ASD1023
5-12Starting and driving
ZX
Page 152 of 263

WARNING
OThe anti-lock brake system is a
sophisticated device, but it cannot
prevent accidents resulting from
careless or dangerous driving tech-
niques. It can help maintain vehicle
control under braking on slippery
surfaces, but remember that the
stopping distance on slippery sur-
faces will be longer than on normal
surfaces even with the anti-lock
brake system. Stopping distances
may also be longer on rough, gravel,
or snow covered roads, or if you are
using tire chains. Always maintain a
safe distance from the vehicle in
front of you. Ultimately, the respon-
sibility for safety of self and others
rests in the hands of the driver.
Tire type and condition may also affect
braking effectiveness.
OWhen replacing tires, install the
specified tire size on all four wheels.
OWhen installing a spare tire, make
sure it is the proper size and type as
specified on the tire placard. For tireplacard location information refer to
``Tire placard'' in the ``Technical and
consumer information'' section of
this manual.FREEING A FROZEN DOOR
LOCK
To prevent a door lock from freezing, apply
de-icer or glycerin through the key hole. If
the lock becomes frozen, heat the key be-
fore inserting it in the key hole.
ANTI-FREEZE
In the winter when it is anticipated that the
temperature will drop below 32ÉF (0ÉC),
check anti-freeze (ethylene glycol base) to
assure proper winter protection. For details,
see ``Engine cooling system'' in the ``Do-it-
yourself'' section of this manual.
BATTERY
If the battery is not fully charged during
extremely cold weather conditions, the bat-
tery fluid may freeze and damage the bat-
tery. To maintain maximum efficiency, the
battery should be checked regularly. For
details, see ``Battery'' in the ``Do-it-yourself''
section of this manual.
DRAINING OF COOLANT WATER
If the vehicle is to be left outside without
anti-freeze, drain the cooling system by open-
ing the drain valves located under the radiator
COLD WEATHER DRIVING
Starting and driving5-25
ZX
Page 163 of 263

COLD pressure:
After vehicle has been parked for three
hours or more or driven less than 1 mile
(1.6 km).
COLD tire pressures are shown on the
tire placard affixed to the inside of the
glove box lid.
ORetighten the wheel nuts when the
vehicle has been driven for 600 miles
(1,000 km) (also in cases of a flat tire,
etc.).
5. Securely store the flat tire and jacking
equipment in the vehicle.
WARNING
Always make sure that the spare tire
and jacking equipment are properly se-
cured after use. Such items can be-
come dangerous projectiles in an acci-
dent or sudden stop.To start your engine with a booster battery,
the instructions and precautions below must
be followed.
WARNING
OIf done incorrectly, jump starting can
lead to a battery explosion, resulting
in severe injury or death. It could
also damage your vehicle.
OExplosive hydrogen gas is always
present in the vicinity of the battery.
Keep all sparks and flames away
from the battery.
ODo not allow battery fluid to come
into contact with eyes, skin, clothing
or painted surfaces. Battery fluid is a
corrosive sulphuric acid solution
which can cause severe burns. If the
fluid should come into contact with
anything, immediately flush the con-
tacted area with water.
OKeep battery out of the reach of
children.
OThe booster battery must be rated at
12 volts. Use of an improperly rated
battery can damage your vehicle.OYour vehicle has and automatic en-
gine cooling fan. It could come on at
any time. Keep hands and other ob-
jects away from it.
OWhenever working on or near a bat-
tery, always wear suitable eye pro-
tectors (for example, goggles or in-
dustrial safety spectacles) and
remove rings, metal bands, or any
other jewelry. Do not lean over the
battery when jump starting.
ODo not attempt to jump start a frozen
battery. It could explode and cause
serious injury.
WARNING
Always follow the instructions be-
low. Failure to do so could result in
damage to the charging system and
cause personal injury.
1.
If the booster battery is in another vehicle,
position the two vehicles to bring their
batteries into close proximity to each other.
Do not allow the two vehicles to touch.
2. Apply the parking brake. Move the shift
selector lever to N (Neutral) (on auto-
JUMP STARTING
6-8In case of emergency
ZX
Page 164 of 263

matic transmission models, move the
lever to P (Park)). Switch off all unneces-
sary electrical systems (lights, heater, air
conditioner, etc.).
3. Remove vent caps on the battery (if so
equipped). Cover the battery with an old
cloth to reduce explosion hazard.
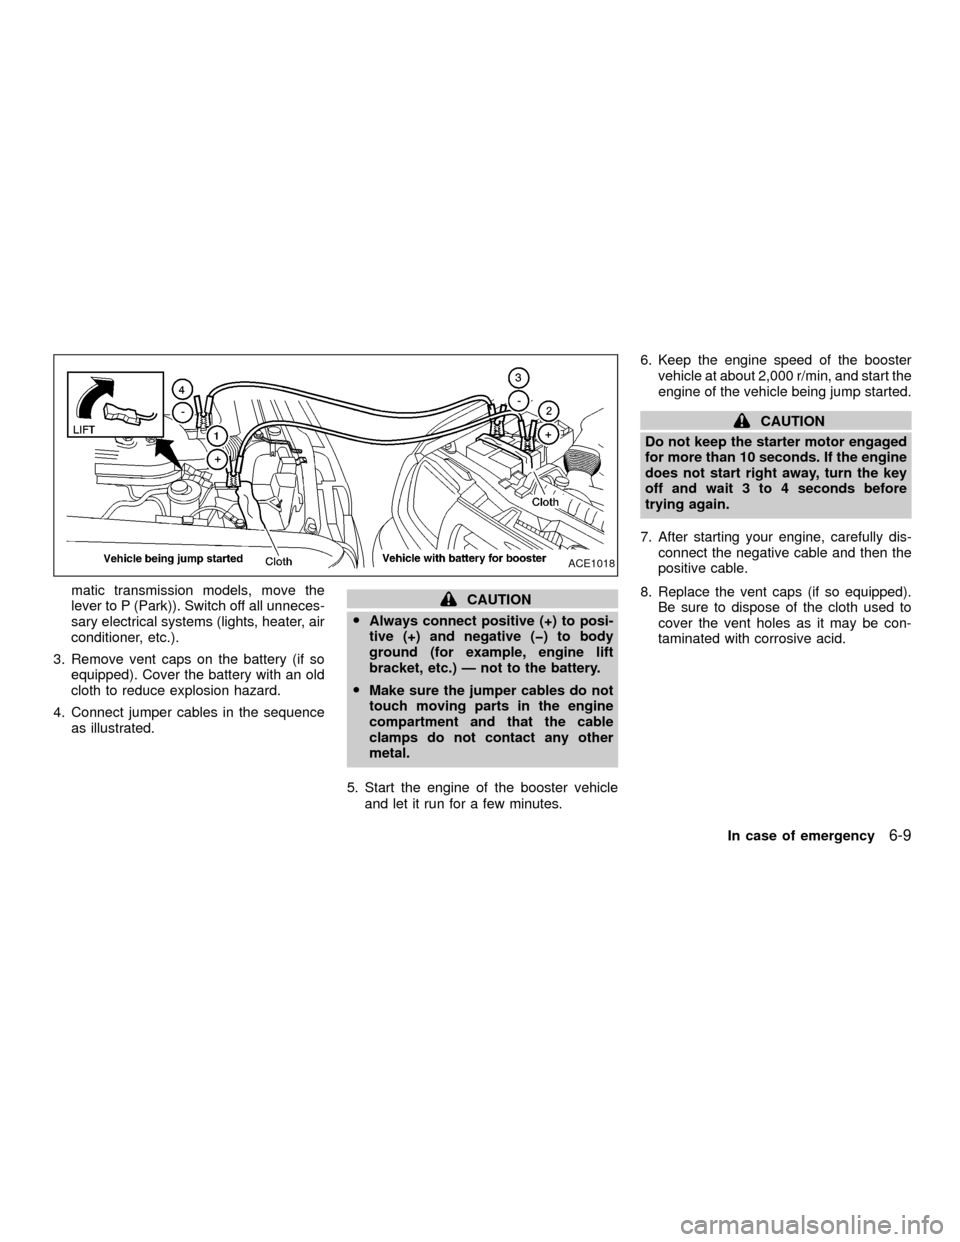
4. Connect jumper cables in the sequence
as illustrated.CAUTION
OAlways connect positive (+) to posi-
tive (+) and negative (þ) to body
ground (for example, engine lift
bracket, etc.) Ð not to the battery.
OMake sure the jumper cables do not
touch moving parts in the engine
compartment and that the cable
clamps do not contact any other
metal.
5. Start the engine of the booster vehicle
and let it run for a few minutes.6. Keep the engine speed of the booster
vehicle at about 2,000 r/min, and start the
engine of the vehicle being jump started.
CAUTION
Do not keep the starter motor engaged
for more than 10 seconds. If the engine
does not start right away, turn the key
off and wait 3 to 4 seconds before
trying again.
7. After starting your engine, carefully dis-
connect the negative cable and then the
positive cable.
8. Replace the vent caps (if so equipped).
Be sure to dispose of the cloth used to
cover the vent holes as it may be con-
taminated with corrosive acid.
ACE1018
In case of emergency6-9
ZX
Page 176 of 263

8 Do-it-yourself
Maintenance precautions .......................................8-2
Engine compartment check locations ....................8-3
Engine cooling system ...........................................8-5
Checking engine coolant level ..........................8-5
Changing engine coolant ..................................8-6
Engine oil ...............................................................8-9
Checking engine oil level ..................................8-9
Changing engine oil ........................................8-10
Changing engine oil filter.................................8-12
Automatic transmission fluid ................................8-13
Temperature conditions for checking ..............8-13
Power steering fluid..............................................8-14
Brake and clutch fluid...........................................8-15
Window washer fluid ............................................8-16
Window washer fluid reservoir ........................8-16
Battery ..................................................................8-16
Jump starting ...................................................8-17
Drive belts ............................................................8-18
Spark plugs ..........................................................8-19
Replacing spark plugs .....................................8-19
Air cleaner ............................................................8-20Windshield wiper blades ......................................8-22
Cleaning ..........................................................8-22
Replacing .........................................................8-22
Parking brake and brake pedal ............................8-24
Checking parking brake...................................8-24
Checking brake pedal .....................................8-24
Brake booster ..................................................8-25
Clutch pedal .........................................................8-26
Checking clutch pedal .....................................8-26
Fuses ....................................................................8-27
Passenger compartment .................................8-27
Multi-remote controller battery replacement ........8-28
Lights ....................................................................8-29
Headlights ........................................................8-29
Fog lights (if so equipped)...............................8-31
Exterior and interior lights ...............................8-32
Wheels and tires ..................................................8-34
Tire pressure ...................................................8-34
Types of tires ...................................................8-34
Tire chains .......................................................8-35
Changing wheels and tires ..............................8-36
ZX