2001 NISSAN XTERRA ESP
[x] Cancel search: ESPPage 23 of 263
CHILD SAFETY
Children need adults to help protect them.
They need to be properly restrained.
The proper restraint depends on the child's
size. Generally, infants up to about 1 year
and less than 20 pounds (9 kg) should be
placed in rear facing child restraints. Front
facing child restraints are available for chil-
dren who outgrow rear facing child re-
straints.
WARNING
OInfants and children need special
protection. The vehicle's seat belts
may not fit them properly. The shoul-
der belt may come too close to the
face or neck. The lap belt may not fit
over their small hip bones. In an
accident, an improperly fitting seat
belt could cause serious or fatal in-
jury. Always use appropriate child
restraints.
All U.S. states and Canadian provinces or
territories require the use of approved child
restraints for infants and small children. See
``Child restraints'' later in this section for
more information.In addition, there are many types of child
restraints available for larger children which
should be used for maximum protection.
NISSAN recommends that all pre-teen
children be restrained in the rear seat if
possible. According to accident statis-
tics, children are safer when properly
restrained in the rear seat than in the
front seat.
This is especially important because
your vehicle has a supplemental re-
straint system (Supplemental air bag
system) for the front passenger (For pre-
cautions, see ``Supplemental restraint
system'' earlier in this section).
Infants and small children
NISSAN recommends that infants and small
children be seated in child restraints that
comply with Federal Motor Vehicle Safety
Standards or Canadian Motor Vehicle
Safety Standards. You should choose a
child restraint which fits your vehicle and
always follow the manufacturer's instruc-
tions for installation and use.
Larger children
Children who are too large for child re-
straints should be seated and restrained by
the seat belts which are provided.
If the child's seating position has a shoulder
belt that fits close to the face or neck, the
use of a booster seat (commercially avail-
able) may help overcome this. The booster
seat should raise the child so the shoulder
belt is properly positioned across the top,
middle portion of the shoulder and the lap
belt is low on the hips. The booster seat
should fit the vehicle seat and have a label
certifying that it complies with Federal Motor
Vehicle Safety Standards or Canadian Mo-
tor Vehicle Safety Standards. Once the child
has grown so the shoulder belt is no longer
on or near the face and neck, use the
shoulder belt without the booster seat.
WARNING
Never let a child stand or kneel on any
seat and do not allow a child in the
cargo areas while the vehicle is moving.
The child could be seriously injured or
killed in an accident or sudden stop.
1-16Seats, restraints and supplemental air bag systems
ZX
Page 69 of 263
ODo not leave children unattended in-
side the vehicle. They could unknow-
ingly activate switches or controls
and become trapped in a window.
Unattended children could become
involved in serious accidents.
The power windows operate when the igni-
tion key is in the ON position, or for 45
seconds after the ignition key is turned to
the OFF position. If the driver's or passen-
ger's door is opened during this 45 second
period, power to the windows is cancelled.
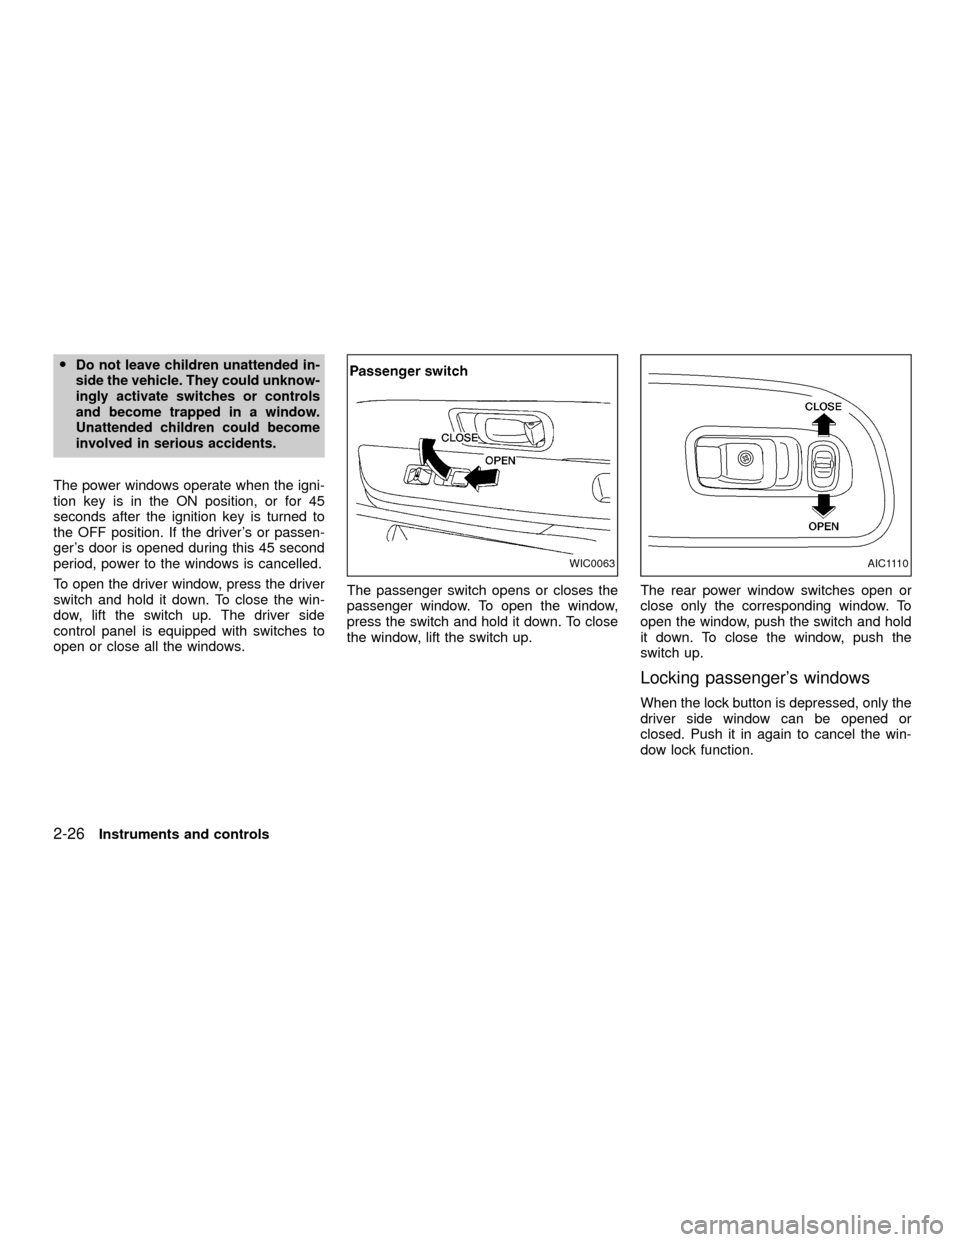
To open the driver window, press the driver
switch and hold it down. To close the win-
dow, lift the switch up. The driver side
control panel is equipped with switches to
open or close all the windows.The passenger switch opens or closes the
passenger window. To open the window,
press the switch and hold it down. To close
the window, lift the switch up.The rear power window switches open or
close only the corresponding window. To
open the window, push the switch and hold
it down. To close the window, push the
switch up.
Locking passenger's windows
When the lock button is depressed, only the
driver side window can be opened or
closed. Push it in again to cancel the win-
dow lock function.
WIC0063AIC1110
2-26Instruments and controls
ZX
Page 136 of 263

OIf the engine is very hard to start in
extremely cold or hot weather, depress
the accelerator pedal fully and hold it
to help start the engine.
OIn the summer, when restarting the
engine within 30 minutes after it has
been stopped, keep the accelerator
pedal fully depressed while starting.
CAUTION
Do not operate the starter for more than
15 seconds at a time. If the engine does
not start, turn the key off and wait 10
seconds before cranking again, other-
wise the starter could be damaged.
4.Warm-up
Always allow the engine to idle for at
least 30 seconds after starting. Drive at a
moderate speed for a short distance first,
especially in cold weather.
AUTOMATIC TRANSMISSION (if
so equipped)
WARNING
ODo not depress the accelerator pedal
while shifting from P (Park) or N
(Neutral) to R (Reverse), D (Drive), 2
or 1. Always depress the brake pedal
until shifting is completed. Failure to
do so could cause you to lose con-
trol and have an accident.
OCold engine idle speed is high, so
use caution when shifting into a for-
ward or reverse gear before the en-
gine has warmed up.
ONever shift to P (Park) or R (Reverse)
while the vehicle is moving. This
could cause an accident.
CAUTION
OWhen stopping the vehicle on an
uphill grade, do not hold the vehicle
by depressing the accelerator pedal.
The foot brake should be used for
this purpose.
OOn slippery roads, do not downshift.
This may cause a loss of control.The automatic transmission in your vehicle
is electronically controlled by a transmission
control module to produce maximum power
and smooth operation.
The recommended operating procedures for
this transmission are shown on the following
pages. Follow these procedures for maximum
vehicle performance and driving enjoyment.
Starting the vehicle
OAfter starting the engine, fully depress
the foot brake pedal to ensure the ve-
hicle is at a complete stop before at-
tempting to shift the selector lever.
OKeep the foot brake pedal depressed
and shift the selector lever into a driving
gear.
ORelease the foot brake, then gradually
start the vehicle in motion.
This automatic transmission is designed
so the foot brake pedal MUST be de-
pressed before shifting from P (Park) to
any drive position while the ignition
switch is ON.
DRIVING THE VEHICLE
Starting and driving5-9
ZX
Page 150 of 263
verse) position. When parking on an up-
hill grade, place the gearshift lever in the
1st position.
Automatic transmission models:
Move the gearshift lever to the P (Park)
position.
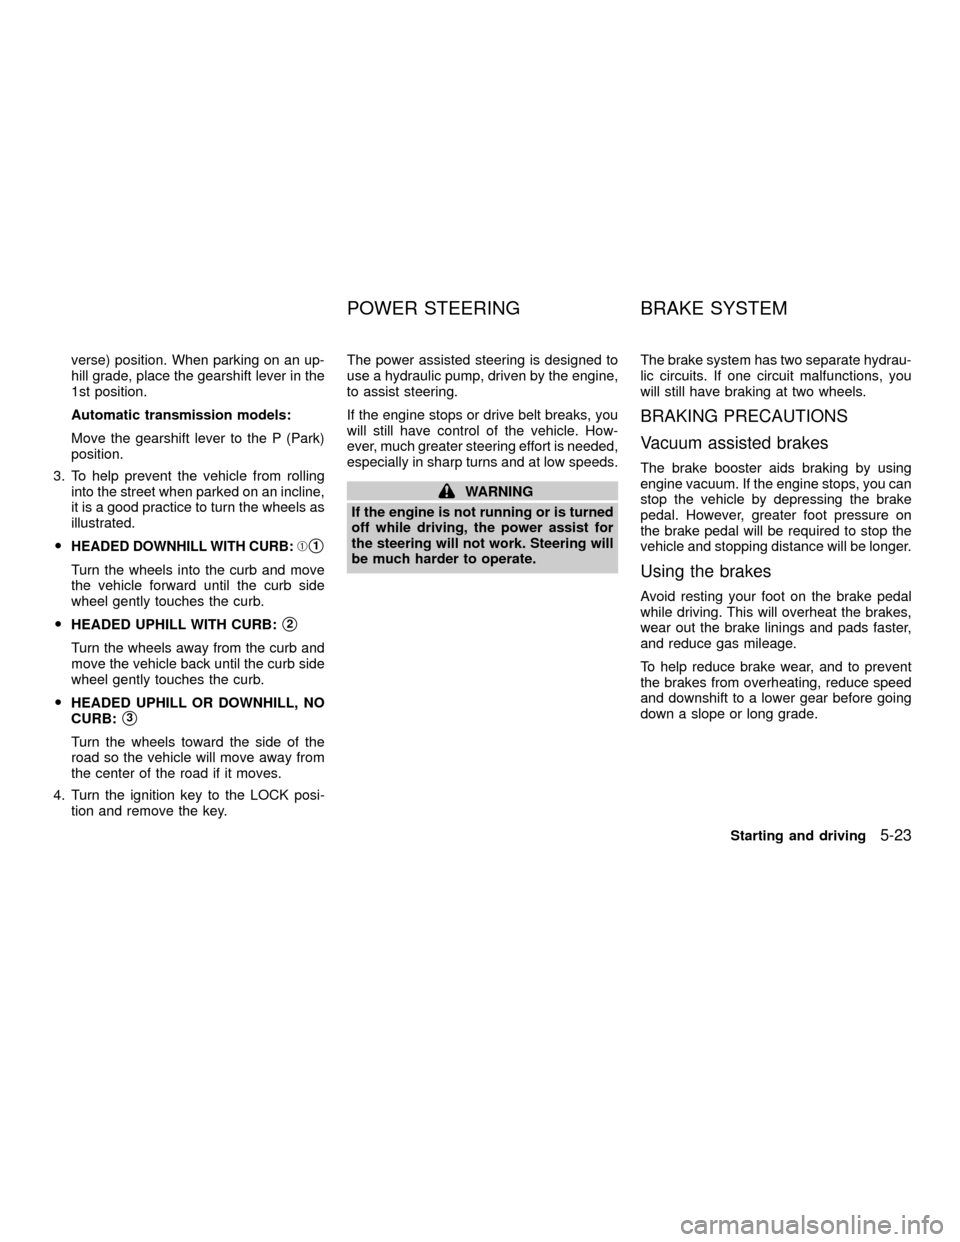
3. To help prevent the vehicle from rolling
into the street when parked on an incline,
it is a good practice to turn the wheels as
illustrated.
O
HEADED DOWNHILL WITH CURB:Às1
Turn the wheels into the curb and move
the vehicle forward until the curb side
wheel gently touches the curb.
OHEADED UPHILL WITH CURB:
s2
Turn the wheels away from the curb and
move the vehicle back until the curb side
wheel gently touches the curb.
OHEADED UPHILL OR DOWNHILL, NO
CURB:
s3
Turn the wheels toward the side of the
road so the vehicle will move away from
the center of the road if it moves.
4. Turn the ignition key to the LOCK posi-
tion and remove the key.The power assisted steering is designed to
use a hydraulic pump, driven by the engine,
to assist steering.
If the engine stops or drive belt breaks, you
will still have control of the vehicle. How-
ever, much greater steering effort is needed,
especially in sharp turns and at low speeds.
WARNING
If the engine is not running or is turned
off while driving, the power assist for
the steering will not work. Steering will
be much harder to operate.The brake system has two separate hydrau-
lic circuits. If one circuit malfunctions, you
will still have braking at two wheels.
BRAKING PRECAUTIONS
Vacuum assisted brakes
The brake booster aids braking by using
engine vacuum. If the engine stops, you can
stop the vehicle by depressing the brake
pedal. However, greater foot pressure on
the brake pedal will be required to stop the
vehicle and stopping distance will be longer.
Using the brakes
Avoid resting your foot on the brake pedal
while driving. This will overheat the brakes,
wear out the brake linings and pads faster,
and reduce gas mileage.
To help reduce brake wear, and to prevent
the brakes from overheating, reduce speed
and downshift to a lower gear before going
down a slope or long grade.
POWER STEERING BRAKE SYSTEM
Starting and driving5-23
ZX
Page 152 of 263
WARNING
OThe anti-lock brake system is a
sophisticated device, but it cannot
prevent accidents resulting from
careless or dangerous driving tech-
niques. It can help maintain vehicle
control under braking on slippery
surfaces, but remember that the
stopping distance on slippery sur-
faces will be longer than on normal
surfaces even with the anti-lock
brake system. Stopping distances
may also be longer on rough, gravel,
or snow covered roads, or if you are
using tire chains. Always maintain a
safe distance from the vehicle in
front of you. Ultimately, the respon-
sibility for safety of self and others
rests in the hands of the driver.
Tire type and condition may also affect
braking effectiveness.
OWhen replacing tires, install the
specified tire size on all four wheels.
OWhen installing a spare tire, make
sure it is the proper size and type as
specified on the tire placard. For tireplacard location information refer to
``Tire placard'' in the ``Technical and
consumer information'' section of
this manual.FREEING A FROZEN DOOR
LOCK
To prevent a door lock from freezing, apply
de-icer or glycerin through the key hole. If
the lock becomes frozen, heat the key be-
fore inserting it in the key hole.
ANTI-FREEZE
In the winter when it is anticipated that the
temperature will drop below 32ÉF (0ÉC),
check anti-freeze (ethylene glycol base) to
assure proper winter protection. For details,
see ``Engine cooling system'' in the ``Do-it-
yourself'' section of this manual.
BATTERY
If the battery is not fully charged during
extremely cold weather conditions, the bat-
tery fluid may freeze and damage the bat-
tery. To maintain maximum efficiency, the
battery should be checked regularly. For
details, see ``Battery'' in the ``Do-it-yourself''
section of this manual.
DRAINING OF COOLANT WATER
If the vehicle is to be left outside without
anti-freeze, drain the cooling system by open-
ing the drain valves located under the radiator
COLD WEATHER DRIVING
Starting and driving5-25
ZX
Page 162 of 263
ONever jack up the vehicle more than
necessary.
ONever use blocks on or under the
jack.
ONever use the tool tray as a jacking
surface.
ODo not allow passengers to stay in
the vehicle while it is on the jack.
ODo not start or run engine while
vehicle is on the jack. It may cause
the vehicle to move. This is espe-
cially true for vehicles with limited
slip differential carriers.
WARNING
OIncorrect wheel nuts or improperly
tightened wheel nuts can cause the
wheel to become loose or come off.
This could cause an accident.
ODo not use oil or grease on the wheel
studs or nuts. This could cause the
nuts to become loose.
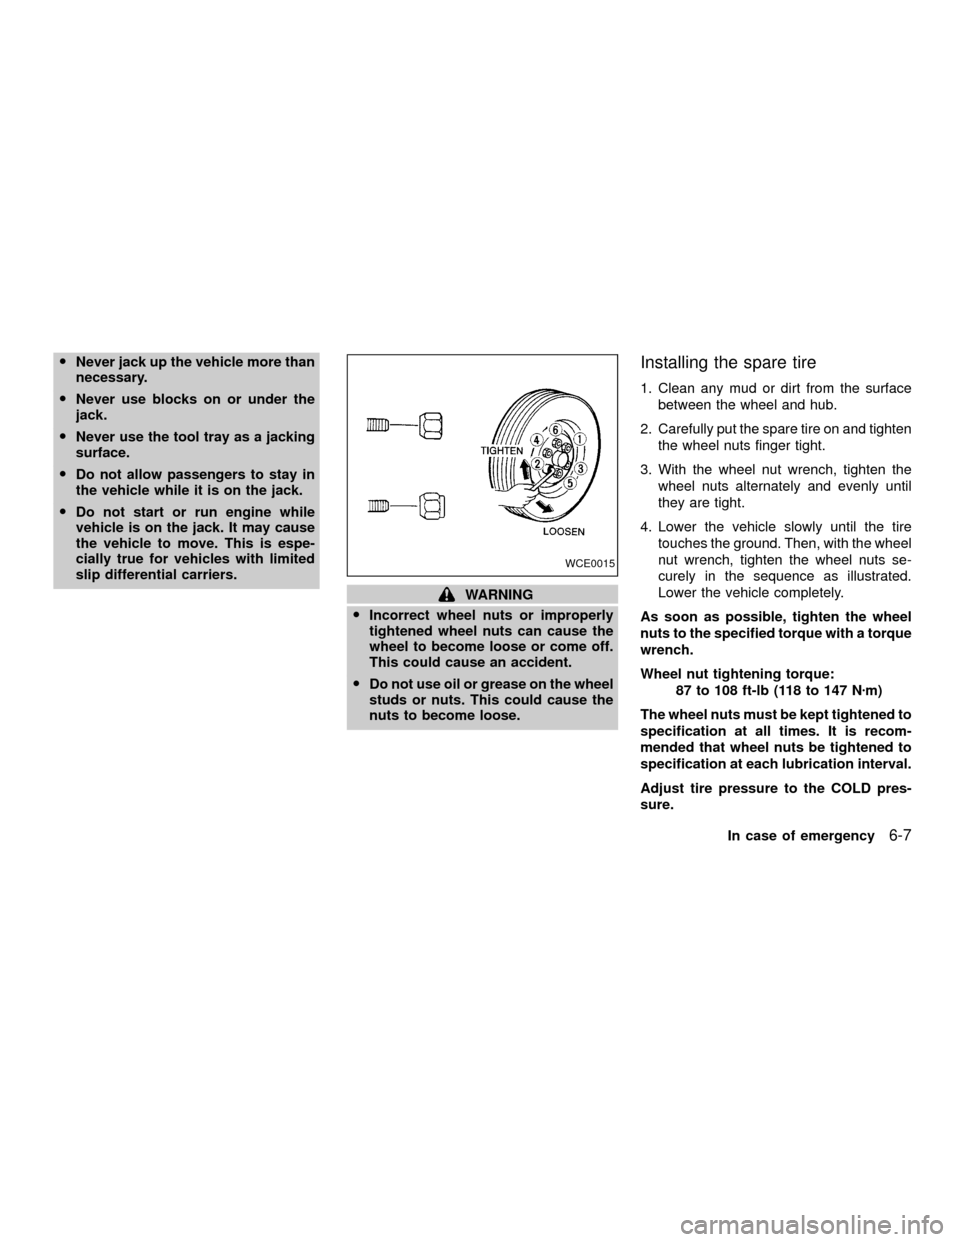
Installing the spare tire
1. Clean any mud or dirt from the surface
between the wheel and hub.
2. Carefully put the spare tire on and tighten
the wheel nuts finger tight.
3. With the wheel nut wrench, tighten the
wheel nuts alternately and evenly until
they are tight.
4. Lower the vehicle slowly until the tire
touches the ground. Then, with the wheel
nut wrench, tighten the wheel nuts se-
curely in the sequence as illustrated.
Lower the vehicle completely.
As soon as possible, tighten the wheel
nuts to the specified torque with a torque
wrench.
Wheel nut tightening torque:
87 to 108 ft-lb (118 to 147 Nzm)
The wheel nuts must be kept tightened to
specification at all times. It is recom-
mended that wheel nuts be tightened to
specification at each lubrication interval.
Adjust tire pressure to the COLD pres-
sure.
WCE0015
In case of emergency6-7
ZX
Page 172 of 263
you in choosing the proper product.
OWax your vehicle only after a thorough
washing. Follow the instructions supplied
with the wax.
ODo not use a wax containing any abra-
sives, cutting compounds or cleaners
that may damage the vehicle finish.
OIf the surface does not polish easily, use
a ``road tar'' remover and wax again.
Machine compounding or aggressive pol-
ishing on a base coat/clear coat paint finish
may dull the finish or leave swirl marks.
REMOVING SPOTS
Remove tar and oil spots, industrial dust,
insects and tree sap as quickly as possible
from the surface of the paint to avoid per-
manent damage or staining. Special clean-
ing products are available at an authorized
NISSAN dealer or any automotive accesso-
ries store.
UNDERBODY
In areas where road salt is used in winter, it
is necessary to clean the underbody regu-
larly in order to prevent dirt and salt from
building up and causing corrosion on theunderbody and suspension. Before the win-
ter period and again in the spring, the
underseal must be checked and, if neces-
sary, retreated.
GLASS
Use glass cleaner to remove smoke and
dust film from the glass surfaces. It is nor-
mal for glass to be coated with a film after
the vehicle is parked in the hot sun. Glass
cleaner and a soft cloth easily remove this
film.
CAUTION
When cleaning the inside of the win-
dow, do not use sharp-edged tools or
abrasive cleaners or chlorine-based
disinfectant cleaners. They could dam-
age the electrical conductors, radio an-
tenna elements or rear window defog-
ger elements.
ALUMINUM ALLOY WHEELS
Wash regularly, especially during winter
months in areas where road salt is used.
Salt could discolor the wheel if not removed.
CHROME PARTS
Clean all chrome parts regularly with a
non-abrasive chrome polish to maintain the
finish.
Appearance and care
7-3
ZX
Page 215 of 263

Your new NISSAN has been designed to
have minimum maintenance requirements
with longer service intervals to save you
both time and money. However, some day-
to-day and regular maintenance is essential
to maintain your NISSAN's good mechani-
cal condition, as well as its emission and
engine performance.
It is the owner's responsibility to make sure
that the specified maintenance, as well as
general maintenance, is performed.
As the vehicle owner, you are the only one
who can ensure that your vehicle receives
proper maintenance. You are a vital link in
the maintenance chain.
General maintenance
General maintenance includes those items
which should be checked during normal
day-to-day operation of the vehicle. They
are essential if your vehicle is to continue to
operate properly. It is your responsibility to
perform these maintenance procedures
regularly as prescribed.
These checks or inspections can be done
by yourself, a qualified technician or, if you
prefer, an authorized NISSAN dealer.Periodic maintenance
The maintenance items listed under peri-
odic maintenance in this section are re-
quired to be serviced at regular intervals.
However, under severe driving conditions,
additional or more frequent maintenance
will be required.
Where to go for service
If maintenance service is required or your
vehicle appears to malfunction, have the
systems checked and tuned by an autho-
rized NISSAN dealer.
NISSAN technicians are well-trained spe-
cialists who and are kept up-to-date with the
latest service information through technical
bulletins, service tips, and in-dealership
training programs. They are completely
qualified to work on NISSAN vehicles
beforethey work on your vehicle, rather
than after they have worked on it.
You can be confident that an authorized
NISSAN dealer's service department per-
forms the best job to meet the maintenance
requirements on your vehicle Ð in a reliable
and economic way.During the normal day-to-day operation of
the vehicle, general maintenance should be
performed regularly as prescribed in this
section. If you detect any unusual sounds,
vibrations or smells, be sure to check for the
cause or have an authorized NISSAN
dealer do it promptly. In addition, you should
notify an authorized NISSAN dealer if you
think that repairs are required.
When performing any checks or mainte-
nance work, closely observe the precau-
tions in the ``Do-it-yourself'' section of this
manual.
EXPLANATION OF MAINTE-
NANCE ITEMS
Additional information on the following
items with ``*'' is found in the ``Do-it-
yourself'' section of this manual.
EXTERIOR MAINTENANCE
Outside the vehicle
The maintenance items listed here should
be performed from time to time, unless
otherwise specified.
Tires*Check the pressure with a gauge
periodically when at a service station, in-
MAINTENANCE
PRECAUTIONSGENERAL MAINTENANCE
9-2Maintenance
ZX