2001 NISSAN X-TRAIL oil
[x] Cancel search: oilPage 3795 of 3833
PERIODIC MAINTENANCE
MA-15
C
D
E
F
G
H
I
J
K
MA
B
MA
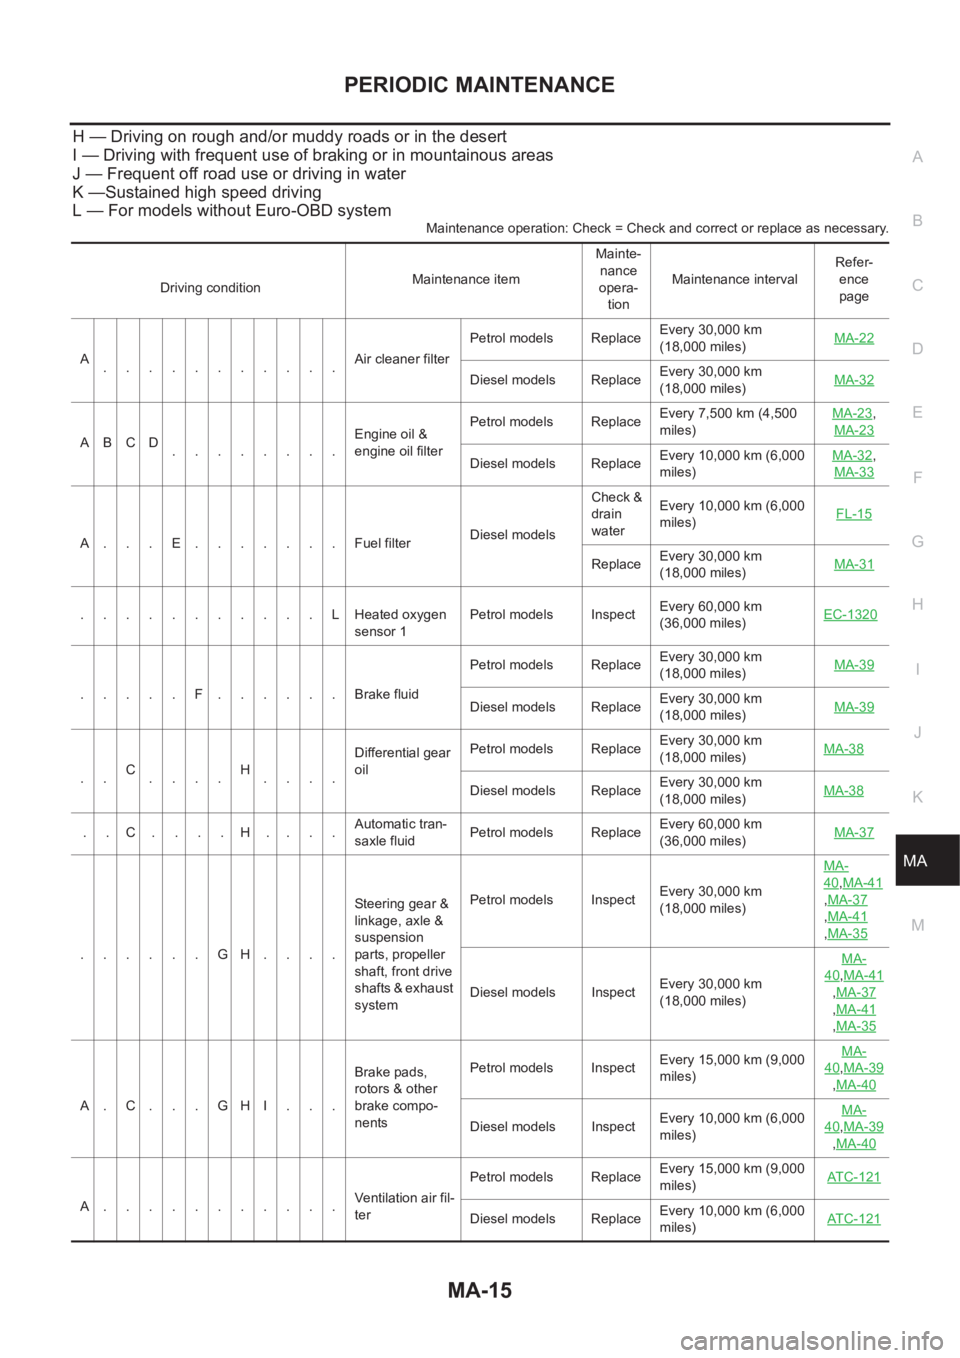
H — Driving on rough and/or muddy roads or in the desert
I — Driving with frequent use of braking or in mountainous areas
J — Frequent off road use or driving in water
K —Sustained high speed driving
L — For models without Euro-OBD system
Maintenance operation: Check = Check and correct or replace as necessary.
Driving conditionMaintenance itemMainte-
nance
opera-
tionMaintenance intervalRefer-
ence
page
A
...........Air cleaner filterPetrol models ReplaceEvery 30,000 km
(18,000 miles) MA-22
Diesel models ReplaceEvery 30,000 km
(18,000 miles) MA-32
ABCD
........Engine oil &
engine oil filter Petrol models ReplaceEvery 7,500 km (4,500
miles) MA-23
,
MA-23
Diesel models ReplaceEvery 10,000 km (6,000
miles) MA-32,
MA-33
A...E.......Fuel filter Diesel models Check &
drain
waterEvery 10,000 km (6,000
miles) FL-15
ReplaceEvery 30,000 km
(18,000 miles) MA-31
...........LHeated oxygen
sensor 1Petrol models InspectEvery 60,000 km
(36,000 miles) EC-1320
.....F......Brake fluidPetrol models ReplaceEvery 30,000 km
(18,000 miles) MA-39Diesel models ReplaceEvery 30,000 km
(18,000 miles) MA-39
..C
....H
....Differential gear
oilPetrol models ReplaceEvery 30,000 km
(18,000 miles) MA-38Diesel models ReplaceEvery 30,000 km
(18,000 miles) MA-38
..C....H....Automatic tran-
saxle fluidPetrol models ReplaceEvery 60,000 km
(36,000 miles) MA-37
......GH....Steering gear &
linkage, axle &
suspension
parts, propeller
shaft, front drive
shafts & exhaust
systemPetrol models InspectEvery 30,000 km
(18,000 miles) MA-
40,MA-41
,MA-37
,MA-41
,MA-35
Diesel models InspectEvery 30,000 km
(18,000 miles) MA-
40,MA-41
,MA-37
,MA-41
,MA-35
A.C...GHI...Brake pads,
rotors & other
brake compo-
nentsPetrol models InspectEvery 15,000 km (9,000
miles) MA-
40,MA-39
,MA-40
Diesel models InspectEvery 10,000 km (6,000
miles) MA-40,MA-39
,MA-40
A...........Ventilation air fil-
terPetrol models ReplaceEvery 15,000 km (9,000
miles) AT C - 1 2 1Diesel models ReplaceEvery 10,000 km (6,000
miles) AT C - 1 2 1
Page 3796 of 3833
MA-16
RECOMMENDED FLUIDS AND LUBRICANTS
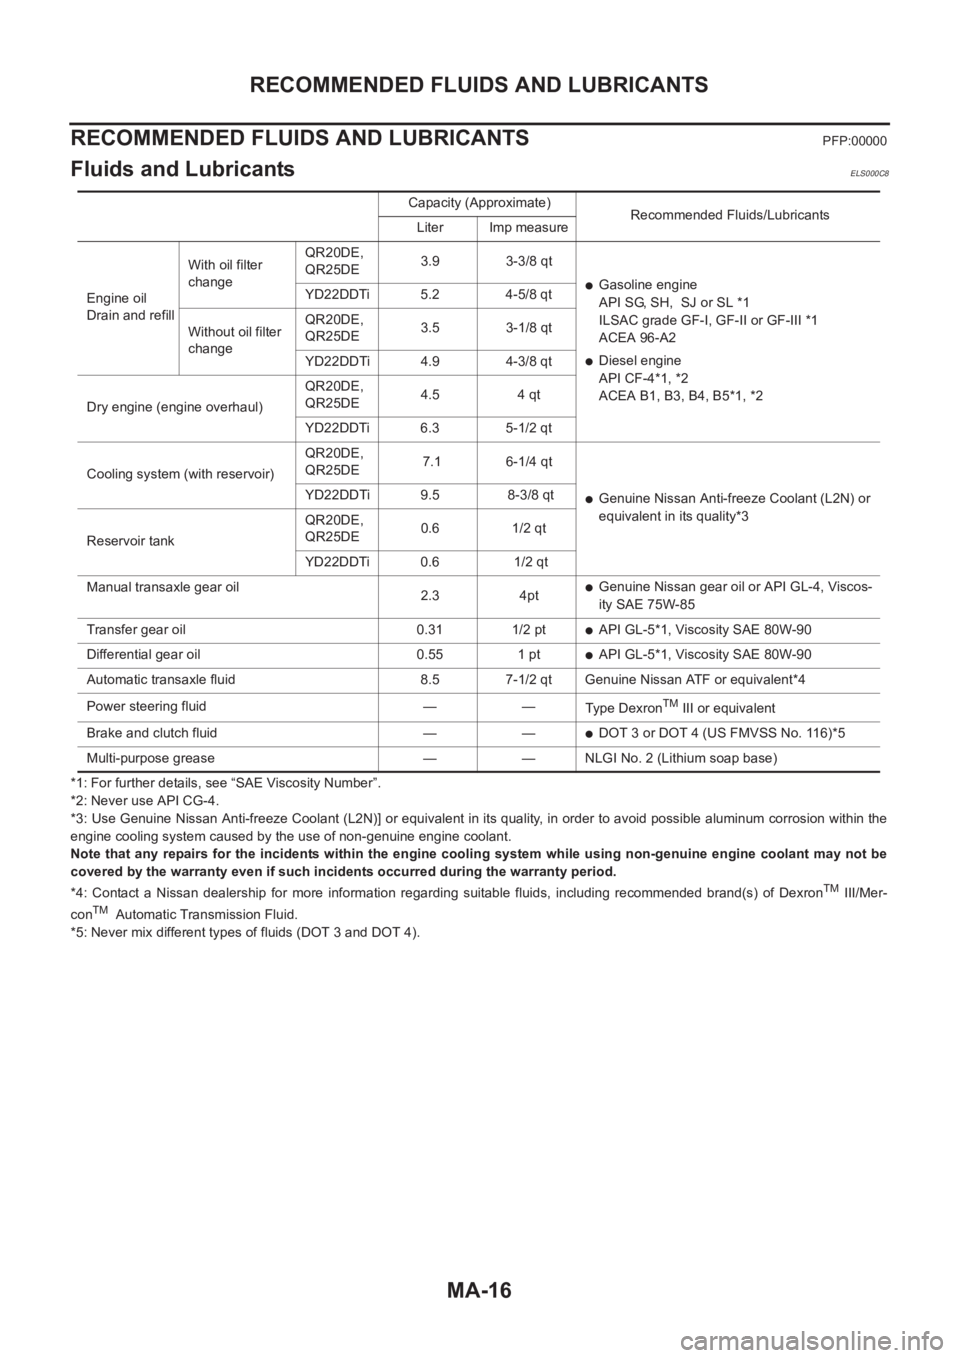
RECOMMENDED FLUIDS AND LUBRICANTS
PFP:00000
Fluids and LubricantsELS000C8
*1: For further details, see “SAE Viscosity Number”.
*2: Never use API CG-4.
*3: Use Genuine Nissan Anti-freeze Coolant (L2N)] or equivalent in its quality, in order to avoid possible aluminum corrosion within the
engine cooling system caused by the use of non-genuine engine coolant.
Note that any repairs for the incidents within the engine cooling system while using non-genuine engine coolant may not be
covered by the warranty even if such incidents occurred during the warranty period.
*4: Contact a Nissan dealership for more information regarding suitable fluids, including recommended brand(s) of Dexron
TM III/Mer-
conTM Automatic Transmission Fluid.
*5: Never mix different types of fluids (DOT 3 and DOT 4).Capacity (Approximate)
Recommended Fluids/Lubricants
Liter Imp measure
Engine oil
Drain and refillWith oil filter
changeQR20DE,
QR25DE3.9 3-3/8 qt
●Gasoline engine
API SG, SH, SJ or SL *1
ILSAC grade GF-I, GF-II or GF-III *1
ACEA 96-A2
●Diesel engine
API CF-4*1, *2
ACEA B1, B3, B4, B5*1, *2 YD22DDTi 5.2 4-5/8 qt
Without oil filter
changeQR20DE,
QR25DE3.5 3-1/8 qt
YD22DDTi 4.9 4-3/8 qt
Dry engine (engine overhaul)QR20DE,
QR25DE4.5 4 qt
YD22DDTi 6.3 5-1/2 qt
Cooling system (with reservoir)QR20DE,
QR25DE 7.1 6-1/4 qt
●Genuine Nissan Anti-freeze Coolant (L2N) or
equivalent in its quality*3 YD22DDTi 9.5 8-3/8 qt
Reservoir tankQR20DE,
QR25DE0.6 1/2 qt
YD22DDTi 0.6 1/2 qt
Manual transaxle gear oil
2.3 4pt
●Genuine Nissan gear oil or API GL-4, Viscos-
ity SAE 75W-85
Transfer gear oil 0.31 1/2 pt
●API GL-5*1, Viscosity SAE 80W-90
Differential gear oil 0.55 1 pt
●API GL-5*1, Viscosity SAE 80W-90
Automatic transaxle fluid 8.5 7-1/2 qt Genuine Nissan ATF or equivalent*4
Power steering fluid — —
Type Dexron
TM III or equivalent
Brake and clutch fluid — —
●DOT 3 or DOT 4 (US FMVSS No. 116)*5
Multi-purpose grease — — NLGI No. 2 (Lithium soap base)
Page 3803 of 3833
ENGINE MAINTENANCE (QR20DE·QR25DE)
MA-23
C
D
E
F
G
H
I
J
K
MA
B
MA
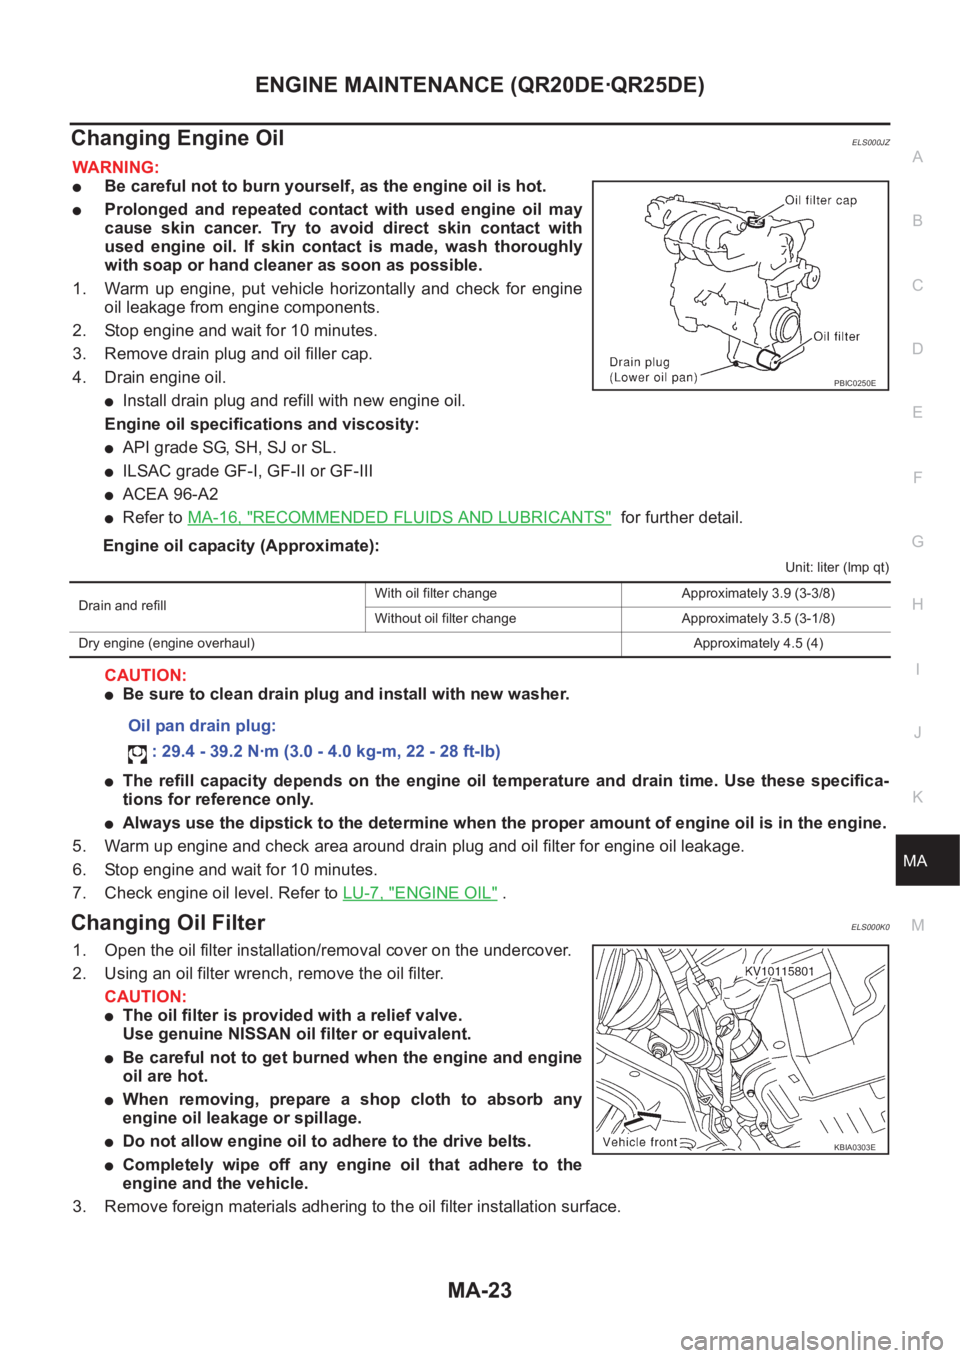
Changing Engine OilELS000JZ
WARNING:
●Be careful not to burn yourself, as the engine oil is hot.
●Prolonged and repeated contact with used engine oil may
cause skin cancer. Try to avoid direct skin contact with
used engine oil. If skin contact is made, wash thoroughly
with soap or hand cleaner as soon as possible.
1. Warm up engine, put vehicle horizontally and check for engine
oil leakage from engine components.
2. Stop engine and wait for 10 minutes.
3. Remove drain plug and oil filler cap.
4. Drain engine oil.
●Install drain plug and refill with new engine oil.
Engine oil specifications and viscosity:
●API grade SG, SH, SJ or SL.
●ILSAC grade GF-I, GF-II or GF-III
●ACEA 96-A2
●Refer to MA-16, "RECOMMENDED FLUIDS AND LUBRICANTS" for further detail.
Engine oil capacity (Approximate):
Unit: liter (lmp qt)
CAUTION:
●Be sure to clean drain plug and install with new washer.
●The refill capacity depends on the engine oil temperature and drain time. Use these specifica-
tions for reference only.
●Always use the dipstick to the determine when the proper amount of engine oil is in the engine.
5. Warm up engine and check area around drain plug and oil filter for engine oil leakage.
6. Stop engine and wait for 10 minutes.
7. Check engine oil level. Refer to LU-7, "
ENGINE OIL" .
Changing Oil FilterELS000K0
1. Open the oil filter installation/removal cover on the undercover.
2. Using an oil filter wrench, remove the oil filter.
CAUTION:
●The oil filter is provided with a relief valve.
Use genuine NISSAN oil filter or equivalent.
●Be careful not to get burned when the engine and engine
oil are hot.
●When removing, prepare a shop cloth to absorb any
engine oil leakage or spillage.
●Do not allow engine oil to adhere to the drive belts.
●Completely wipe off any engine oil that adhere to the
engine and the vehicle.
3. Remove foreign materials adhering to the oil filter installation surface.
PBIC0250E
Drain and refillWith oil filter change Approximately 3.9 (3-3/8)
Without oil filter change Approximately 3.5 (3-1/8)
Dry engine (engine overhaul)Approximately 4.5 (4)
Oil pan drain plug:
: 29.4 - 39.2 N·m (3.0 - 4.0 kg-m, 22 - 28 ft-lb)
KBIA0303E
Page 3804 of 3833
MA-24
ENGINE MAINTENANCE (QR20DE·QR25DE)
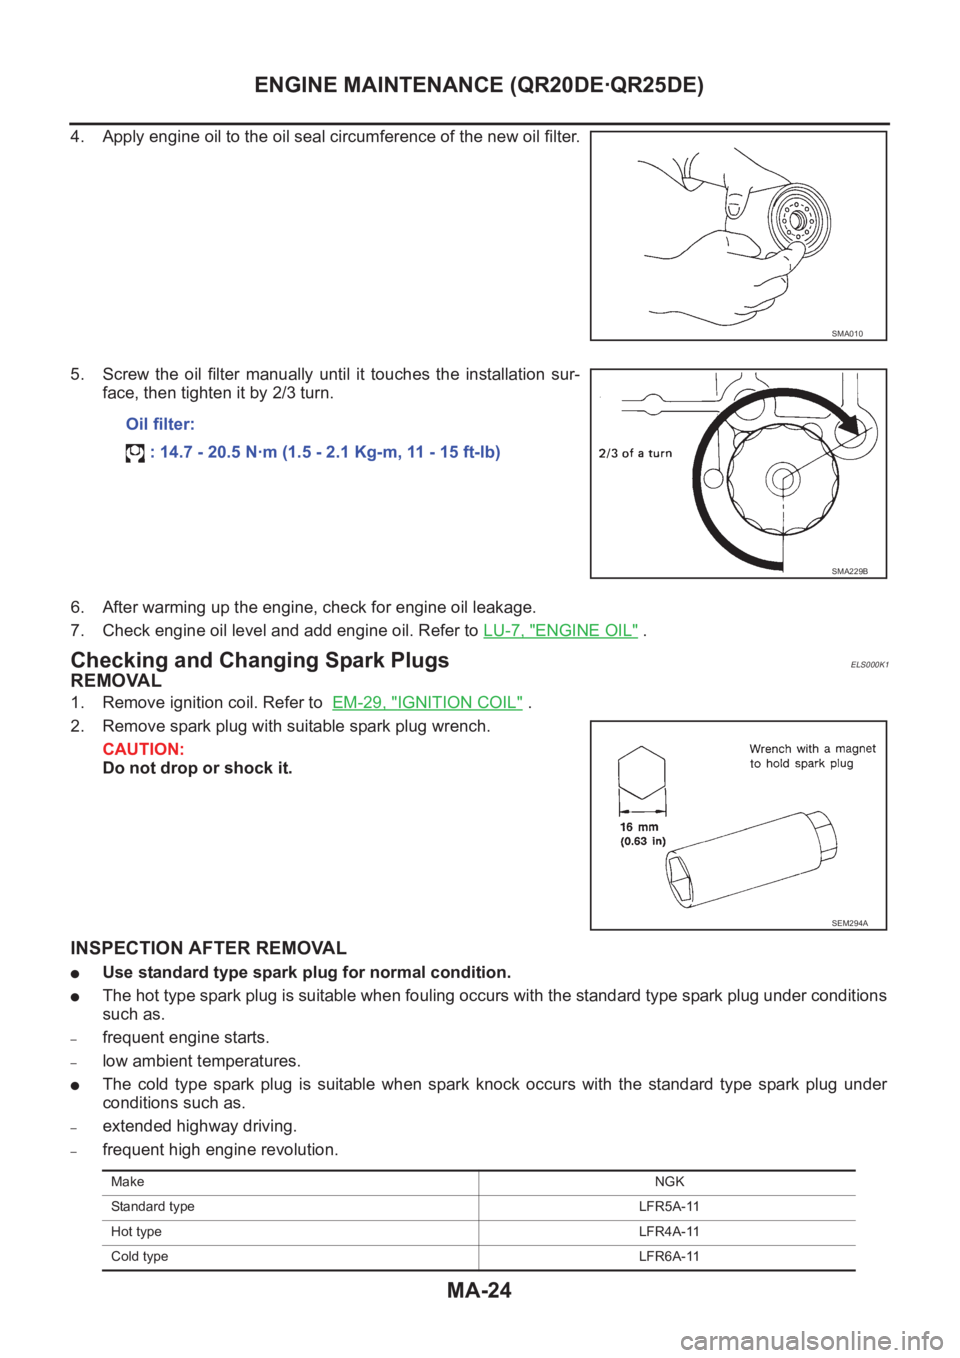
4. Apply engine oil to the oil seal circumference of the new oil filter.
5. Screw the oil filter manually until it touches the installation sur-
face, then tighten it by 2/3 turn.
6. After warming up the engine, check for engine oil leakage.
7. Check engine oil level and add engine oil. Refer to LU-7, "
ENGINE OIL" .
Checking and Changing Spark PlugsELS000K1
REMOVAL
1. Remove ignition coil. Refer to EM-29, "IGNITION COIL" .
2. Remove spark plug with suitable spark plug wrench.
CAUTION:
Do not drop or shock it.
INSPECTION AFTER REMOVAL
●Use standard type spark plug for normal condition.
●The hot type spark plug is suitable when fouling occurs with the standard type spark plug under conditions
such as.
–frequent engine starts.
–low ambient temperatures.
●The cold type spark plug is suitable when spark knock occurs with the standard type spark plug under
conditions such as.
–extended highway driving.
–frequent high engine revolution.
SMA010
Oil filter:
: 14.7 - 20.5 N·m (1.5 - 2.1 Kg-m, 11 - 15 ft-lb)
SMA229B
SEM294A
MakeNGK
Standard typeLFR5A-11
Hot typeLFR4A-11
Cold typeLFR6A-11
Page 3806 of 3833

MA-26
ENGINE MAINTENANCE (YD22DDTI)
ENGINE MAINTENANCE (YD22DDTI)
PFP:00100
Checking Drive BeltsELS000CC
●Before inspecting the engine, make sure the engine has cooled
down; wait approximately 30 minutes after the engine has been
stopped.
●Visually inspect all belts for wear, damage or cracks on contact-
ing surfaces and edge areas.
●When measuring deflection, apply 98 N (10 kg, 22 lb) at the
marked point ( ).
CAUTION:
●When checking belt deflection immediately after installa-
tion, first adjust it to the specified value. Then, after turn-
ing the crankshaft two turns or more, re-adjust to the
specified value to avoid variation in deflection between
pulleys.
●Tighten idler pulley lock nut by hand and measure deflection without looseness.
Belt Deflection:
*: When engine is cold.
Tension AdjustmentELS000K5
Adjust belts with the parts shown below.
CAUTION:
●When a new belt is installed as a replacement, adjust it to the value specified under “New” value
because of insufficient adaptability with pulley grooves.
●If the belt deflection of the current belt is out of the “Limit for re-adjusting”, adjust to the
“Adjusted” value.
●When checking belt deflection immediately after installation, first adjust it to the specified value.
Then, after turning crankshaft two turns or more, re-adjust it to the specified value to avoid varia-
tion in deflection between pulleys.
●Make sure the belts are fully fitted into the pulley grooves during installation.
●Handle with care to avoid smearing the belts with engine oil or cooling water etc.
●Do not twist or bend the belts with strong force.
PBIC1251E
Applied beltBelt deflection with 98 N (10 kg, 22 lb) force applied* mm (in)
New Adjusted Limit for re-adjusting
Air conditioner compressor belt 4 - 5 (0.16 - 0.20) 6 - 7 (0.24 - 0.28) 8.5 (0.335)
Alternator and water pump belt 9.0 - 10.5 (0.354 - 0.413) 11.0 - 12.5 (0.433 - 0.492) 16.5 (0.650)
Applied belt Belt adjustment method
Air conditioner compressor belt Adjusting bolt on idler pulley
Alternator and water pump belt Adjusting bolt on alternator
Page 3812 of 3833
MA-32
ENGINE MAINTENANCE (YD22DDTI)
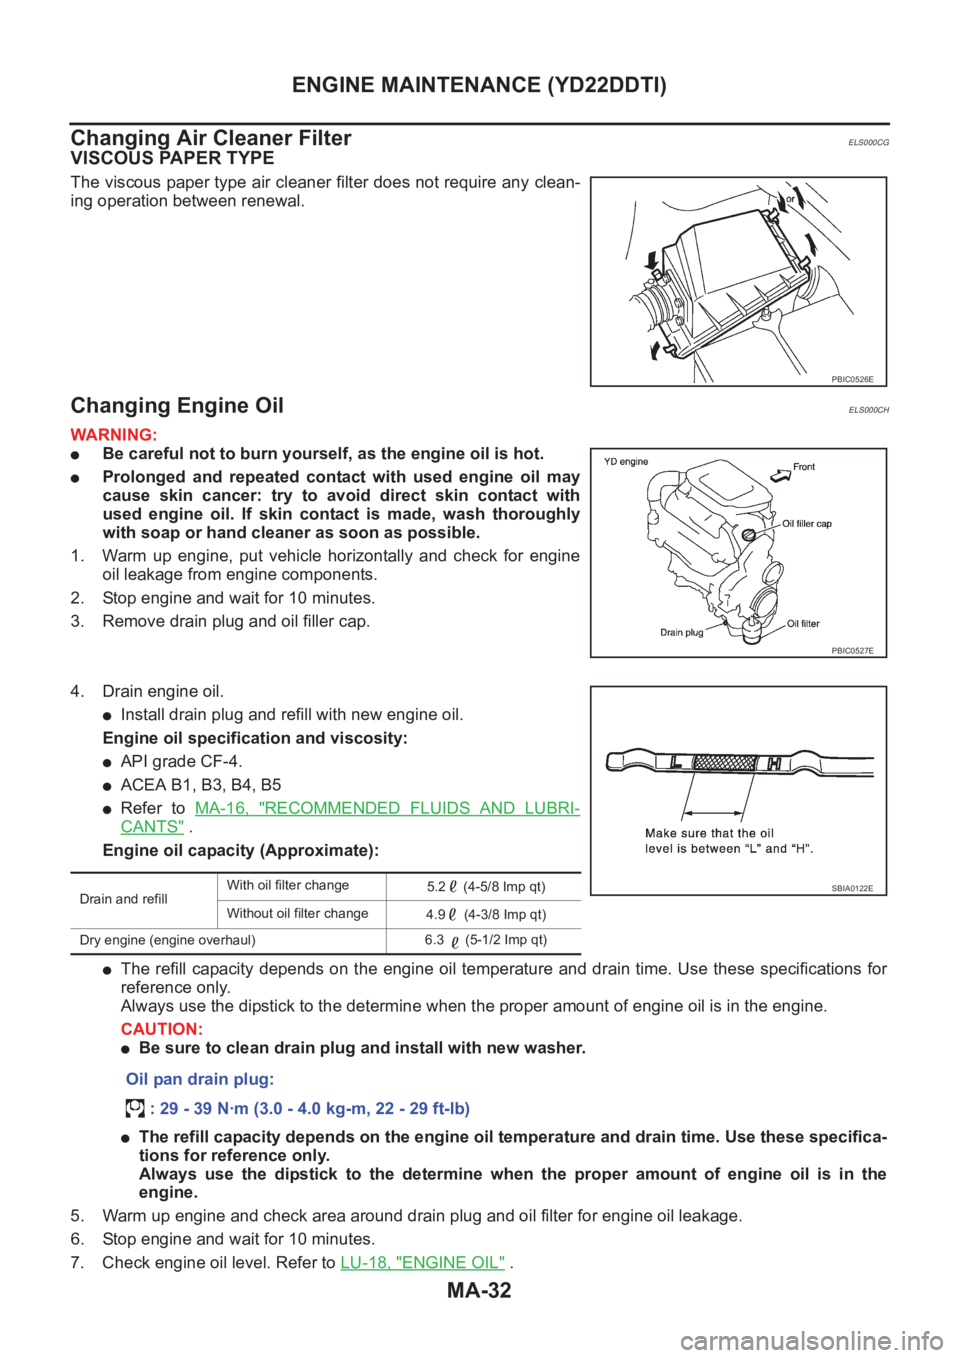
Changing Air Cleaner Filter
ELS000CG
VISCOUS PAPER TYPE
The viscous paper type air cleaner filter does not require any clean-
ing operation between renewal.
Changing Engine OilELS000CH
WARNING:
●Be careful not to burn yourself, as the engine oil is hot.
●Prolonged and repeated contact with used engine oil may
cause skin cancer: try to avoid direct skin contact with
used engine oil. If skin contact is made, wash thoroughly
with soap or hand cleaner as soon as possible.
1. Warm up engine, put vehicle horizontally and check for engine
oil leakage from engine components.
2. Stop engine and wait for 10 minutes.
3. Remove drain plug and oil filler cap.
4. Drain engine oil.
●Install drain plug and refill with new engine oil.
Engine oil specification and viscosity:
●API grade CF-4.
●ACEA B1, B3, B4, B5
●Refer to MA-16, "RECOMMENDED FLUIDS AND LUBRI-
CANTS" .
Engine oil capacity (Approximate):
●The refill capacity depends on the engine oil temperature and drain time. Use these specifications for
reference only.
Always use the dipstick to the determine when the proper amount of engine oil is in the engine.
CAUTION:
●Be sure to clean drain plug and install with new washer.
●The refill capacity depends on the engine oil temperature and drain time. Use these specifica-
tions for reference only.
Always use the dipstick to the determine when the proper amount of engine oil is in the
engine.
5. Warm up engine and check area around drain plug and oil filter for engine oil leakage.
6. Stop engine and wait for 10 minutes.
7. Check engine oil level. Refer to LU-18, "
ENGINE OIL" .
PBIC0526E
PBIC0527E
Drain and refillWith oil filter change
5.2 (4-5/8 Imp qt)
Without oil filter change
4.9 (4-3/8 Imp qt)
Dry engine (engine overhaul)6.3 (5-1/2 Imp qt)
Oil pan drain plug:
: 29 - 39 N·m (3.0 - 4.0 kg-m, 22 - 29 ft-lb)
SBIA0122E
Page 3813 of 3833
ENGINE MAINTENANCE (YD22DDTI)
MA-33
C
D
E
F
G
H
I
J
K
MA
B
MA
Changing Oil FilterELS000CI
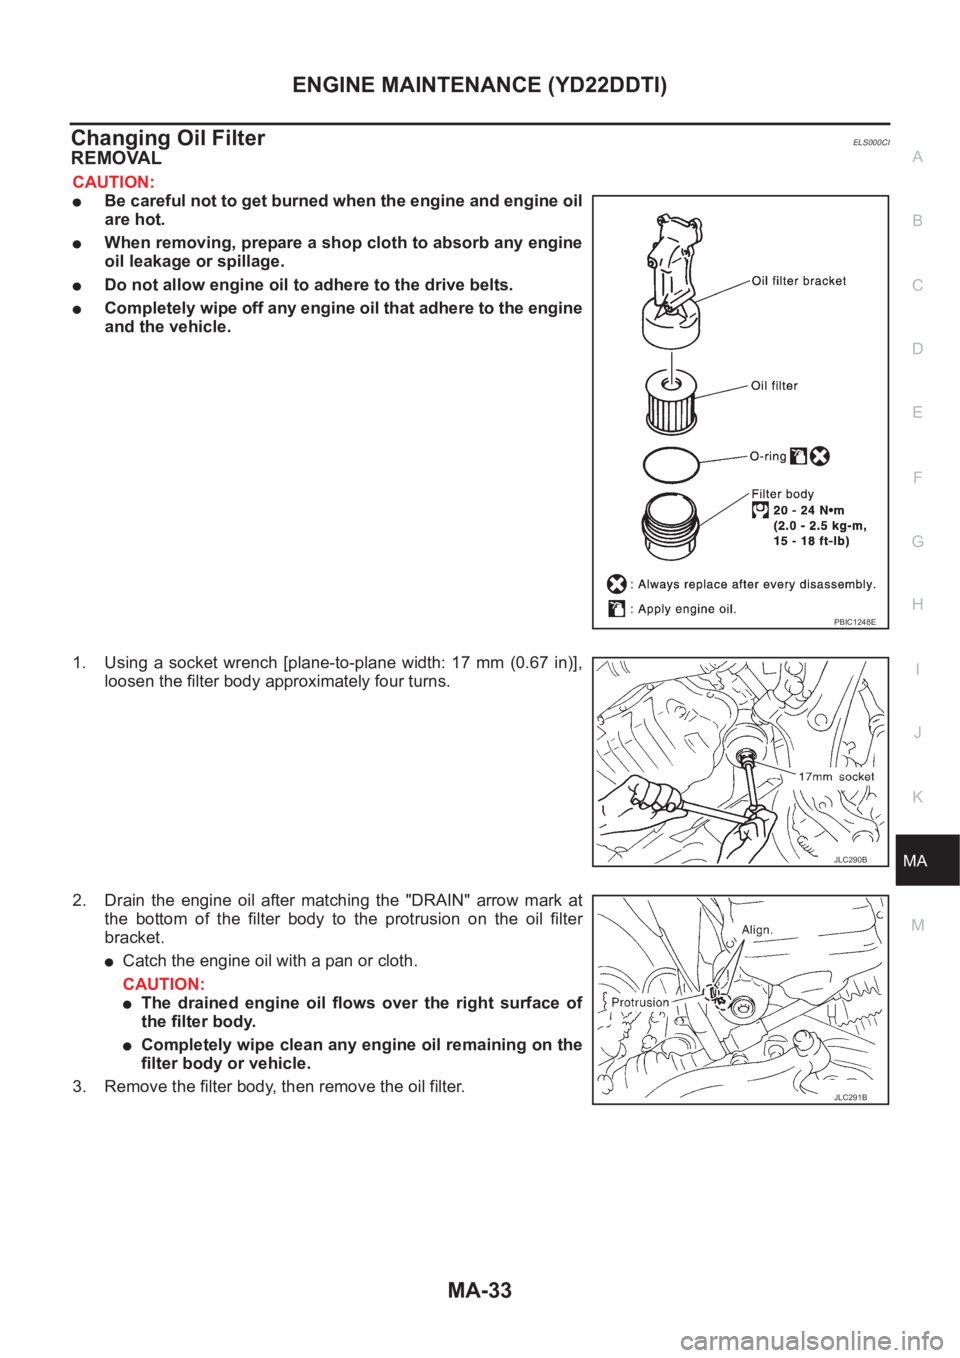
REMOVAL
CAUTION:
●Be careful not to get burned when the engine and engine oil
are hot.
●When removing, prepare a shop cloth to absorb any engine
oil leakage or spillage.
●Do not allow engine oil to adhere to the drive belts.
●Completely wipe off any engine oil that adhere to the engine
and the vehicle.
1. Using a socket wrench [plane-to-plane width: 17 mm (0.67 in)],
loosen the filter body approximately four turns.
2. Drain the engine oil after matching the "DRAIN" arrow mark at
the bottom of the filter body to the protrusion on the oil filter
bracket.
●Catch the engine oil with a pan or cloth.
CAUTION:
●The drained engine oil flows over the right surface of
the filter body.
●Completely wipe clean any engine oil remaining on the
filter body or vehicle.
3. Remove the filter body, then remove the oil filter.
PBIC1248E
JLC290B
JLC291B
Page 3814 of 3833
MA-34
ENGINE MAINTENANCE (YD22DDTI)
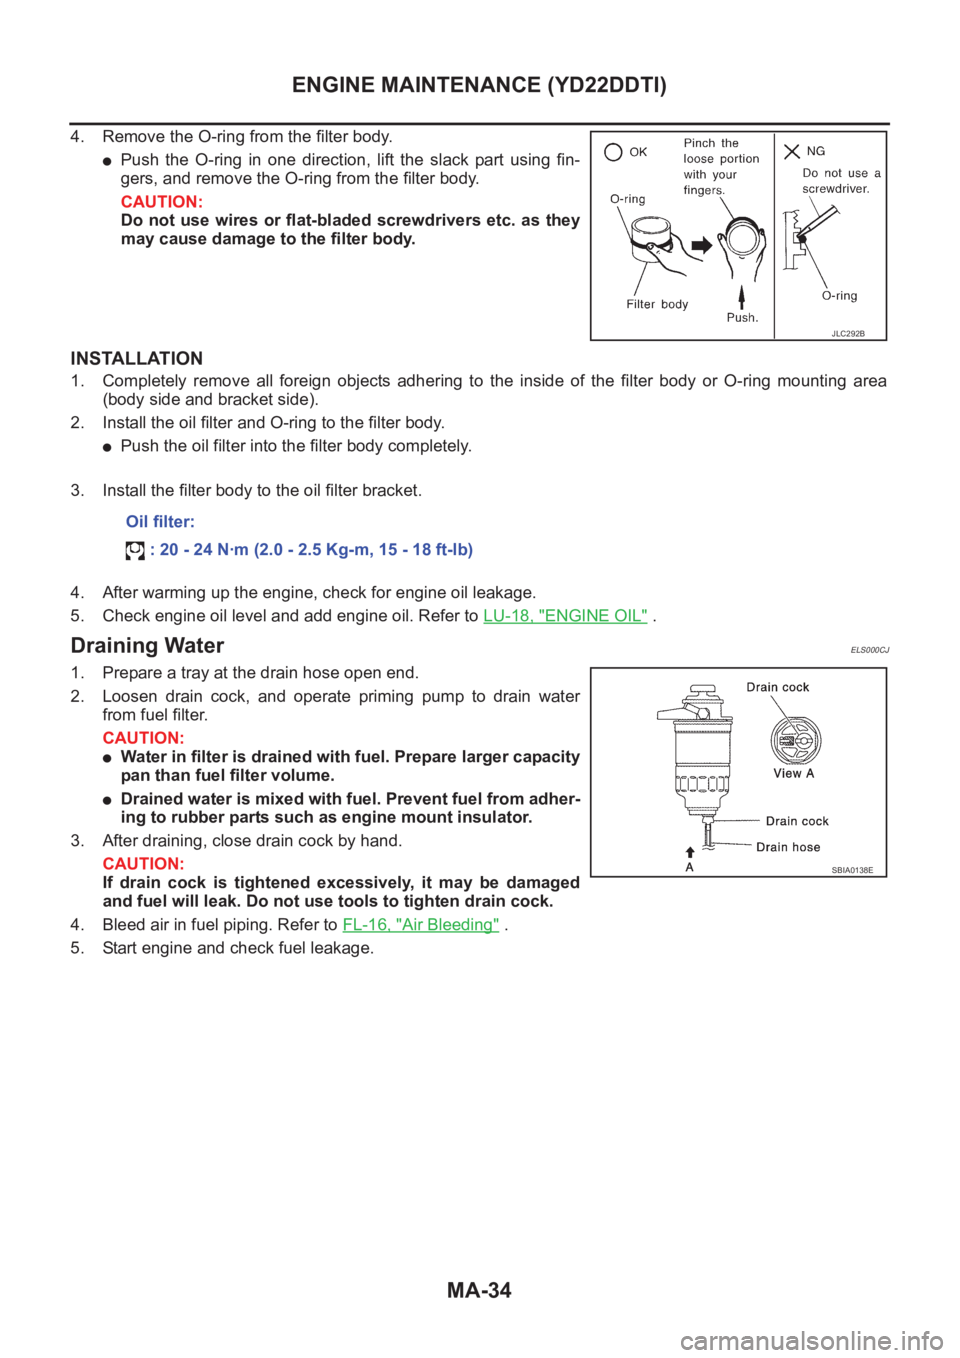
4. Remove the O-ring from the filter body.
●Push the O-ring in one direction, lift the slack part using fin-
gers, and remove the O-ring from the filter body.
CAUTION:
Do not use wires or flat-bladed screwdrivers etc. as they
may cause damage to the filter body.
INSTALLATION
1. Completely remove all foreign objects adhering to the inside of the filter body or O-ring mounting area
(body side and bracket side).
2. Install the oil filter and O-ring to the filter body.
●Push the oil filter into the filter body completely.
3. Install the filter body to the oil filter bracket.
4. After warming up the engine, check for engine oil leakage.
5. Check engine oil level and add engine oil. Refer to LU-18, "
ENGINE OIL" .
Draining WaterELS000CJ
1. Prepare a tray at the drain hose open end.
2. Loosen drain cock, and operate priming pump to drain water
from fuel filter.
CAUTION:
●Water in filter is drained with fuel. Prepare larger capacity
pan than fuel filter volume.
●Drained water is mixed with fuel. Prevent fuel from adher-
ing to rubber parts such as engine mount insulator.
3. After draining, close drain cock by hand.
CAUTION:
If drain cock is tightened excessively, it may be damaged
and fuel will leak. Do not use tools to tighten drain cock.
4. Bleed air in fuel piping. Refer to FL-16, "
Air Bleeding" .
5. Start engine and check fuel leakage.
JLC292B
Oil filter:
: 20 - 24 N·m (2.0 - 2.5 Kg-m, 15 - 18 ft-lb)
SBIA0138E