2001 NISSAN QUEST fuse
[x] Cancel search: fusePage 165 of 304

Pushing the button again during this 5 sec-
ond period stops SCAN tuning and remains
tuned to that station.
Station memory operations
Six stations can be set for the AM band.
Twelve stations can be set for the FM band
(six for FM1, six for FM2).
1. Push the FM or AM buttons to select AM,FM1, or FM2. The selected band illumi-
nates in the display.
2. Tune to the desired station.
3. Push the desired station select button for
more than 1.5 seconds. The radio mutes
when the select button is pushed.
4. When the sound resumes, memorizing is
complete.
5. Other station select buttons can be set in
the same manner.
If the battery is disconnected, or if the radio
fuse opens, the radio memory is canceled.
In that case, reset the desired stations.
RDS (Radio Data System)
RDS stands for Radio Data System, and is
a data information service transmitted by
some radio stations on the FM band (not
AM band) encoded within a regular radio
broadcast. Most RDS stations are currently
in large cities, but many stations are now
considering broadcasting RDS data.
RDS can display:
cStation name or call-sign, such as
``WHFR 98.3''.
AHA1107
4-22Heater, air conditioner and audio systems
ZX
Page 171 of 304

tinues in the SEEK mode at the highest
station.
SCAN tuning
Push the SCAN tuning button, SCAN illumi-
nates in the display. SCAN tuning begins
from low to high frequencies and stops at
each broadcasting station for 5 seconds.
Pushing the button again during this 5 sec-
ond period stops SCAN tuning and remains
tuned to that station.
Station memory operations
Six stations can be set for the AM band.
Twelve stations can be set for the FM band
(six for FM1, six for FM2).
1. Push the FM or AM buttons to select AM,FM1, or FM2. The selected band illumi-
nates in the display.
2. Tune to the desired station.
3. Push the desired station select button for
more than 1.5 seconds. The radio mutes
when the select button is pushed.
4. When the sound resumes, memorizing is
complete.
5. Other station select buttons can be set in
the same manner.
If the battery is disconnected, or if the radio
fuse opens, the radio memory is canceled.
In that case, reset the desired stations.
RDS (Radio Data System)
RDS stands for Radio Data System, and is
a data information service transmitted by
some radio stations on the FM band (not
AM band) encoded within a regular radio
broadcast. Most RDS stations are currently
in large cities, but many stations are now
considering broadcasting RDS data.
RDS can display:
cStation name or call-sign, such as
``WHFR 98.3''.
AHA1108
4-28Heater, air conditioner and audio systems
ZX
Page 187 of 304

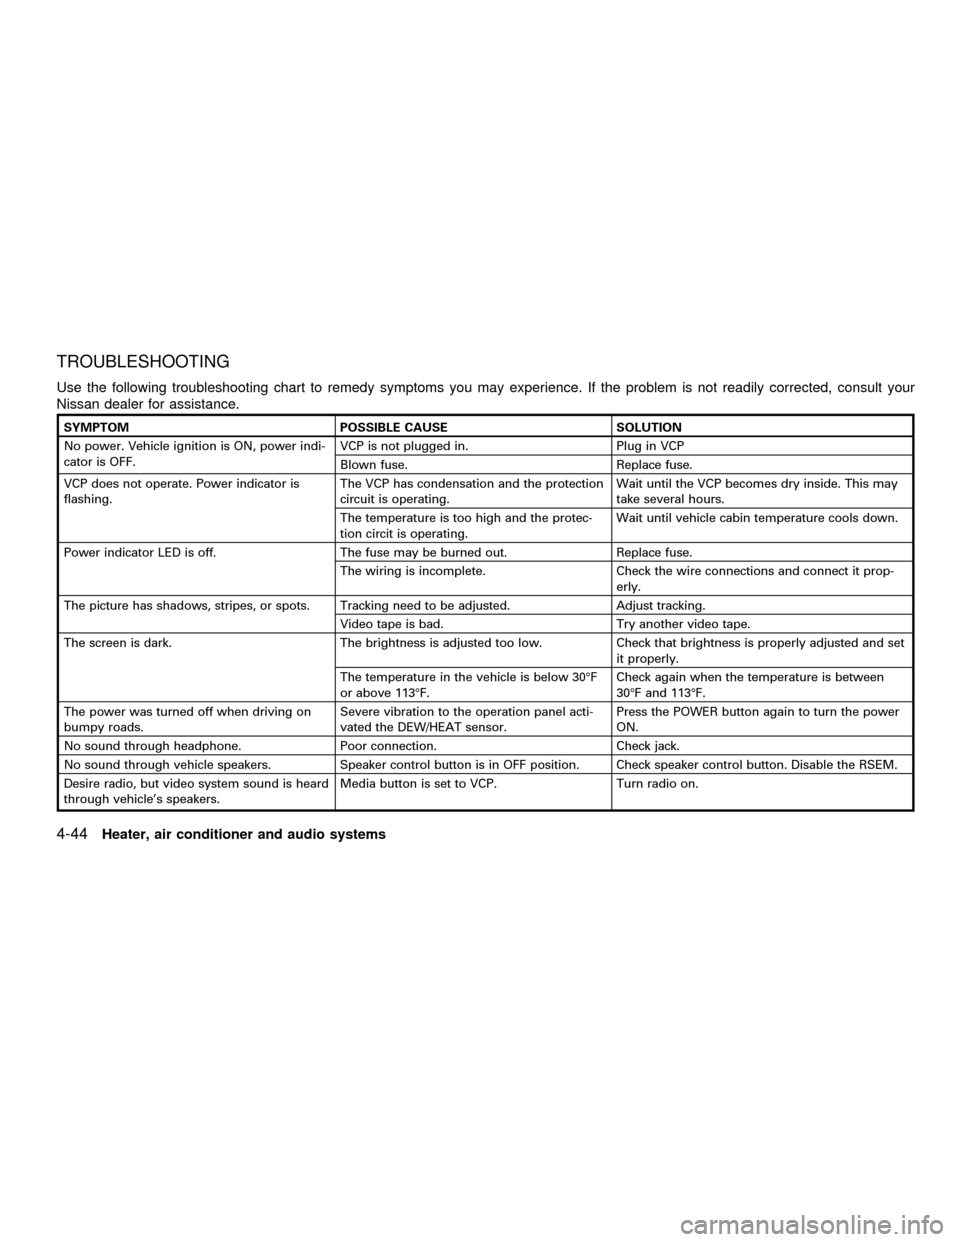
TROUBLESHOOTING
Use the following troubleshooting chart to remedy symptoms you may experience. If the problem is not readily corrected, consult your
Nissan dealer for assistance.
SYMPTOM POSSIBLE CAUSE SOLUTION
No power. Vehicle ignition is ON, power indi-
cator is OFF.VCP is not plugged in. Plug in VCP
Blown fuse. Replace fuse.
VCP does not operate. Power indicator is
flashing.The VCP has condensation and the protection
circuit is operating.Wait until the VCP becomes dry inside. This may
take several hours.
The temperature is too high and the protec-
tion circit is operating.Wait until vehicle cabin temperature cools down.
Power indicator LED is off. The fuse may be burned out. Replace fuse.
The wiring is incomplete. Check the wire connections and connect it prop-
erly.
The picture has shadows, stripes, or spots. Tracking need to be adjusted. Adjust tracking.
Video tape is bad. Try another video tape.
The screen is dark. The brightness is adjusted too low. Check that brightness is properly adjusted and set
it properly.
The temperature in the vehicle is below 30ÉF
or above 113ÉF.Check again when the temperature is between
30ÉF and 113ÉF.
The power was turned off when driving on
bumpy roads.Severe vibration to the operation panel acti-
vated the DEW/HEAT sensor.Press the POWER button again to turn the power
ON.
No sound through headphone. Poor connection. Check jack.
No sound through vehicle speakers. Speaker control button is in OFF position. Check speaker control button. Disable the RSEM.
Desire radio, but video system sound is heard
through vehicle's speakers.Media button is set to VCP. Turn radio on.
4-44Heater, air conditioner and audio systems
ZX
Page 228 of 304

8 Do-it-yourself
Maintenance precautions .......................................8-2
Engine compartment check locations ....................8-3
Engine cooling system ...........................................8-4
Checking engine coolant level ..........................8-4
Changing engine coolant ..................................8-5
Engine oil ...............................................................8-5
Checking engine oil level ..................................8-5
Changing engine oil ..........................................8-6
Changing engine oil filter...................................8-7
Automatic transmission fluid ..................................8-8
Temperature conditions for checking ................8-8
Power steering fluid................................................8-9
Brake fluid ..............................................................8-9
Window washer fluid ............................................8-10
Battery ..................................................................8-10
Jump starting ...................................................8-11
Drive belts ............................................................8-12
Spark plugs ..........................................................8-12
Replacing spark plugs .....................................8-12
Air cleaner ............................................................8-13
Cabin air filter ..................................................8-14Windshield wiper blades ......................................8-17
Cleaning ..........................................................8-17
Replacing .........................................................8-17
Parking brake and brake pedal ............................8-19
Checking parking brake...................................8-19
Checking brake pedal .....................................8-19
Brake booster ..................................................8-20
Fuses ....................................................................8-20
Engine compartment .......................................8-20
Passenger compartment .................................8-21
Multi-remote controller battery replacement ........8-22
Lights ....................................................................8-23
Headlights ........................................................8-23
Fog lights .........................................................8-24
Exterior and interior lights ...............................8-25
Wheels and tires ..................................................8-29
Tire pressure ...................................................8-29
Types of tires ...................................................8-30
Tire chains .......................................................8-31
Changing tires and wheels ..............................8-31
ZX
Page 247 of 304

Proper brake inspection intervals should
be followed.For more information regard-
ing brake inspections, see the appropriate
maintenance schedule information in the
``Maintenance'' section of this manual.
BRAKE BOOSTER
Check the brake booster function as fol-
lows:
1. With the engine off, press and release
the brake pedal several times. When
brake pedal movement (distance of
travel) remains the same from one pedal
application to the next, continue on to the
next step.
2. While depressing the brake pedal, start
the engine. The pedal height should drop
a little.
3. With the brake pedal depressed, turn the
engine off. Keep the pedal depressed for
about 30 seconds; the pedal height
should not change.
4. Run the engine for one minute without
depressing the brake pedal, then turn it
off. Depress the brake pedal several
times. The pedal travel distance will de-
crease gradually with each depressionas the vacuum is released from the
booster.
If the brakes do not operate properly, see an
authorized NISSAN dealer.
ENGINE COMPARTMENT
CAUTION
Never use a fuse of a higher amperage
rating than that specified on the fuse
box cover. This could damage the elec-
trical system or cause a fire.
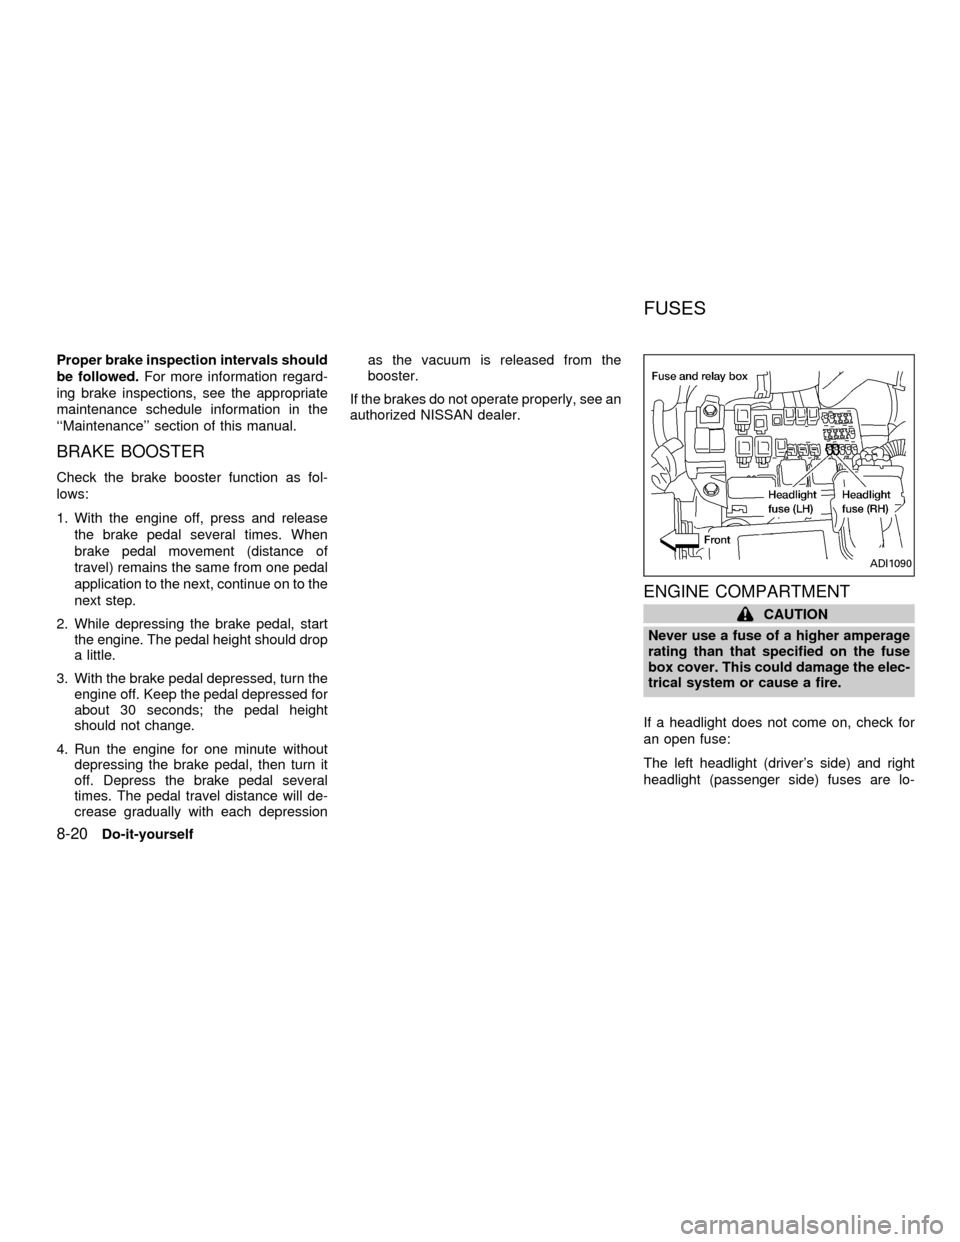
If a headlight does not come on, check for
an open fuse:
The left headlight (driver's side) and right
headlight (passenger side) fuses are lo-
ADI1090
FUSES
8-20Do-it-yourself
ZX
Page 248 of 304

cated in the left-hand fuse box, near the
radiator cap.
1. Turn the headlight switch to the OFF
position.
2. Open the engine hood.
3. Remove the fuse box cover.
4. Remove the fuse with the fuse puller
attached to the passenger compartment
fuse box cover.
5. If the fuse is open, replace it with a new
fuse.
6. If a new fuse opens again, have the
electrical system checked and repaired
by an authorized NISSAN dealer.
Fusible Links
If the electrical equipment does not operate
and fuses are in good condition, check the
fusible links. If any of these fusible links are
melted, replace only with genuine NISSAN
parts.
If the new fusible link melts again, have the
system checked and repaired by an autho-
rized NISSAN dealer.
PASSENGER COMPARTMENT
CAUTION
Never use a fuse of a higher amperage
rating than that specified on the fuse
box cover. This could damage the elec-
trical system or cause a fire.
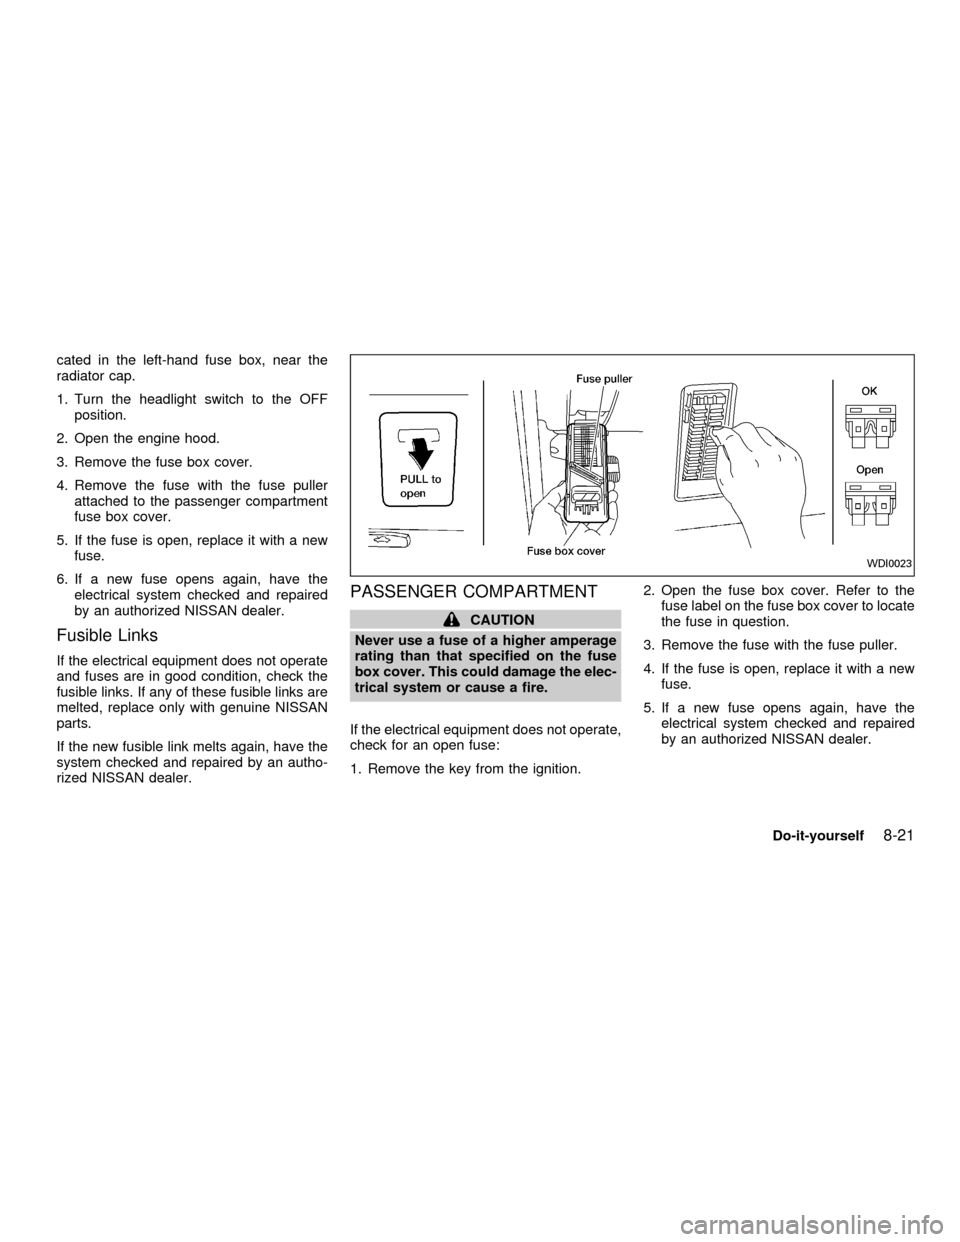
If the electrical equipment does not operate,
check for an open fuse:
1. Remove the key from the ignition.2. Open the fuse box cover. Refer to the
fuse label on the fuse box cover to locate
the fuse in question.
3. Remove the fuse with the fuse puller.
4. If the fuse is open, replace it with a new
fuse.
5. If a new fuse opens again, have the
electrical system checked and repaired
by an authorized NISSAN dealer.
WDI0023
Do-it-yourself8-21
ZX
Page 290 of 304

Trailer tow harness and module
(if so equipped)
The trailer tow module on your vehicle al-
lows turn/stop lamp control of a trailer being
towed by your NISSAN.The trailer tow module includes:
ctrailer tow module which draws power
from the vehicle stop lamp fuse
cone subharness containing a SAE J1239
specified connectorTo use the tow harness:
1) Remove the connector cap from the
vehicle harness, located behind the rear
bumper. Store the connector cap in ve-
hicle glove box for reinstallation.
2) Connect the tow harness to the vehicle
harness located behind the rear bumper.
3) Connect the tow harness connector
(SAE J1239) to your trailer.
4) Confirm proper vehicle and trailer
stop/turn lamp operation.
5) When towing is completed, disconnect
the tow harness from the trailer and the
vehicle. Store the tow harness in the
glove box. Reinstall the connector cap to
the vehicle harness.
If you need further assistance in wiring
a trailer to your NISSAN, contact an autho-
rized NISSAN dealer.
Always confirm proper vehicle and
trailer stop/turn lamp operation every
time the trailer light circuits are con-
nected for use.
ATI0555
Technical and consumer information10-17
ZX
Page 299 of 304

Compact disc (CD) player ................ 4-30, 4-32
Controls
Audio controls (rear) ............................. 4-35
Audio controls (steering wheel) ............ 4-34
Heater and air conditioner controls
(automatic) ............................................ 4-11
Heater and air conditioner controls
(manual).................................................. 4-3
Rear seat air conditioner ...................... 4-14
Coolant
Capacities and recommended fuel/
lubricants .............................................. 10-2
Changing engine coolant........................ 8-5
Checking engine coolant level ............... 8-4
Engine coolant temperature gauge ........ 2-5
Cornering light ........................................... 2-18
Corrosion protection .................................... 7-4
Cruise control............................................. 5-10
Cup holders ............................................... 2-24
D
Daytime running light system
(Canada only) ............................................ 2-16
Defogger switch
Rear window defogger switch .............. 2-15
Dimensions and weights............................ 10-9
Door locks .................................................... 3-2
Door open warning light .............................. 2-8
Drive belts .................................................. 8-12
Driving
Cold weather driving............................. 5-16Driving with automatic transmission ....... 5-6
Precautions when starting and driving ... 5-2
E
Economy - fuel........................................... 5-12
Emission control information label........... 10-11
Emission control system warranty ........... 10-20
Engine
Before starting the engine ...................... 5-5
Capacities and recommended fuel/
lubricants .............................................. 10-2
Changing engine coolant........................ 8-5
Changing engine oil................................ 8-6
Changing engine oil filter........................ 8-7
Checking engine coolant level ............... 8-4
Checking engine oil level ....................... 8-5
Engine compartment check locations .... 8-3
Engine coolant temperature gauge ........ 2-5
Engine cooling system ........................... 8-4
Engine oil ................................................ 8-5
Engine oil and oil filter
recommendation ................................... 10-4
Engine oil pressure warning light ........... 2-7
Engine oil viscosity ............................... 10-5
Engine serial number ......................... 10-11
Starting the engine ................................. 5-5
Exhaust gas (Carbon monoxide) ................. 5-2F
Family entertainment system..................... 4-37
Five passenger seating ............................. 1-28
Five passenger seating with cargo room .. 1-29
Flashers (See hazard warning flasher
switch) ........................................................ 2-18
Flat tire ......................................................... 6-2
Flexible seating .......................................... 1-12
Floor mat positioning ........................ 1-27, 1-30
Floor mat positioning aid ........................... 1-30
Fluid
Automatic transmission fluid (ATF) ........ 8-8
Brake fluid ..................................... 10-2, 8-9
Capacities and recommended fuel/
lubricants .............................................. 10-2
Engine coolant ........................................ 8-4
Engine oil ................................................ 8-5
Power steering fluid ...................... 10-2, 8-9
Window washer fluid ............................ 8-10
F.M.V.S.S. certification label ................... 10-11
Fuel
Capacities and recommended fuel/
lubricants .............................................. 10-2
Fuel economy ....................................... 5-12
Fuel filler lid and cap ............................ 3-10
Fuel filler lid lock opener lever ............. 3-10
Fuel gauge.............................................. 2-5
Fuel octane rating................................. 10-3
Fuel recommendation ........................... 10-2
Interia fuel shut-off switch .................... 6-11
Fuses ......................................................... 8-20
11-2
ZX