2001 NISSAN QUEST automatic transmission fluid
[x] Cancel search: automatic transmission fluidPage 96 of 304
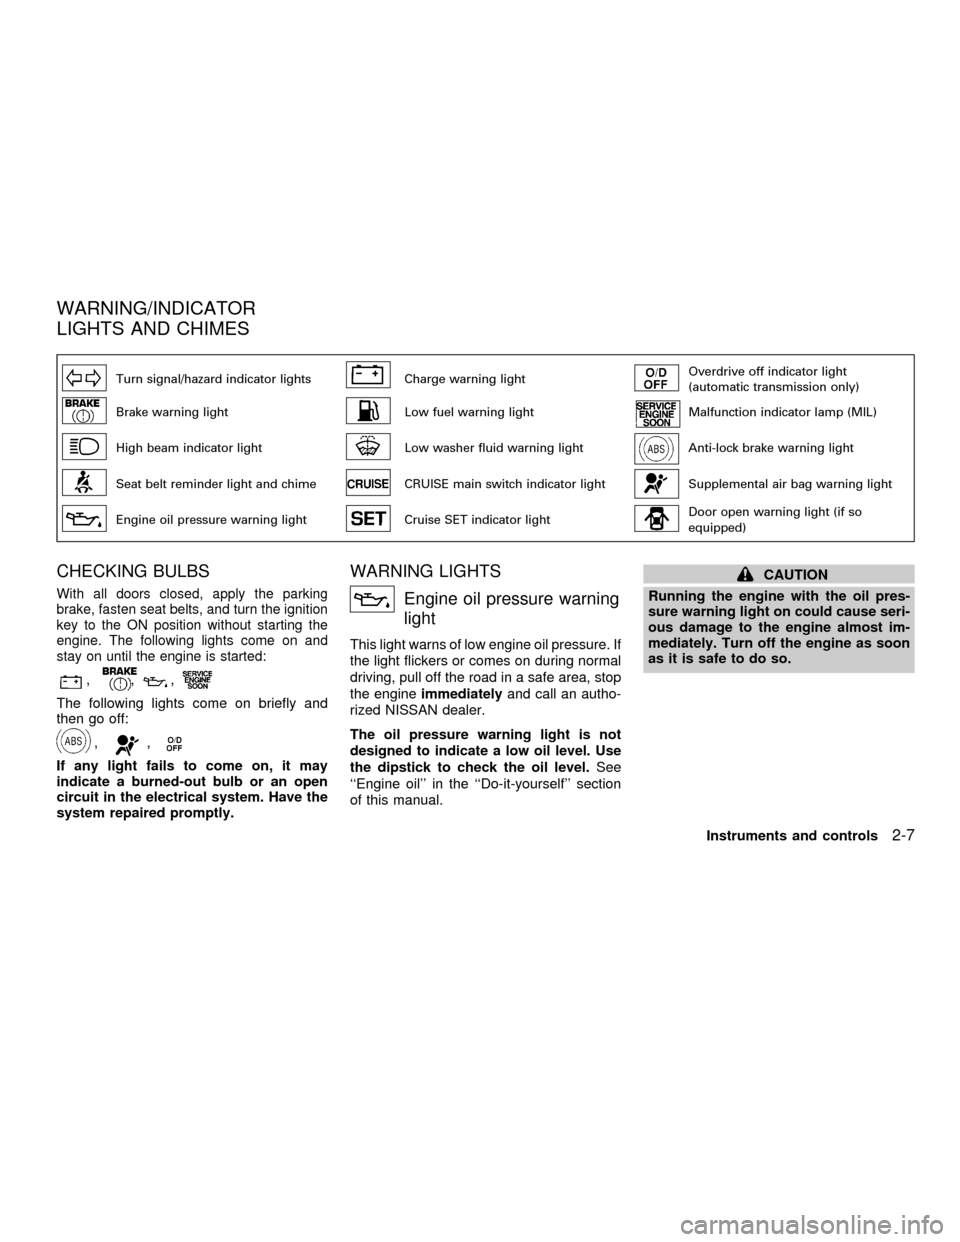
Turn signal/hazard indicator lightsCharge warning lightOverdrive off indicator light
(automatic transmission only)
Brake warning lightLow fuel warning lightMalfunction indicator lamp (MIL)
High beam indicator lightLow washer fluid warning lightAnti-lock brake warning light
Seat belt reminder light and chimeCRUISE main switch indicator lightSupplemental air bag warning light
Engine oil pressure warning lightCruise SET indicator lightDoor open warning light (if so
equipped)
CHECKING BULBS
With all doors closed, apply the parking
brake, fasten seat belts, and turn the ignition
key to the ON position without starting the
engine. The following lights come on and
stay on until the engine is started:
,,,
The following lights come on briefly and
then go off:
,,
If any light fails to come on, it may
indicate a burned-out bulb or an open
circuit in the electrical system. Have the
system repaired promptly.
WARNING LIGHTS
Engine oil pressure warning
light
This light warns of low engine oil pressure. If
the light flickers or comes on during normal
driving, pull off the road in a safe area, stop
the engineimmediatelyand call an autho-
rized NISSAN dealer.
The oil pressure warning light is not
designed to indicate a low oil level. Use
the dipstick to check the oil level.See
``Engine oil'' in the ``Do-it-yourself'' section
of this manual.
CAUTION
Running the engine with the oil pres-
sure warning light on could cause seri-
ous damage to the engine almost im-
mediately. Turn off the engine as soon
as it is safe to do so.
WARNING/INDICATOR
LIGHTS AND CHIMES
Instruments and controls2-7
ZX
Page 98 of 304
applied, stop the vehicle and perform the
following:
1.
Check the brake fluid level. Add brake fluid
as necessary. See ``Brake fluid'' in the
``Do-it-yourself'' section of this manual.
2. If the brake fluid level is correct, have the
warning system checked by an autho-
rized NISSAN dealer.
WARNING
cYour brake system may not be work-
ing properly if the warning light is
on. Driving could be dangerous. If
you judge it to be safe, drive care-
fully to the nearest service station
for repairs. Otherwise, have your ve-
hicle towed because driving it could
be dangerous.
cPressing the brake pedal with the
engine stopped and/or low brake
fluid level may increase your stop-
ping distance and braking will re-
quire greater pedal effort as well as
pedal travel.
cIf the brake fluid level is below the
MINIMUM or MIN mark on the brakefluid reservoir, do not drive until the
brake system has been checked at a
NISSAN dealer.
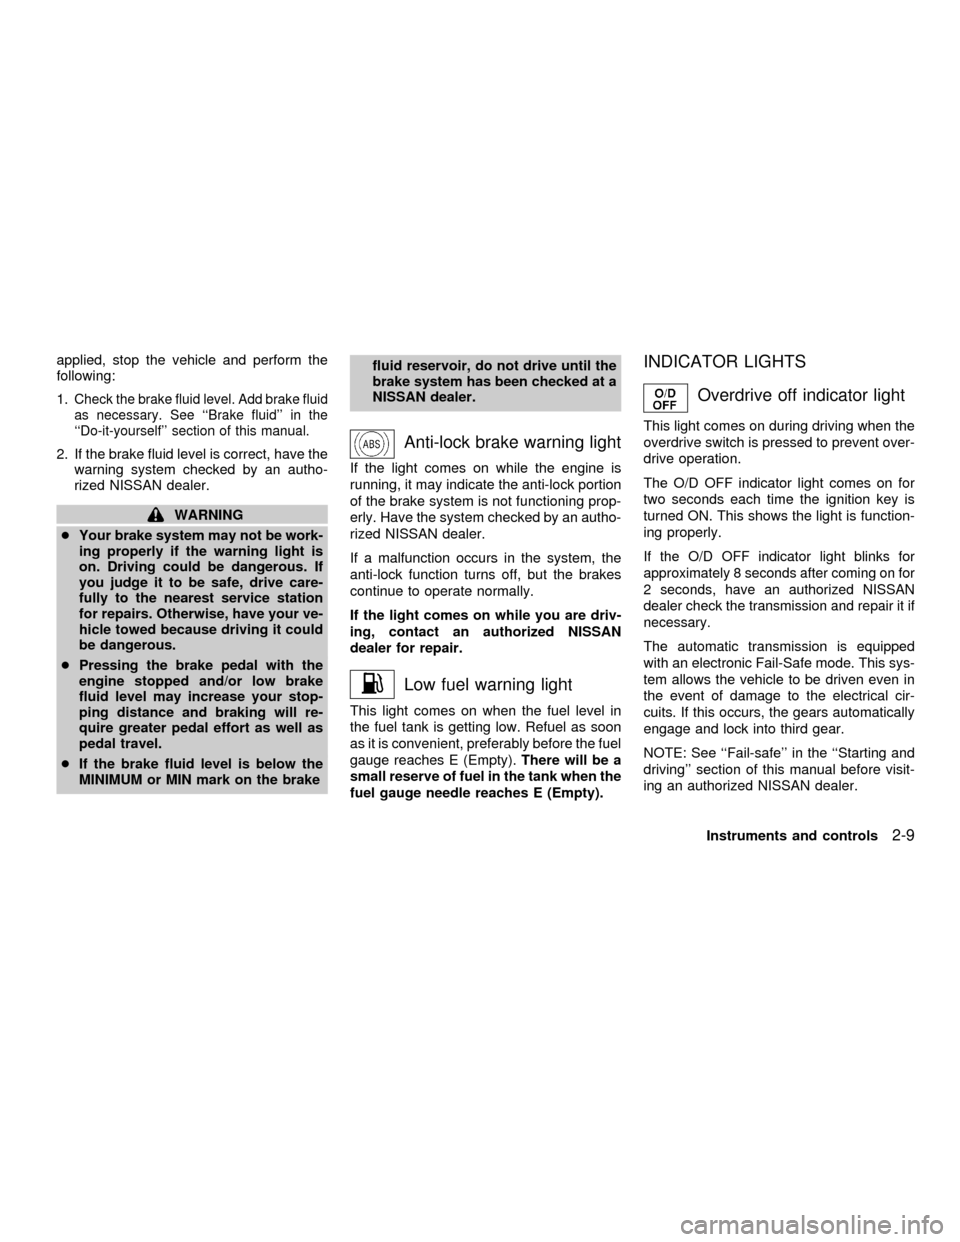
Anti-lock brake warning light
If the light comes on while the engine is
running, it may indicate the anti-lock portion
of the brake system is not functioning prop-
erly. Have the system checked by an autho-
rized NISSAN dealer.
If a malfunction occurs in the system, the
anti-lock function turns off, but the brakes
continue to operate normally.
If the light comes on while you are driv-
ing, contact an authorized NISSAN
dealer for repair.
Low fuel warning light
This light comes on when the fuel level in
the fuel tank is getting low. Refuel as soon
as it is convenient, preferably before the fuel
gauge reaches E (Empty).There will be a
small reserve of fuel in the tank when the
fuel gauge needle reaches E (Empty).
INDICATOR LIGHTS
Overdrive off indicator light
This light comes on during driving when the
overdrive switch is pressed to prevent over-
drive operation.
The O/D OFF indicator light comes on for
two seconds each time the ignition key is
turned ON. This shows the light is function-
ing properly.
If the O/D OFF indicator light blinks for
approximately 8 seconds after coming on for
2 seconds, have an authorized NISSAN
dealer check the transmission and repair it if
necessary.
The automatic transmission is equipped
with an electronic Fail-Safe mode. This sys-
tem allows the vehicle to be driven even in
the event of damage to the electrical cir-
cuits. If this occurs, the gears automatically
engage and lock into third gear.
NOTE: See ``Fail-safe'' in the ``Starting and
driving'' section of this manual before visit-
ing an authorized NISSAN dealer.
Instruments and controls
2-9
ZX
Page 228 of 304

8 Do-it-yourself
Maintenance precautions .......................................8-2
Engine compartment check locations ....................8-3
Engine cooling system ...........................................8-4
Checking engine coolant level ..........................8-4
Changing engine coolant ..................................8-5
Engine oil ...............................................................8-5
Checking engine oil level ..................................8-5
Changing engine oil ..........................................8-6
Changing engine oil filter...................................8-7
Automatic transmission fluid ..................................8-8
Temperature conditions for checking ................8-8
Power steering fluid................................................8-9
Brake fluid ..............................................................8-9
Window washer fluid ............................................8-10
Battery ..................................................................8-10
Jump starting ...................................................8-11
Drive belts ............................................................8-12
Spark plugs ..........................................................8-12
Replacing spark plugs .....................................8-12
Air cleaner ............................................................8-13
Cabin air filter ..................................................8-14Windshield wiper blades ......................................8-17
Cleaning ..........................................................8-17
Replacing .........................................................8-17
Parking brake and brake pedal ............................8-19
Checking parking brake...................................8-19
Checking brake pedal .....................................8-19
Brake booster ..................................................8-20
Fuses ....................................................................8-20
Engine compartment .......................................8-20
Passenger compartment .................................8-21
Multi-remote controller battery replacement ........8-22
Lights ....................................................................8-23
Headlights ........................................................8-23
Fog lights .........................................................8-24
Exterior and interior lights ...............................8-25
Wheels and tires ..................................................8-29
Tire pressure ...................................................8-29
Types of tires ...................................................8-30
Tire chains .......................................................8-31
Changing tires and wheels ..............................8-31
ZX
Page 235 of 304
WARNING
cWhen the engine is running, keep
hands, jewelry and clothing away
from any moving parts such as the
cooling fan and drive belts.
cAutomatic transmission fluid is poi-
sonous and should be stored care-
fully in marked containers out of the
reach of children.
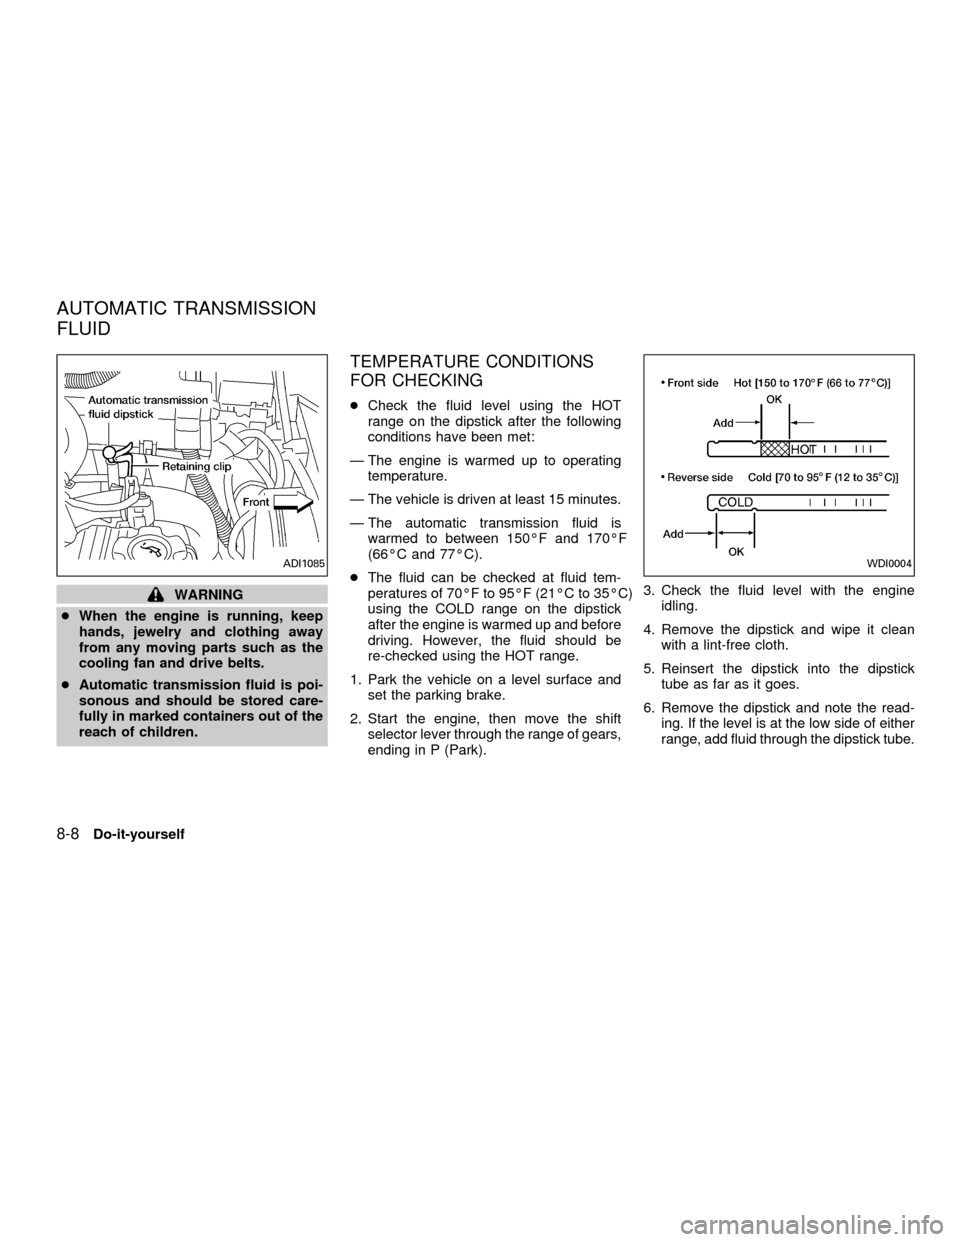
TEMPERATURE CONDITIONS
FOR CHECKING
cCheck the fluid level using the HOT
range on the dipstick after the following
conditions have been met:
Ð The engine is warmed up to operating
temperature.
Ð The vehicle is driven at least 15 minutes.
Ð The automatic transmission fluid is
warmed to between 150ÉF and 170ÉF
(66ÉC and 77ÉC).
cThe fluid can be checked at fluid tem-
peratures of 70ÉF to 95ÉF (21ÉC to 35ÉC)
using the COLD range on the dipstick
after the engine is warmed up and before
driving. However, the fluid should be
re-checked using the HOT range.
1. Park the vehicle on a level surface and
set the parking brake.
2. Start the engine, then move the shift
selector lever through the range of gears,
ending in P (Park).3. Check the fluid level with the engine
idling.
4. Remove the dipstick and wipe it clean
with a lint-free cloth.
5. Reinsert the dipstick into the dipstick
tube as far as it goes.
6. Remove the dipstick and note the read-
ing. If the level is at the low side of either
range, add fluid through the dipstick tube.
WDI0004ADI1085
AUTOMATIC TRANSMISSION
FLUID
8-8Do-it-yourself
ZX
Page 236 of 304
CAUTION
DO NOT OVERFILL. Use ONLY Nissan
Matic `D' (Continental U.S. and Alaska)
or Canada NISSAN Automatic Trans-
mission Fluid. Dexron
TMIII/MerconTM
or equivalent may also be used. Out-
side the continental United States and
Alaska contact a Nissan dealership for
more information regarding suitable
fluids, including recommended
brand(s) of Dexron
TMIII/MerconTM.
NOTE:
If the vehicle has been driven for a long
time at high speeds, or in city traffic in
hot weather, or if it is being used to pull
a trailer, the accurate fluid level cannot
be read. You should wait until the fluid
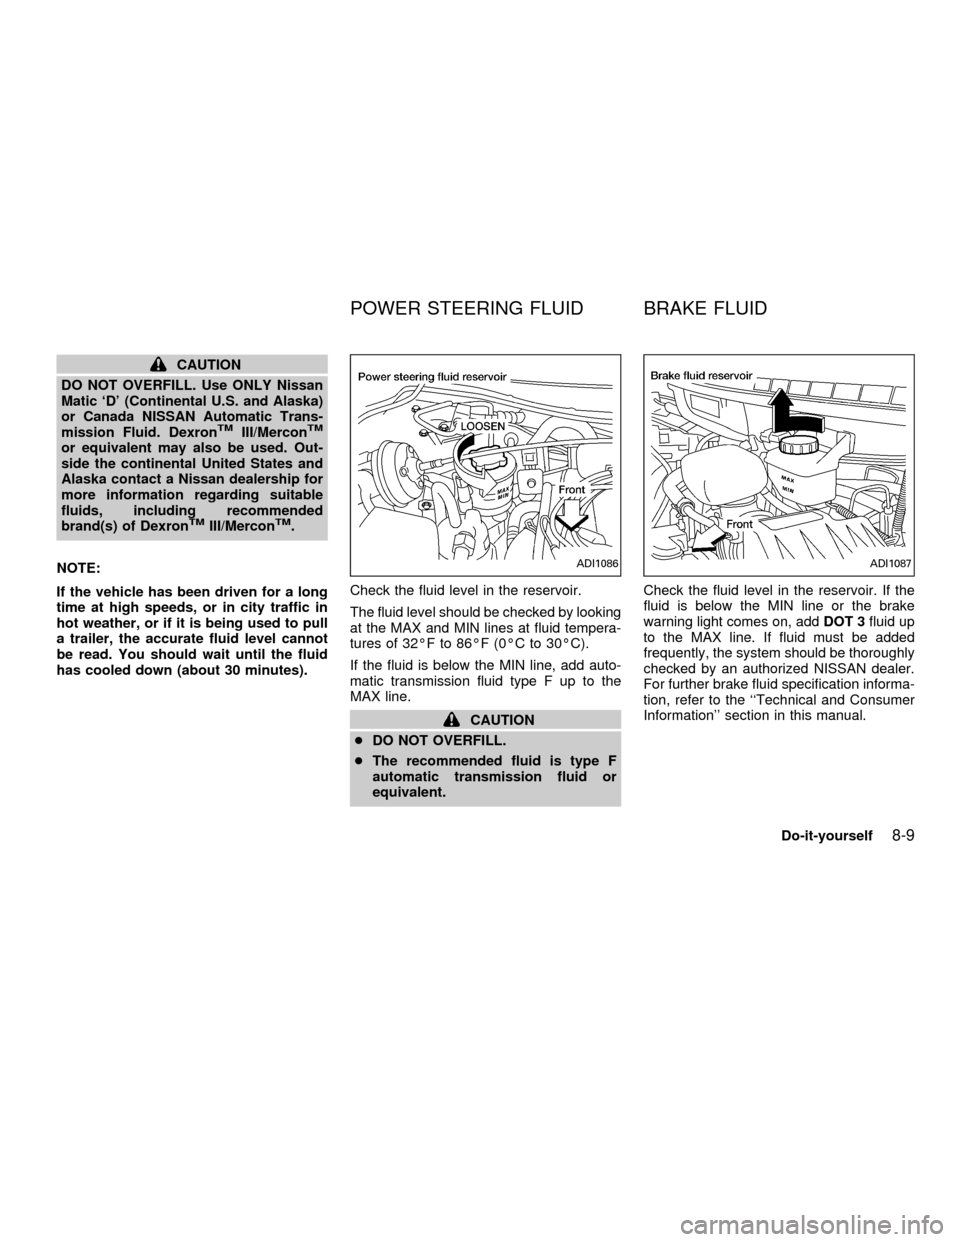
has cooled down (about 30 minutes).Check the fluid level in the reservoir.
The fluid level should be checked by looking
at the MAX and MIN lines at fluid tempera-
tures of 32ÉF to 86ÉF (0ÉC to 30ÉC).
If the fluid is below the MIN line, add auto-
matic transmission fluid type F up to the
MAX line.
CAUTION
cDO NOT OVERFILL.
cThe recommended fluid is type F
automatic transmission fluid or
equivalent.Check the fluid level in the reservoir. If the
fluid is below the MIN line or the brake
warning light comes on, addDOT 3fluid up
to the MAX line. If fluid must be added
frequently, the system should be thoroughly
checked by an authorized NISSAN dealer.
For further brake fluid specification informa-
tion, refer to the ``Technical and Consumer
Information'' section in this manual.
ADI1086ADI1087
POWER STEERING FLUID BRAKE FLUID
Do-it-yourself8-9
ZX
Page 265 of 304

has the proper distance under it when de-
pressed fully. Check the brake booster func-
tion. Be certain to keep the floor mat away
from the pedal.
Parking brake*Ð Check that the pedal is
adjusted to specification and confirm that
your vehicle is held securely on a fairly
steep hill with only the parking brake ap-
plied.
Automatic transmission P mechanismÐ
On a fairly steep hill check that your vehicle
is held securely with the selector lever in the
P (Park) position without applying any
brakes.
Under the hood and vehicle
The maintenance items listed here should
be checked periodically, for example, each
time you check the engine oil or refuel.
Additional information on the following
items with an ``*'' is found in the ``Do-it-
yourself section'' of this manual.
Windshield washer fluid* ÐCheck that
there is adequate fluid in the reservoir.
Engine oil level*Ð Check the level after
parking the vehicle on a level surface with
the engine off. Wait a few minutes for the oilto drain back into the oil pan.
Brake fluid level*Ð Make sure the brake
fluid level is between the MIN and MAX
lines on the reservoir.
Power steering fluid level* and linesÐ
Check the level when the fluid is cold with
the engine off. Check the lines for proper
attachment, leaks, cracks, etc.
Automatic transmission fluid level*Ð
Check the level after putting the selector
lever in P (Park) with the engine idling at
operating temperature.
Engine coolant level*Ð Check the cool-
ant level when the engine is cold.
Radiator and hosesÐ Check the front of
the radiator and clean off any dirt, insects,
leaves, etc., that may have accumulated.
Make sure the hoses have no cracks, de-
formation, rot, or loose connections.
Engine drive belts*Ð Make sure the drive
belts are not frayed, worn, cracked or oily.
Battery*Ð Check the fluid level in each
cell. It should be between the MAX and MIN
lines.
Exhaust systemÐ Make sure there are nocracks, holes, loose joints or supports. If the
sound of the exhaust seems unusual or
there is a smell of exhaust fumes, immedi-
ately have the exhaust system inspected by
an authorized NISSAN dealer. See the car-
bon monoxide warning in the ``Starting and
driving'' section of this manual.
UnderbodyÐ The underbody is frequently
exposed to corrosive substances such as
those used on icy roads or to control dust. It
is very important to remove these sub-
stances from the underbody, otherwise rust
may form on the floor pan, frame, fuel lines
and exhaust system. At the end of winter,
the underbody should be thoroughly flushed
with plain water, in those areas where mud
and dirt may have accumulated. See the
``Appearance and care'' section of this
manual.
Fluid leaksÐ Check under the vehicle for
fuel, oil, water or other fluid leaks after the
vehicle has been parked for a while. Water
dripping from the air conditioner after use is
normal. If you should notice any leaks or if
gasoline fumes are evident, check for the
cause and have it corrected immediately by
an authorized NISSAN dealer.
9-4Maintenance
ZX
Page 268 of 304
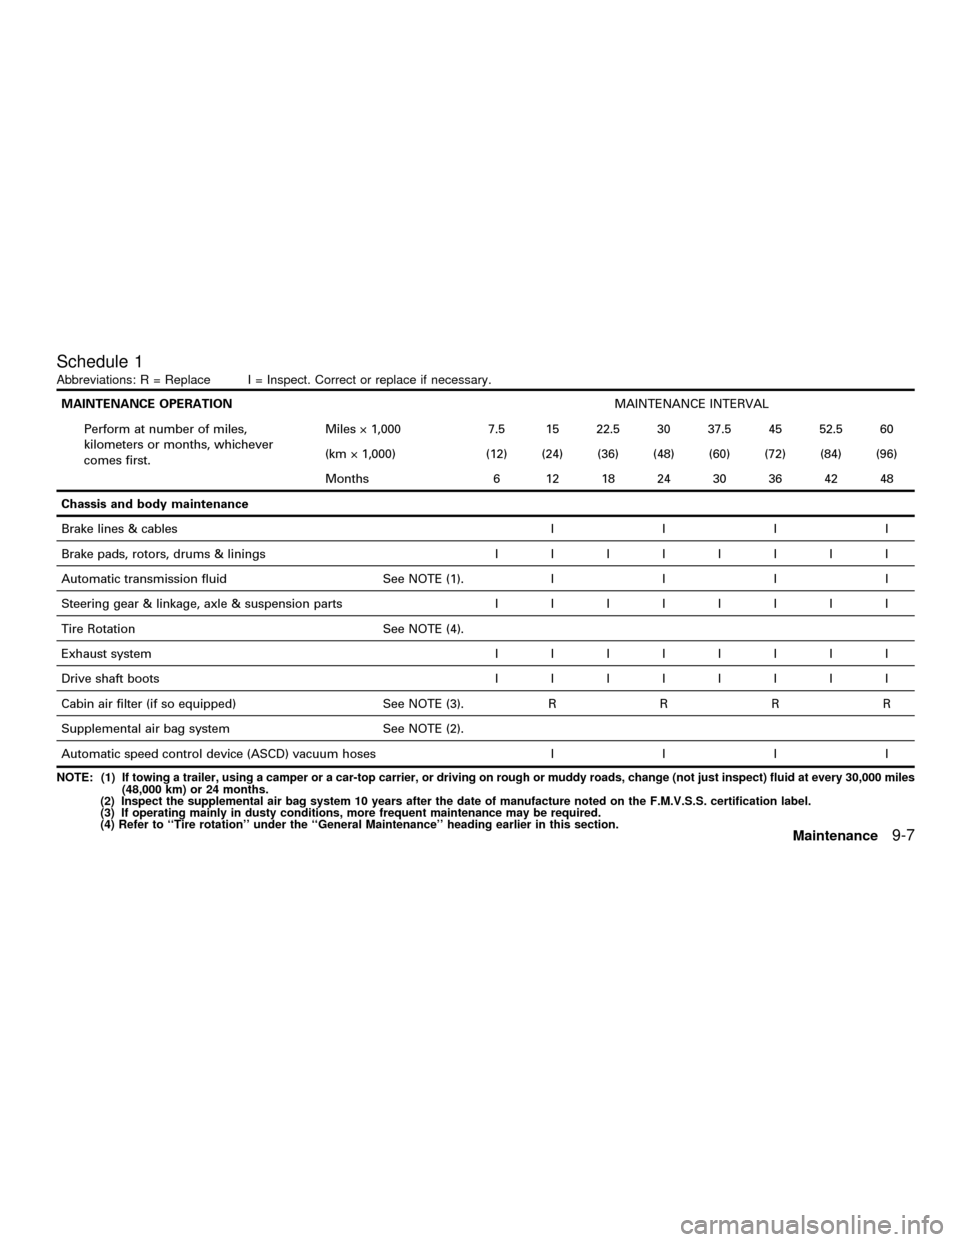
Schedule 1
Abbreviations: R = Replace I = Inspect. Correct or replace if necessary.
MAINTENANCE OPERATIONMAINTENANCE INTERVAL
Perform at number of miles,
kilometers or months, whichever
comes first.Miles ý 1,000 7.5 15 22.5 30 37.5 45 52.5 60
(km ý 1,000) (12) (24) (36) (48) (60) (72) (84) (96)
Months 6 12 18 24 30 36 42 48
Chassis and body maintenance
Brake lines & cablesIIII
Brake pads, rotors, drums & liningsIIIIIIII
Automatic transmission fluid See NOTE (1).IIII
Steering gear & linkage, axle & suspension partsIIIIIIII
Tire Rotation See NOTE (4).
Exhaust systemIIIIIIII
Drive shaft bootsIIIIIIII
Cabin air filter (if so equipped) See NOTE (3).RRRR
Supplemental air bag system See NOTE (2).
Automatic speed control device (ASCD) vacuum hosesIIII
NOTE: (1) If towing a trailer, using a camper or a car-top carrier, or driving on rough or muddy roads, change (not just inspect) fluid at every 30,000 miles
(48,000 km) or 24 months.
(2) Inspect the supplemental air bag system 10 years after the date of manufacture noted on the F.M.V.S.S. certification label.
(3) If operating mainly in dusty conditions, more frequent maintenance may be required.
(4) Refer to ``Tire rotation'' under the ``General Maintenance'' heading earlier in this section.
Maintenance9-7
ZX
Page 270 of 304
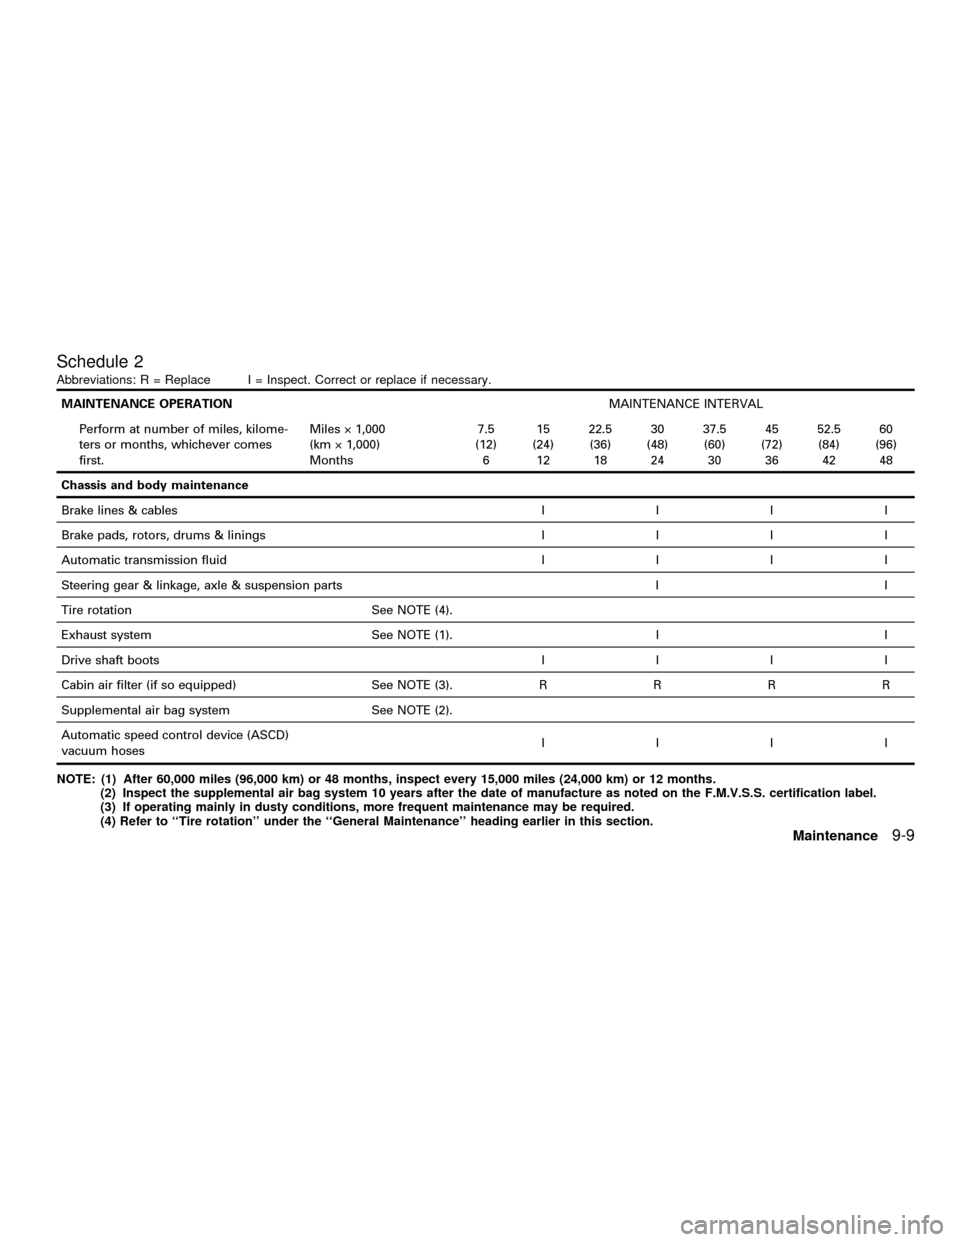
Schedule 2
Abbreviations: R = Replace I = Inspect. Correct or replace if necessary.
MAINTENANCE OPERATIONMAINTENANCE INTERVAL
Perform at number of miles, kilome-
ters or months, whichever comes
first.Miles ý 1,000
(km ý 1,000)
Months7.5
(12)
615
(24)
1222.5
(36)
1830
(48)
2437.5
(60)
3045
(72)
3652.5
(84)
4260
(96)
48
Chassis and body maintenance
Brake lines & cablesIIII
Brake pads, rotors, drums & liningsIIII
Automatic transmission fluidIIII
Steering gear & linkage, axle & suspension parts I I
Tire rotation See NOTE (4).
Exhaust system See NOTE (1). I I
Drive shaft bootsIIII
Cabin air filter (if so equipped) See NOTE (3).RRRR
Supplemental air bag system See NOTE (2).
Automatic speed control device (ASCD)
vacuum hosesIIII
NOTE: (1) After 60,000 miles (96,000 km) or 48 months, inspect every 15,000 miles (24,000 km) or 12 months.
(2) Inspect the supplemental air bag system 10 years after the date of manufacture as noted on the F.M.V.S.S. certification label.
(3) If operating mainly in dusty conditions, more frequent maintenance may be required.
(4) Refer to ``Tire rotation'' under the ``General Maintenance'' heading earlier in this section.
Maintenance9-9
ZX