2001 NISSAN QUEST turn signal
[x] Cancel search: turn signalPage 125 of 304

5. Press the desired button until the red
indicator light flashes slowly. Do not re-
lease the button. Continue holding and
press the hand-held transmitter button
through step 6.
6. Hold down both buttons until the red
indicator light on the Integrated
HomeLinkTUniversal Transceiver
flashes rapidly (This may take 1 to 90
seconds). Then release both buttons.
The rapid flashing means that the trans-
ceiver has been successfully pro-
grammed to match your hand-held trans-
mitter. You can now use the Integrated
HomeLinkTUniversal Transceiver in-
stead of your hand-held transmitter.
PROGRAMMING HomelinkTFOR
CANADIAN CUSTOMERS
Prior to 1992, D.O.C. regulations required
many hand-held transmitters to stop trans-
mitting after one or two seconds, even
though you continue to hold down the but-
ton. If you think you have one of these
hand-held transmitters, you should press
and re-press the transmitter button every 2
seconds without ever releasing the Inte-
grated HomeLinkTUniversal Transceiver
button. The indicator light on the IntegratedHomeLinkTUniversal Transceiver should
blink rapidly indicating a successful pro-
gramming procedure. If it returns to the slow
blink of program mode, continue to periodi-
cally reactivate your hand-held transmitter
until a successful programming procedure
is indicated by the rapidly flashing indicator
light.
OPERATING THE INTEGRATED
HomeLinkTUNIVERSAL TRANS-
CEIVER
To operate, simply press the appropriate
button on the Integrated HomeLinkTUniver-
sal Transceiver. The red indicator light illu-
minates while the signal is being transmit-
ted. The effective transmission range of the
Integrated HomeLinkTUniversal Trans-
ceiver may differ from your hand-held trans-
mitter.
PROGRAMMING TROUBLE
DIAGNOSIS
Be sure to keep your original hand-held
transmitter for possible reprogramming if
necessary.
cMake sure batteries in the hand-held
transmitter are fully charged.cHold your hand-held transmitter against
the bottom surface of the Integrated
HomeLinkTUniversal Transceiver so
that you can still see the red indicator
light.
cHold buttons for duration of the program-
ming without interruption.
cRotate your hand-held transmitter end-
over-end and program again. For best
results, place the end opposite the bat-
tery compartment against the Integrated
HomeLinkTUniversal Transceiver when
programming.
2-36Instruments and controls
ZX
Page 159 of 304

RADIO
Turn the ignition key to ACC or ON and
press the power on switch to turn on the
radio. If you listen to the radio with the
engine not running, the key should be
turned to the ACC position.
Radio reception is affected by station signal
strength, distance from radio transmitter,
buildings, bridges, mountains and other ex-
ternal influences. Intermittent changes in
reception quality normally are caused by
these external influences.
Using a cellular phone in or near the
vehicle may influence radio reception
quality.
Radio reception
Your NISSAN radio system is equipped with
state-of-the-art electronic circuits to en-
hance radio reception. These circuits are
designed to extend reception range, and to
enhance the quality of that reception.
However there are some general character-
istics of both FM and AM radio signals that
can affect radio reception quality in a mov-
ing vehicle, even when the finest equipment
is used. These characteristics are com-pletely normal in a given reception area,
and do not indicate any malfunction in your
NISSAN radio system.
Reception conditions will constantly change
because of vehicle movement. Buildings,
terrain, signal distance and interference
from other vehicles can work against ideal
reception. Described below are some of the
factors that can affect your radio reception.
FM RADIO RECEPTION
Range: FM range is normally limited to 25 to
30 miles (40 to 48 km), with monaural
(single channel) FM having slightly more
range than stereo FM. External influences
may sometimes interfere with FM station
reception even if the FM station is within 25
miles (40 km). The strength of the FM signal
is directly related to the distance between
the transmitter and receiver. FM signals
follow a line-of-sight path, exhibiting many
of the same characteristics as light. For
example they will reflect off objects.
Fade and drift: As your vehicle moves away
from a station transmitter, the signals will
tend to fade and/or drift.
Static and flutter: During signal interference
from buildings, large hills or due to antennaposition, usually in conjunction with in-
creased distance from the station transmit-
ter, static or flutter can be heard. This can
be reduced by adjusting the treble control
counterclockwise to reduce treble re-
sponse.
Multipath reception: Because of the reflec-
tive characteristics of FM signals, direct and
reflected signals reach the receiver at the
same time. The signals may cancel each
other, resulting in momentary flutter or loss
of sound.
AM RADIO RECEPTION
AM signals, because of their low frequency,
can bend around objects and skip along the
ground. In addition, the signals can be
bounced off the ionosphere and bent back
to earth. Because of these characteristics.
AM signals are also subject to interference
as they travel from transmitter to receiver.
Fading: Occurs while the vehicle is passing
through freeway underpasses or in areas
with many tall buildings. It can also occur for
several seconds during ionospheric turbu-
lence even in areas where no obstacles
exist.
Static: Caused by thunderstorms, electrical
AUDIO SYSTEM
4-16Heater, air conditioner and audio systems
ZX
Page 162 of 304

FM-AM RADIO WITH CASSETTE
PLAYER
NOTE: Audio control features include com-
mand buttons for CD players which can be
installed as optional equipment to upgradethe audio system. A CD player is not in-
cluded with this system, but can be pur-
chased as an option at any time. Consult
with an authorized NISSAN dealer for fea-
ture availability.
Audio main operation
To turn the radio on, turn the ignition key to
ACC or ON. If you listen to the radio with the
engine not running, turn the key to the ACC
position.
Radio reception is affected by station signal
strength, distance from radio transmitter,
buildings, bridges, mountains, and other
external influences. Intermittent changes in
reception quality normally are caused by
external influences.
Using a cellular phone in or near the
vehicle may influence radio reception
quality.
Power/Volume control
Push the VOL knob to turn the radio on.
Push the VOL knob once more to turn the
radio OFF.
Turn the knob to the right to increase vol-
ume or to the left to decrease volume. If the
knob is set above a certain volume level and
the ignition is turned off, the volume will
come back on at a nominal listening level
when the ignition is turned back on.
AHA1057
Heater, air conditioner and audio systems4-19
ZX
Page 164 of 304

Clock operation
The clock is on in the display regardless of
what mode, media, or function the radio is in
as long as the ignition is in ACC or ON.
Clock set
Press the RDS/CLK button until SELECT
HOURS is displayed then use the SEL
buttons to change the hour, press
the RDS/CLK button again until SELECT
MINS is displayed then use the SEL
buttons to change the minutes.
The display will return to clock priority mode
in 10 seconds or press the RDS/CLK button
to return to the clock display.
Selecting the desired band
Push the AM or FM buttons to change to AM
or FM band reception.
The FM stereo indicator, ST illuminates during
FM stereo reception. When the stereo broad-
cast signal is weak, the radio automatically
changes from stereo to monaural reception.
FM-AM radio operation
MUTE button
Push the MUTE button to mute out the
radio.TUNE buttons
WARNING
The radio should not be tuned while
driving so full attention may be given to
vehicle operation.
Use the
orbuttons for manual
tuning. To move quickly through the chan-
nels, hold either of the tune buttons down
for more than 0.5 seconds.
AUTO SET
Press the AUTO button while listening to the
radio to activate the auto set feature. When
AUTO is depressed for less than 5 seconds,
the display window momentarily indicates
AUTO ON, and the radio seeks the first six
strong stations for the respective band. The
first six strong stations are then stored in
order in memory buttons one through six.
Only stations in the selected band are set,
and the station seek begins from the last
frequency stored in memory button six. If
AM, FM, SCAN, TUNE, SEEK, AUTO or a
memory button is pushed while auto set is
operating, auto set is canceled and AUTO
OFF shows in the display window.AUTO LOAD
Press the AUTO button for longer than 5
seconds while listening to the radio to acti-
vate the auto load feature. When AUTO is
depressed for longer than 5 seconds, the
display window momentarily indicates
AUTO LOAD, and the radio seeks the first
six strong stations for every band. The first
six strong stations are then stored in order
in memory buttons one through six for each
band (AM, FM1, and FM2).
SEEK tuning
Push the SEEKorbuttons to find the
next broadcast station. Pushing the
SEEKS up andbutton SEEKS down.
Pushing the button again continues the SEEK
function. Once the highest broadcast station
is reached, the radio continues in the SEEK
mode at the lowest station. Once the lowest
broadcast station is reached, the radio con-
tinues in the SEEK mode at the highest
station.
SCAN tuning
Push the SCAN tuning button, SCAN illumi-
nates in the display. SCAN tuning begins
from low to high frequencies and stops at
each broadcasting station for 5 seconds.
Heater, air conditioner and audio systems
4-21
ZX
Page 168 of 304

FM-AM RADIO WITH CASSETTE
PLAYER AND COMPACT DISC
(CD) PLAYER
Audio main operationTo turn the radio on, turn the ignition key to
ACC or ON. If you listen to the radio with the
engine not running, turn the key to the ACC
position.
Radio reception is affected by station signal
strength, distance from radio transmitter,buildings, bridges, mountains, and other
external influences. Intermittent changes in
reception quality normally are caused by
external influences.
Using a cellular phone in or near the
vehicle may influence radio reception
quality.
Power/Volume control
Push the VOL knob to turn the radio on.
Push the VOL knob once more to turn the
radio OFF.
The control buttons are illuminated when
the parking lamps or headlamps are on.
Only the text for the active controls will
illuminate for each specific type of media.
No bulbs or lights have malfunctioned. For
example when a cassette tape is being
played, SHUFFLE will not illuminate.
Turn the knob to the right to increase vol-
ume or to the left to decrease volume. If the
knob is set above a certain volume level and
the ignition is turned off, the volume will
come back on at a nominal listening level
when the ignition is turned back on.
AHA1058
Heater, air conditioner and audio systems4-25
ZX
Page 170 of 304

Clock operation
The clock is on in the display regardless of
what mode, media, or function the radio is in
as long as the ignition is in ACC or ON.
Clock set
Press the RDS/CLK button until SELECT
HOURS is displayed then use the SEL
buttons to change the hour, press
the RDS/CLK button again until SELECT
MINS is displayed then use the SEL
buttons to change the minutes.
The display will return to the previous radio
station, tape or CD that was being played
previous to setting the clock in 7 seconds or
you may press the RDS/CLK button until the
previous display appears.
Selecting the desired band
Push the AM buttons to change to AM band
or push the FM button to change to FM1 or
FM2 band reception.
The FM stereo indicator, ST illuminates
during FM stereo reception. When the ste-
reo broadcast signal is weak, the radio
automatically changes from stereo to mon-
aural reception.
FM-AM Radio operation
MUTE button
Push the MUTE button to mute out the
radio.
TUNE buttons
WARNING
The radio should not be tuned while
driving so full attention may be given to
vehicle operation.
Use the
orbuttons for manual
tuning. To move quickly through the chan-
nels, hold either of the tune buttons down
for more than 0.5 seconds.
AUTO SET
Press the AUTO button while listening to the
radio to activate the auto set feature. When
AUTO is depressed for less than 5 seconds,
the display window momentarily indicates
AUTO ON, and the radio seeks the first six
strong stations for the respective band. The
first six strong stations are then stored in
order in memory buttons one through six.
Only stations in the selected band are set,and the station seek begins from the last
frequency stored in memory button six. If
AM, FM, SCAN, TUNE, SEEK, AUTO or a
memory button is pushed while auto set is
operating, auto set is canceled and AUTO
OFF shows in the display window.
AUTO LOAD
Press the AUTO button for longer than 5
seconds while listening to the radio to acti-
vate the auto load feature. When AUTO is
depressed for longer than 5 seconds, the
display window momentarily indicates
AUTO LOAD, and the radio seeks the first
six strong stations for every band. The first
six strong stations are then stored in order
in memory buttons one through six for each
band (AM, FM1, and FM2).
SEEK tuning
Push the SEEKorbuttons to find the
next broadcast station. Pushing the
SEEKS up andbutton SEEKS down.
Pushing the button again continues the SEEK
function. Once the highest broadcast station
is reached, the radio continues in the SEEK
mode at the lowest station. Once the lowest
broadcast station is reached, the radio con-
Heater, air conditioner and audio systems4-27
ZX
Page 209 of 304

CHANGING A FLAT TIRE
If you have a flat tire, follow the instructions
below:
Stopping the vehicle
1. Safely move the vehicle off the road and
away from traffic.
2. Turn on the hazard warning flashers.
3. Park on a level surface and apply the
parking brake. Move the gearshift lever
to the P (Park) position.
4. Turn off the engine.
5. Raise the hood to warn other traffic, and
to signal professional road assistance
personnel that you need assistance.
6. Have all passengers get out of the ve-
hicle and stand in a safe place, away
from traffic and clear of the vehicle.
WARNING
cMake sure the parking brake is se-
curely applied and the automatic
transmission is shifted into P (Park).
cNever change tires when the vehicle
is on a slope, ice or slippery areas.
This is hazardous.cNever change tires if oncoming traf-
fic is close to your vehicle. Wait for
professional road assistance.
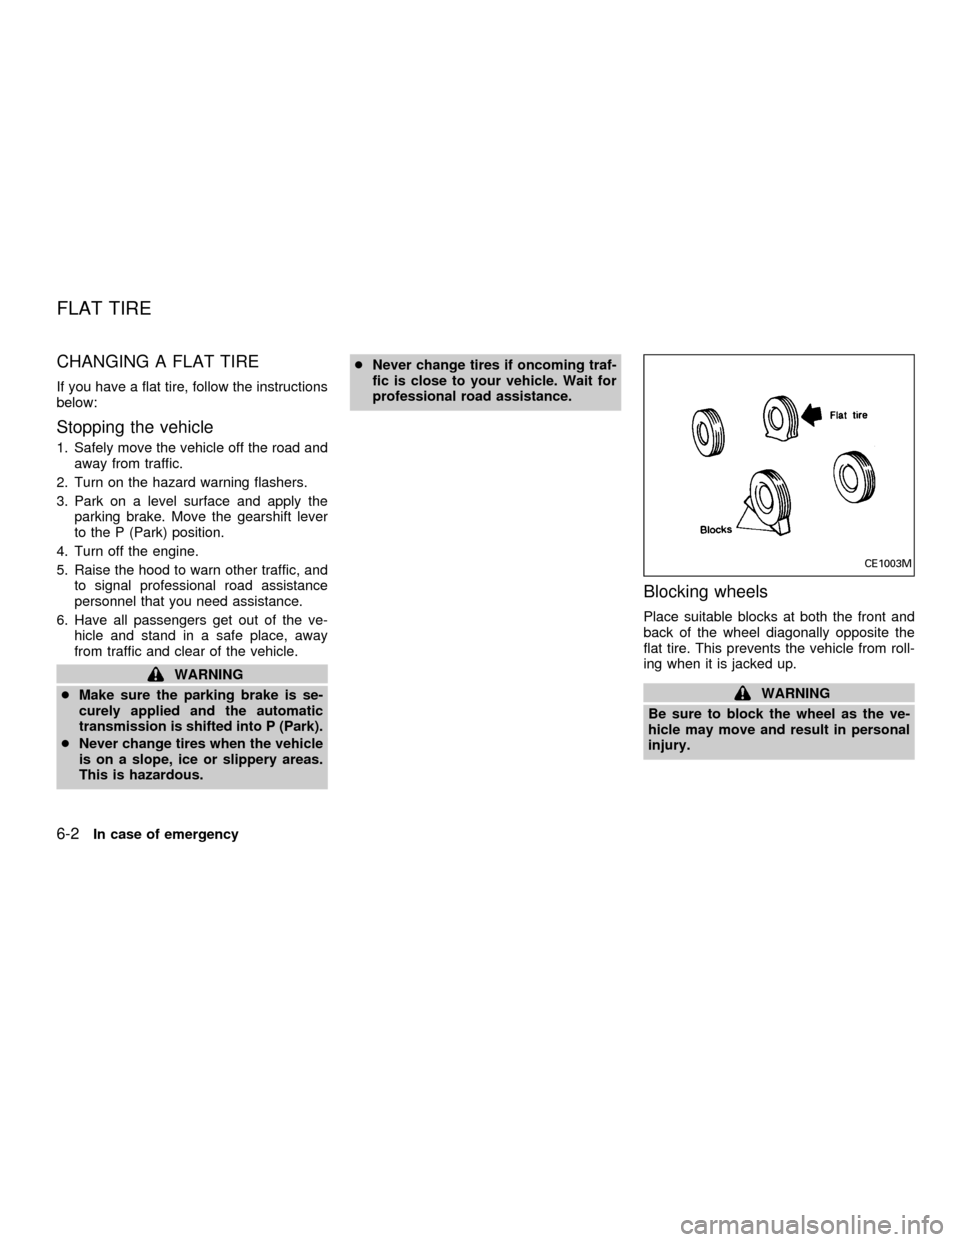
Blocking wheels
Place suitable blocks at both the front and
back of the wheel diagonally opposite the
flat tire. This prevents the vehicle from roll-
ing when it is jacked up.
WARNING
Be sure to block the wheel as the ve-
hicle may move and result in personal
injury.
CE1003M
FLAT TIRE
6-2In case of emergency
ZX
Page 252 of 304

EXTERIOR AND INTERIOR
LIGHTS
Item Wattage (W) Bulb No.
Headlight assembly
High/Low 65/55 9007 (HB5)
Front turn signal light 8.25/27 3157A
Front fog light 27 881L
Front combination light:
Front side marker light 3.8 194
Parking/Cornering 8.25/27 3157
Rear combination light:
Turn signal 27 3156A
Stop/Tail 8.25/27 3157
Rear side marker light 5 168
Back-up light 27 3156
License plate light 3.8 194
High-mounted stop light 12.8 912
Interior lights 12 211-2
Personal reading light 10 578
Luggage compartment light 12 211-2
Steplight 12 211-2
Spotlight 10 578
Do-it-yourself8-25
ZX