2001 NISSAN QUEST instrument panel
[x] Cancel search: instrument panelPage 117 of 304

The parcel shelf allows for additional stor-
age for packages.
Do not load more than 30 pounds (13.6 kg)
on the parcel shelf. The parcel shelf can be
installed at two different heights and in a
storage position.
To install the parcel shelf:
c
Position the right side of the parcel shelf
in to one of the shelf positions on the right
side luggage compartment trim panel.
cPosition the left side of the parcel shelf
into the matching position (same height)
on the left side luggage compartment trim
panel.
cSlide the parcel shelf lock knob fully to
the left side (latch in green dot position).
cTurn the parcel shelf lock knob clock-
wise until securely locked.
The parcel shelf is also equipped with a
parcel shelf net to keep packages on the
parcel shelf from moving around while the
vehicle is in motion.
The parcel shelf net is permanently at-
tached to the back side of the parcel shelf.
Pull the parcel shelf net over the packagesand attach the three loops to the three
retainers on the bottom side of the parcel
shelf. Make sure the parcel shelf is securely
locked before covering the packages with
the parcel shelf net.
To remove the parcel shelf:
cUnlock the parcel shelf net.
cRemove all packages from the parcel
shelf.
cTurn the parcel shelf lock knob counter
clockwise until loose (maximum two
turns).
cSlide the parcel shelf lock knob fully to
the right side (unlatch in red dot posi-
tion).
cRemove the parcel shelf from the left
side luggage compartment trim panel,
then the right side luggage compartment
trim panel and reposition the parcel shelf
where desired.Put the parcel shelf in the floor storage
position when the parcel shelf is not used or
required.
APD1073
2-28Instruments and controls
ZX
Page 122 of 304
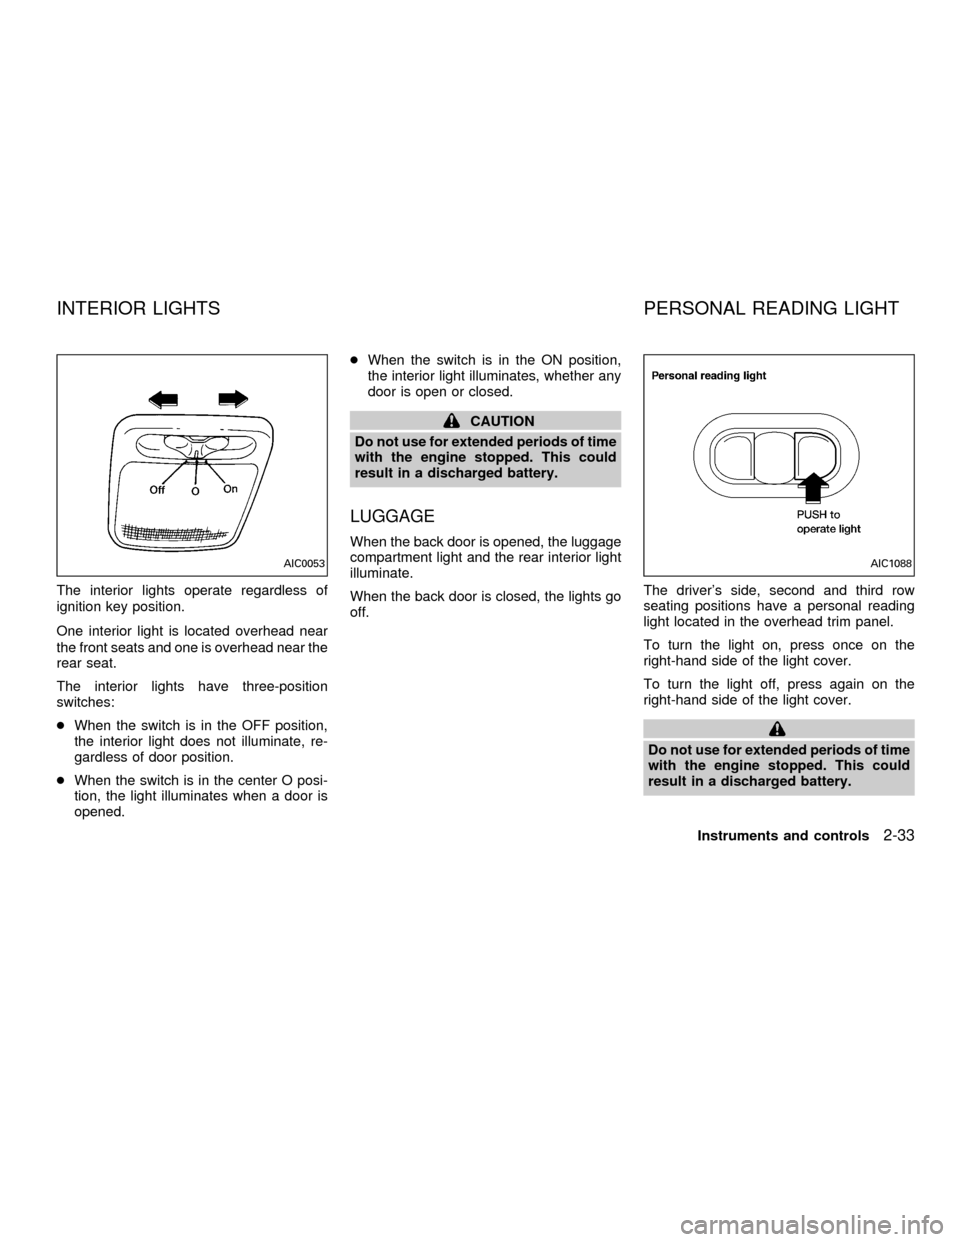
The interior lights operate regardless of
ignition key position.
One interior light is located overhead near
the front seats and one is overhead near the
rear seat.
The interior lights have three-position
switches:
cWhen the switch is in the OFF position,
the interior light does not illuminate, re-
gardless of door position.
cWhen the switch is in the center O posi-
tion, the light illuminates when a door is
opened.cWhen the switch is in the ON position,
the interior light illuminates, whether any
door is open or closed.
CAUTION
Do not use for extended periods of time
with the engine stopped. This could
result in a discharged battery.
LUGGAGE
When the back door is opened, the luggage
compartment light and the rear interior light
illuminate.
When the back door is closed, the lights go
off.The driver's side, second and third row
seating positions have a personal reading
light located in the overhead trim panel.
To turn the light on, press once on the
right-hand side of the light cover.
To turn the light off, press again on the
right-hand side of the light cover.
Do not use for extended periods of time
with the engine stopped. This could
result in a discharged battery.
AIC0053AIC1088
INTERIOR LIGHTS PERSONAL READING LIGHT
Instruments and controls2-33
ZX
Page 126 of 304

CLEARING THE PROGRAMMED
INFORMATION
Should you sell your vehicle, be sure to
clear the channels of the Integrated
HomeLinkTUniversal Transceiver. To clear
the channels, simultaneously hold down the
outside two buttons (#1 & #3) until the red
indicator light begins to flash rapidly (ap-
proximately 20 seconds). This will clear all
three buttons. Individual buttons cannot be
cleared, but can be reprogrammed at any
time by following the programming proce-
dures described previously.
ROLLING CODE PROGRAMMING
If your hand held transmitter appears to
train to the Integrated HomeLinkTUniversal
Transceiver, but does not open your garage
door, and your garage door opener was
manufactured after 1995, your garage door
opener may have a Code Protected or
Rolling Code feature. This type of system
will change the code of your garage door
opener every time you open or close your
garage door.
To determine if you have one of these
systems, depress the button on the Inte-
grated HomeLinkTUniversal Transceiver
that you have just programmed. If the LED
on the HomeLinkTUniversal Transceiver
flashes rapidly for 1 to 2 seconds, then
remains on, your garage door opener has a
rolling code system.
To operate your rolling code garage door
opener from your Integrated HomeLinkT
Universal Transceiver, follow these steps:
1. Program your hand held transmitter to
the Integrated HomeLinkTUniversal
Transceiver by following the procedures
outlined previously (if not yet pro-
grammed).2. Program your garage door opener re-
ceiver to recognize the Integrated
HomeLinkTUniversal Transceiver (The
Integrated HomeLinkTUniversal Trans-
ceiver follows the same procedure to
train to the receiver as your hand held
transmitter did when it was first installed):
a) Remove the cover panel from your
garage door opener receiver. The re-
ceiver should be located by the ga-
rage door opener motor.
b)
Locate the training button on the ga-
rage door opener receiver. The exact
location and color of the button may
vary by garage door opener brand. If
you have difficulty locating the training
button, reference your garage door
opener manual. If you have difficulty
programming your garage door
opener equipped with a rolling code
system to recognize the Integrated
HomeLinkTUniversal Transceiver with
the Rolling Code feature, call NISSAN
Consumer Affairs Department.
c) Press the training button on the ga-
rage door opener receiver for 1 to 2
seconds.
AIC1070
Instruments and controls2-37
ZX
Page 136 of 304
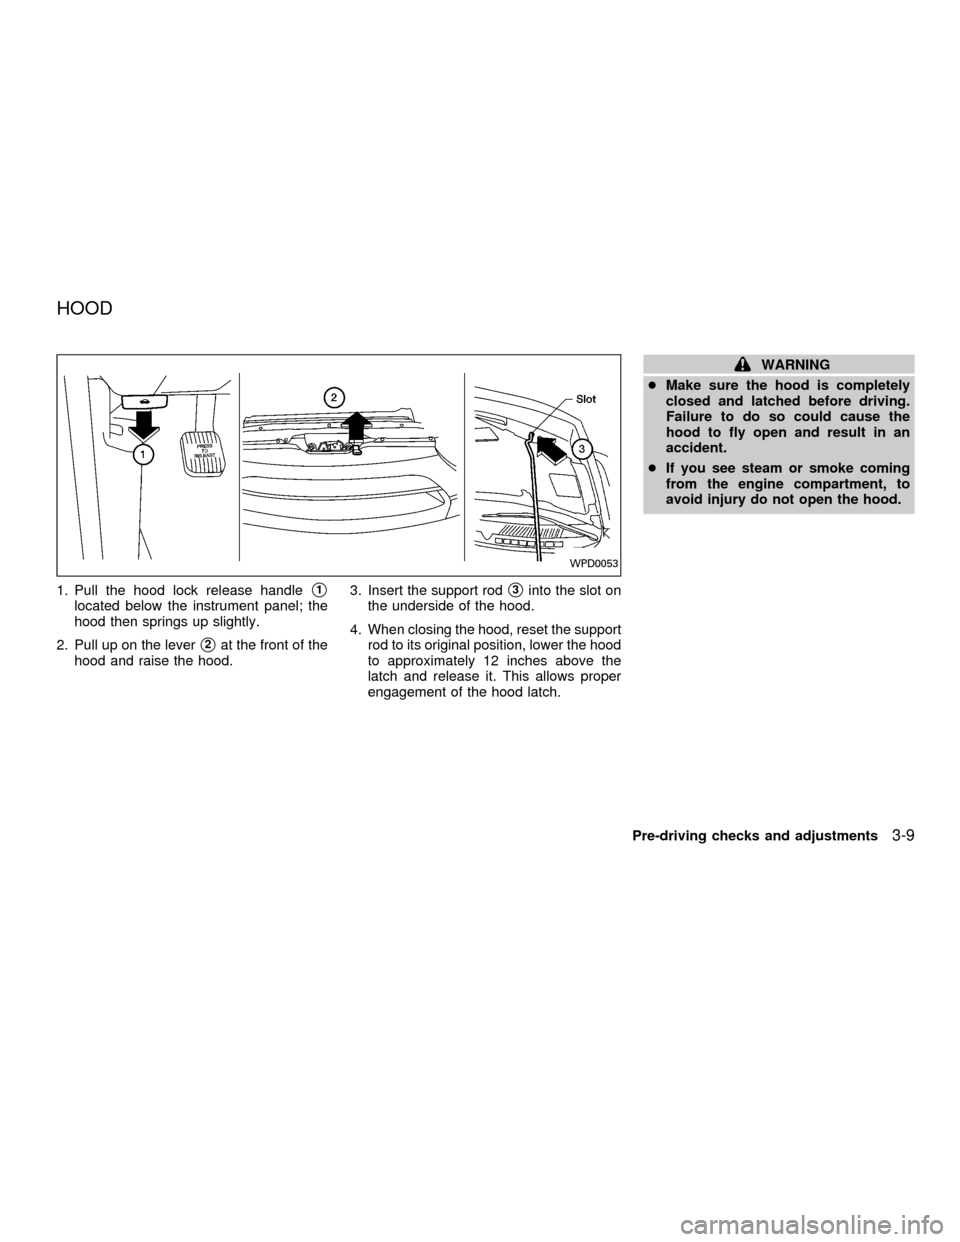
1. Pull the hood lock release handles1
located below the instrument panel; the
hood then springs up slightly.
2. Pull up on the lever
s2at the front of the
hood and raise the hood.3. Insert the support rod
s3into the slot on
the underside of the hood.
4. When closing the hood, reset the support
rod to its original position, lower the hood
to approximately 12 inches above the
latch and release it. This allows proper
engagement of the hood latch.
WARNING
cMake sure the hood is completely
closed and latched before driving.
Failure to do so could cause the
hood to fly open and result in an
accident.
cIf you see steam or smoke coming
from the engine compartment, to
avoid injury do not open the hood.
WPD0053
HOOD
Pre-driving checks and adjustments3-9
ZX
Page 154 of 304
WARNING
cThe air conditioner cooling function
operates only when the engine is
running.
cDo not leave children, impaired
adults, or pets alone in your vehicle.
On hot, sunny days, temperatures in
a closed vehicle could quickly be-
come high enough to cause severe
or possibly fatal injuries to people or
animals.
cDo not use the recirculation mode
for long periods as it may cause theinterior air to become stale and the
windows to fog up.
cPositioning of the heater and air con-
ditioner controls should not be done
while driving, so full attention may
be given to vehicle operation.
The cabin air filter (if so equipped) requires
periodic maintenance. See the ``Do it your-
self'' section for additional information.
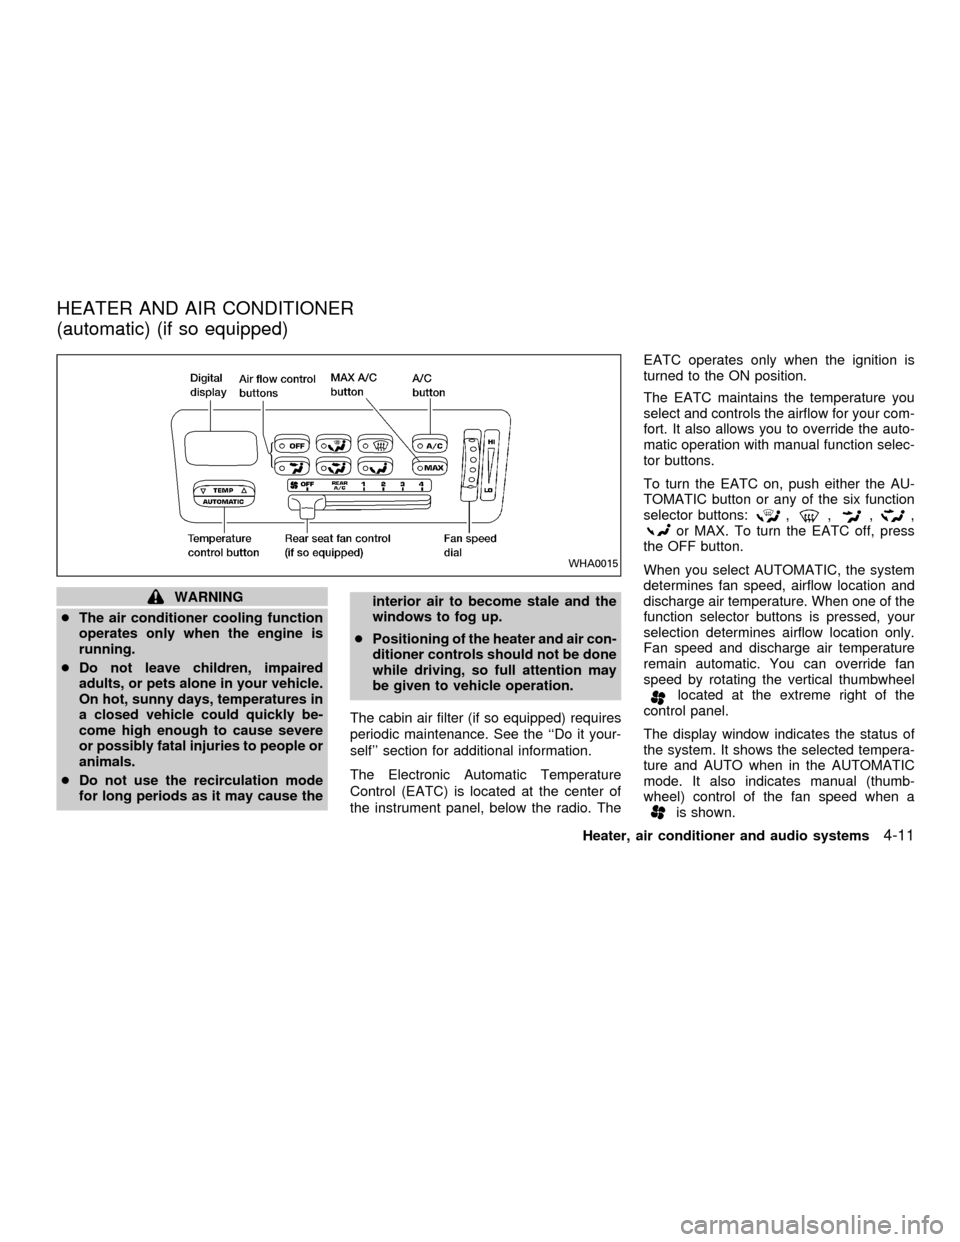
The Electronic Automatic Temperature
Control (EATC) is located at the center of
the instrument panel, below the radio. TheEATC operates only when the ignition is
turned to the ON position.
The EATC maintains the temperature you
select and controls the airflow for your com-
fort. It also allows you to override the auto-
matic operation with manual function selec-
tor buttons.
To turn the EATC on, push either the AU-
TOMATIC button or any of the six function
selector buttons:
,,,,or MAX. To turn the EATC off, press
the OFF button.
When you select AUTOMATIC, the system
determines fan speed, airflow location and
discharge air temperature. When one of the
function selector buttons is pressed, your
selection determines airflow location only.
Fan speed and discharge air temperature
remain automatic. You can override fan
speed by rotating the vertical thumbwheel
located at the extreme right of the
control panel.
The display window indicates the status of
the system. It shows the selected tempera-
ture and AUTO when in the AUTOMATIC
mode. It also indicates manual (thumb-
wheel) control of the fan speed when a
is shown.
WHA0015
HEATER AND AIR CONDITIONER
(automatic) (if so equipped)
Heater, air conditioner and audio systems4-11
ZX
Page 156 of 304
the instrument panel registers. The
indicator light comes on, and the
display window shows the set temperature.
The EATC heats the air if the selected
temperature is warmer than the outside air
coming into the vehicle. However, the air is
not cooled regardless of the temperature
setting, unless the A/C button is selected.
Push this button to get air from the front and
rear floor outlets and instrument panel ven-
tilators at the same time. The
indicator
light comes on and the display window
shows the set temperature. The EATC
heats the air if the selected temperature is
warmer than the outside air coming into the
vehicle. However, the air is not cooled re-
gardless of the temperature setting, unless
the A/C button is selected.
Push this button to direct airflow to the front
and rear floor outlets. Theindicator
light comes on, and the display window
shows the set temperature. The EATC
heats the air if the selected temperature is
warmer than the outside air coming into the
vehicle. However, the air is not cooled re-gardless of the temperature setting, unless
the A/C button is selected.
Push the MAX button to choose air recircu-
lation. In this mode the EATC system recir-
culates the air inside the vehicle rather than
drawing air from outside. Air is distributed
through the instrument panel ventilators
similar to
mode. Use this mode to rap-
idly cool the inside of the vehicle, or to
dehumidify the air inside the vehicle.
Activate the air conditioner in any of the
override modes listed above by pressing the
A/C button. The A/C indicator light comes
on to verify activation, and cooled air flows
from the vents. Fan speed continues to be
controlled by the EATC unless the fan
speed thumbwheel is used to override.English/metric mode
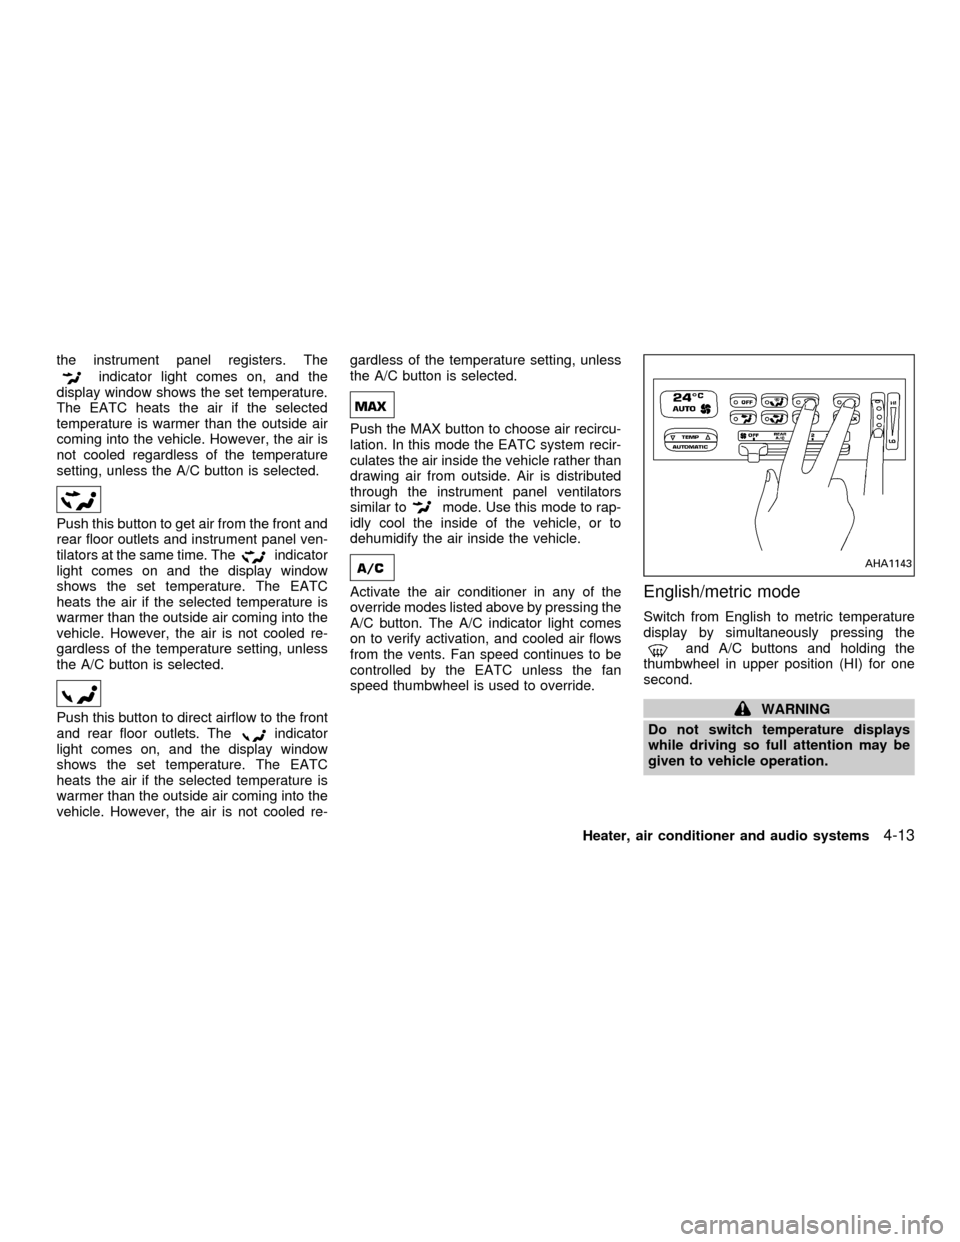
Switch from English to metric temperature
display by simultaneously pressing the
and A/C buttons and holding the
thumbwheel in upper position (HI) for one
second.
WARNING
Do not switch temperature displays
while driving so full attention may be
given to vehicle operation.
AHA1143
Heater, air conditioner and audio systems4-13
ZX
Page 175 of 304

COMPACT DISC (CD) PLAYER
(if so equipped)
The compact disc player consists of two
main components; the 6 CD magazine and
the CD changer. Both components are lo-
cated on the center instrument panel con-
sole, below the ashtray.
How to load the CD magazine
To load the magazine with CDs, first push
the EJECT button on the CD changer to
eject the magazine, then remove the maga-
zine from the changer. The inside of the CD
magazine contains six shelves, one foreach CD to be loaded. Carefully slide a CD
(label side up) onto one of the shelves and
push it in. Repeat as desired, loading up to
six CDs.
CD magazine insert
Once the desired number of CDs are loaded
into the magazine, insert the magazine back
into the CD changer.
With the ignition switch OFF, the CD maga-
zine loads into the CD changer. Once the
ignition switch is turned to ACC or ON, the
audio system returns to its previous mode.
With the ignition switch in the ACC or ONposition, the CD magazine loads into the
CD changer and begins play with disc one,
track one.
CD button
Push this button to switch from radio or tape
mode to CD mode. CD play begins auto-
matically if at least one disc is loaded in the
magazine. The display window shows the
CD number for three seconds, then the track
number for three seconds, then displays
both together for the remainder of the track.
If the CD button is pushed while in the radio
or tape mode, and there are no CDs loaded
in the magazine, the display window flashes
a NO DISC message for 4 seconds.
CD Player controls
SEEK
Push
SEEK to select the previous
track number, or push SEEKto select
the next track number. After the last track on
a disc, pushing SEEK
selects the first
track of the same disc.
SELECT DISCS
Push
TUNE to select the previous CD
in the magazine. Push TUNEto select
AHA1064
4-32Heater, air conditioner and audio systems
ZX
Page 199 of 304
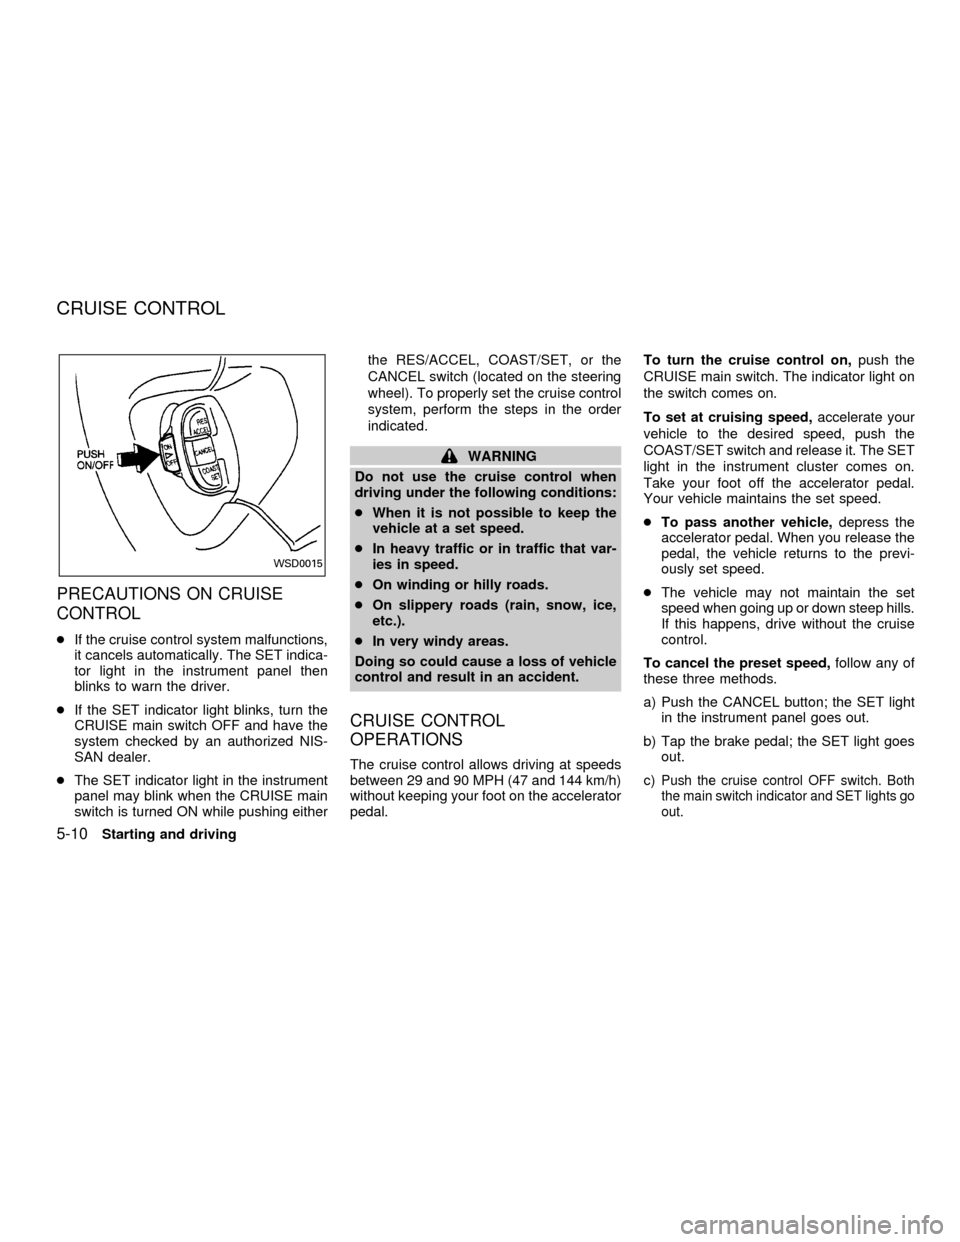
PRECAUTIONS ON CRUISE
CONTROL
cIf the cruise control system malfunctions,
it cancels automatically. The SET indica-
tor light in the instrument panel then
blinks to warn the driver.
cIf the SET indicator light blinks, turn the
CRUISE main switch OFF and have the
system checked by an authorized NIS-
SAN dealer.
cThe SET indicator light in the instrument
panel may blink when the CRUISE main
switch is turned ON while pushing eitherthe RES/ACCEL, COAST/SET, or the
CANCEL switch (located on the steering
wheel). To properly set the cruise control
system, perform the steps in the order
indicated.
WARNING
Do not use the cruise control when
driving under the following conditions:
cWhen it is not possible to keep the
vehicle at a set speed.
cIn heavy traffic or in traffic that var-
ies in speed.
cOn winding or hilly roads.
cOn slippery roads (rain, snow, ice,
etc.).
cIn very windy areas.
Doing so could cause a loss of vehicle
control and result in an accident.
CRUISE CONTROL
OPERATIONS
The cruise control allows driving at speeds
between 29 and 90 MPH (47 and 144 km/h)
without keeping your foot on the accelerator
pedal.To turn the cruise control on,push the
CRUISE main switch. The indicator light on
the switch comes on.
To set at cruising speed,accelerate your
vehicle to the desired speed, push the
COAST/SET switch and release it. The SET
light in the instrument cluster comes on.
Take your foot off the accelerator pedal.
Your vehicle maintains the set speed.
cTo pass another vehicle,depress the
accelerator pedal. When you release the
pedal, the vehicle returns to the previ-
ously set speed.
cThe vehicle may not maintain the set
speed when going up or down steep hills.
If this happens, drive without the cruise
control.
To cancel the preset speed,follow any of
these three methods.
a) Push the CANCEL button; the SET light
in the instrument panel goes out.
b) Tap the brake pedal; the SET light goes
out.
c)Push the cruise control OFF switch. Both
the main switch indicator and SET lights go
out.
WSD0015
CRUISE CONTROL
5-10Starting and driving
ZX