Page 78 of 304
3. Tighten the tether strap to remove any
slack.
4. Before placing the child in the child re-
straint, use force to tilt the child restraint
from side to side, and tug it forward to
make sure it is securely held in place.
5. Check to make sure the child restraint is
properly secured prior to each use. If not
secure, repeat steps two through four.
ARS1193ARS1199ARS1192
Seats, restraints and supplemental air bag systems1-71
ZX
Page 79 of 304

INSTALLATION ON THREE-
PASSENGER BENCH SEAT IN
SECOND ROW
A child restraint with a top tether strap may
be placed at the passenger side outboard
and center positions on the three-passenger
bench seat when the seat is in the second
row location. Once the child restraint is prop-
erly secured to the seat (see ªInstallation on
second and third row outboard positions,
Front facingº earlier in this section), follow
the directions explained in ``Installation on
three passenger bench seat in third row''
later in this section.
INSTALLATION ON THREE-
PASSENGER BENCH SEAT IN
THIRD ROW
A child restraint with a top tether strap may
be placed at the passenger/driver side out-
board and center positions on the three-
passenger bench seat when the seat is in
the third row location. Once the child re-
straint is properly secured to the seat (see
ªInstallation on second and third row out-
board positions, Front facingº or ªInstallation
on three-passenger bench seat center posi-
tion, Front facingº earlier in this section),follow the directions to attach the tether
strap anchor brackets.
To attach a tether strap to a third row bench
seat:
1. For the passenger/driver side outboard
seating positions, route the tether strap
under the head restraint and between the
head restraint supports.
For the center seating position, route the
tether strap over the seatback.
WRS0022
1-72Seats, restraints and supplemental air bag systems
ZX
Page 80 of 304

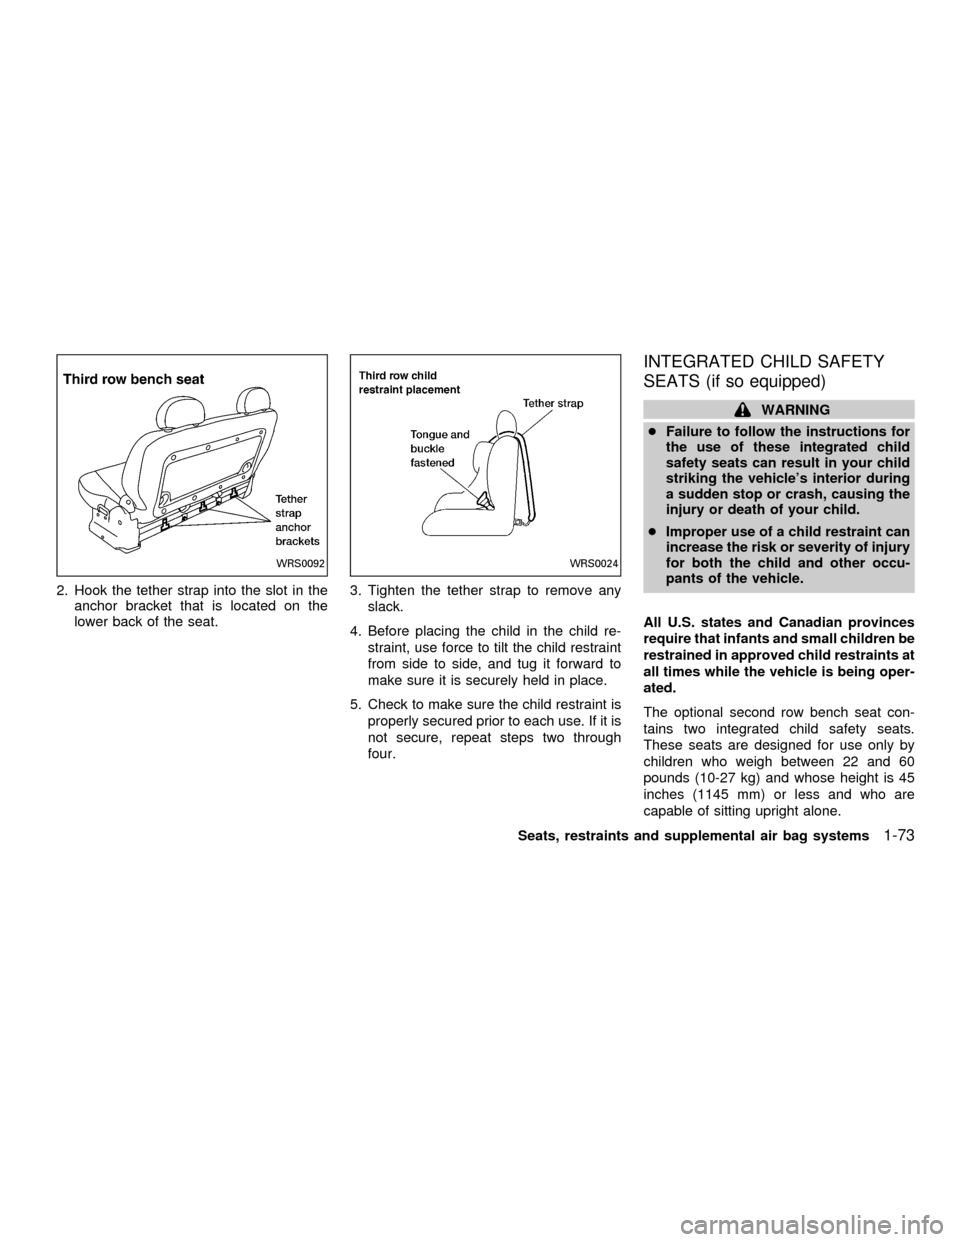
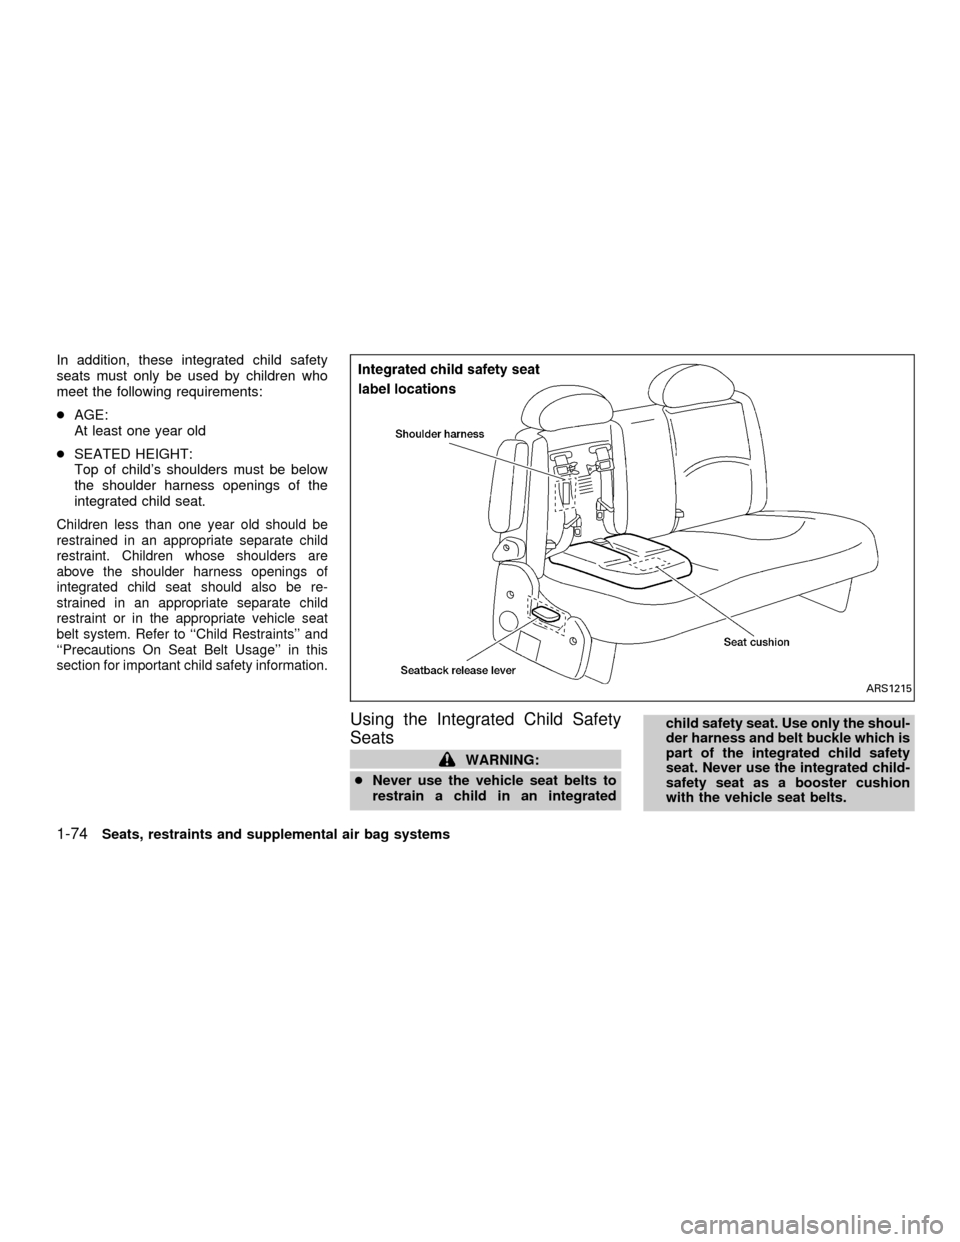
2. Hook the tether strap into the slot in the
anchor bracket that is located on the
lower back of the seat.3. Tighten the tether strap to remove any
slack.
4. Before placing the child in the child re-
straint, use force to tilt the child restraint
from side to side, and tug it forward to
make sure it is securely held in place.
5. Check to make sure the child restraint is
properly secured prior to each use. If it is
not secure, repeat steps two through
four.
INTEGRATED CHILD SAFETY
SEATS (if so equipped)
WARNING
cFailure to follow the instructions for
the use of these integrated child
safety seats can result in your child
striking the vehicle's interior during
a sudden stop or crash, causing the
injury or death of your child.
cImproper use of a child restraint can
increase the risk or severity of injury
for both the child and other occu-
pants of the vehicle.
All U.S. states and Canadian provinces
require that infants and small children be
restrained in approved child restraints at
all times while the vehicle is being oper-
ated.
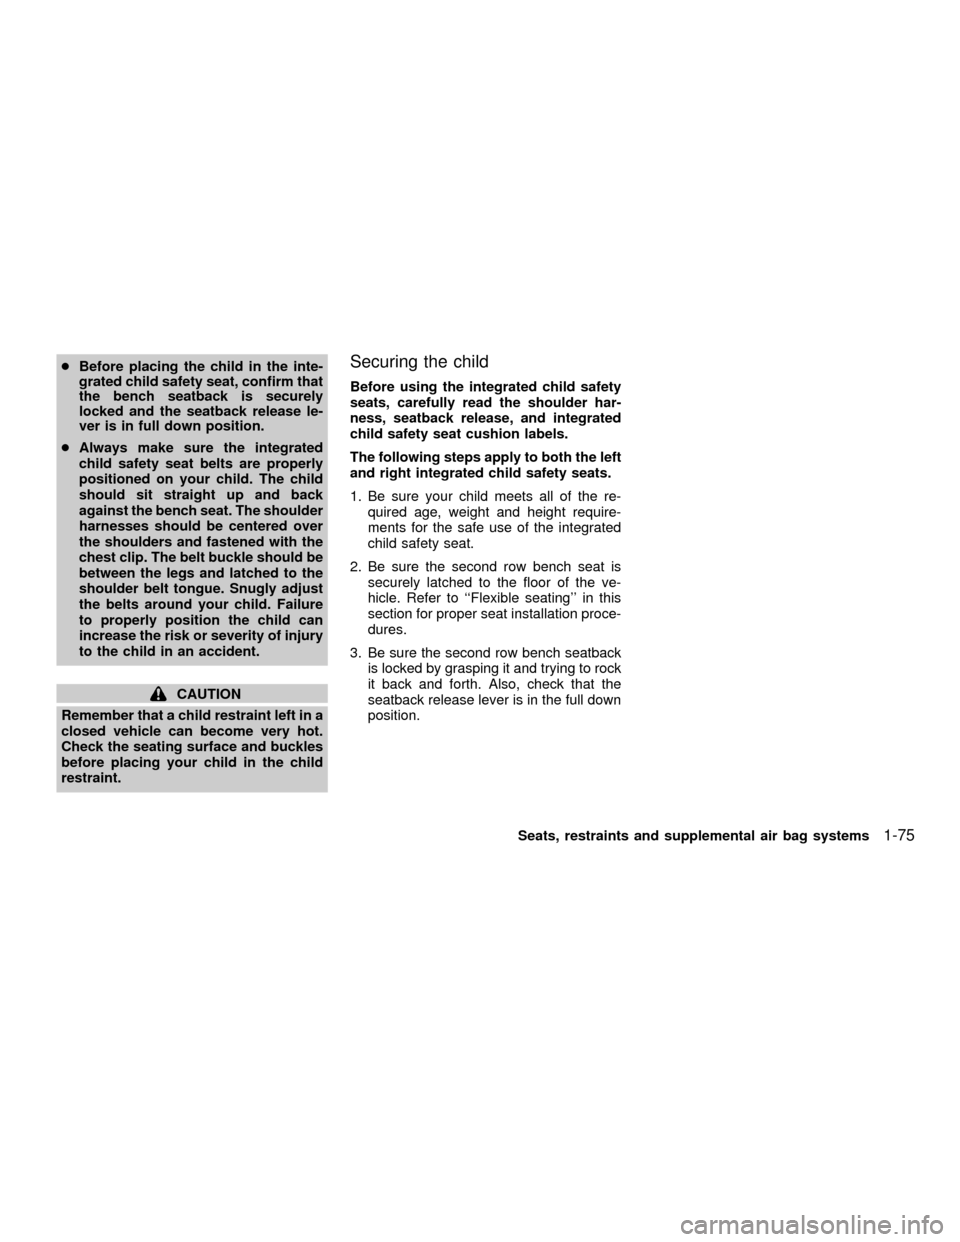
The optional second row bench seat con-
tains two integrated child safety seats.
These seats are designed for use only by
children who weigh between 22 and 60
pounds (10-27 kg) and whose height is 45
inches (1145 mm) or less and who are
capable of sitting upright alone.
WRS0092WRS0024
Seats, restraints and supplemental air bag systems1-73
ZX
Page 81 of 304

In addition, these integrated child safety
seats must only be used by children who
meet the following requirements:
cAGE:
At least one year old
cSEATED HEIGHT:
Top of child's shoulders must be below
the shoulder harness openings of the
integrated child seat.
Children less than one year old should be
restrained in an appropriate separate child
restraint. Children whose shoulders are
above the shoulder harness openings of
integrated child seat should also be re-
strained in an appropriate separate child
restraint or in the appropriate vehicle seat
belt system. Refer to ``Child Restraints'' and
``Precautions On Seat Belt Usage'' in this
section for important child safety information.
Using the Integrated Child Safety
Seats
WARNING:
cNever use the vehicle seat belts to
restrain a child in an integratedchild safety seat. Use only the shoul-
der harness and belt buckle which is
part of the integrated child safety
seat. Never use the integrated child-
safety seat as a booster cushion
with the vehicle seat belts.
ARS1215
1-74Seats, restraints and supplemental air bag systems
ZX
Page 82 of 304

cBefore placing the child in the inte-
grated child safety seat, confirm that
the bench seatback is securely
locked and the seatback release le-
ver is in full down position.
cAlways make sure the integrated
child safety seat belts are properly
positioned on your child. The child
should sit straight up and back
against the bench seat. The shoulder
harnesses should be centered over
the shoulders and fastened with the
chest clip. The belt buckle should be
between the legs and latched to the
shoulder belt tongue. Snugly adjust
the belts around your child. Failure
to properly position the child can
increase the risk or severity of injury
to the child in an accident.
CAUTION
Remember that a child restraint left in a
closed vehicle can become very hot.
Check the seating surface and buckles
before placing your child in the child
restraint.
Securing the child
Before using the integrated child safety
seats, carefully read the shoulder har-
ness, seatback release, and integrated
child safety seat cushion labels.
The following steps apply to both the left
and right integrated child safety seats.
1. Be sure your child meets all of the re-
quired age, weight and height require-
ments for the safe use of the integrated
child safety seat.
2. Be sure the second row bench seat is
securely latched to the floor of the ve-
hicle. Refer to ``Flexible seating'' in this
section for proper seat installation proce-
dures.
3. Be sure the second row bench seatback
is locked by grasping it and trying to rock
it back and forth. Also, check that the
seatback release lever is in the full down
position.
Seats, restraints and supplemental air bag systems
1-75
ZX
Page 83 of 304
4. Pull the cushion release strap and lower
the intregrated child safety seat cushion
completely.NOTE: The head restraints on the pas-
senger bench seat equipped with the
integrated child safety seats, are not
adjustable or removable.5. If connected, separate the two halves of
the shoulder harness from the belt
buckle. Also if connected, disconnect the
chest clip and lay the shoulder harness
halves aside.
ARS1201
APD0814
1-76Seats, restraints and supplemental air bag systems
ZX
Page 84 of 304
6. Place the child on the integrated child
safety seat. Place the belt buckle be-
tween the child's legs.7.Place the left shoulder harness over the
child's left shoulder. Insert the left shoulder
harness tongue into the left side of the belt
buckle. Confirm that the left shoulder har-
ness tongue indicator is green. The shoul-
der harness tongues only fit into the proper
sides of the belt buckle.
8.Place the right shoulder harness over the
child's right shoulder. Insert the right shoul-
der harness tongue into the right side of the
belt buckle. Confirm that the right shoulder
harness tongue indicator is green. The
shoulder harness tongues only fit into the
proper sides of the belt buckle.
APD0815APD0816APD0817
Seats, restraints and supplemental air bag systems1-77
ZX
Page 85 of 304

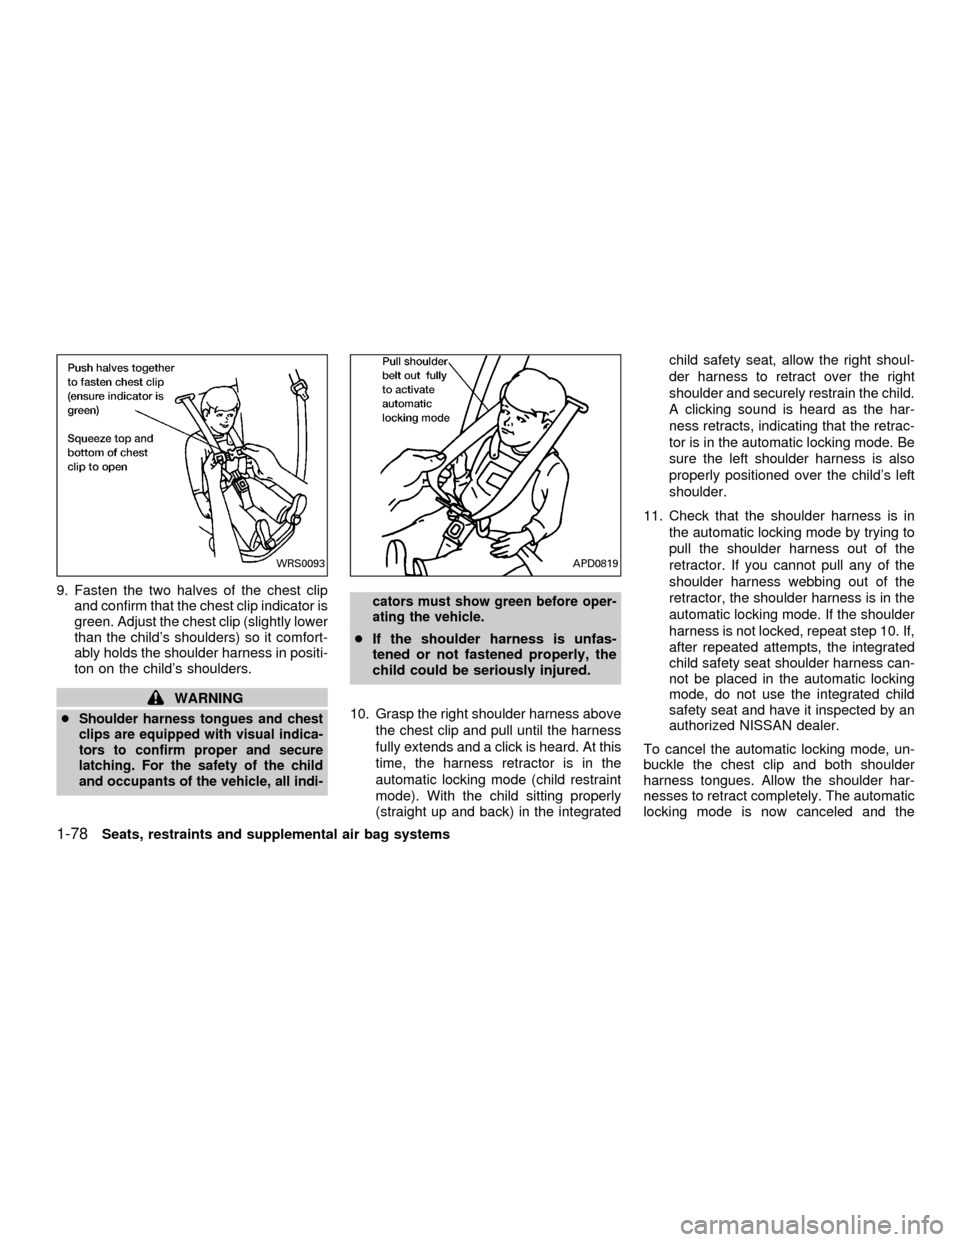
9. Fasten the two halves of the chest clip
and confirm that the chest clip indicator is
green. Adjust the chest clip (slightly lower
than the child's shoulders) so it comfort-
ably holds the shoulder harness in positi-
ton on the child's shoulders.
WARNING
cShoulder harness tongues and chest
clips are equipped with visual indica-
tors to confirm proper and secure
latching. For the safety of the child
and occupants of the vehicle, all indi-cators must show green before oper-
ating the vehicle.
cIf the shoulder harness is unfas-
tened or not fastened properly, the
child could be seriously injured.
10. Grasp the right shoulder harness above
the chest clip and pull until the harness
fully extends and a click is heard. At this
time, the harness retractor is in the
automatic locking mode (child restraint
mode). With the child sitting properly
(straight up and back) in the integratedchild safety seat, allow the right shoul-
der harness to retract over the right
shoulder and securely restrain the child.
A clicking sound is heard as the har-
ness retracts, indicating that the retrac-
tor is in the automatic locking mode. Be
sure the left shoulder harness is also
properly positioned over the child's left
shoulder.
11. Check that the shoulder harness is in
the automatic locking mode by trying to
pull the shoulder harness out of the
retractor. If you cannot pull any of the
shoulder harness webbing out of the
retractor, the shoulder harness is in the
automatic locking mode. If the shoulder
harness is not locked, repeat step 10. If,
after repeated attempts, the integrated
child safety seat shoulder harness can-
not be placed in the automatic locking
mode, do not use the integrated child
safety seat and have it inspected by an
authorized NISSAN dealer.
To cancel the automatic locking mode, un-
buckle the chest clip and both shoulder
harness tongues. Allow the shoulder har-
nesses to retract completely. The automatic
locking mode is now canceled and the
WRS0093APD0819
1-78Seats, restraints and supplemental air bag systems
ZX