Page 100 of 273
Body No. 2 Harness/LHD Models
CEL221M
GROUND DISTRIBUTION/WAGON AND HARDTOP MODELS
EL-2023
Page 101 of 273
Back Door and Rear Window Defogger
Harness/LHD Models
CEL222M
GROUND DISTRIBUTION/WAGON AND HARDTOP MODELS
EL-2024
Page 102 of 273
Engine Room Harness/RHD Models
CEL223M
GROUND DISTRIBUTION/WAGON AND HARDTOP MODELS
EL-2025
Page 103 of 273
Main Harness/RHD Models
CEL224M
GROUND DISTRIBUTION/WAGON AND HARDTOP MODELS
EL-2026
Page 104 of 273
CEL225M
GROUND DISTRIBUTION/WAGON AND HARDTOP MODELS
Main Harness/RHD Models (Cont'd)
EL-2027
Page 105 of 273
CEL226M
GROUND DISTRIBUTION/WAGON AND HARDTOP MODELS
Main Harness/RHD Models (Cont'd)
EL-2028
Page 112 of 273

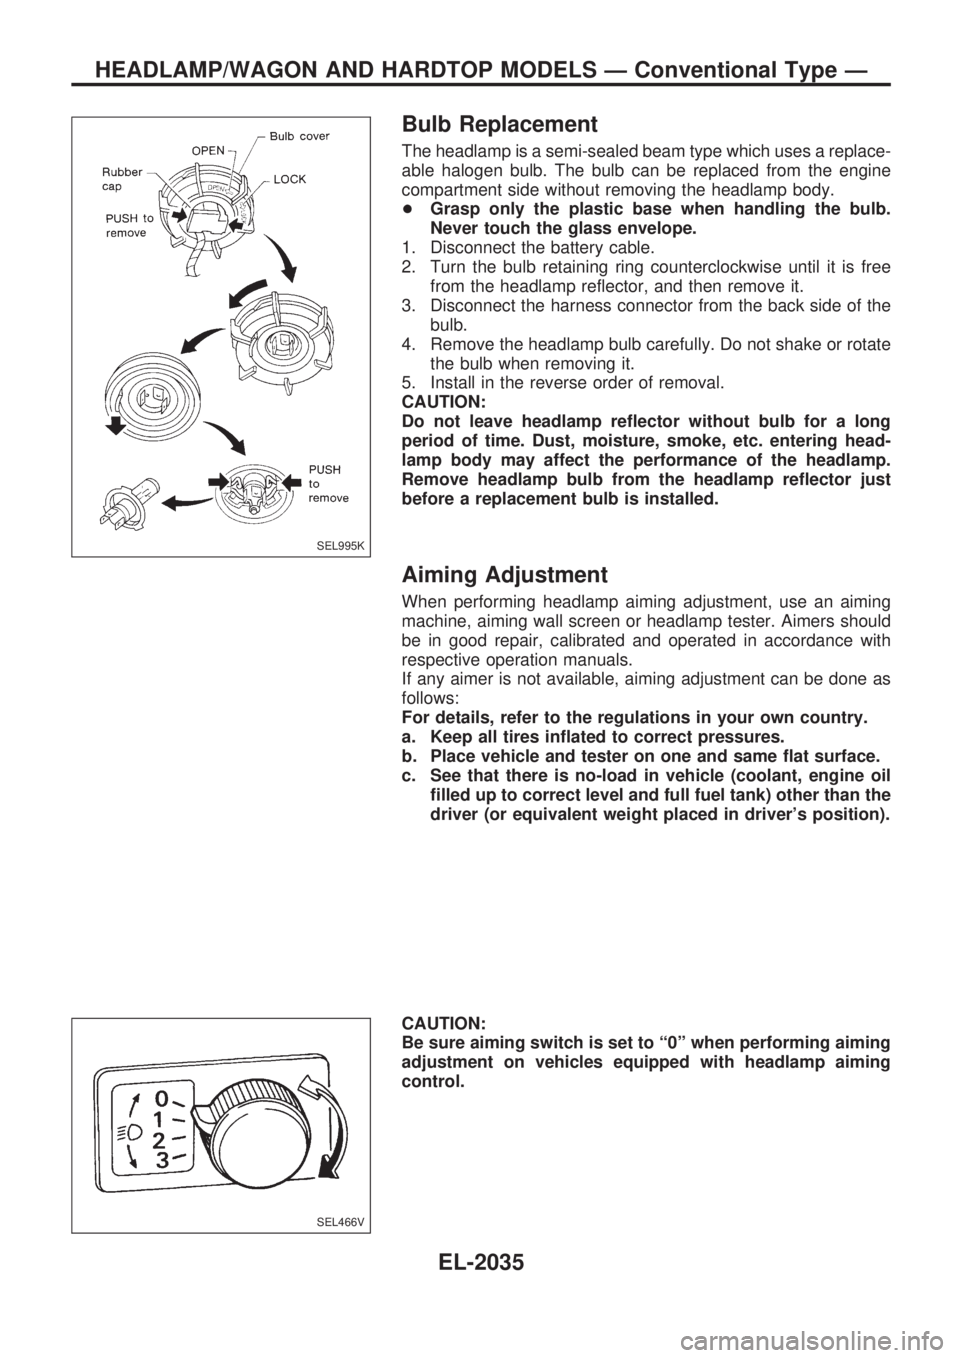
Bulb Replacement
The headlamp is a semi-sealed beam type which uses a replace-
able halogen bulb. The bulb can be replaced from the engine
compartment side without removing the headlamp body.
+Grasp only the plastic base when handling the bulb.
Never touch the glass envelope.
1. Disconnect the battery cable.
2. Turn the bulb retaining ring counterclockwise until it is free
from the headlamp reflector, and then remove it.
3. Disconnect the harness connector from the back side of the
bulb.
4. Remove the headlamp bulb carefully. Do not shake or rotate
the bulb when removing it.
5. Install in the reverse order of removal.
CAUTION:
Do not leave headlamp reflector without bulb for a long
period of time. Dust, moisture, smoke, etc. entering head-
lamp body may affect the performance of the headlamp.
Remove headlamp bulb from the headlamp reflector just
before a replacement bulb is installed.
Aiming Adjustment
When performing headlamp aiming adjustment, use an aiming
machine, aiming wall screen or headlamp tester. Aimers should
be in good repair, calibrated and operated in accordance with
respective operation manuals.
If any aimer is not available, aiming adjustment can be done as
follows:
For details, refer to the regulations in your own country.
a. Keep all tires inflated to correct pressures.
b. Place vehicle and tester on one and same flat surface.
c. See that there is no-load in vehicle (coolant, engine oil
filled up to correct level and full fuel tank) other than the
driver (or equivalent weight placed in driver's position).
CAUTION:
Be sure aiming switch is set to ª0º when performing aiming
adjustment on vehicles equipped with headlamp aiming
control.
SEL995K
SEL466V
HEADLAMP/WAGON AND HARDTOP MODELS Ð Conventional Type Ð
EL-2035
Page 183 of 273
How to Read Harness Layout
Example:
G2E1B/6: ASCD ACTUATOR
Connector color / Cavity
Connector number
Grid reference
The following Harness Layouts use a map style grid to help locate connectors on the drawings:
+Main Harness
+Engine Room Harness (Engine Compartment)
To use the grid reference
1)Find the desired connector number on the connector list.
2) Find the grid reference.
3) On the drawing, find the crossing of the grid reference letter column and number row.
4) Find the connector number in the crossing zone.
5) Follow the line (if used) to the connector.
CONNECTOR SYMBOL
Main symbols of connector (in Harness Layout) are indicated in the below.
Connector typeWater proof type Standard type
Male Female Male Female
+Cavity: Less than 4
+Relay connector
+Cavity: From 5 to 8
+Cavity: More than 9
ÐÐ
+Ground terminal etc.
Ð
HARNESS LAYOUT
EL-2106