2001 NISSAN PATHFINDER stop start
[x] Cancel search: stop startPage 65 of 289

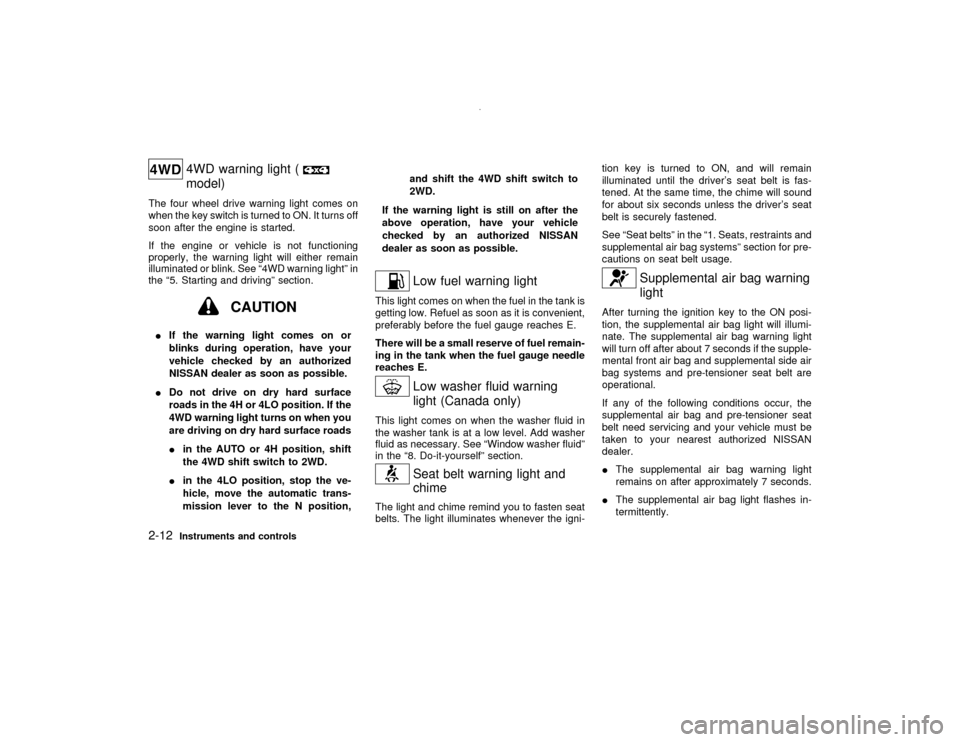
4WD warning light (model)
The four wheel drive warning light comes on
when the key switch is turned to ON. It turns off
soon after the engine is started.
If the engine or vehicle is not functioning
properly, the warning light will either remain
illuminated or blink. See ª4WD warning lightº in
the ª5. Starting and drivingº section.
CAUTION
IIf the warning light comes on or
blinks during operation, have your
vehicle checked by an authorized
NISSAN dealer as soon as possible.
IDo not drive on dry hard surface
roads in the 4H or 4LO position. If the
4WD warning light turns on when you
are driving on dry hard surface roads
Iin the AUTO or 4H position, shift
the 4WD shift switch to 2WD.
Iin the 4LO position, stop the ve-
hicle, move the automatic trans-
mission lever to the N position,and shift the 4WD shift switch to
2WD.
If the warning light is still on after the
above operation, have your vehicle
checked by an authorized NISSAN
dealer as soon as possible.
Low fuel warning light
This light comes on when the fuel in the tank is
getting low. Refuel as soon as it is convenient,
preferably before the fuel gauge reaches E.
There will be a small reserve of fuel remain-
ing in the tank when the fuel gauge needle
reaches E.
Low washer fluid warning
light (Canada only)
This light comes on when the washer fluid in
the washer tank is at a low level. Add washer
fluid as necessary. See ªWindow washer fluidº
in the ª8. Do-it-yourselfº section.
Seat belt warning light and
chime
The light and chime remind you to fasten seat
belts. The light illuminates whenever the igni-tion key is turned to ON, and will remain
illuminated until the driver's seat belt is fas-
tened. At the same time, the chime will sound
for about six seconds unless the driver's seat
belt is securely fastened.
See ªSeat beltsº in the ª1. Seats, restraints and
supplemental air bag systemsº section for pre-
cautions on seat belt usage.
Supplemental air bag warning
light
After turning the ignition key to the ON posi-
tion, the supplemental air bag light will illumi-
nate. The supplemental air bag warning light
will turn off after about 7 seconds if the supple-
mental front air bag and supplemental side air
bag systems and pre-tensioner seat belt are
operational.
If any of the following conditions occur, the
supplemental air bag and pre-tensioner seat
belt need servicing and your vehicle must be
taken to your nearest authorized NISSAN
dealer.
IThe supplemental air bag warning light
remains on after approximately 7 seconds.
IThe supplemental air bag light flashes in-
termittently.
2-12
Instruments and controls
Z
00.1.10/R50-D/V5
X
Page 67 of 289

IMalfunction indicator lamp on steady Ð An
emission control system malfunction has
been detected. Check the fuel filler cap. If
the fuel filler cap is loose or missing, tighten
or install the cap and continue to drive the
vehicle. The
lamp should turn off after
a few driving trips. If the
lamp does
not turn off after a few driving trips, have the
vehicle inspected by an authorized NISSAN
dealer. You do not need to have your
vehicle towed to the dealer.
IMalfunction indicator lamp blinking Ð An
engine misfire has been detected which
may damage the emission control system.
To reduce or avoid emission control system
damage:
* do not drive at speeds above 45 MPH (72
km/h).
* avoid hard acceleration or deceleration.
* avoid steep uphill grades.
* if possible, reduce the amount of cargo
being hauled or towed.
The malfunction indicator lamp may stop blink-
ing and come on steady.
Have the vehicle inspected by an authorized
NISSAN dealer. You do not need to have your
vehicle towed to the dealer.
CAUTION
Continued vehicle operation without
having the emission control system
checked and repaired as necessary
could lead to poor driveability, reduced
fuel economy, and possible damage to
the emission control system.
Overdrive off indicator light
(Automatic transmission
models only)
This light comes on during driving when the
overdrive switch is pressed to prevent over-
drive operation.
The O/D OFF indicator light comes on for two
seconds each time the ignition key is turned
ON. This shows the light is functioning prop-
erly.If the O/D OFF indicator light blinks for
approximately 8 seconds after coming on for
2 seconds, have your NISSAN dealer check
the transmission and repair it if necessary.The automatic transmission is equipped with
an electronic Fail-Safe mode. This system
allows the vehicle to be driven even in theevent of damage to the electrical circuits. If this
occurs, the gears automatically engage and
lock into 3rd gear.
See ªDriving the vehicleº in the ª5. Starting
and drivingº section for failsafe before vis-
iting your NISSAN dealer.
Transfer 4LO position
indicator light (
model)
The light should turn off within 1 second after
turning the ignition switch to ON.
This light comes on when the 4WD shift switch
is set in the 4LO position with ignition key in
the ON position.
If the 4WD shift switch is set in the 4LO
position and the light blinks, stop the vehicle,
drive slowly forward and the light will turn on.
When you shift between 4H and 4LO, stop the
vehicle, move the automatic transmission se-
lector lever to the N position, and press the
4WD shift switch and move it in 4LO or 4H.
The transfer case may be damaged if you shift
the switch while driving.
You cannot move the transfer 4WD shift switch
between 4H and 4LO unless you have first
stopped the vehicle and moved the automatic
transmission shift lever to neutral. Make sure
2-14
Instruments and controls
Z
00.1.10/R50-D/V5
X
Page 70 of 289

with the key or multi-remote controller. The
alarm will not stop if the ignition switch is
turned to ACC or ON.
The alarm may be activated when the glass
hatch is opened quickly with a key after the
alarm has been set.
If the system does not operate as de-
scribed above, have it checked by your
NISSAN dealer.NISSAN VEHICLE IMMOBILIZER
SYSTEMThe Nissan Vehicle Immobilizer System will
not allow the engine to start without the use of
the registered Nissan Vehicle Immobilizer Sys-
tem key.
If the engine fails to start using the registered
Nissan Vehicle Immobilizer System key (for
example, when interference is caused by an-
other Nissan Vehicle Immobilizer System key,
an automated toll road device or automated
payment device on the key ring), restart the
engine using the following procedures:
1. Leave the ignition switch in the ON position
for approximately 5 seconds.
2. Turn the ignition switch to the OFF or LOCK
position, and wait approximately 10 sec-
onds.3. Repeat step 1 and 2.
4. Restart the engine while holding the device
(which may have caused the interference)
separate from the registered Nissan Ve-
hicle Immobilizer System key.
If the no start condition re-occurs, NISSAN
recommends placing the registered Nissan
Vehicle Immobilizer System key on a separate
key ring to avoid interference from other de-
vices.
Statement related to section 15 of FCC
rules for Nissan Vehicle Immobilizer Sys-
tem
(CONT ASSY - IMMOBILIZER)
This device complies with part 15 of the
FCC Rules and RSS-210 of Industry
Canada. Operation is subject to the follow-
ing two conditions;
(1) This device may not cause harmful
interference, and (2) this device must ac-
cept any interference received, including
interference that may cause undesired op-
eration of the device.
CHANGES OR MODIFICATIONS NOT EX-
PRESSLY APPROVED BY THE MANUFAC-
TURE RESPONSIBLE FOR COMPLIANCE
COULD VOID THE USER'S AUTHORITY TO
OPERATE THE EQUIPMENT.
Security indicator lightThis light blinks whenever the ignition switch is
in the LOCK, OFF or ACC position. This
function indicates the security systems
equipped on the vehicle are operational.
If the Nissan Vehicle Immobilizer System is
malfunctioning, this light will remain on while
the ignition key is in the ON position.
If the light still remains on and/or the en-
gine will not start, see your NISSAN dealer
for Nissan Vehicle Immobilizer System ser-
vice as soon as possible. Please bring all
Nissan Vehicle Immobilizer System keys
that you have when visiting your NISSAN
dealer for service.
Instruments and controls
2-17
Z
00.1.10/R50-D/V5
X
Page 109 of 289

WARNING
Do not drive with the rear door open.
This could allow dangerous exhaust
gases to be drawn into the vehicle. See
ªPrecautions when starting and drivingº
in the ª5. Starting and drivingº section
for exhaust gas.KEY OPERATION1. Turn the key counterclockwise to unlock the
rear door.Turning the rear door key one time coun-
terclockwise will unlock the rear door.
From that position, returning the key to
neutral (where the key can only the re-
moved and inserted.) and turning it coun-
terclockwise again within 5 seconds will
unlock all doors.
2. Pull the opener handle to open the rear
door.
3. To lock the rear door, push it down firmly
and turn the key clockwise.
The power door lock system allows you to
lock or unlock all doors including the rear
door simultaneously.
ITurning the front door key to the front of
the vehicle will lock all doors.
ITurning the front door key one time to
the rear of the vehicle will unlock the
corresponding door. From that position,
returning the key to neutral (where the
key can only be removed and inserted.)
and turning it to the rear again within 5
seconds will unlock all doors.When opening the rear door, first open the
spare tire carrier in the sequence shown in the
illustration above. Then insert the stopper into
the hole to secure the carrier in the open
position.
CAUTION
IBe certain that there is adequate area
to allow the carrier to open fully.
IOpen and close the spare tire carrier
slowly.
SPA0462
SPA0385
REAR DOOR
SPARE TIRE CARRIER (if so
equipped)3-10
Pre-driving checks and adjustments
Z
00.1.10/R50-D/V5
X
Page 111 of 289

gases to be drawn into the vehicle. See
ªPrecautions when starting and drivingº
in the ª5. Starting and drivingº section
for exhaust gas.
CAUTION
Do not open the glass hatch unless the
wiper is in the stowed position.
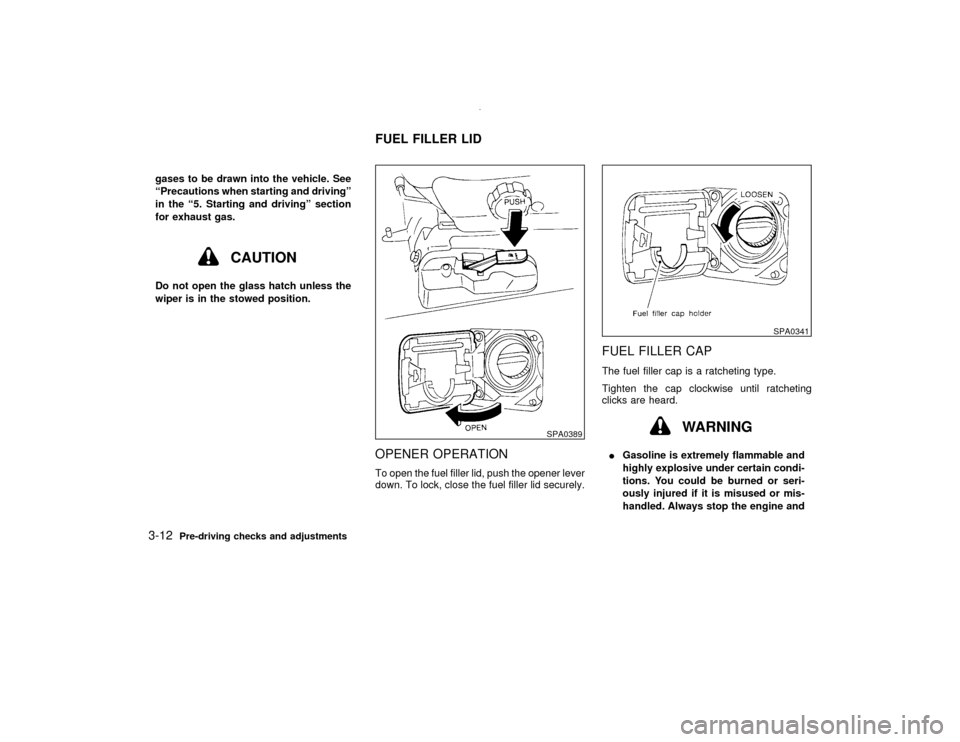
OPENER OPERATIONTo open the fuel filler lid, push the opener lever
down. To lock, close the fuel filler lid securely.
FUEL FILLER CAPThe fuel filler cap is a ratcheting type.
Tighten the cap clockwise until ratcheting
clicks are heard.
WARNING
IGasoline is extremely flammable and
highly explosive under certain condi-
tions. You could be burned or seri-
ously injured if it is misused or mis-
handled. Always stop the engine and
SPA0389
SPA0341
FUEL FILLER LID
3-12
Pre-driving checks and adjustments
Z
00.1.10/R50-D/V5
X
Page 112 of 289

do not smoke or allow open flames or
sparks near the vehicle when refuel-
ing.
IFuel may be under pressure. Turn the
cap one-half turn, and wait for any
hissing sound to stop to prevent fuel
from spraying out and possible per-
sonal injury. Then remove the cap.
IDo not attempt to top off the fuel tank
after the fuel pump nozzle shuts off
automatically. Continued refueling
may cause fuel over-flow, resulting in
fuel spray and possibly a fire.
IOnly use an original equipment type
fuel filler cap as a replacement. It has
a built-in safety valve needed for
proper operation of the fuel system
and emission control system. An in-
correct cap can result in a serious
malfunction and possible injury or it
may cause the MIL to illuminate.
INever pour fuel into the throttle body
to attempt to start your vehicle.
CAUTION
IIf fuel is spilled on the vehicle body,
flush it away with water to avoid paint
damage.
ITighten until the fuel filler cap clicks.
Failure to tighten the fuel filler cap
properly may cause the
mal-
function indicator lamp (MIL) to illu-
minate. If the
lamp illuminates
because the fuel filler cap is loose or
missing, tighten or install the cap and
continue to drive the vehicle. The
lamp should turn off after a few
driving trips. If the
lamp does
not turn off after a few driving trips,
have the vehicle inspected by an au-
thorized NISSAN dealer.
IFor additional information, see the
ªMalfunction indicator lamp (MIL)º in
the ª2. Instruments and controlsº
section.Put the fuel filler cap on the cap holder while
refueling.
SPA0342
Pre-driving checks and adjustments
3-13
Z
00.1.10/R50-D/V5
X
Page 120 of 289

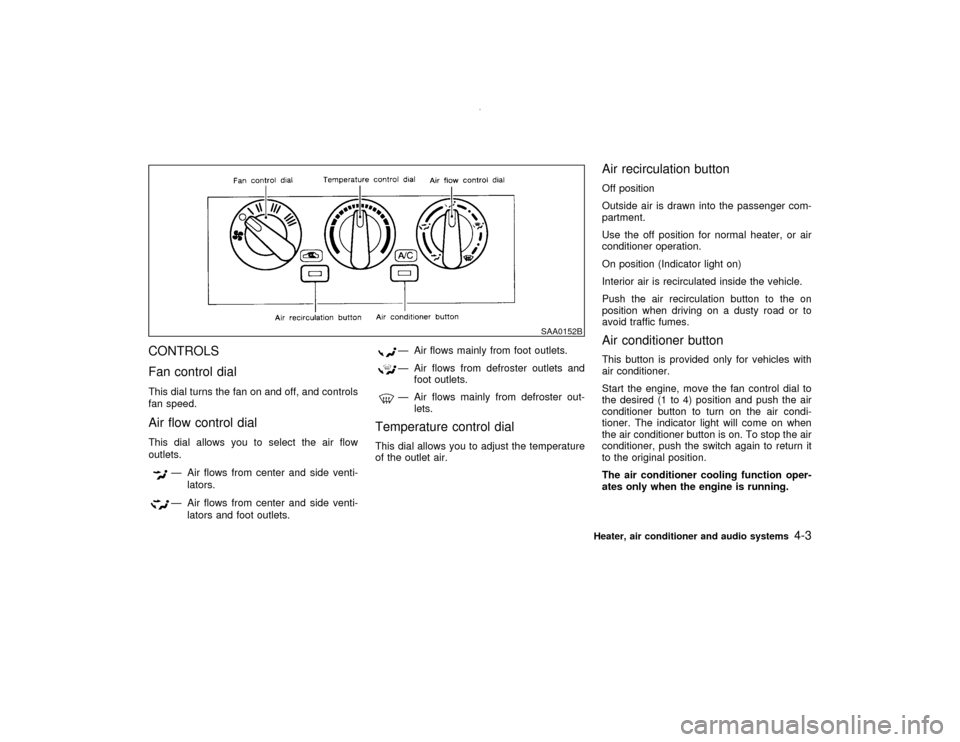
CONTROLS
Fan control dialThis dial turns the fan on and off, and controls
fan speed.Air flow control dialThis dial allows you to select the air flow
outlets.
Ð Air flows from center and side venti-
lators.Ð Air flows from center and side venti-
lators and foot outlets.
Ð Air flows mainly from foot outlets.Ð Air flows from defroster outlets and
foot outlets.Ð Air flows mainly from defroster out-
lets.
Temperature control dialThis dial allows you to adjust the temperature
of the outlet air.
Air recirculation buttonOff position
Outside air is drawn into the passenger com-
partment.
Use the off position for normal heater, or air
conditioner operation.
On position (Indicator light on)
Interior air is recirculated inside the vehicle.
Push the air recirculation button to the on
position when driving on a dusty road or to
avoid traffic fumes.Air conditioner buttonThis button is provided only for vehicles with
air conditioner.
Start the engine, move the fan control dial to
the desired (1 to 4) position and push the air
conditioner button to turn on the air condi-
tioner. The indicator light will come on when
the air conditioner button is on. To stop the air
conditioner, push the switch again to return it
to the original position.
The air conditioner cooling function oper-
ates only when the engine is running.
SAA0152B
Heater, air conditioner and audio systems
4-3
Z
00.1.10/R50-D/V5
X
Page 134 of 289

cassette tape will begin to play.
CAUTION
Do not force the cassette tape into the
tape door. This could cause player dam-
age.
If the system is turned off by pushing the
ON×OFF/VOL control knob with the cassette
tape still in the player, the tape will resume
playing when the system is turned back on.
PLAY:
IWhen the TAPE button is pushed with the
system turned off and a tape loaded, the
system will come on and the tape will play.
IWhen the TAPE button is pushed with
either the radio or compact disc turned on
and the tape loaded, the compact disc or
the radio will automatically be turned off
and the tape will play.
FF (Fast Forward), REW
(Rewind):
Push the(fast forward) button to fast
forward the tape. To rewind the tape, push the
(rewind) button. Either the FF or REW
symbol illuminates on the right side of thedisplay window. To stop the FF or REW func-
tion, press the
(fast forward) or
(re-
wind) again, or the TAPE button.
APS (Automatic Program
Search) FF, APS REW:
When the(APS FF) button is pushed
while the tape is being played, the next pro-
gram will start to play from the beginning. Push
the
(APS FF) button several times to skip
through programs. The tape will advance the
number of times the button is pushed (up to
nine programs).
When the
(APS REW) button is pushed
once, the program being played starts over
from the beginning. Push the
(APS
REW) button several times to skip back sev-
eral selections. The tape will go back the
number of times the button is pushed. Either
the FF or REW symbol flashes on the right
side of the display window while searching for
the selection.
This system searches for the blank intervals
between selections. If there is a blank interval
within one program or there is no interval
between programs, the system may not stop in
the desired or expected location.
PROG (Program):
Push the PROG button to change the tapeside while the tape is being played.
The cassette tape will automatically change
directions to play the other side when the first
side is completed.
Dolby NR (Noise Reduction):
Push the Dolby NR
button for Dolby NR
encoded tapes to reduce high frequency tape
noise. The indicator will come on.
Dolby noise reduction manufactured under li-
cense from Dolby Laboratories Licensing Cor-
poration. Dolby NR and the double-D symbol
are trademarks of Dolby Laboratories
Licensing Corporation.
Metal or chrome tape usage:
The cassette player will be automatically set to
high performance play when playing a metal or
chrome cassette tape.TAPE EJECT:
When this button is pushed with the tape
loaded, the tape will be ejected.
When the tape is ejected while it is being
played, the system will be turned off.
Compact Disc (CD) player operationTurn the ignition key to the ACC or ON position
and insert the compact disc into the slot with
the label side facing up. The compact disc will
Heater, air conditioner and audio systems
4-17
Z
00.1.10/R50-D/V5
X