2001 NISSAN PATHFINDER start
[x] Cancel search: startPage 120 of 289
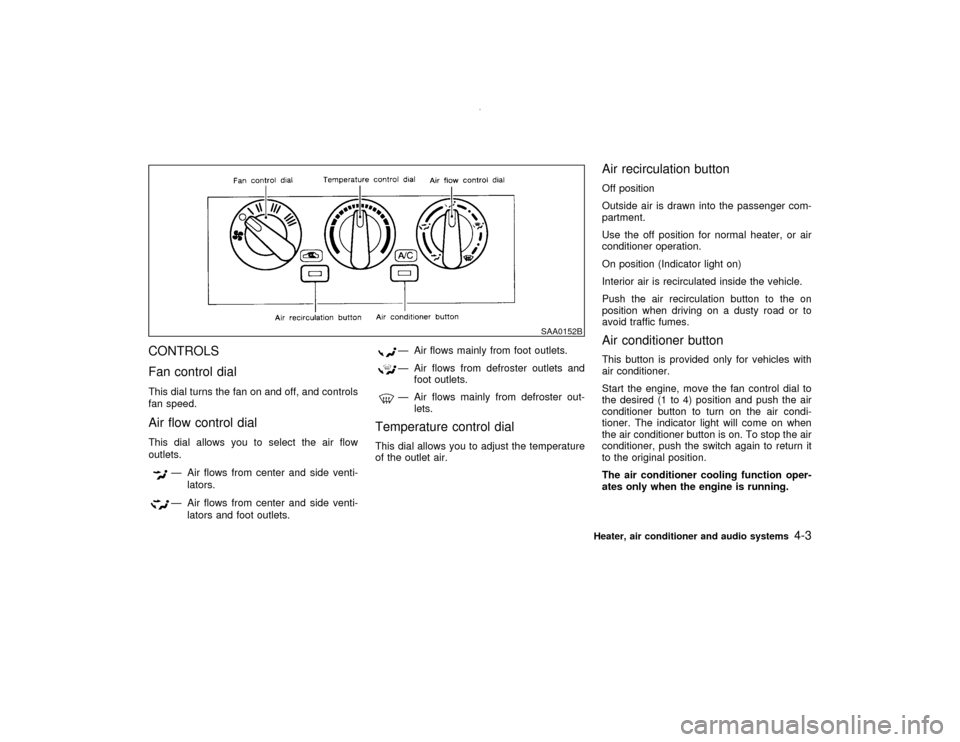
CONTROLS
Fan control dialThis dial turns the fan on and off, and controls
fan speed.Air flow control dialThis dial allows you to select the air flow
outlets.
Ð Air flows from center and side venti-
lators.Ð Air flows from center and side venti-
lators and foot outlets.
Ð Air flows mainly from foot outlets.Ð Air flows from defroster outlets and
foot outlets.Ð Air flows mainly from defroster out-
lets.
Temperature control dialThis dial allows you to adjust the temperature
of the outlet air.
Air recirculation buttonOff position
Outside air is drawn into the passenger com-
partment.
Use the off position for normal heater, or air
conditioner operation.
On position (Indicator light on)
Interior air is recirculated inside the vehicle.
Push the air recirculation button to the on
position when driving on a dusty road or to
avoid traffic fumes.Air conditioner buttonThis button is provided only for vehicles with
air conditioner.
Start the engine, move the fan control dial to
the desired (1 to 4) position and push the air
conditioner button to turn on the air condi-
tioner. The indicator light will come on when
the air conditioner button is on. To stop the air
conditioner, push the switch again to return it
to the original position.
The air conditioner cooling function oper-
ates only when the engine is running.
SAA0152B
Heater, air conditioner and audio systems
4-3
Z
00.1.10/R50-D/V5
X
Page 122 of 289

AIR CONDITIONER OPERATIONStart the engine, move the fan control dial to
the desired (1 to 4) position and push in the air
conditioner button to activate the air condi-
tioner. When the air conditioner is on, cooling
and dehumidifying functions will be added to
the heater operation.
The air conditioner cooling function oper-
ates only when the engine is running.CoolingThis mode is used to cool and dehumidify.
1. Push the air recirculation button to the off
position.
2. Turn the air control dial to the
position.
3. Turn on the fan control dial.
4. Push on the air conditioner button. The
indicator light will come on.
5. Turn the temperature control dial to the
desired position.
IFor quick cooling when the outside tem-
perature is high, push the air recirculation
button to the on position. Be sure to return
the air recirculation button to the off position
for normal cooling.
Dehumidified heatingThis mode is used to heat and dehumidify.
1. Push the air recirculation button to the off
position.
2. Turn the air control dial to the
posi-
tion.
3. Turn on the fan control dial.
4. Push on the air conditioner button. The
indicator light will come on.
5. Turn the temperature control dial to the
desired position.
Dehumidified defoggingThis mode is used to defog the windows and
dehumidify.
1. Push the air recirculation button to the off
position.
2. Turn the air control dial to the
posi-
tion.
3. Turn on the fan control dial.
4. Push on the air conditioner button. The
indicator light will come on.
5. Turn the temperature control dial to the
desired position.
Operating tipsIKeep windows and sun roof closed while
the air conditioner is in operation.
IAfter parking in the sun, drive for two or
three minutes with the windows open to
vent hot air from the passenger compart-
ment. Then, close the windows. This will
allow the air conditioner to cool the interior
more quickly.
IThe air conditioning system should be
operated for about ten minutes at least
once a month. This helps prevent dam-
age to the system due to lack of lubrica-
tion.
IIf the coolant temperature gauge exceeds
the hot position, turn the air conditioner off.
For additional information, see ªIf your ve-
hicle overheatsº in the ª6. In case of emer-
gencyº section.AIR FLOW CHARTSThe following charts show the button and dial
positions formaximum and quickheating,
cooling or defrosting.The air recirculation
switch should always be in the off position
for heating and defrosting.Heater, air conditioner and audio systems
4-5
Z
00.1.10/R50-D/V5
X
Page 125 of 289
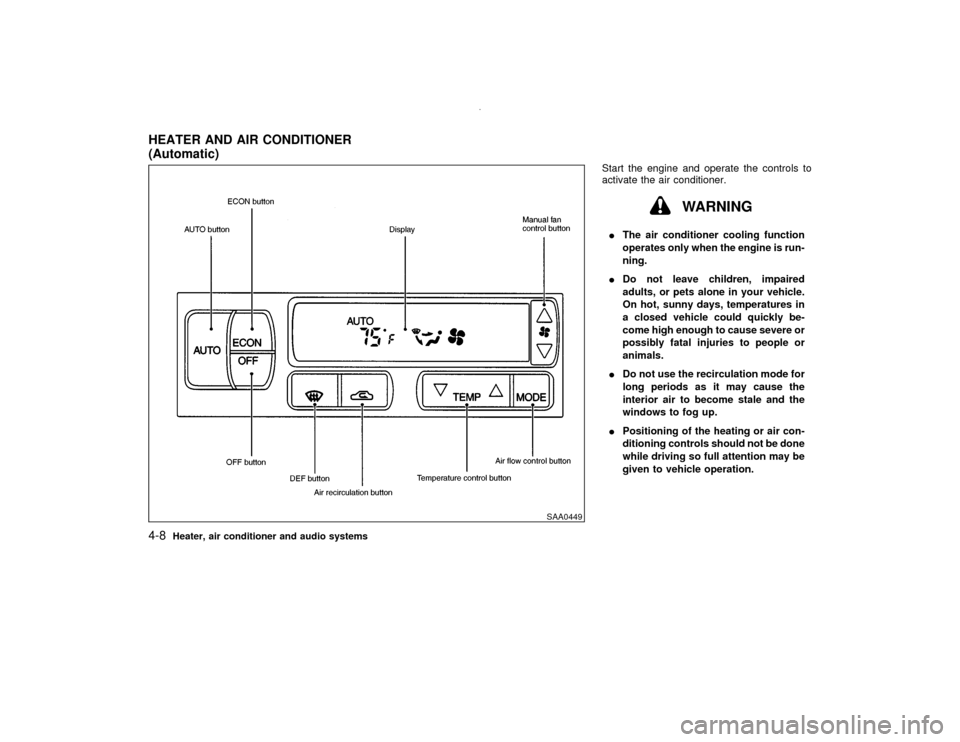
Start the engine and operate the controls to
activate the air conditioner.
WARNING
IThe air conditioner cooling function
operates only when the engine is run-
ning.
IDo not leave children, impaired
adults, or pets alone in your vehicle.
On hot, sunny days, temperatures in
a closed vehicle could quickly be-
come high enough to cause severe or
possibly fatal injuries to people or
animals.
IDo not use the recirculation mode for
long periods as it may cause the
interior air to become stale and the
windows to fog up.
IPositioning of the heating or air con-
ditioning controls should not be done
while driving so full attention may be
given to vehicle operation.
SAA0449
HEATER AND AIR CONDITIONER
(Automatic)4-8
Heater, air conditioner and audio systems
Z
00.1.10/R50-D/V5
X
Page 134 of 289
cassette tape will begin to play.
CAUTION
Do not force the cassette tape into the
tape door. This could cause player dam-
age.
If the system is turned off by pushing the
ON×OFF/VOL control knob with the cassette
tape still in the player, the tape will resume
playing when the system is turned back on.
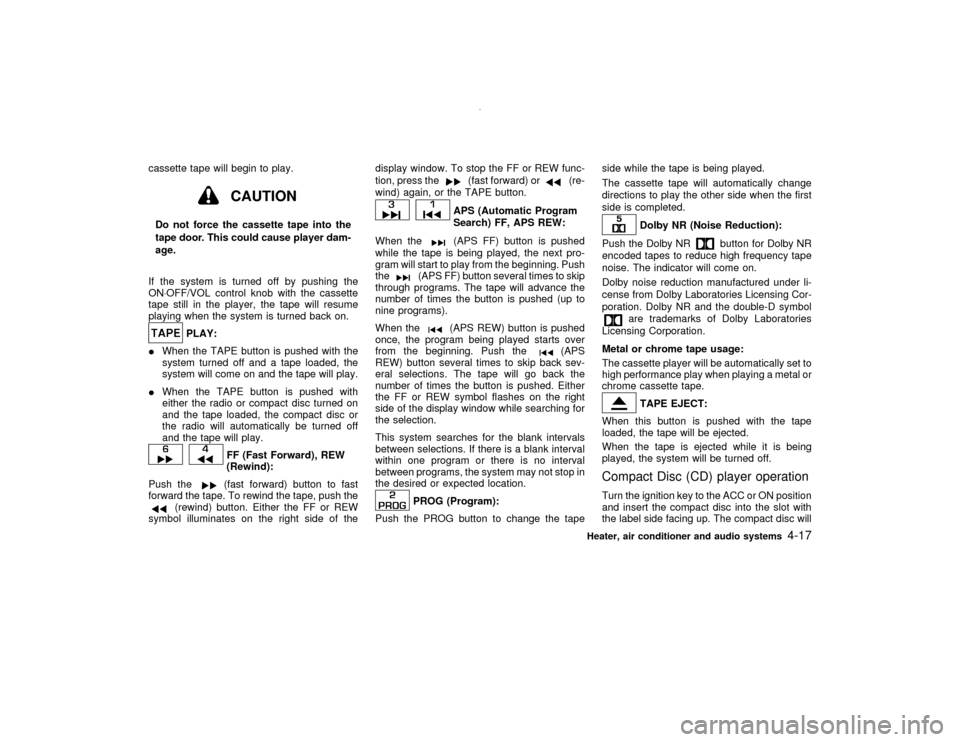
PLAY:
IWhen the TAPE button is pushed with the
system turned off and a tape loaded, the
system will come on and the tape will play.
IWhen the TAPE button is pushed with
either the radio or compact disc turned on
and the tape loaded, the compact disc or
the radio will automatically be turned off
and the tape will play.
FF (Fast Forward), REW
(Rewind):
Push the(fast forward) button to fast
forward the tape. To rewind the tape, push the
(rewind) button. Either the FF or REW
symbol illuminates on the right side of thedisplay window. To stop the FF or REW func-
tion, press the
(fast forward) or
(re-
wind) again, or the TAPE button.
APS (Automatic Program
Search) FF, APS REW:
When the(APS FF) button is pushed
while the tape is being played, the next pro-
gram will start to play from the beginning. Push
the
(APS FF) button several times to skip
through programs. The tape will advance the
number of times the button is pushed (up to
nine programs).
When the
(APS REW) button is pushed
once, the program being played starts over
from the beginning. Push the
(APS
REW) button several times to skip back sev-
eral selections. The tape will go back the
number of times the button is pushed. Either
the FF or REW symbol flashes on the right
side of the display window while searching for
the selection.
This system searches for the blank intervals
between selections. If there is a blank interval
within one program or there is no interval
between programs, the system may not stop in
the desired or expected location.
PROG (Program):
Push the PROG button to change the tapeside while the tape is being played.
The cassette tape will automatically change
directions to play the other side when the first
side is completed.
Dolby NR (Noise Reduction):
Push the Dolby NR
button for Dolby NR
encoded tapes to reduce high frequency tape
noise. The indicator will come on.
Dolby noise reduction manufactured under li-
cense from Dolby Laboratories Licensing Cor-
poration. Dolby NR and the double-D symbol
are trademarks of Dolby Laboratories
Licensing Corporation.
Metal or chrome tape usage:
The cassette player will be automatically set to
high performance play when playing a metal or
chrome cassette tape.TAPE EJECT:
When this button is pushed with the tape
loaded, the tape will be ejected.
When the tape is ejected while it is being
played, the system will be turned off.
Compact Disc (CD) player operationTurn the ignition key to the ACC or ON position
and insert the compact disc into the slot with
the label side facing up. The compact disc will
Heater, air conditioner and audio systems
4-17
Z
00.1.10/R50-D/V5
X
Page 135 of 289
be guided automatically into the slot and start
playing.
After loading the disc, the number of tracks on
the disc and the play time will appear on the
display.
If the radio or tape is already operating, it will
automatically turn off and the compact disc will
play.
CAUTION
Do not force the compact disc into the
slot. This could damage the player.
If the system has been turned off while the
compact disc was playing, pushing the
ON×OFF/VOL control knob will start the com-
pact disc.
8 cm diameter compact discs can also be used
without an adapter.
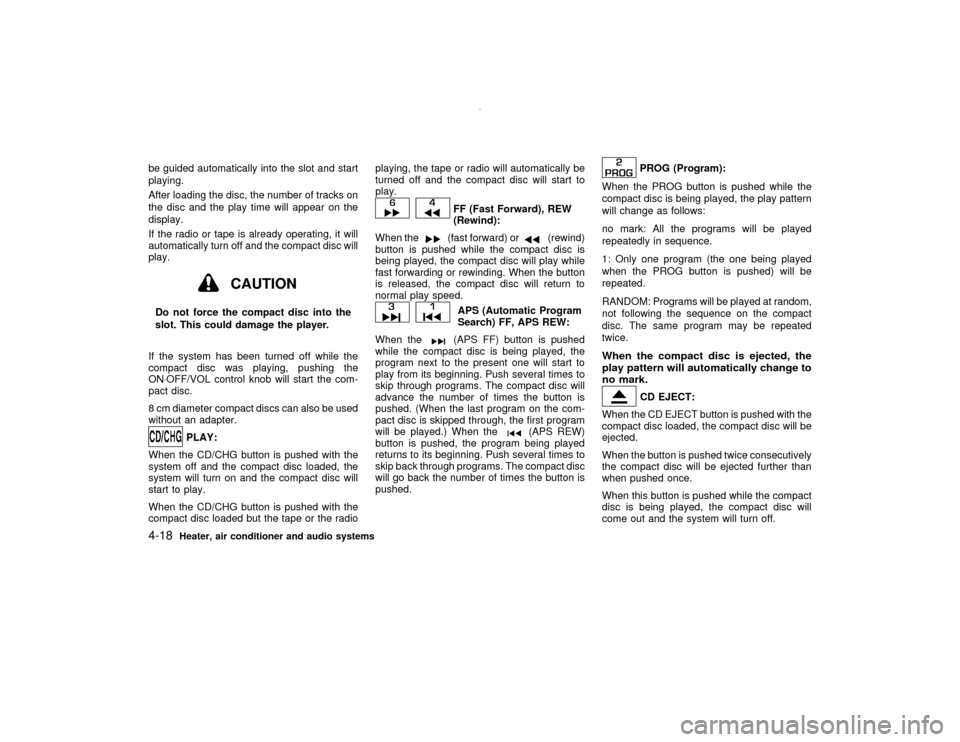
PLAY:
When the CD/CHG button is pushed with the
system off and the compact disc loaded, the
system will turn on and the compact disc will
start to play.
When the CD/CHG button is pushed with the
compact disc loaded but the tape or the radioplaying, the tape or radio will automatically be
turned off and the compact disc will start to
play.
FF (Fast Forward), REW
(Rewind):
When the(fast forward) or
(rewind)
button is pushed while the compact disc is
being played, the compact disc will play while
fast forwarding or rewinding. When the button
is released, the compact disc will return to
normal play speed.
APS (Automatic Program
Search) FF, APS REW:
When the(APS FF) button is pushed
while the compact disc is being played, the
program next to the present one will start to
play from its beginning. Push several times to
skip through programs. The compact disc will
advance the number of times the button is
pushed. (When the last program on the com-
pact disc is skipped through, the first program
will be played.) When the
(APS REW)
button is pushed, the program being played
returns to its beginning. Push several times to
skip back through programs. The compact disc
will go back the number of times the button is
pushed.
PROG (Program):
When the PROG button is pushed while the
compact disc is being played, the play pattern
will change as follows:
no mark: All the programs will be played
repeatedly in sequence.
1: Only one program (the one being played
when the PROG button is pushed) will be
repeated.
RANDOM: Programs will be played at random,
not following the sequence on the compact
disc. The same program may be repeated
twice.
When the compact disc is ejected, the
play pattern will automatically change to
no mark.
CD EJECT:
When the CD EJECT button is pushed with the
compact disc loaded, the compact disc will be
ejected.
When the button is pushed twice consecutively
the compact disc will be ejected further than
when pushed once.
When this button is pushed while the compact
disc is being played, the compact disc will
come out and the system will turn off.
4-18
Heater, air conditioner and audio systems
Z
00.1.10/R50-D/V5
X
Page 141 of 289
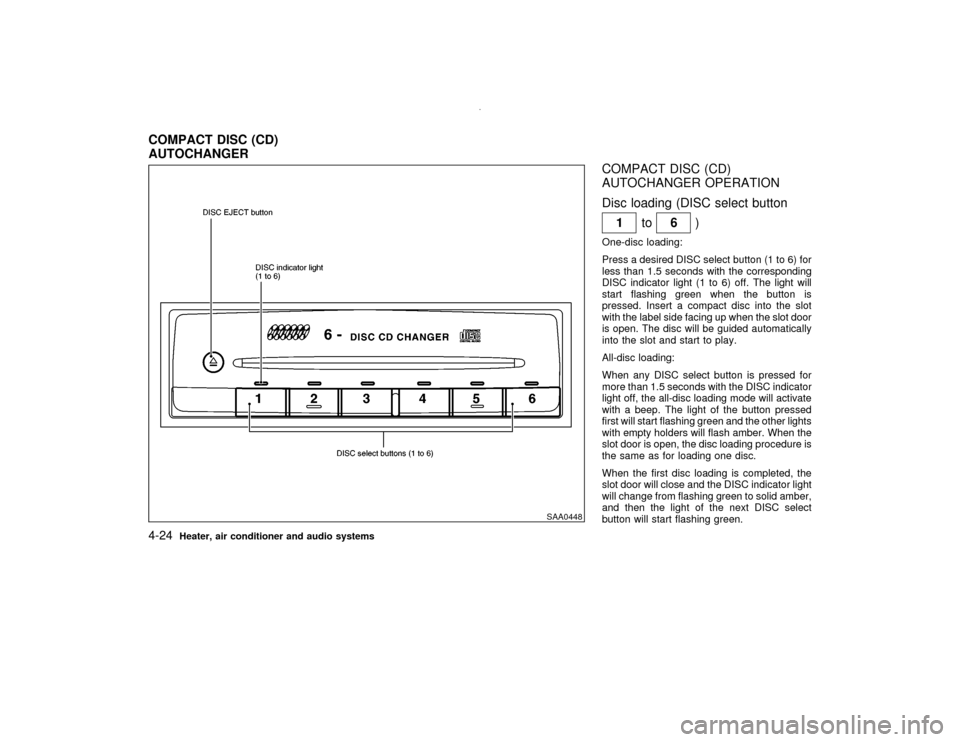
COMPACT DISC (CD)
AUTOCHANGER OPERATION
Disc loading (DISC select button
1to
6)
One-disc loading:
Press a desired DISC select button (1 to 6) for
less than 1.5 seconds with the corresponding
DISC indicator light (1 to 6) off. The light will
start flashing green when the button is
pressed. Insert a compact disc into the slot
with the label side facing up when the slot door
is open. The disc will be guided automatically
into the slot and start to play.
All-disc loading:
When any DISC select button is pressed for
more than 1.5 seconds with the DISC indicator
light off, the all-disc loading mode will activate
with a beep. The light of the button pressed
first will start flashing green and the other lights
with empty holders will flash amber. When the
slot door is open, the disc loading procedure is
the same as for loading one disc.
When the first disc loading is completed, the
slot door will close and the DISC indicator light
will change from flashing green to solid amber,
and then the light of the next DISC select
button will start flashing green.
SAA0448
COMPACT DISC (CD)
AUTOCHANGER4-24
Heater, air conditioner and audio systems
Z
00.1.10/R50-D/V5
X
Page 142 of 289
The disc loading procedure is the same as
above, and so continue on.
When all the discs are set or no more discs are
loaded for about 15 seconds after the slot door
is open, the first disc loaded will start to play.
CAUTION
When loading, wait for green light at the
CD slot and insert only one disc at a
time. Forcing in the compact disc could
damage the player.
Hold the disc only on the edges and center
hole. Never touch the surface of the disc.Disc eject (DISC EJECT button
)
One-disc eject:
When the DISC EJECT button is pressed for
less than 1.5 seconds while a disc is playing or
stopped, the current or last disc played will be
ejected.
When the DISC EJECT button is pressed, the
DISC indicator light will start flashing amber
until the disc is ready to be ejected. The light
will turn off when the disc is ejected.To select a disc to eject, press the DISC
EJECT button within 3 seconds after a DISC
select button is pressed, or do it in reverse
order.
All-disc eject:
When the DISC EJECT button is pressed for
more than 1.5 seconds while any disc is play-
ing or stopped, the all-disc eject mode will
activate with a beep.
When the DISC EJECT button is pressed, the
all DISC indicator lights of the disc stored
holder will start flashing amber. Each light will
turn off when the disc is ejected. When the disc
is released from the slot and then the slot door
is closed, the unit will start to eject the next
disc, and so on continuously upto full disc
eject. After all discs are ejected, the all DISC
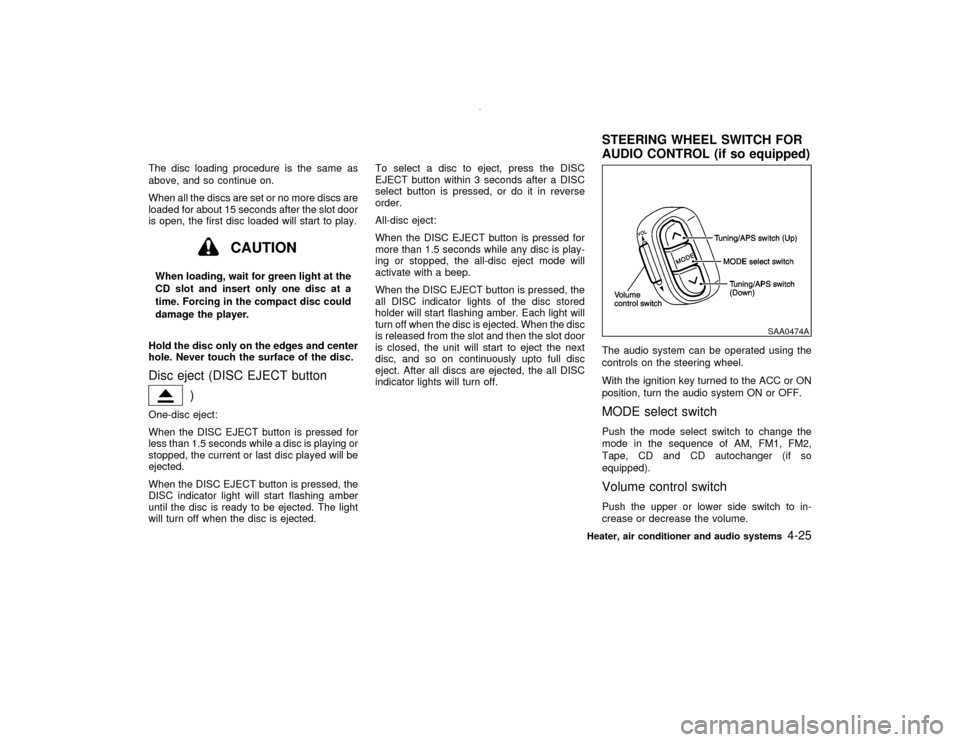
indicator lights will turn off.The audio system can be operated using the
controls on the steering wheel.
With the ignition key turned to the ACC or ON
position, turn the audio system ON or OFF.
MODE select switchPush the mode select switch to change the
mode in the sequence of AM, FM1, FM2,
Tape, CD and CD autochanger (if so
equipped).Volume control switchPush the upper or lower side switch to in-
crease or decrease the volume.
SAA0474A
STEERING WHEEL SWITCH FOR
AUDIO CONTROL (if so equipped)
Heater, air conditioner and audio systems
4-25
Z
00.1.10/R50-D/V5
X
Page 146 of 289

5 Starting and drivingPrecautions when starting and driving ...................... 5-2
Exhaust gas (Carbon monoxide).......................... 5-2
Three way catalyst ............................................... 5-3
On-pavement and offroad driving precautions ..... 5-3
Avoiding collision and rollover .............................. 5-4
Drinking alcohol/drugs and driving ....................... 5-4
Driving safety precautions .................................... 5-4
Ignition switch............................................................ 5-6
Automatic transmission ........................................ 5-6
Manual transmission ............................................ 5-7
Key positions ........................................................ 5-8
Nissan vehicle immobilizer system ...................... 5-8
Before starting the engine ......................................... 5-9
Starting the engine .................................................... 5-9
Driving the vehicle ................................................... 5-10
Automatic transmission ...................................... 5-10
Manual transmission .......................................... 5-14
Parking brake .......................................................... 5-16
Cruise control (if so equipped) ................................ 5-17
Precautions on cruise control ............................. 5-17
Cruise control operations ................................... 5-17Break-in schedule ................................................... 5-19
Increasing fuel economy ......................................... 5-19
Using part time four wheel drive (4WD) ................. 5-20
Transfer case shifting procedures ...................... 5-21
Using all-mode four wheel drive (4WD) .................. 5-23
Transfer case shifting procedures ...................... 5-23
Parking/parking on hills ........................................... 5-30
Power steering ........................................................ 5-31
Brake system .......................................................... 5-32
Braking precautions............................................ 5-32
Anti-lock brake system (ABS) ............................ 5-32
Cold weather driving ............................................... 5-34
Freeing a frozen door lock ................................. 5-34
Anti-freeze .......................................................... 5-34
Battery ................................................................ 5-34
Draining of coolant water ................................... 5-34
Tire equipment ................................................... 5-34
Special winter equipment ................................... 5-35
Driving on snow or ice ....................................... 5-35
Engine block heater (if so equipped) ................. 5-35
Z
00.1.10/R50-D/V5
X