2001 NISSAN MAXIMA stop start
[x] Cancel search: stop startPage 54 of 247
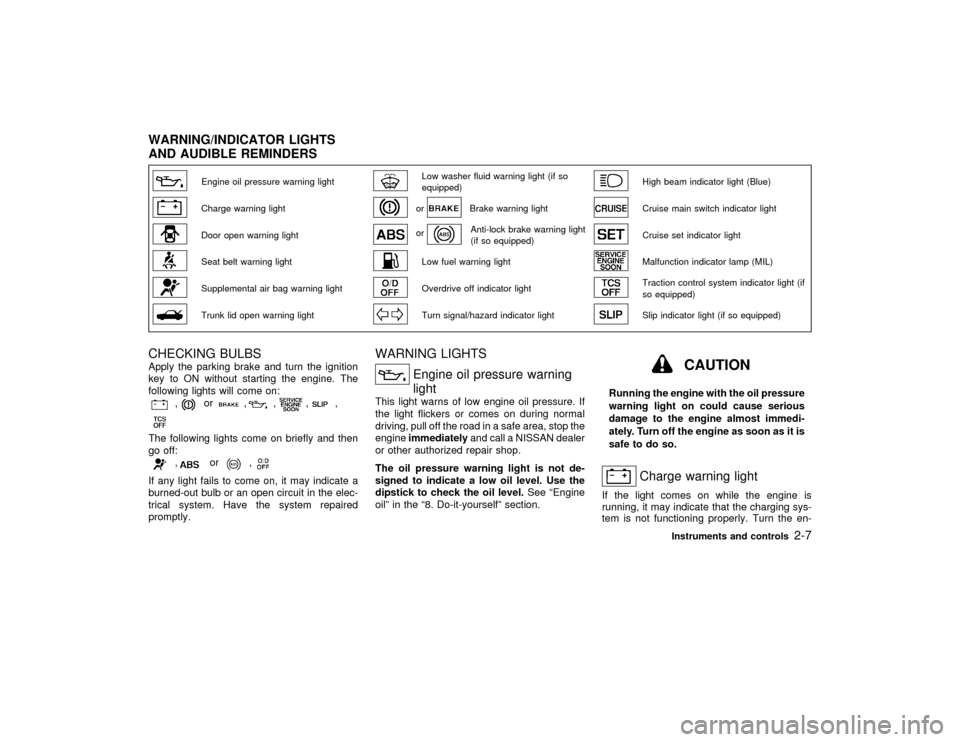
Engine oil pressure warning light
Low washer fluid warning light (if so
equipped)
High beam indicator light (Blue)
Charge warning light
or
Brake warning light
Cruise main switch indicator light
Door open warning light
or
Anti-lock brake warning light
(if so equipped)
Cruise set indicator light
Seat belt warning light
Low fuel warning light
Malfunction indicator lamp (MIL)
Supplemental air bag warning light
Overdrive off indicator light
Traction control system indicator light (if
so equipped)
Trunk lid open warning light
Turn signal/hazard indicator light
Slip indicator light (if so equipped)
CHECKING BULBSApply the parking brake and turn the ignition
key to ON without starting the engine. The
following lights will come on:
,
or
,
,
,
,
The following lights come on briefly and then
go off:
,
or
,
If any light fails to come on, it may indicate a
burned-out bulb or an open circuit in the elec-
trical system. Have the system repaired
promptly.
WARNING LIGHTS
Engine oil pressure warning
light
This light warns of low engine oil pressure. If
the light flickers or comes on during normal
driving, pull off the road in a safe area, stop the
engineimmediatelyand call a NISSAN dealer
or other authorized repair shop.
The oil pressure warning light is not de-
signed to indicate a low oil level. Use the
dipstick to check the oil level.See ªEngine
oilº in the ª8. Do-it-yourselfº section.
CAUTION
Running the engine with the oil pressure
warning light on could cause serious
damage to the engine almost immedi-
ately. Turn off the engine as soon as it is
safe to do so.
Charge warning light
If the light comes on while the engine is
running, it may indicate that the charging sys-
tem is not functioning properly. Turn the en-
WARNING/INDICATOR LIGHTS
AND AUDIBLE REMINDERS
Instruments and controls
2-7
Z
00.1.17/A33-D/V5.0
X
Page 57 of 247

occurs, the gears automatically engage and
lock into third gear.
See the ªDriving the vehicleº in the ª5. Starting
and drivingº section for fail-safe before visiting
your NISSAN dealer.
Turn signal/hazard indicator
lights
The light flashes when the turn signal switch
lever or hazard switch is turned on.
High beam indicator light
(Blue)
This light comes on when the headlight high
beam is on and goes out when the low beam is
selected.
Cruise main switch indicator
light
The light comes on when the cruise control
main switch is pushed. The light goes out
when the main switch is pushed again. When
the cruise main switch indicator light comes
on, the cruise control system is operational.
Cruise set indicator light
The light comes on while the vehicle speed is
controlled by the cruise control system. If the
light blinks while the engine is running, it mayindicate the cruise control system is not func-
tioning properly. Have the system checked by
your NISSAN dealer.
Malfunction indicator lamp
(MIL)
If the malfunction indicator lamp comes on
steady or blinks while the engine is running, it
may indicate a potential emission control mal-
function.
The malfunction indicator lamp may also come
on steady if the fuel filler cap is loose or
missing, or if the vehicle runs out of fuel.
Check to make sure the fuel filler cap is
installed and closed tightly, and that the ve-
hicle has at least three gallons of fuel in the
fuel tank.
After a few driving trips, the
lamp should
turn off if no other potential emission control
system malfunction exists.
Operation
The malfunction indicator lamp will come on in
one of two ways:
IMalfunction indicator lamp on steady Ð An
emission control system malfunction has
been detected. Check the fuel filler cap. If
the fuel filler cap is loose or missing, tighten
or install the cap and continue to drive thevehicle. The
lamp should turn off after
a few driving trips. If the
lamp does
not turn off after a few driving trips, have the
vehicle inspected by an authorized NISSAN
dealer. You do not need to have your
vehicle towed to the dealer.
IMalfunction indicator lamp blinking Ð An
engine misfire has been detected which
may damage the emission control system.
To reduce or avoid emission control system
damage:
a) Do not drive at speeds above 45 MPH
(72 km/h).
b) Avoid hard acceleration or deceleration.
c) Avoid steep uphill grades.
d) If possible, reduce the amount of cargo
being hauled or towed.
The malfunction indicator lamp may stop
blinking and come on steady.
Have the vehicle inspected by an autho-
rized NISSAN dealer. You do not need to
have your vehicle towed to the dealer.
CAUTION
Continued vehicle operation without
having the emission control system
2-10
Instruments and controls
Z
00.1.17/A33-D/V5.0
X
Page 58 of 247
checked and repaired as necessary
could lead to poor driveability, reduced
fuel economy, and possible damage to
the emission control system.
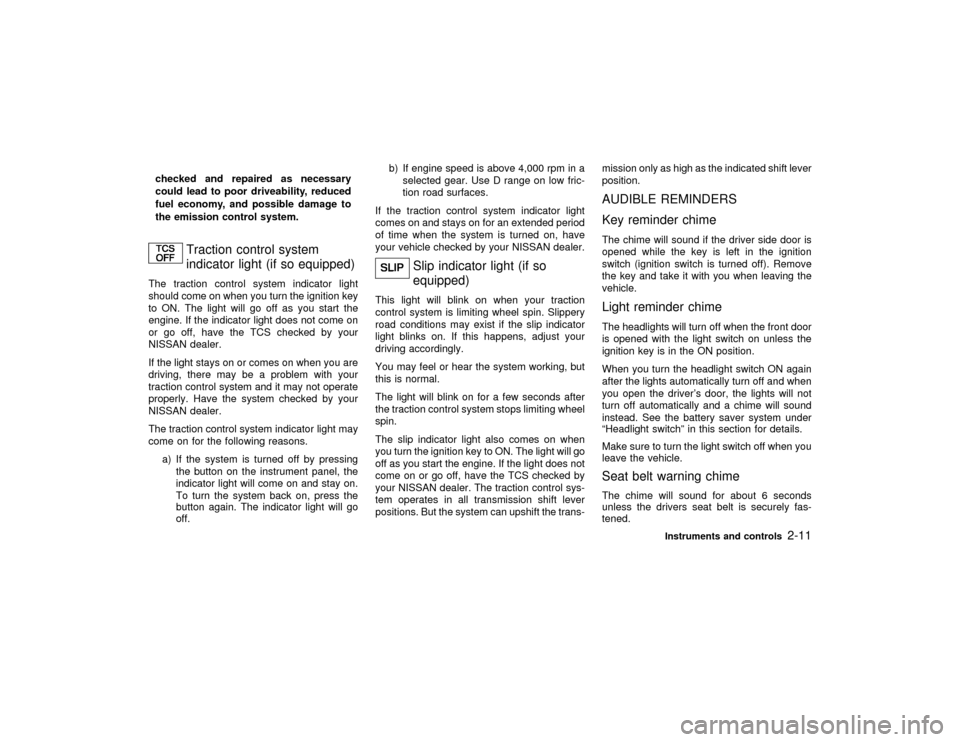
Traction control system
indicator light (if so equipped)
The traction control system indicator light
should come on when you turn the ignition key
to ON. The light will go off as you start the
engine. If the indicator light does not come on
or go off, have the TCS checked by your
NISSAN dealer.
If the light stays on or comes on when you are
driving, there may be a problem with your
traction control system and it may not operate
properly. Have the system checked by your
NISSAN dealer.
The traction control system indicator light may
come on for the following reasons.
a) If the system is turned off by pressing
the button on the instrument panel, the
indicator light will come on and stay on.
To turn the system back on, press the
button again. The indicator light will go
off.b) If engine speed is above 4,000 rpm in a
selected gear. Use D range on low fric-
tion road surfaces.
If the traction control system indicator light
comes on and stays on for an extended period
of time when the system is turned on, have
your vehicle checked by your NISSAN dealer.
Slip indicator light (if so
equipped)
This light will blink on when your traction
control system is limiting wheel spin. Slippery
road conditions may exist if the slip indicator
light blinks on. If this happens, adjust your
driving accordingly.
You may feel or hear the system working, but
this is normal.
The light will blink on for a few seconds after
the traction control system stops limiting wheel
spin.
The slip indicator light also comes on when
you turn the ignition key to ON. The light will go
off as you start the engine. If the light does not
come on or go off, have the TCS checked by
your NISSAN dealer. The traction control sys-
tem operates in all transmission shift lever
positions. But the system can upshift the trans-mission only as high as the indicated shift lever
position.
AUDIBLE REMINDERS
Key reminder chimeThe chime will sound if the driver side door is
opened while the key is left in the ignition
switch (ignition switch is turned off). Remove
the key and take it with you when leaving the
vehicle.Light reminder chimeThe headlights will turn off when the front door
is opened with the light switch on unless the
ignition key is in the ON position.
When you turn the headlight switch ON again
after the lights automatically turn off and when
you open the driver's door, the lights will not
turn off automatically and a chime will sound
instead. See the battery saver system under
ªHeadlight switchº in this section for details.
Make sure to turn the light switch off when you
leave the vehicle.Seat belt warning chimeThe chime will sound for about 6 seconds
unless the drivers seat belt is securely fas-
tened.
Instruments and controls
2-11
Z
00.1.17/A33-D/V5.0
X
Page 60 of 247

4. Confirm that the SECURITY indicator light
comes on. The SECURITY light glows for
about 30 seconds and then blink. The sys-
tem is now activated. If, during this 30
second time period, the door is unlocked by
the key or the multi-remote controller, or the
ignition key is turned to ACC or ON, the
system will not activate.
IIf the key is turned slowly toward the
front of the vehicle when locking the
door, the system may not activate. If the
key is returned beyond the vertical po-
sition toward the rear of the vehicle to
remove the key, the system may be
deactivated. If the indicator light fails to
glow for 30 seconds, unlock the door
once and lock it again.
IEven when the driver and/or passengers
are in the vehicle, the system will acti-
vate with all doors, hood and trunk lid
locked and ignition key off. Turn the
ignition key to ACC to turn the system
off.Vehicle security system operationThe security system will give the following
alarm:
IThe headlights blink and the horn sounds
intermittently.IThe alarm automatically turns off after ap-
proximately 1 minute. However, the alarm
reactivates if the vehicle is tampered with
again. The alarm can be shut off by unlock-
ing a door or trunk lid with the key, or by
pressing the UNLOCK button on the multi-
remote controller.
The alarm is activated by:
IOpening the door without using the key or
multi-remote controller.
IOpening the trunk lid without using the key
or multi-remote controller.
IOpening the hood.
How to stop alarmThe alarm will stop only by unlocking a door or
trunk lid with the key, or by pressing the
UNLOCK button on multi-remote controller.
The alarm will not stop if the ignition switch is
turned to ACC or ON.
If the system does not operate as de-
scribed above, have it checked by your
NISSAN dealer.NISSAN VEHICLE IMMOBILIZER
SYSTEMThe Nissan Vehicle Immobilizer System will
not allow the engine to start without the use ofthe registered Nissan Vehicle Immobilizer Sys-
tem key.
If the engine fails to start using the registered
Nissan Vehicle Immobilizer System key, it may
be due to interference caused by another
Nissan Vehicle Immobilizer System key, an
automated toll road device or automated pay-
ment device on the key ring. Restart the en-
gine using the following procedures:
1. Leave the ignition switch in the ON position
for approximately 5 seconds.
2. Turn the ignition switch to the OFF or LOCK
position and wait approximately 10 sec-
onds.
3. Repeat step 1 and 2 again.
4. Restart the engine while holding the device
(which may have caused the interference)
separate from the registered Nissan Ve-
hicle Immobilizer System key.
If this procedure allows the engine to start,
NISSAN recommends placing the regis-
tered Nissan Vehicle Immobilizer System
key on a separate key ring to avoid inter-
ference from other devices.
Statement related to section 15 of FCC
rules for Nissan Vehicle Immobilizer Sys-
tem (CONT ASSY-IMMOBILIZER)
Instruments and controls
2-13
Z
00.1.17/A33-D/V5.0
X
Page 68 of 247
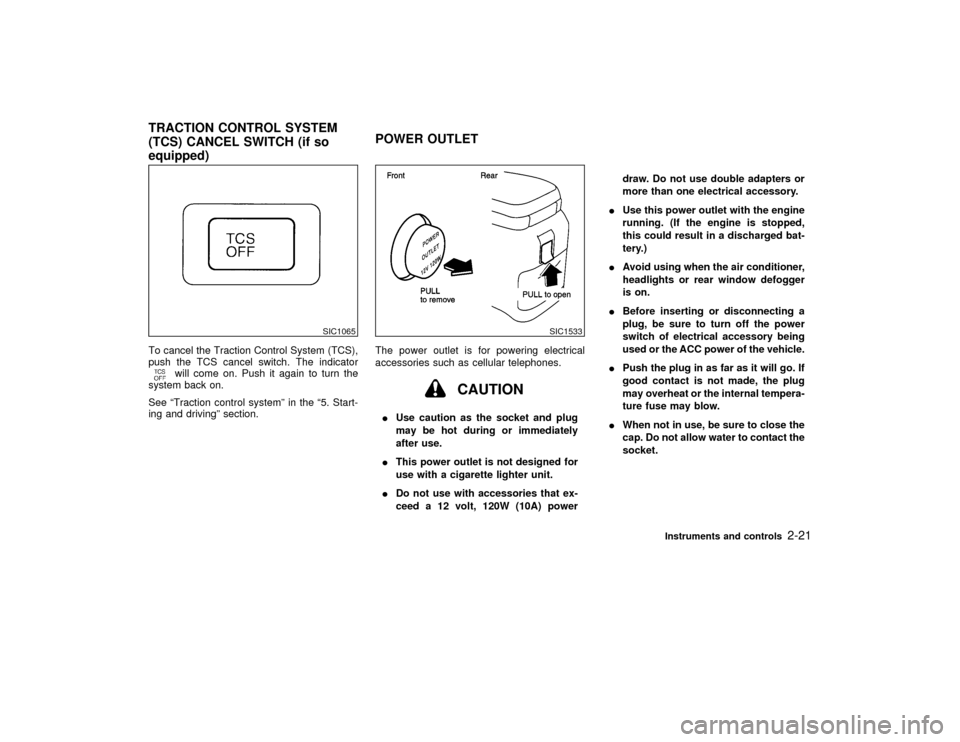
To cancel the Traction Control System (TCS),
push the TCS cancel switch. The indicator
will come on. Push it again to turn the
system back on.
See ªTraction control systemº in the ª5. Start-
ing and drivingº section.The power outlet is for powering electrical
accessories such as cellular telephones.
CAUTION
IUse caution as the socket and plug
may be hot during or immediately
after use.
IThis power outlet is not designed for
use with a cigarette lighter unit.
IDo not use with accessories that ex-
ceed a 12 volt, 120W (10A) powerdraw. Do not use double adapters or
more than one electrical accessory.
IUse this power outlet with the engine
running. (If the engine is stopped,
this could result in a discharged bat-
tery.)
IAvoid using when the air conditioner,
headlights or rear window defogger
is on.
IBefore inserting or disconnecting a
plug, be sure to turn off the power
switch of electrical accessory being
used or the ACC power of the vehicle.
IPush the plug in as far as it will go. If
good contact is not made, the plug
may overheat or the internal tempera-
ture fuse may blow.
IWhen not in use, be sure to close the
cap. Do not allow water to contact the
socket.
SIC1065
SIC1533
TRACTION CONTROL SYSTEM
(TCS) CANCEL SWITCH (if so
equipped)POWER OUTLET
Instruments and controls
2-21
Z
00.1.17/A33-D/V5.0
X
Page 71 of 247
CAUTION
IAvoid abrupt starting and braking
when the cup holder is being used to
prevent spilling the drink. If the liquid
is hot, it can scald you or your pas-
senger.
IUse only soft cups in the cup holder.
Hard objects can injure you in an
accident.
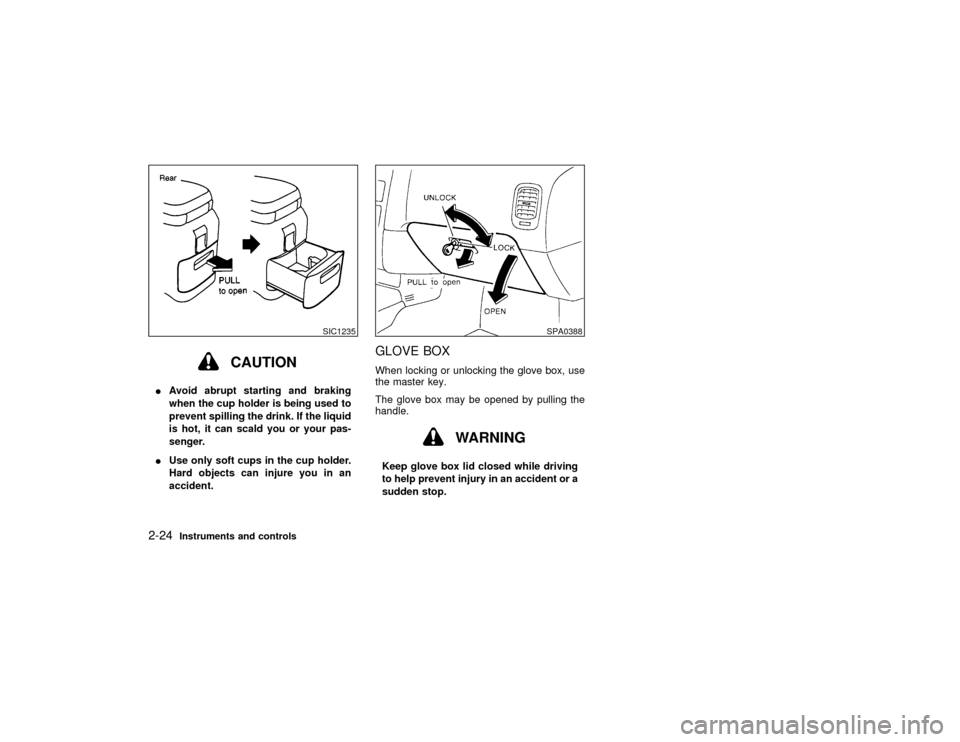
GLOVE BOXWhen locking or unlocking the glove box, use
the master key.
The glove box may be opened by pulling the
handle.
WARNING
Keep glove box lid closed while driving
to help prevent injury in an accident or a
sudden stop.
SIC1235
SPA0388
2-24
Instruments and controls
Z
00.1.17/A33-D/V5.0
X
Page 105 of 247

indicator and air recirculation lights will turn on.Air recirculation buttonOFF position:
Outside air is drawn into the passenger com-
partment.
Use the off position for normal heater, or air
conditioner operation.
ON position (Indicator light ON):
Interior air is recirculated inside the vehicle.
Push the air recirculation button to the ON
position when driving on a dusty road or to
avoid traffic fumes and for maximum cooling
when using the air conditioner.Air conditioning buttonStart the engine, move the fan control dial to
the desired (1 to 4) position and push the air
conditioning button to turn on the air condi-
tioner. The indicator light will come on when
the air conditioner is on. To stop the air con-
ditioner, push the switch again to return it to
the original position.
The air conditioner cooling function oper-
ates only when the engine is running.
HEATER OPERATION
HeatingThis mode is used to direct hot air from the
floor outlets. Some air will also come from the
defrost vents.
1. Push the air recirculation button to the OFF
position for normal heating.
2. Push the
button in.
3. Turn on the fan control dial.
4. Move the temperature control lever to the
desired position between the middle and
the HOT position.
For quick heating, move the air recirculation
button to the ON position. Be sure to return the
air recirculation button to the OFF position for
normal heating.
VentilationThis mode directs outside air from the side and
center vents.
1. Push the air recirculation button to the OFF
position.
2. Push the
button in.
3. Turn on the fan control dial.4. Move the temperature control lever to the
desired position.
Defrosting or defoggingThis mode is used to defrost/defog the win-
dows.
1. Push the
button in.
2. Turn on the fan control dial.
3. Move the temperature control lever to the
desired position between the middle and
the HOT position.
ITo quickly remove ice or fog from the
windows, turn on the fan control dial to 4
and the temperature control lever to the full
HOT position.
IWhen thebutton is pushed, the air
conditioner will automatically be turned on
to defog the windshield, and the air recircu-
late mode will automatically be turned off.
Outside air is drawn into the passenger
compartment to improve the defogging per-
formance.
4-4
Heater, air conditioner and audio systems
Z
00.1.17/A33-D/V5.0
X
Page 123 of 247
CAUTION
Do not force the cassette tape into the
tape door. This could cause player dam-
age.
If the system is turned off by pushing the
ON×OFF/VOL control knob with the cassette
tape still in the player, the tape will resume
playing when the system is turned back on.
PLAY:
IWhen the TAPE button is pushed with the
system turned off and a tape loaded, the
system will come on and the tape will play.
IWhen the TAPE button is pushed with
either the radio or compact disc turned on
and the tape loaded, the compact disc or
the radio will automatically be turned off
and the tape will play.
FF (Fast Forward), REW
(Rewind):
Push the(fast forward) button to fast
forward the tape. To rewind the tape, push the
(rewind) button. Either the FF or REW
symbol illuminates on the right side of the
display window. To stop the FF or REW func-tion, press the
(fast forward) or
(re-
wind) again, or the TAPE button.
APS (Automatic Program
Search) FF, APS REW:
When the(APS FF) button is pushed
while the tape is being played, the next pro-
gram will start to play from the beginning. Push
the
(APS FF) button several times to skip
through programs. The tape will advance the
number of times the button is pushed (up to
nine programs).
When the
(APS REW) button is pushed
once, the program being played starts over
from the beginning. Push the
(APS
REW) button several times to skip back sev-
eral selections. The tape will go back the
number of times the button is pushed. Either
the FF or REW symbol flashes on the right
side of the display window while searching for
the selection.
This system searches for the blank intervals
between selections. If there is a blank interval
within one program or there is no interval
between programs, the system may not stop in
the desired or expected location.
PROG (Program):
Push the PROG button to change the tape
side while the tape is being played.The cassette tape will automatically change
directions to play the other side when the first
side is completed.
Dolby NR (Noise Reduction):
Push the Dolby NR
button for Dolby NR
encoded tapes to reduce high frequency tape
noise. The indicator will come on.
Dolby noise reduction manufactured under li-
cense from Dolby Laboratories Licensing Cor-
poration. Dolby NR and the double-D symbol
are trademarks of Dolby Laboratories
Licensing Corporation.
Metal or chrome tape usage:
The cassette player will be automatically set to
high performance play when playing a metal or
chrome cassette tape.TAPE EJECT:
When this button is pushed with the tape
loaded, the tape will be ejected.
When the tape is ejected while it is being
played, the system will be turned off.
Compact disc (CD) player operationTurn the ignition key to the ACC or ON position
and insert the compact disc into the slot with
the label side facing up. The compact disc will
4-22
Heater, air conditioner and audio systems
Z
00.1.17/A33-D/V5.0
X