2001 NISSAN MAXIMA window
[x] Cancel search: windowPage 118 of 247
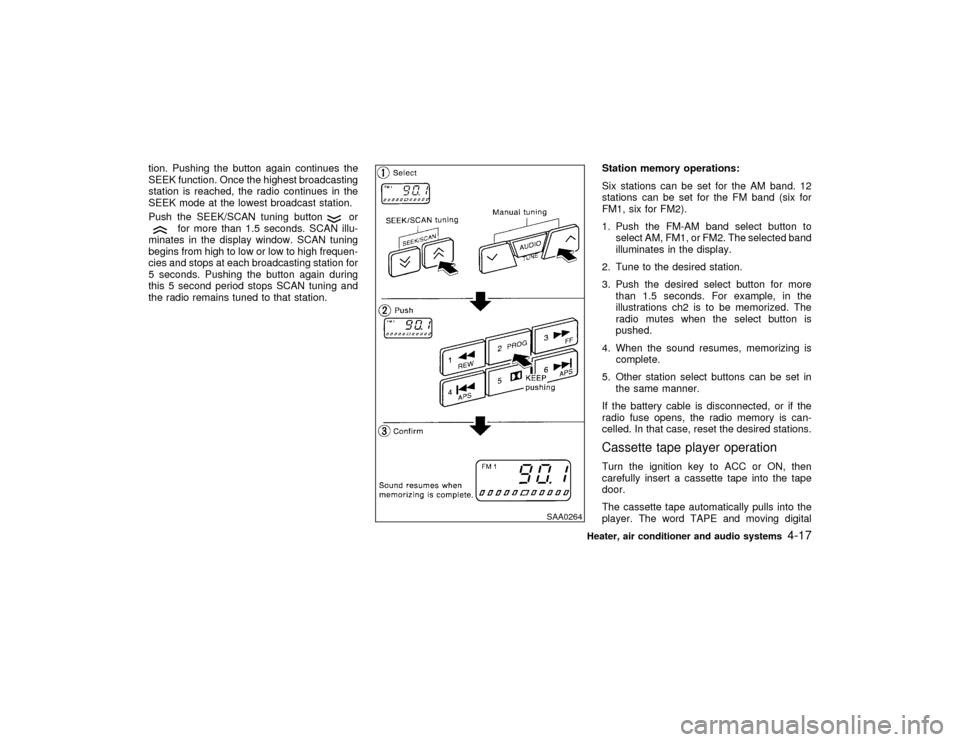
tion. Pushing the button again continues the
SEEK function. Once the highest broadcasting
station is reached, the radio continues in the
SEEK mode at the lowest broadcast station.
Push the SEEK/SCAN tuning button
or
for more than 1.5 seconds. SCAN illu-
minates in the display window. SCAN tuning
begins from high to low or low to high frequen-
cies and stops at each broadcasting station for
5 seconds. Pushing the button again during
this 5 second period stops SCAN tuning and
the radio remains tuned to that station.Station memory operations:
Six stations can be set for the AM band. 12
stations can be set for the FM band (six for
FM1, six for FM2).
1. Push the FM-AM band select button to
select AM, FM1, or FM2. The selected band
illuminates in the display.
2. Tune to the desired station.
3. Push the desired select button for more
than 1.5 seconds. For example, in the
illustrations ch2 is to be memorized. The
radio mutes when the select button is
pushed.
4. When the sound resumes, memorizing is
complete.
5. Other station select buttons can be set in
the same manner.
If the battery cable is disconnected, or if the
radio fuse opens, the radio memory is can-
celled. In that case, reset the desired stations.
Cassette tape player operationTurn the ignition key to ACC or ON, then
carefully insert a cassette tape into the tape
door.
The cassette tape automatically pulls into the
player. The word TAPE and moving digital
SAA0264
Heater, air conditioner and audio systems
4-17
Z
00.1.17/A33-D/V5.0
X
Page 119 of 247
squares illuminate on the right side of the
display window.
CAUTION
Do not force the cassette tape into the
tape door. This could cause player dam-
age.
The cassette tape automatically changes di-
rections to play the other side when the first
side is complete. At this time, the moving
digital squares illuminate on the left side of the
display window.
PLAY/STOP:
Push the PLAY/STOP button while the cas-
sette tape is playing to stop the tape. Push the
button again to play the tape.
FF (fast forward), REW
(rewind):
Push either the FF or REW button for the
desired direction.
The FF or REW symbol illuminates in the
display.
To stop the FF or REW function, press the FFor REW button again, or the PLAY/STOP
button.
APS (automatic program
search) FF, APS REW:
Push either the APS FF or APS REW button
while the cassette tape is playing. The tape
runs quickly, stops, then plays the next selec-
tion. Either the FF or REW symbol flashes in
the display while searching for the selection.
This system searches at the blank intervals
between selections. If there is a blank interval
within one selection or there is no interval
between selections, the system may not stop
in the desired or expected location.
PROG (program):
Push the PROG button. The moving digital
squares illuminate on either the right or left
side of the display window to indicate the side
of program play.Dolby NR (Noise Reduction):
Push the Dolby NR
button for Dolby NR
encoded tapes to reduce high frequency tape
noise. The
indicator light comes on.
Dolby NR is manufactured under license from
Dolby Laboratories Licensing Corporation.
DOLBY NR and the double-D symbol
are trademarks of Dolby Laboratories
Licensing Corporation.
Metal or chrome tape usage:
The cassette player is automatically set to high
performance play when playing a metal or
chrome cassette tape.Ejecting the cassette tape:
Push the EJECT button. The cassette tape
automatically comes out.
4-18
Heater, air conditioner and audio systems
Z
00.1.17/A33-D/V5.0
X
Page 120 of 247
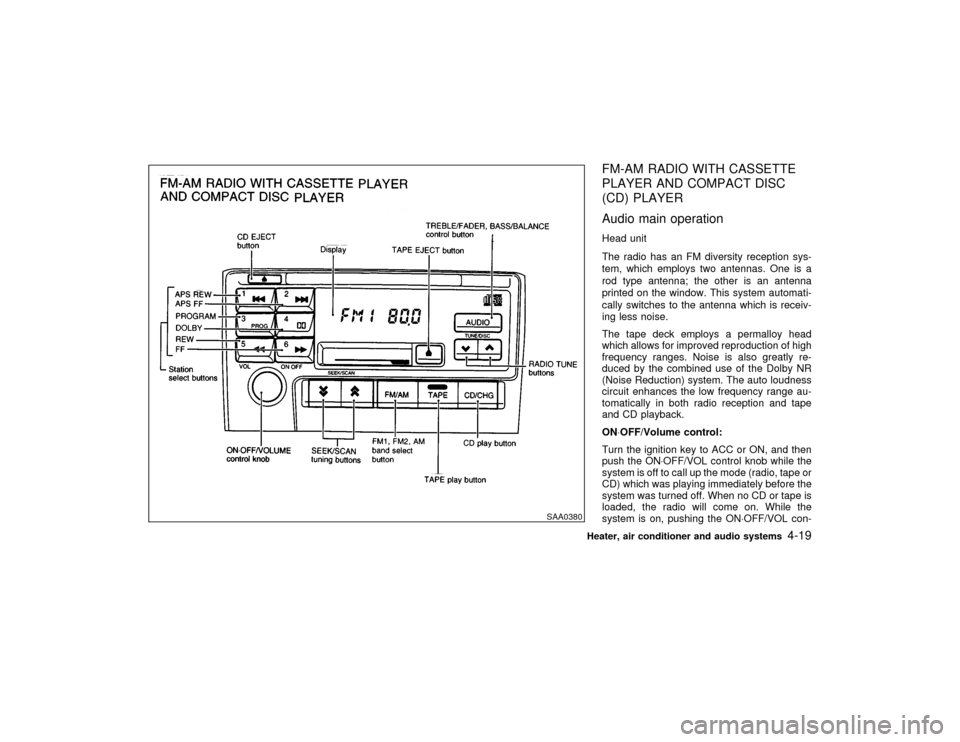
FM-AM RADIO WITH CASSETTE
PLAYER AND COMPACT DISC
(CD) PLAYER
Audio main operationHead unit
The radio has an FM diversity reception sys-
tem, which employs two antennas. One is a
rod type antenna; the other is an antenna
printed on the window. This system automati-
cally switches to the antenna which is receiv-
ing less noise.
The tape deck employs a permalloy head
which allows for improved reproduction of high
frequency ranges. Noise is also greatly re-
duced by the combined use of the Dolby NR
(Noise Reduction) system. The auto loudness
circuit enhances the low frequency range au-
tomatically in both radio reception and tape
and CD playback.
ON×OFF/Volume control:
Turn the ignition key to ACC or ON, and then
push the ON×OFF/VOL control knob while the
system is off to call up the mode (radio, tape or
CD) which was playing immediately before the
system was turned off. When no CD or tape is
loaded, the radio will come on. While the
system is on, pushing the ON×OFF/VOL con-
SAA0380
Heater, air conditioner and audio systems
4-19
Z
00.1.17/A33-D/V5.0
X
Page 123 of 247
CAUTION
Do not force the cassette tape into the
tape door. This could cause player dam-
age.
If the system is turned off by pushing the
ON×OFF/VOL control knob with the cassette
tape still in the player, the tape will resume
playing when the system is turned back on.
PLAY:
IWhen the TAPE button is pushed with the
system turned off and a tape loaded, the
system will come on and the tape will play.
IWhen the TAPE button is pushed with
either the radio or compact disc turned on
and the tape loaded, the compact disc or
the radio will automatically be turned off
and the tape will play.
FF (Fast Forward), REW
(Rewind):
Push the(fast forward) button to fast
forward the tape. To rewind the tape, push the
(rewind) button. Either the FF or REW
symbol illuminates on the right side of the
display window. To stop the FF or REW func-tion, press the
(fast forward) or
(re-
wind) again, or the TAPE button.
APS (Automatic Program
Search) FF, APS REW:
When the(APS FF) button is pushed
while the tape is being played, the next pro-
gram will start to play from the beginning. Push
the
(APS FF) button several times to skip
through programs. The tape will advance the
number of times the button is pushed (up to
nine programs).
When the
(APS REW) button is pushed
once, the program being played starts over
from the beginning. Push the
(APS
REW) button several times to skip back sev-
eral selections. The tape will go back the
number of times the button is pushed. Either
the FF or REW symbol flashes on the right
side of the display window while searching for
the selection.
This system searches for the blank intervals
between selections. If there is a blank interval
within one program or there is no interval
between programs, the system may not stop in
the desired or expected location.
PROG (Program):
Push the PROG button to change the tape
side while the tape is being played.The cassette tape will automatically change
directions to play the other side when the first
side is completed.
Dolby NR (Noise Reduction):
Push the Dolby NR
button for Dolby NR
encoded tapes to reduce high frequency tape
noise. The indicator will come on.
Dolby noise reduction manufactured under li-
cense from Dolby Laboratories Licensing Cor-
poration. Dolby NR and the double-D symbol
are trademarks of Dolby Laboratories
Licensing Corporation.
Metal or chrome tape usage:
The cassette player will be automatically set to
high performance play when playing a metal or
chrome cassette tape.TAPE EJECT:
When this button is pushed with the tape
loaded, the tape will be ejected.
When the tape is ejected while it is being
played, the system will be turned off.
Compact disc (CD) player operationTurn the ignition key to the ACC or ON position
and insert the compact disc into the slot with
the label side facing up. The compact disc will
4-22
Heater, air conditioner and audio systems
Z
00.1.17/A33-D/V5.0
X
Page 126 of 247
Tuning
Memory change (radio):
Push the tuning switch
or
for less
than 1.5 seconds to change the radio fre-
quency.
Seek tuning (radio):
Push the tuning switch
or
for more
than 1.5 seconds to seek the next or previous
radio station.
APS (Automatic Program Search) FF, APS
REW (tape/CD or CD changer):
Push the tuning switch
or
for less
1.5 seconds to return to the beginning of the
present program or skip to the next program.
Push several times to skip back or skip
through programs.
This system searches for the blank intervals
between selections. If there is a blank interval
within one program or there is no interval
between programs, the system may not stop in
the desired or expected location.
FF REW (tape or CD changer):
Push the tuning switch
or
for more
than 1.5 seconds to rewind or fast forward the
tape or to change the playing disc up or down.
To stop the FF or REW function, press the
or
button for more than 1.5 sec-
onds again.
ANTENNA
Window antennaThe antenna pattern is printed inside the rear
window.
CAUTION
IDo not place metalized film near the
rear window glass or attach any metal
parts to it. This may cause poor re-
ception or noise.
IWhen cleaning the inside of the rear
window, be careful not to scratch or
damage the rear window antenna.
Lightly wipe along the antenna with a
dampened soft cloth.If equipped with a genuine NISSAN cellular
phone, your NISSAN features a non-
directional microphone in the steering column
cover, so it is not necessary to look at or speak
directly into the microphone when calling. To
do so could detract from the driving operation
and cause an accident. See the car phone
manual for operation.
Some models are pre-wired to accept the
genuine NISSAN cellular phone. In addition,
the same model has the phone antenna built
into the rear glass window.
When installing a CB, ham radio or car phone
in your NISSAN, be sure to observe the follow-
ing cautions, otherwise the new equipment
may adversely affect the Engine control sys-
tem and other electronic parts.
WARNING
IA cellular telephone should not be
used while driving so full attention
may be given to vehicle operation.
Some jurisdictions prohibit the use of
cellular telephones while driving.CAR PHONE OR CB RADIO
Heater, air conditioner and audio systems
4-25
Z
00.1.17/A33-D/V5.0
X
Page 129 of 247

WARNING
IDo not leave children, impaired
adults, or pets alone in your vehicle.
They could accidentally injure them-
selves or others through inadvertent
operation of the vehicle. Also, on hot,
sunny days, temperatures in a closed
vehicle could quickly become high
enough to cause severe or possibly
fatal injuries to people or animals.
IClosely supervise children when they
are around cars to prevent them from
playing and becoming locked in the
trunk where they could be seriously
injured. Keep the car locked with the
trunk closed when not in use, and
prevent children's access to car keys.EXHAUST GAS (Carbon monoxide)
WARNING
Do not breathe exhaust gases; they con-tain colorless and odorless carbon mon-
oxide. Carbon monoxide is dangerous. It
can cause unconsciousness or death.
IIf you suspect that exhaust fumes are
entering the vehicle, drive with all
windows fully open, and have the
vehicle inspected immediately.
IDo not run the engine in closed
spaces such as a garage.
IDo not park the vehicle with the en-
gine running for any extended length
of time.
IKeep the trunk lid closed while driv-
ing, otherwise exhaust gases could
be drawn into the passenger com-
partment. If you must drive with the
trunk lid open, follow these precau-
tions:
1. Open all the windows.
2. Set the air recirculation switch
OFF and the fan control at 4 (high)
to circulate the air.
IIf electrical wiring or other cable con-nections must pass to a trailer
through the seal on the trunk lid or
the body, follow the manufacturer's
recommendation to prevent carbon
monoxide entry into the vehicle.
IIf a special body or other equipment
is added for recreational or other us-
age, follow the manufacturer's rec-
ommendation to prevent carbon
monoxide entry into the vehicle.
(Some recreational vehicle appli-
ances such as stoves, refrigerator,
heaters, etc. may also generate car-
bon monoxide.)
IThe exhaust system and body should
be inspected by a qualified mechanic
whenever:
a. The vehicle is raised for service.
b. You suspect that exhaust fumes
are entering into the passenger
compartment.
c. You notice a change in the sound
of the exhaust system.PRECAUTIONS WHEN STARTING
AND DRIVING5-2
Starting and driving
Z
00.1.17/A33-D/V5.0
X
Page 134 of 247

IMake sure the area around the vehicle is
clear.
IMaintenance items listed here should be
checked periodically, e.g., each time you
check engine oil.
ICheck that all windows and lights are clean.
IVisually inspect tires for their appearance
and condition. Also check tires for proper
inflation.
ILock all doors.
IPosition seat and adjust head restraints.
IAdjust inside and outside mirrors.
IFasten seat belts and ask all passengers to
do likewise.
ICheck the operation of warning lights when
key is turned to the ON (3) position.1. Apply the parking brake.
2.Automatic transmission:
Move the selector lever to P (Park) or N
(Neutral). (P preferred.)
The selector lever cannot be moved out of
P (Park) position and into any of the other
gear positions if the key is removed from
the switch.
The starter is designed not to operate if the
selector lever is in one of the driving posi-
tions.
Manual transmission:
Move the shift lever to N (Neutral) position,
and depress the clutch pedal to the floor
while cranking the engine.
The starter is designed not to operate un-
less the clutch pedal is fully depressed.
3. Crank the enginewith your foot off the
accelerator pedalby turning the ignition
key to START. Release the key when the
engine starts. If the engine starts, but fails
to run, repeat the above procedure.
IIf the engine is very hard to start in
extremely cold or hot weather, de-
press the accelerator pedal and hold it
to help start the engine.IIn the summer, when restarting the
engine within 30 minutes after it has
been stopped, keep the accelerator
pedal fully depressed while starting.
CAUTION
Do not operate the starter for more than
15 seconds at a time. If the engine does
not start, turn the key off and wait 10
seconds before cranking again, other-
wise the starter could be damaged.
4.Warm-up
Allow the engine to idle for at least 30
seconds after starting. Drive at moderate
speed for a short distance first, especially in
cold weather.
BEFORE STARTING THE ENGINE STARTING THE ENGINE
Starting and driving
5-7
Z
00.1.17/A33-D/V5.0
X
Page 143 of 247
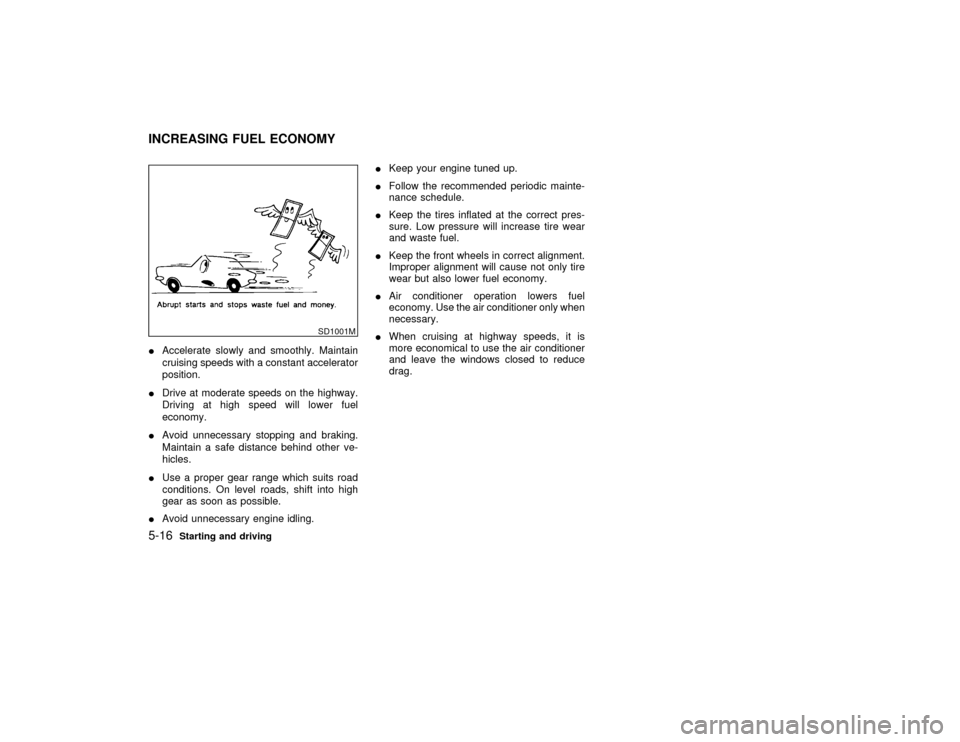
IAccelerate slowly and smoothly. Maintain
cruising speeds with a constant accelerator
position.
IDrive at moderate speeds on the highway.
Driving at high speed will lower fuel
economy.
IAvoid unnecessary stopping and braking.
Maintain a safe distance behind other ve-
hicles.
IUse a proper gear range which suits road
conditions. On level roads, shift into high
gear as soon as possible.
IAvoid unnecessary engine idling.IKeep your engine tuned up.
IFollow the recommended periodic mainte-
nance schedule.
IKeep the tires inflated at the correct pres-
sure. Low pressure will increase tire wear
and waste fuel.
IKeep the front wheels in correct alignment.
Improper alignment will cause not only tire
wear but also lower fuel economy.
IAir conditioner operation lowers fuel
economy. Use the air conditioner only when
necessary.
IWhen cruising at highway speeds, it is
more economical to use the air conditioner
and leave the windows closed to reduce
drag.
SD1001M
INCREASING FUEL ECONOMY5-16
Starting and driving
Z
00.1.17/A33-D/V5.0
X