Page 83 of 317

80 Instrument cluster
Te ch n ica l
data Instruments
and controlsOperationDrivingInstrument
cluster displayPractical hints Car care Index
Activating instrument cluster display
The display for temperature, odometer, oil level
indicator and clock is activated by:
•Opening the driver’s door.
•Pressing button (1) in the instrument cluster (with
key removed or in steering lock position 0).
•Turning the key in steering lock to position 1 or 2.Display illumination
Rotate knob (1) to vary intensity of instrument lamps:
•Clockwise - instrument lamp intensity increases.
•Counterclockwise - instrument lamp intensity
decreases.
Odometer/trip odometer
Activate the instrument cluster.
•Press knob (1) once to switch to or from odometer to
trip odometer readout.
•Press and hold knob (1) for more than 1 second to
reset trip odometer (with trip odometer displayed).
•Press knob (1) twice to display next scheduled
service.
Clock
Adjusting clock (instrument cluster activated):
Minute: Pull out knob (2) and turn it to the right.
Hour: Pull out knob (2) and turn it to the left.
Page 86 of 317
83 Trip computer
Te ch n ica l
data Instruments
and controlsOperationDrivingInstrument
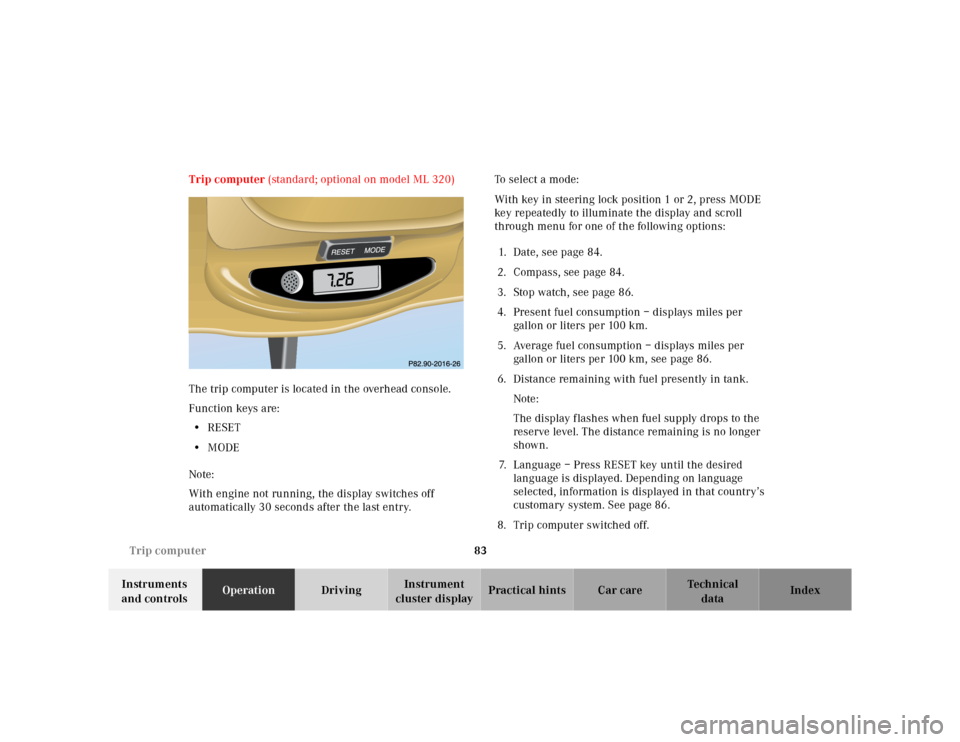
cluster displayPractical hints Car care Index Trip computer (standard; optional on model ML 320)
The trip computer is located in the overhead console.
Function keys are:
•RESET
•MODE
Note:
With engine not running, the display switches off
automatically 30 seconds after the last entry.To select a mode:
With key in steering lock position 1 or 2, press MODE
key repeatedly to illuminate the display and scroll
through menu for one of the following options:
1. Date, see page 84.
2. Compass, see page 84.
3. Stop watch, see page 86.
4. Present fuel consumption – displays miles per
gallon or liters pe r 100 km.
5. Average fuel consumption – displays miles per
gallon or liters per 100 km, see page 86.
6. Distance remaining with fuel presently in tank.
Note:
The display f lashes when fuel supply drops to the
reserve level. The distance remaining is no longer
shown.
7. Language – Press RESET key until the desired
language is displayed. Depending on language
selected, information is displayed in that country’s
customary system. See page 86.
8. Trip computer switched off.
MODE
Page 87 of 317
84 Trip computer
Te ch n ica l
data Instruments
and controlsOperationDrivingInstrument
cluster displayPractical hints Car care Index
To change an entry, select mode to be changed:
•Date –
Press RESET key, the month shown blinks. Now
press MODE key to advance to selected month.
Press RESET key again, the day shown blinks. Now
press MODE key to advance to selected day.
Press RESET key again, the year shown blinks. Now
press MODE key to advance to selected year.
Press RESET key again, the display stops blinking
and the date is set.
•Compass –
The compass displays the direction the vehicle is
traveling, such as N, NE, E, SE, S, SW, W or NW.
Note:
The presence of buildings, bridges, power lines and
large antenna masts can influence the displayed
values. Metallic or magnetic objects in or on the
vehicle can influence the accuracy of the compass.To change the compass zones:
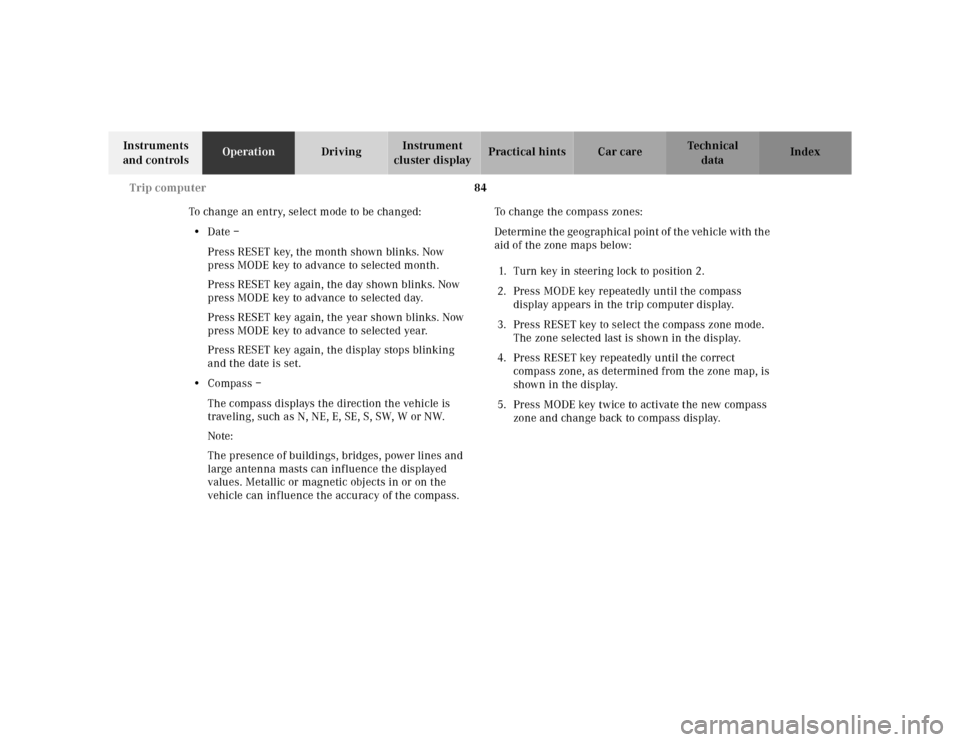
Determine the geographical point of the vehicle with the
aid of the zone maps below:
1. Turn key in steering lock to position 2.
2. Press MODE key repeatedly until the compass
display appears in the trip computer display.
3. Press RESET key to select the compass zone mode.
The zone selected last is shown in the display.
4. Press RESET key repeatedly until the correct
compass zone, as determined from the zone map, is
shown in the display.
5. Press MODE key twice to activate the new compass
zone and change back to compass display.
Page 89 of 317
86 Trip computer
Te ch n ica l
data Instruments
and controlsOperationDrivingInstrument
cluster displayPractical hints Car care Index
To calibrate the compass:
If the vehicle was exposed to a significant magnetic
zone, such as high voltage power lines, the compass
may have to be calibrated.
Calibration of the compass should be done in an area
free of steel superstructures and power lines. All
electrical consumers (e.g. exterior lamps, climate
control, etc.) should be switched off, doors and liftgate
closed. Do not open or close the roof. An open door or
liftgate triggers the display “–––”.
1. Start and run the engine.
2. Press MODE key repeatedly until the compass
display appears in the trip computer display.
3. Press RESET key to select the compass zone display.
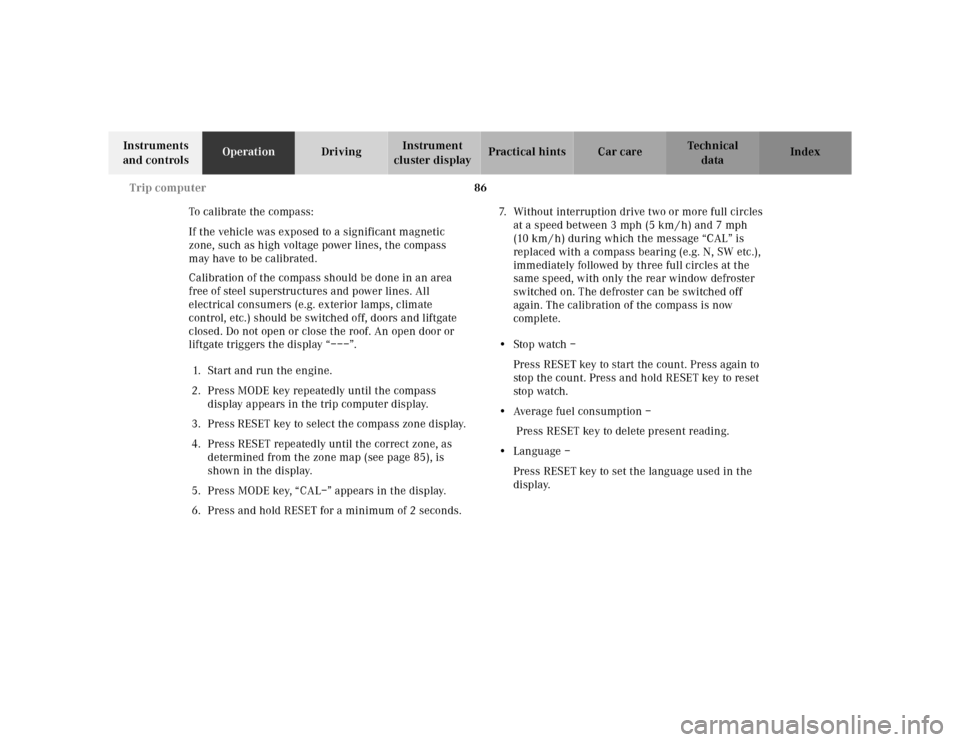
4. Press RESET repeatedly until the correct zone, as
determined from the zone map (see page 85), is
shown in the display.
5. Press MODE key, “CAL–” appears in the display.
6. Press and hold RESET for a minimum of 2 seconds.7. Without interruption drive two or more full circles
at a speed between 3 mph (5 km / h) and 7 mph
(10 km / h) during which the message “CAL” is
replaced with a compass bearing (e.g. N, SW etc.),
immediately followed by three full circles at the
same speed, with only the rear window defroster
switched on. The defroster can be switched off
again. The calibration of the compass is now
complete.
•Stop watch –
Press RESET key to start the count. Press again to
stop the count. Press and hold RESET key to reset
sto p watch.
•Average fuel consumption –
Press RESET key to delete present reading.
•Language –
Press RESET key to set the language used in the
display.
Page 91 of 317
88 Flexible service system
Te ch n ica l
data Instruments
and controlsOperationDrivingInstrument
cluster displayPractical hints Car care Index
Important!
The FSS indicator is not an engine oil level indicator.
See page 89 for engine oil level indicator.
Notes:
When disconnecting vehicle battery for one or more
days at a time, such days will not be counted. Any such
days not counted by the FSS can be added by your
Mercedes-Benz Light Truck Center.
The interval between services is determined by the type
of driving for which the vehicle is used. For example,
driving at extreme speeds, and cold starts combined
with short distance driving in which the engine does not
reach normal operating temperature, reduce the interval
between services.
Following a completed A or B service the Mercedes-
Benz Light Truck Center sets the counter mileage to
10 000 miles (Canada: 15 000 km) and 365 days.
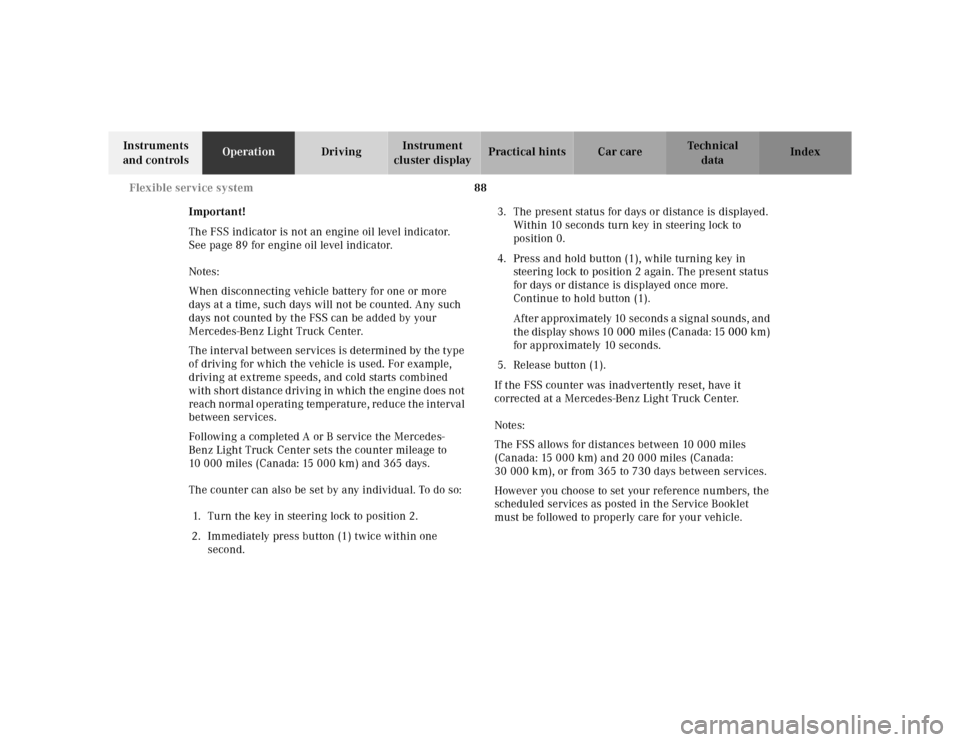
The counter can also be set by any individual. To do so:
1. Turn the key in steering lock to position 2.
2. Immediately press button (1) twice within one
second.3. The present status for days or distance is displayed.
Within 10 seconds turn key in steering lock to
position 0.
4. Press and hold button (1), while turning key in
steering lock to position 2 again. The present status
for days or distance is displayed once more.
Continue to hold button (1).
After approximately 10 seconds a signal sounds, and
the display shows 10 000 miles (Canada: 15 000 km)
for approximately 10 seconds.
5. Release button (1).
If the FSS counter was inadvertently reset, have it
corrected at a Mercedes-Benz Light Truck Center.
Notes:
The FSS allows for distances between 10 000 miles
(Canada: 15 000 km) and 20 000 miles (Canada:
30 000 km), or from 365 to 730 days between services.
However you choose to set your reference numbers, the
scheduled services as posted in the Service Booklet
must be followed to properly care for your vehicle.
Page 110 of 317
107 Interior equipment
Te ch n ica l
data Instruments
and controlsOperationDrivingInstrument
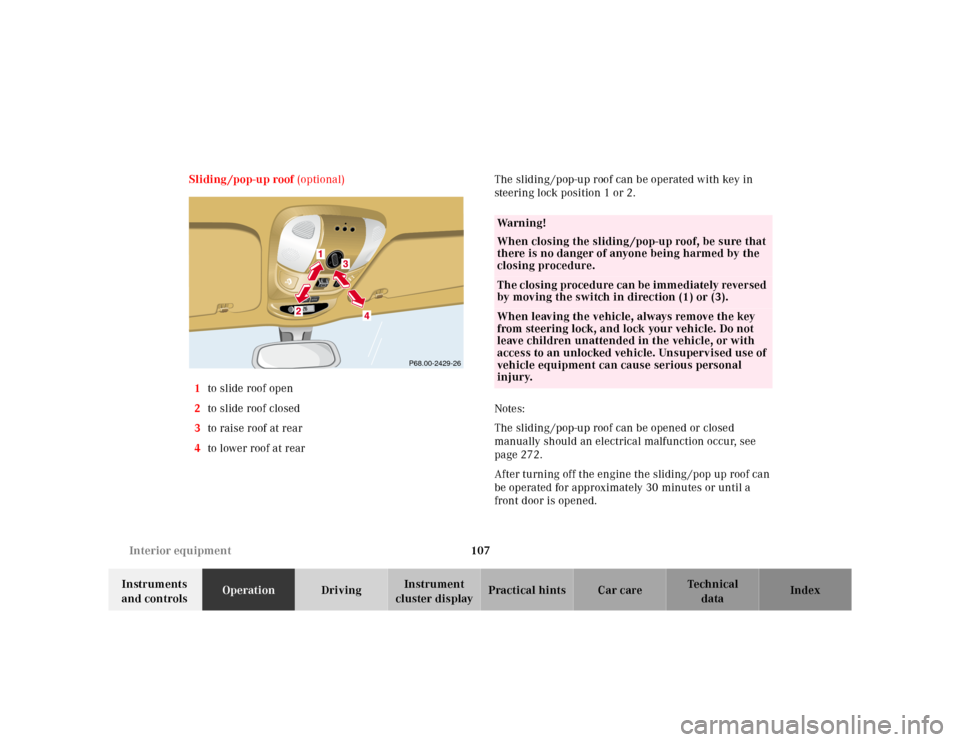
cluster displayPractical hints Car care Index Sliding /pop-up roof (optional)
1to slide roof open
2to slide roof closed
3to raise roof at rear
4to lower roof at rearThe sliding /pop-up roof can be operated with key in
steering lock position 1 or 2.
Notes:
The sliding /pop-up roof can be opened or closed
manually should an electrical malfunction occur, see
page 272.
After turning off the engine the sliding /pop up roof can
be operated for approximately 30 minutes or until a
front door is opened.
RESETMODE
P68.00-2429-26
Wa r n i n g !
When closing the sliding /pop-up roof, be sure that
there is no danger of anyone being harmed by the
closing procedure.The closing procedure can be immediately reversed
by moving the switch in direction (1) or (3).When leaving the vehicle, always remove the key
from steering lock, and lock your vehicle. Do not
leave children unattended in the vehicle, or with
access to an unlocked vehicle. Unsupervised use of
vehicle equipment can cause serious personal
injury.
Page 111 of 317
108 Interior equipment
Te ch n ica l
data Instruments
and controlsOperationDrivingInstrument
cluster displayPractical hints Car care Index
With the roof closed or tilted open, a screen can be slid
into the roof opening to guard against sun rays. When
sliding the roof open, the screen will also retract.Express opening of sliding /pop-up roof
To open sliding /pop-up roof automatically, briefly move
switch in direction (1) and release. The roof will not
open fully. Press again to open it fully.
To interrupt procedure, brief ly move switch in any
direction.
Note:
For resynchronizing the express opening feature see
page 272.
RESETMODE
Page 112 of 317
109 Interior equipment
Te ch n ica l
data Instruments
and controlsOperationDrivingInstrument
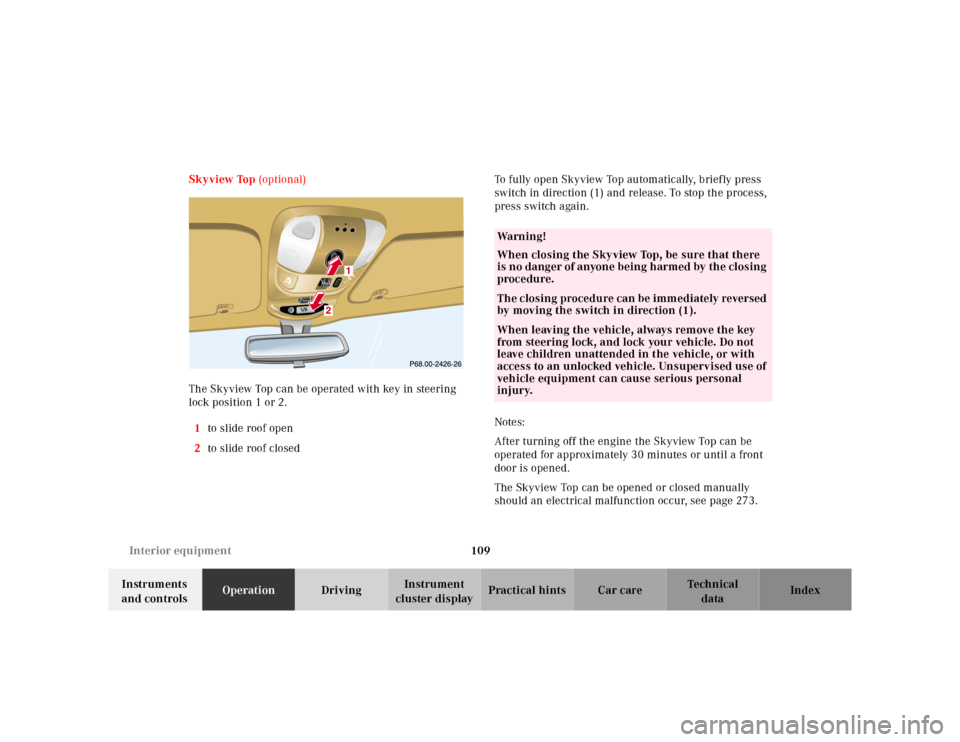
cluster displayPractical hints Car care Index Skyview Top (optional)
The Skyview Top can be operated with key in steering
lock position 1 or 2.
1to slide roof open
2to slide roof closedTo fully open Skyview Top automatically, brief ly press
switch in direction (1) and release. To stop the process,
press switch again.
Notes:
After turning off the engine the Skyview Top can be
operated for approximately 30 minutes or until a front
door is opened.
The Skyview Top can be opened or closed manually
should an electrical malfunction occur, see page 273.
RESETMODE
Wa r n i n g !
When closing the Skyview Top, be sure that there
is no danger of anyone being h armed by th e closing
procedure.The closing procedure can be immediately reversed
by moving the switch in direction (1).When leaving the vehicle, always remove the key
from steering lock, and lock your vehicle. Do not
leave children unattended in the vehicle, or with
access to an unlocked vehicle. Unsupervised use of
vehicle equipment can cause serious personal
injury.