2001 MERCEDES-BENZ E320 park lock
[x] Cancel search: park lockPage 6 of 341

3 ContentsShelf below rear window .............. 170
Garage door opener ....................... 171
DrivingControl and operation
of radio transmitters ................ 176
The first 1 000 miles
(1 500 km) ................................. 177
Maintenance ................................... 177
Tele Aid ........................................... 178
Catalytic converter ........................ 188
Emission control ............................ 189
Steering lock ................................... 190
Starting and turning off
the engine .................................. 192
Automatic transmission ............... 193
Parking brake .................................202
Driving instructions ......................203
Drive sensibly - Save Fuel .........203
Drinking and driving .................203
Pedals ...........................................203
Power assistance ........................204
Brakes ..........................................204
Driving off ...................................205Parking ........................................ 205
Tires ............................................. 206
Snow chains ............................... 208
Winter driving
instructions ................................ 209
Block heater .................................210
Deep water ................................... 211
Passenger compartment ............ 211
Traveling abroad ......................... 211
Cruise control .................................212
Brake assist system
(BAS) ...........................................215
Antilock brake system
(ABS) ...........................................217
Four Wheel Electronic Traction
System (4MATIC) .......................219
Electronic stability program
(ESP) ........................................... 220
Parking assist
(Parktronic) .............................. 224
What you should know
at the gas station ...................... 229
Check regularly and
before a long trip ...................... 231
Instrument cluster displayMalfunction and
indicator lamps in the
instrument cluster ....................234
On-board
diagnostic system .......................234
Check engine malfunction
indicator lamp .............................234
Brake warning lamp ..................235
Supplemental restraint
system (SRS)
indicator lamp .............................236
Fuel reserve and fuel cap
placement warning ....................236
Electronic stability program
(ESP) — warning lamp ...............237
BAS / ESP malfunction
indicator lamp .............................237
ABS malfunction
indicator lamp .............................237
Seat belt warning lamp .............238
Malfunction and
indicator lamp in
the center console .....................238
Page 7 of 341

4 Contents
AIRBAG OFF
indicator lamp .............................238
Malfunction and warning
messages in the
multifunction display ...............239
DISPLAY DEFECTIVE ................240
BATTERY / ALTERNATOR ......... 241
ABS-SYSTEM ...............................242
BRAKE ASSIST ...........................242
BRAKE LINING WEAR ..............243
BRAKE FLUID .............................243
PARKING BRAKE .......................244
ENGINE FAN ...............................244
COOLANT (coolant level) ..........245
COOLANT TEMP. ........................246
LIGHTING SYSTEM ....................247
LIGHT SENSOR ...........................248
REMOVE KEY .............................248
TELE AID .....................................249
STEERING GEAR OIL .................249
ENGINE OIL LEVEL ...................250
WASHER FLUID .......................... 251
ELEC. STABIL. PROG.
(Electronic stability program) ..252
Practical hintsFirst aid kit ..................................... 254
Stowing things in the vehicle ...... 254
Fuses ............................................... 255
Hood ................................................ 257
Checking engine oil level ............. 260
Automatic transmission
fluid level ................................... 261
Coolant level ................................... 261
Adding coolant ........................... 262
Windshield and headlamp
washer system .......................... 263
Windshield and headlamp
washer fluid mixing ratio ........ 263
Spare wheel, vehicle tools,
storage compartment ............... 264
Vehicle jack .................................... 265
Wheels ............................................ 266
Tire replacement ....................... 266
Rotating wheels ......................... 267
Spare wheel .................................... 268
Spare wheel bolts ...................... 268
Spare wheel .................................... 269Changing wheels ........................... 271
Tire inflation pressure .................. 276
Battery .............................................277
Jump starting ..................................279
Towing the vehicle .........................282
Transmission selector lever,
manually unlocking ..................284
Exterior lamps ................................285
Headlamp assembly ...................286
Taillamp assemblies ..................289
Changing batteries in the
electronic main key .................. 291
Synchronizing
remote control ............................293
Emergency engine
shut-down ..................................293
Rear seat cushion ..........................294
Emergency operation of
sliding / pop-up roof .................295
Manual release for
fuel filler flap .............................296
Replacing wiper blade insert .......296
Trunk lamp .....................................298
Roof rack .........................................298
Page 22 of 341

19 Instruments and controls
Technical
data Instruments
and controlsOperation DrivingInstrument
cluster displayPractical hints Car care Index 1Parking assist warning indicators, see page 226
2Side defroster outlet
3Side air outlet, adjustable
4Air volume control for side air outlet
5Exterior lamp switch, see page 119
6Parking brake release, see page 202
7Hood lock release, see page 257
8Combination switch, see page 122
9Cruise control switch, see page 212
10Instrument cluster, see page 86
11Multifunction steering wheel, see page 92
Horn (with electronic key in steering lock
position 1 or 2),
Airbag, see page 70
12Steering lock with ignition / starter switch, see
page 190
13Voice recognition system switch, see separate
operating instructions
14Center air outlets, adjustable15Air volume control for center air outlets
16Left front seat heater switch, see page 55
Left front seat ventilation switch, see page 58
17Headlamp washer switch, see page 121
18Rear seat head restraints switch, see page 53
19Hazard warning f lasher switch, see page 125
20Central locking switch, see page 37
21Tow-away alarm switch, see page 45
Indicator lamp for antitheft alarm system, see
page 43
22Right front seat heater switch, see page 55
Right front seat ventilation switch, see page 58
23Glove box (illuminated with electronic key in
steering lock position 1 or 2)
24Automatic climate control, see page 126
Rear window defroster switch
Activated charcoal filter switch
25Audio system, see page 135
26Storage / eyeglasses compartment
Page 48 of 341

45 Tow-away alarm
Technical
data Instruments
and controlsOperationDrivingInstrument
cluster displayPractical hints Car care Index Tow -away ala rm
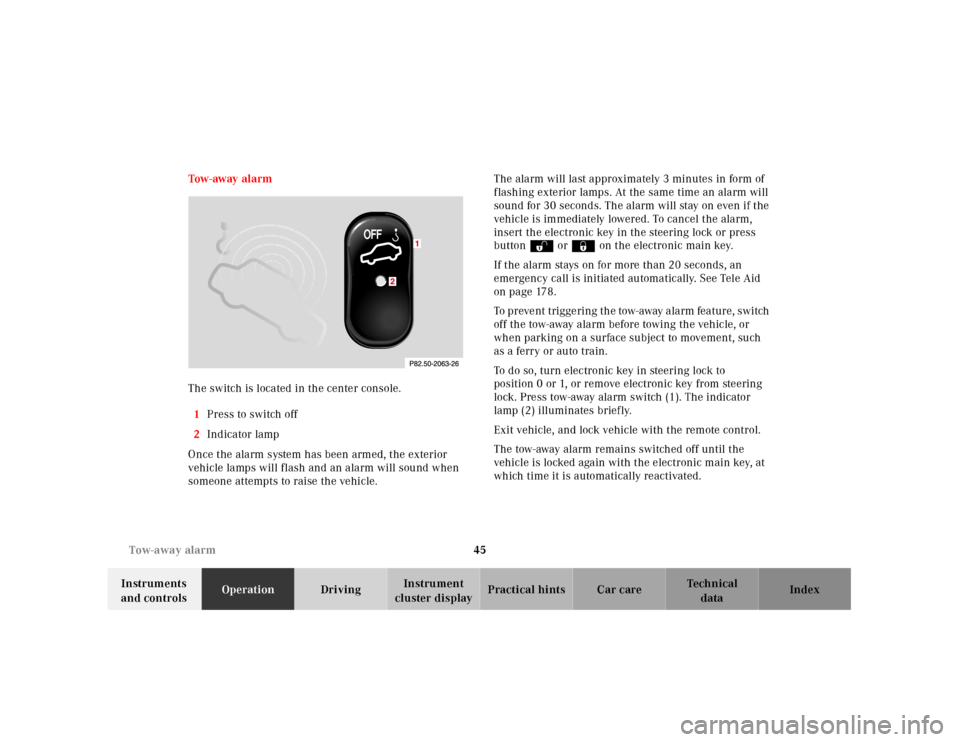
The switch is located in the center console.
1Press to switch off
2Indicator lamp
Once the alarm system has been armed, the exterior
vehicle lamps will flash and an alarm will sound when
someone attempts to raise the vehicle.The alarm will last approximately 3 minutes in form of
flashing exterior lamps. At the same time an alarm will
sound for 30 seconds. The alarm will stay on even if the
vehicle is immediately lowered. To cancel the alarm,
insert the electronic key in the steering lock or press
buttonŒ or‹ on the electronic main key.
If the alarm stays on for more than 20 seconds, an
emergency call is initiated automatically. See Tele Aid
on page 178.
To prevent triggering the tow-away alarm feature, switch
off the tow-away alarm before towing the vehicle, or
when parking on a surface subject to movement, such
as a ferry or auto train.
To do so, turn electronic key in steering lock to
position 0 or 1, or remove electronic key from steering
lock. Press tow-away alarm switch (1). The indicator
lamp (2) illuminates briefly.
Exit vehicle, and lock vehicle with the remote control.
The tow-away alarm remains switched off until the
vehicle is locked again with the electronic main key, at
which time it is automatically reactivated.
Page 88 of 341

85 Rear view mirrors
Technical
data Instruments
and controlsOperationDrivingInstrument
cluster displayPractical hints Car care Index Parking position
The passenger-side exterior mirror can be adjusted and
programmed to assist the driver during parking
maneuvers (e.g. to observe the curb or other objects
close to the vehicle).
With electronic key in steering lock position 2, and the
exterior rear view mirror switch in the passenger-side
position, the passenger-side mirror will be turned
downward when placing the gear selector lever in “R”
Reverse.
The mirror position can now be adjusted as desired.
At speeds above approximately 6 mph (10 km / h), upon
shifting gear selector lever from “R” Reverse, or upon
pressing the driver’s side mirror button, the passenger-
side mirror will return to its previous position.One passenger-side mirror position can be stored in
memory. To do so:
1. Turn electronic key to steering lock position 2.
The vehicle must be stationary.
2. Select passenger-side mirror and adjust the mirror
to view the curb.
3. Press green memory button located in switch cluster
for driver seat, see page 49.
4. Within 3 seconds pull the mirror toggle switch
rearward. The mirror should not move.
Repeat the memory procedure if the mirror moves.
5. Select driver side mirror. The passenger-side mirror
will return to its previous position.
Page 120 of 341

117 Engine oil level indicator
Technical
data Instruments
and controlsOperationDrivingInstrument
cluster displayPractical hints Car care Index Engine oil level indicator
To check the engine oil level, park vehicle on level
ground, with engine at normal operational temperature.
Check oil level approximately 5 minutes after stopping
the engine, allowing for the oil to return to the oil pan.Turn the electronic key in steering lock to position 2.
To call up the trip odometer and main odometer, press
button è or ÿ on the multifunction steering
wheel until the display appears. See page 96.
Press button j or k on the multifunction
steering wheel repeatedly until the “MEASUREMENT
CORRECT – ONLY IF VEH. LEVEL” engine oil level
indicator appears. This indicator is only a reminder.
Measurement can be cancelled by pressing button j
or k if the vehicle is not parked on level ground. An
incorrect reading will be recorded if you do not cancel
the measurement. Move the vehicle to level ground and
measure again.
The electronic key in steering lock is not in position 2 if
the “ENGINE OIL LEVEL – SWITCH ON IGNITION”
message appears.
The “ENGINE OIL LEVEL – MEASURING NOW”
message is displayed after approximately 3 seconds.
Page 122 of 341

119 Exterior lamp switch
Technical
data Instruments
and controlsOperationDrivingInstrument
cluster displayPractical hints Car care Index Exterior lamp switch
DOff
CParking lamps (also side marker lamps, taillamps,
licence plate lamps, instrument panel lamps)
Canada only: When the engine is running, the low
beam is additionally switched on.BParking lamps plus low beam or high beam
headlamps (combination switch pushed forward).
ˆStanding lamps, right (turn left one stop)
‚Standing lamps, left (turn left two stops)
‡Front fog lamps (pull out one stop) with parking
lamps and / or low beam headlamps on. Green
indicator in lamp switch comes on.
†Rear fog lamp (pull out to second detent) in
addition to the front fog lamps. Yellow indicator in
lamp switch comes on.
Standing lamps
When the vehicle is parked on the street the standing
lamps (right or left side parking lamps) can be turned
on, making the vehicle more visible to passing vehicles.
The standing lamps cannot be operated with the
electronic key in steering lock position 2.
Page 166 of 341

163 Interior equipment
Technical
data Instruments
and controlsOperationDrivingInstrument
cluster displayPractical hints Car care Index Glove box
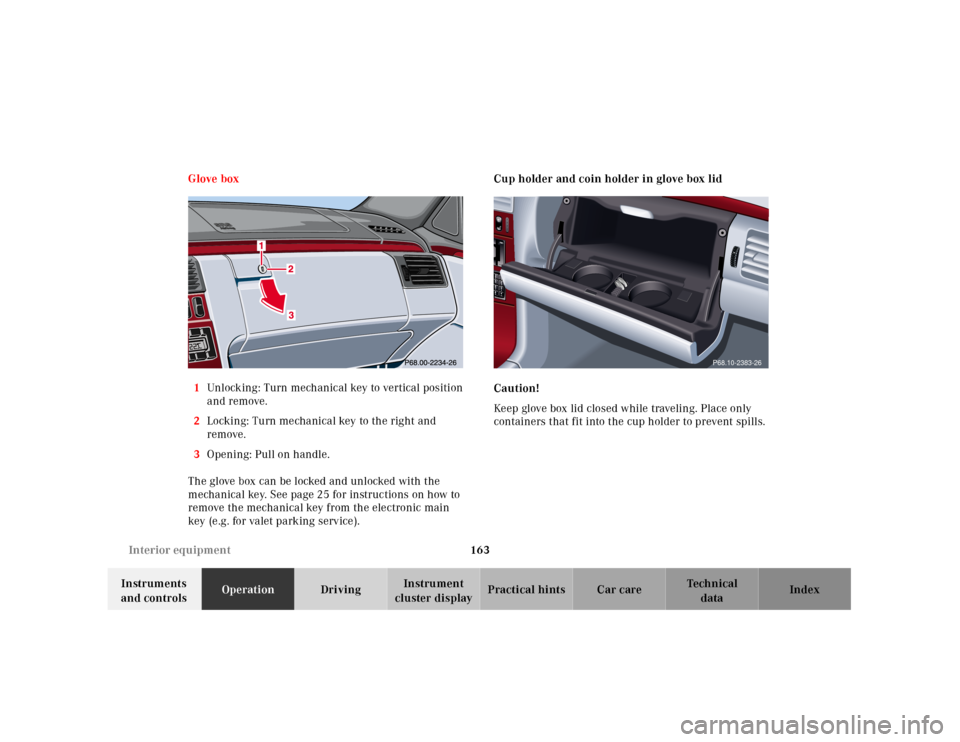
1Unlocking: Turn mechanical key to vertical position
and remove.
2Locking: Turn me chanical key to the right and
remove.
3Opening: Pull on handle.
The glove box can be locked and unlocked with the
mechanical key. See page 25 for instructions on how to
remove the mechanical key from the electronic main
key (e.g. for valet parking service).Cup holder and coin holder in glove box lid
Caution!
Keep glove box lid closed while traveling. Place only
containers that fit into the cup holder to prevent spills.
P68.10-2383-26