Page 118 of 424

115 Instrument cluster
Te ch n ica l
data Instruments
and controlsOperationDrivingInstrument
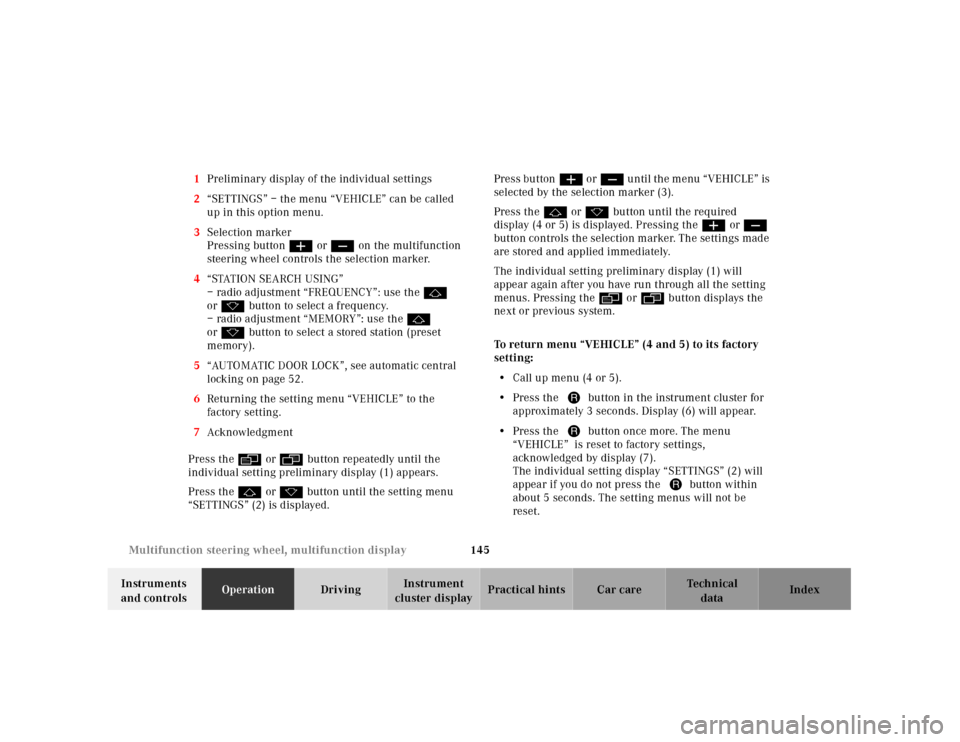
cluster displayPractical hints Car care Index 1Knob for instrument cluster illumination,
s e e p a g e 116
2Engine malfunction indicator lamp, see page 290
3Brake fluid low or parking brake engaged,
see page 301
4Supplemental restraint system (SRS) malfunction
indicator lamp, see page 293
5Coolant temperature gauge, see page 117
6Outside temperature indicator, see page 117
7Fuel gauge with reserve warning lamp, see page 293
8Left turn signal indicator lamp, see combination
switch on page 160
9Speedometer, see page 118
10Electronic stability program (ESP) warning lamp,
system is adjusting to road conditions, see page 295
11Distance warning lamp – vehicles with Distronic
(DTR), distance to the vehicle ahead is insufficient,
see page 264 and page 295.12Multifunction display, see page 120
Instrument cluster display, see page 297
13Trip odometer, see page 119 and 124
14Main odometer, see page 124
15Right turn signal indicator lamp, see combination
switch on page 160
16Tachometer, see page 119
17Gear range indicator display, see selector lever
positions on page 232
18Digital clock
To set the time, see COMAND operator’s manual
19Antilock brake system (ABS) malfunction indicator
lamp, see page 294
20High beam headlamp indicator,
see exterior lamp switch, page 156, and
combination switch, page 160
21Fasten seat belts, see page 296
22Reset buttonJ, s e e p a g e s 116 , 119
Activating the instrument cluster display
The instrument cluster is activated by:•Opening the door
1.
•Pressing button Jon the instrument cluster
1.
Page 148 of 424

145 Multifunction steering wheel, multifunction display
Te ch n ica l
data Instruments
and controlsOperationDrivingInstrument
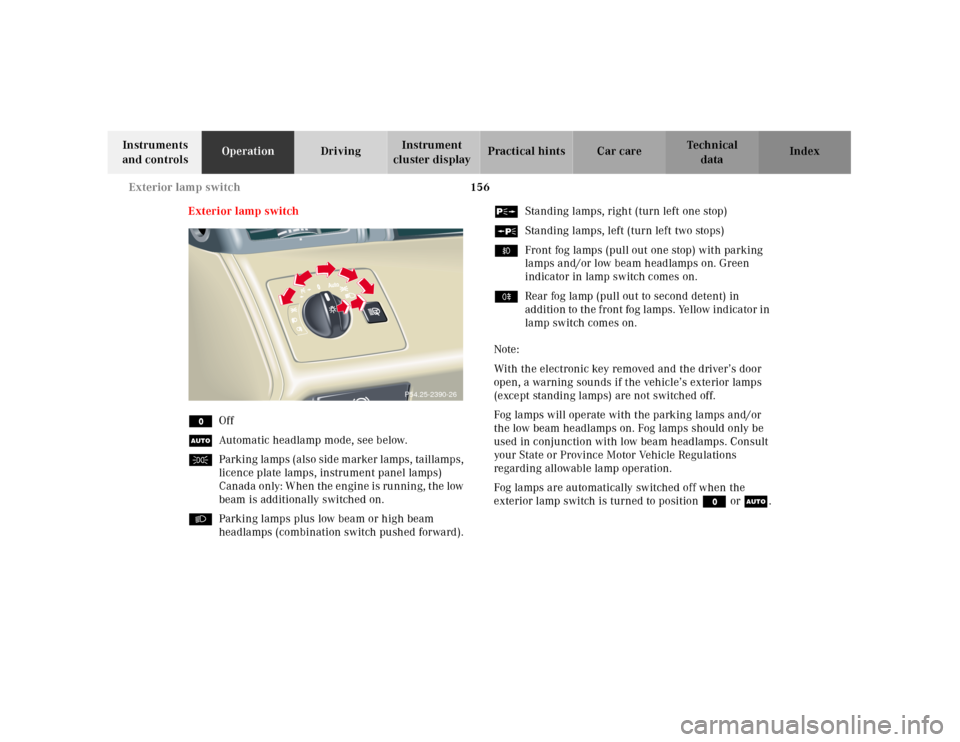
cluster displayPractical hints Car care Index 1Preliminary display of the individual settings
2“SETTINGS” – the menu “VEHICLE” can be called
up in this option menu.
3Selection marker
Pressing buttonæ orç on the multifunction
steering wheel controls the selection marker.
4“STATION SEARCH USING”
– radio adjustment “FREQUENCY”: use thej
ork button to select a frequency.
– radio adjustment “MEMORY”: use thej
ork button to select a stored station (preset
memory).
5“AUTOMATIC DOOR LOCK”, see automatic central
locking on page 52.
6Returning the setting menu “VEHICLE” to the
factory setting.
7Acknowledgment
Press theè or ÿbutton repeatedly until the
individual setting preliminary display (1) appears.
Press thej or kbutton until the setting menu
“SETTINGS” (2) is displayed.Press buttonæ o rç u n ti l t h e m e nu “ VE H I C L E ” is
selected by the selection marker (3).
Press thej or kbutton until the required
display (4 or 5) is displayed. Pressing theæ orç
button controls the selection marker. The settings made
are stored and applied immediately.
The individual setting preliminary display (1) will
appear again after you have run through all the setting
menus. Pressing theè or ÿbutton displays the
next or previous system.
To return menu “VEHICLE” (4 and 5) to its factory
setting:
•Call up menu (4 or 5).
•Press the Jbutton in the instrument cluster for
approximately 3 seconds. Display (6) will appear.
•Press the Jbutton once more. The menu
“VEHICLE” is reset to factory settings,
acknowledged by display (7).
The individual setting display “SETTINGS” (2) will
appear if you do not press the Jbutton within
about 5 seconds. The setting menus will not be
reset.
Page 159 of 424

156 Exterior lamp switch
Te ch n ica l
data Instruments
and controlsOperationDrivingInstrument
cluster displayPractical hints Car care Index
Exterior lamp switch
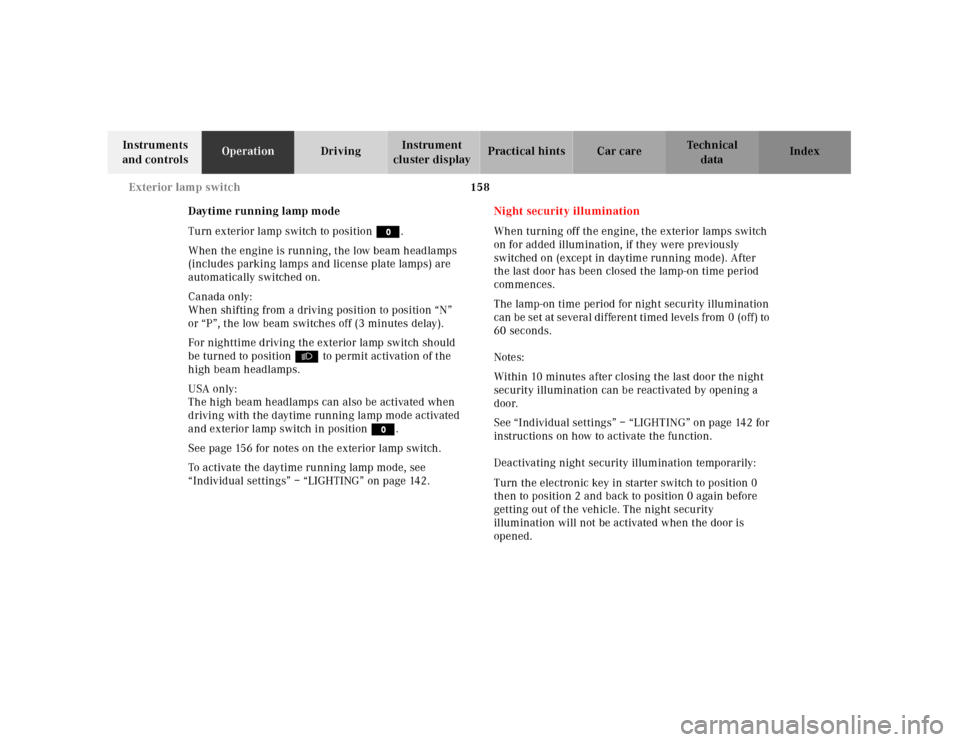
MOff
UAutomatic headlamp mode, see below.
CParking lamps (also side marker lamps, taillamps,
licence plate lamps, instrument panel lamps)
Canad a only: W hen the engine is ru nning, t he low
beam is additionally switched on.
BParking lamps plus low beam or high beam
headlamps (combination switch pushed forward).ˆStanding lamps, right (turn left one stop)
‚Standing lamps, left (turn left two stops)
‡Front fog lamps (pull out one stop) with parking
lamps and/or low beam headlamps on. Green
indicator in lamp switch comes on.
†Rear fog lamp (pull out to second detent) in
addition to the front fog lamps. Yellow indicator in
lamp switch comes on.
Note:
With the electronic key removed and the driver’s door
open, a warning sounds if the vehicle’s exterior lamps
(except standing lamps) are not switched off.
Fog lamps will operate with the parking lamps and/or
the low beam headlamps on. Fog lamps should only be
used in conjunction with low beam headlamps. Consult
your State or Province Motor Vehicle Regulations
regarding allowable lamp operation.
Fog lamps are automatically switched off when the
exterior lamp switch is turned to position M or U.
P54.25-2390-26
Page 161 of 424

158 Exterior lamp switch
Te ch n ica l
data Instruments
and controlsOperationDrivingInstrument
cluster displayPractical hints Car care Index
Daytime running lamp mode
Turn exterior lamp switch to positionM.
When the engine is running, the low beam headlamps
(includes parking lamps and license plate lamps) are
automatically switched on.
Canada only:
When shifting from a driving position to position “N”
or “P”, the low beam switches off (3 minutes delay).
For nighttime driving the exterior lamp switch should
be turned to positionB to permit activation of the
high beam headlamps.
USA only:
The high beam headlamps can also be activated when
driving with the daytime running lamp mode activated
and exterior lamp switch in positionM.
See page 156 for notes on the exterior lamp switch.
To activate the daytime running lamp mode, see
“Individual settings” – “LIGHTING” on page 142.Night security illumination
When turning off the engine, the exterior lamps switch
on for added illumination, if they were previously
switched on (except in daytime running mode). After
the last door has been closed the lamp-on time period
commences.
The lamp-on time period for night security illumination
can be set at several different timed levels from 0 (off) to
60 seconds.
Notes:
Within 10 minutes after closing the last door the night
security illumination can be reactivated by opening a
door.
See “Individual settings” – “LIGHTING” on page 142 for
instructions on how to activate the function.
Deactivating night security illumination temporarily:
Turn the electronic key in starter switch to position 0
then to position 2 and back to position 0 again before
getting out of the vehicle. The night security
illumination will not be activated when the door is
opened.
Page 162 of 424
159 Exterior lamp switch
Te ch n ica l
data Instruments
and controlsOperationDrivingInstrument
cluster displayPractical hints Car care Index Locator lighting
After unlocking the vehicle with the electronic main key
during darkness, the fog lamps, parking lamps,
taillamps and license plate lamps switch on for a
approx. 40 seconds.
The exterior lamps will be switched off when opening
the driver’s door.
See “Individual settings” – “LIGHTING” on page 142 for
instructions on how to activate the function. Headlamp cleaning system
Turn the electronic key in starter switch to position 1
or 2.
The headlamps will be cleaned with a high-pressure
water jet when you press the headlamp washer
button (1).
See page 334 for instructions on filling up the
windshield/headlamp washer reservoir.
P54.25-2391-26
1
Page 164 of 424

161 Combination switch
Te ch n ica l
data Instruments
and controlsOperationDrivingInstrument
cluster displayPractical hints Car care Index 6Press switch briefly:
Single wipe without washer fluid
(select only if windshield is wet).
Push switch past resistance point:
Windshield washer system, windshield wipers.
See page 334 for instructions on filling the
windshield/headlamp washer reservoir.
7Windshield wipers0Off
I Intermittent wiping
One initial wipe, pauses between wipes are
automatically controlled by a rain sensor
monitoring the wetness of the windshield. This
will not occur with a front door open.
Notes:
With switch in this position, one wipe occurs
wh en tu rning th e electronic key in starter sw itch
from position 0. This will not occur with a front
door open.
Do not leave in inte rmittent se tting w hen vehicle
is taken to an automatic car wash or during
windshield cleaning. Wipers will operate in
presence of water spray at windshield, and
wipers may be damaged as a result.
II Normal wiper speed
III Fast wiper speed
P54.25-2389-26
6
7
Page 168 of 424

165 Automatic climate control
Te ch n ica l
data Instruments
and controlsOperationDrivingInstrument
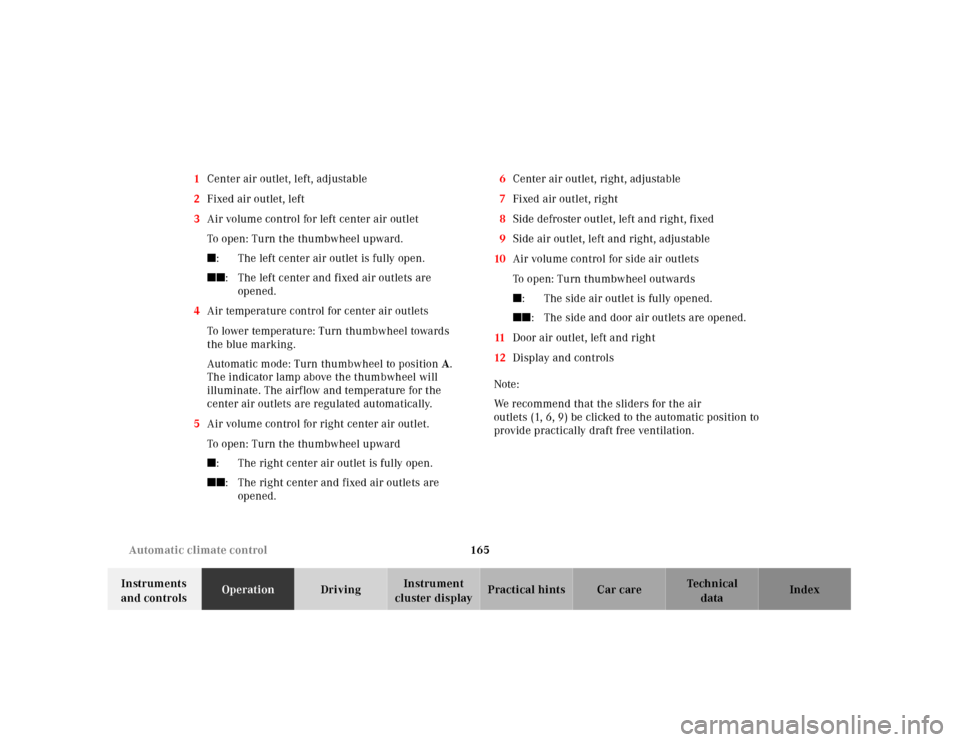
cluster displayPractical hints Car care Index 1Center air outlet, left, adjustable
2Fixed air outlet, left
3Air volume control for left center air outlet
To open: Turn the thumbwheel upward.
�: The left center air outlet is fully open.
��: The left center and fixed air outlets are
opened.
4Air temperature control for center air outlets
To lower temperature: Turn thumbwheel towards
the blue marking.
Automatic mode: Turn thumbwheel to positionA.
The indicator lamp above the thumbwheel will
illuminate. The airflow and temperature for the
center air outlets are regulated automatically.
5Air volume control for right center air outlet.
To open: Turn the thumbwheel upward
�: The right center air outlet is fully open.
��: The right center and fixed air outlets are
opened.6Center air outlet, right, adjustable
7Fixed air outlet, right
8Side defroster outlet, left and right, fixed
9Side air outlet, left and right, adjustable
10Air volume control for side air outlets
To open: Turn thumbwheel outwards
�: The side air outlet is fully opened.
��: The side and door air outlets are opened.
11Door air outlet, left and right
12Display and controls
Note:
We recommend that the sliders for the air
outlets (1, 6, 9) be clicked to the automatic position to
provide practically draft free ventilation.
Page 172 of 424
169 Automatic climate control
Te ch n ica l
data Instruments
and controlsOperationDrivingInstrument
cluster displayPractical hints Car care Index Special settings
(use only for short duration)
Air distribution, manual:
Press Ubutton. The button pops out, theh, j
andk symbols are visible. Turn the button to select
the air distribution desired.
hAir from the center, side and door air outlets.
jAir from the center, side, door and windshield air
outlets.
kAir from the center, side, door and footwell air
outlets.
To return to automatic mode:
Press the Ubutton until it clicks in. Theh, j
and ksymbols will no longer be visible.Air volume, manual
Press the air volume switch up or down. Seven blower
speeds can be selected.
P83.40-2257-21