Page 304 of 381

295 Fuses
Te ch n i c a l
data Instruments
and controlsOperation DrivingInstrument
cluster displayPractical hintsCar care Index Fuses
Most of your vehicle’s electrical components are fused
with safety fuses. With the exception of the brake lights,
all individual lighting system components are
electronically fused. Before replacing a blown safety
fuse, determine the cause of the short circuit. Always
observe amperage and color of fuse.
The circuit for components is protected by a cycled
circuit breaker interrupted if too much current is being
drawn. The circuit closes automatically after a short
time; the circuit is broken again if the malfunction
reoccurs.
A lways us e a new fus e for re placeme nt. Never atte mp t to
repair or bridge a blown fuse.
A fuse chart is located in fuse box (1).
A fuse extractor is located in the auxiliary fuse box in
the trunk, see page 296.Fuse box in the passenger compartment
1Fuse box in passenger compartment
To gain access to fuse box, pull cover away from fuse
box (arrow) and remove rearward.
Page 309 of 381

300 Engine compartment
Te ch n i c a l
data Instruments
and controlsOperation DrivingInstrument
cluster displayPractical hintsCar care Index
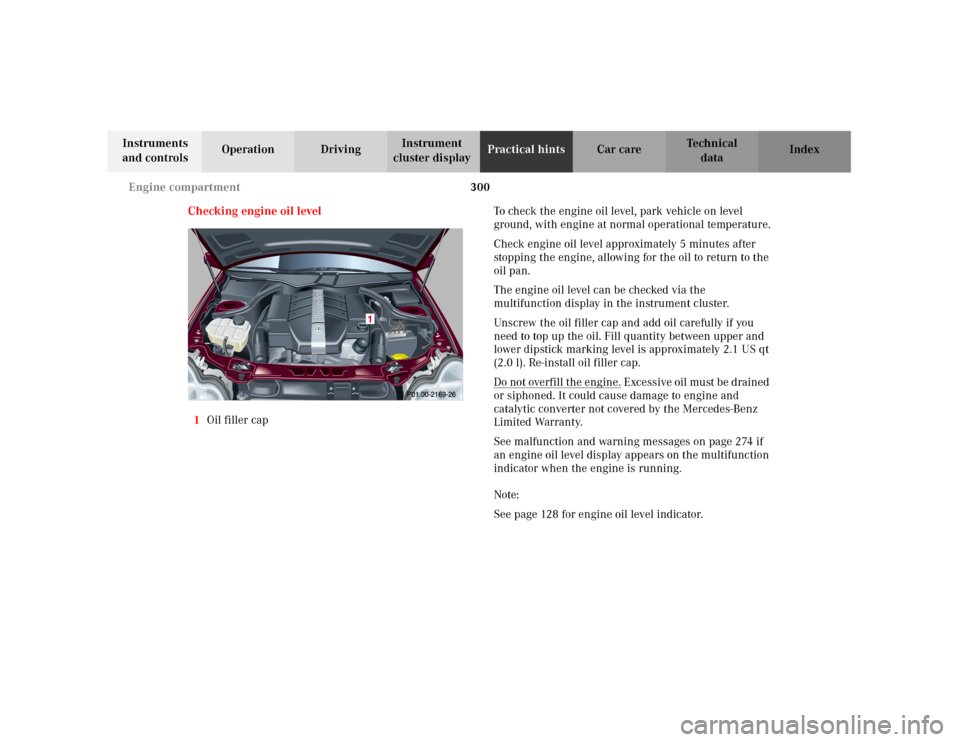
Checking engine oil level
1Oil filler capTo check the engine oil level, park vehicle on level
ground, with engine at normal operational temperature.
Check engine oil level approximately 5 minutes after
stopping the engine, allowing for the oil to return to the
oil pan.
The engine oil level can be checked via the
multifunction display in the instrument cluster.
Unscrew the oil filler cap and add oil carefully if you
need to top up the oil. Fill quantity between upper and
lower dipstick marking level is approximately 2.1 US qt
(2.0 l). Re-install oil filler cap.
Do not overfill the engine.
Excessive oil must be drained
or siphoned. It could cause damage to engine and
catalytic converter not covered by the Mercedes-Benz
Limited Warranty.
See malfunction and warning messages on page 274 if
an engine oil level display appears on the multifunction
indicator when the engine is running.
Note:
See page 128 for engine oil level indicator.
Page 310 of 381
301 Engine compartment
Te ch n i c a l
data Instruments
and controlsOperation DrivingInstrument
cluster displayPractical hintsCar care Index Automatic transmission fluid level
The transmission has a permanent fill of automatic
transmission fluid.
Regular automatic transmission fluid level checks and
changes are not required. For this reason the dipstick is
omitted.
If you notice fluid leaks or gear shifting malfunctions,
have your authorized Mercedes-Benz Center check the
transmission fluid level.Coolant level
1Coolant expansion tank
To check the coolant level, the vehicle must be parked
on level ground and the engine stopped.
Check coolant level only when coolant is cold.
The coolant level should reach the black top part of the
reservoir.
See page 359 for antifreeze / anticorrosion mixture.
Page 316 of 381

307 Tires, Wheels
Te ch n i c a l
data Instruments
and controlsOperation DrivingInstrument
cluster displayPractical hintsCar care Index It is imperative that the wheel mounting bolts be
fastened to a tightening torque of 110 ft.lb. (150 Nm)
whenever wheels are mounted.
For rim and tire specifications, refer to “Technical Data”.Rotating wheels
The wheels can be rotated according to the degree of
tire wear while retaining the same direction of travel.
Rotating, however, should be carried out as
recommended by the tire manufacturer, before the
characteristic tire wear pattern (shoulder wear on front
wheels and tread center wear on rear wheels) becomes
visible, as otherwise the driving properties deteriorate.
Notes:
Thoroughly clean the inner side of the wheels any time
you rotate the wheels or wash the vehicle underside.
The use of retread tires is not recommended. Retread
tires may adversely affect the handling characteristics
and safety of the vehicle.
Dented or bent rims can cause tire pressure loss and
damage to the tire beads. For this reason, check rims for
damage at regular intervals. The rim flanges must be
checked for wear before a tire is mounted. Remove
burrs, if any.
Check and ensure proper tire inflation pressure after
rotating the wheels. For tire inflation pressure see
inside of fuel filler flap and also page 264.
Wa r n i n g !
Worn, old tires can cause accidents. If the tire tread
is badly worn, or if the tires have sustained
damage, replace them.When replacing rims, use only genuine
Mercedes-Benz wheel bolts specified for the
particular rim type. Failure to do so can result in
the bolts loosening and possibly an accident.
Page 317 of 381

308 Tires, Wheels
Te ch n i c a l
data Instruments
and controlsOperation DrivingInstrument
cluster displayPractical hintsCar care Index
Spare wheel
Important!
The spare wheel rim is mounted with a full size tire of
the same type as on the vehicle, and is fully functional.
However, that spare wheel rim is weight optimized and
has a limited service life of 12 000 miles (20 000 km)
use before a standard wheel rim must replace it.
In the case of a flat tire, you may temporarily use the
spare wheel.
Do not operate vehicle with more than one spare wheel
mounted.Spare wheel
The spare wheel rim size is 7 J x 16 H2
(C 240 Canada only - steel rims 6
1/2 J x 16 H2).
In the case of a flat tire or breakdown, you may
temporarily use the spare wheel, while observing the
following restrictions:
•Do not exceed vehicle speed of 50 mph (80 km / h).
•Drive to the nearest repair facility to have the flat
tire repaired or replaced as appropriate.
•Do not operate vehicle with more than one spare
wheel mounted.
For additional information, refer to page 352.
Wa r n i n g !
The spare wheel rim is for temporary use only. Use
for over a total of 12 000 miles (20 000 km)
(aggregate of all uses) may cause wheel rim failure
leading to an accident and possible injuries.
Page 320 of 381
311 Tires, Wheels
Te ch n i c a l
data Instruments
and controlsOperation DrivingInstrument
cluster displayPractical hintsCar care Index 5. Remove the two-piece wheel wrench from the
vehicle tool kit and assemble (see page 305).
6. Using the wrench, loosen but do not yet remove the
wheel bolts.7. Place jack on firm ground. Position jack (1) under
the take-up bracket (2) so that it is always vertical
(plumb-line) as seen from the side, even if the
vehicle is parked on an incline.
The jack take-up brackets are located directly
behind the front wheel housings and in front of the
rear wheel housings.
8. Jack up the vehicle until the wheel is clear of the
ground. Never start engine while vehicle is raised.
P40.10-2283-26
Page 324 of 381

315 Tires, Wheels
Te ch n i c a l
data Instruments
and controlsOperation DrivingInstrument
cluster displayPractical hintsCar care Index Notes:
Before storing the jack, it should be fully collapsed, with
handle folded in.
For proper storage of vehicle jack see page 304.Tire inflation pressure
A table (see fuel filler flap) lists the tire inflation
pressures specified for Mercedes-Benz recommended
tires as well as for the varying operating conditions.
Important!
Tire pressure changes by approximately 1.5 psi (0.1 bar)
per 18
°F (10
°C) of air temperature change. Keep this in
mind when checking tire pressure inside a garage –
especially in the winter.
Example:
If garage temperature = approximately +68
°F (+20
°C)
and ambient temperature = approximately +32
°F (0
°C)
then the adjusted air pressure = specified air pressure
+3 psi (+0.2 bar).
Tire pressures listed for light loads are minimum values
offering high driving comfort. Increased inflation
pressures for heavy loads produce favorable handling
characteristics with lighter loads and are perfectly
permissible. The ride of the vehicle, however, will
become somewhat harder.
Tire temperature and pressure increase with the vehicle
speed. Tire pressure should therefore only be checked
and corrected on cold tires. Correct tire pressure in
Wa r n i n g !
Always replace wheel bolts that are damaged or
rusted.Never apply oil or grease to wheel bolts.Damaged wheel hub threads should be repaired
immediately.Incorrect mounting bolts or improperly tightened
mounting bolts can cause the wheel to come off.
This could cause an accident. Be sure to use the
correct mounting bolts.
Page 327 of 381

318 Jump starting
Te ch n i c a l
data Instruments
and controlsOperation DrivingInstrument
cluster displayPractical hintsCar care Index
Note:
After reconnecting the battery also set the clock
(vehicles with COMAND: see COMAND operator’s
manual) resynchronize the front seat head restraints,
the express feature of the power windows, the sliding /
pop-up roof, and the electronic stability program (see
individual settings on page 111, head restraints on
p a ge 4 7 , p owe r w i n d ows o n p a ge 18 4 , s y n ch r o n i z i n g t h e
sliding / pop-up roof on page 188 and electronic
stability program on page 260).
Battery recycling
Batteries contain materials that can harm the
environment with improper disposal.
Large 12 Volt storage batteries contain lead.
Recycling of batteries is the preferred method of
disposal.
Many states require sellers of batteries to accept old
batteries for recycling.Jump starting
Wa r n i n g !
Failure to follow these directions will cause
damage to the electronic components, and can lead
to a battery explosion and severe injury or death.Never lean over batteries while connecting or jump
starting, you might get injured.Battery fluid contains sulfuric acid. Do not allow
this fluid to come in contact with eyes, skin or
clot hin g. In cas e i t d oes , i mm ed ia tely f lus h a f fected
area with water, and seek medical help if
necessary.A battery will also produce hydrogen gas, which is
flammable and very explosive. Keep flames or
sparks away from battery, avoid improper
connection of jumper cables, smoking etc.Read all instructions before proceeding.