Page 159 of 381

150 Automatic climate control
Te ch n i c a l
data Instruments
and controlsOperationDrivingInstrument
cluster displayPractical hints Car care Index
Notes:
Do not obstruct the air f low by placing objects on the air
flow-through exhaust slots below the rear window.
Also keep the air intake grill in front of the windshield
free of snow and debris.
The storage compartment between the front seats can be
ventilated. See page 158 for notes on ventilating the
storage space under the armrest in the center console.
The air conditioner switches itself off for its own
protection if refrigerant is lost. No cooling will then take
place. Economy mode S can n ot be s witched of f. Have
the air conditioner checked by a Mercedes-Benz Center
should this happen.
Dust filter
Nearly all dust particles and pollen are filtered out
before outside air enters the passenger compartment
through the air distribution system.Basic setting – automatic mode
Briefly press left or right U button. The h, j
and k symbols will no longer be visible.
The economy mode and air recirculation functions will
be switched off. The automatic blower will be activated
at the same time.
Set the temperature switches on the left and right
to 72
°F (22
°C). This provides for comfortable conditions
in the vehicle.
Heating mode:
To lower headroom temperature, use thumbwheel
(4, page 146).
Air conditioning mode:
Open air outlets at dashboard top center (7, page 146)
for an even air distribution.
Page 202 of 381
193 Interior equipment
Te ch n i c a l
data Instruments
and controlsOperationDrivingInstrument
cluster displayPractical hints Car care Index Interior Storage compartments and armrests
Wa r n i n g !
To help avoid personal injury during a collision or
sudden maneuver, exercise care when stowing
things. Put luggage or cargo in the trunk if
possible. Do not pile luggage or cargo higher than
the seat backs. Do not place anything on the shelf
below the rear window.Luggage nets cannot secure hard or heavy objects.
Wa r n i n g !
Keep compartment lids closed. This will help to
prevent stored objects from being thrown about
and injuring vehicle occupants during an accident.
Page 207 of 381
198 Interior equipment
Te ch n i c a l
data Instruments
and controlsOperationDrivingInstrument
cluster displayPractical hints Car care Index
2Cup holder in rear seat armrestTo o p e n :
Push front of sliding compartment – the cup holder
slides out.
To c l o s e :
Push the sliding compartment back until it engages.
Wa r n i n g !
Keep the cup holder closed while traveling. Place
only containers that fit into the cup holder to
prevent spills. Do not fill containers to a height
where the contents could spill during vehicle
maneuvers, especially hot liquids.
Page 209 of 381
200 Interior equipment
Te ch n i c a l
data Instruments
and controlsOperationDrivingInstrument
cluster displayPractical hints Car care Index
Rear seatsTo o p e n a s h t r ay :
Pull at top of cover.
To r e m ove i n s e r t :
Press latch (2) and remove insert.
To replace insert:
Install insert and close the ashtray.
Page 214 of 381
205 Interior equipment
Te ch n i c a l
data Instruments
and controlsOperationDrivingInstrument
cluster displayPractical hints Car care Index 8. Connect snap hook (6) of front strap to eye (7)
located on center tunnel in front of rear seat bench.Unloading and folding
1. Loosen strap, open clasp by pressing tabs (arrows)
together, and unload skis.
2. Close flap in trunk.
3. Disconnect snap hook (6) from eye (7).
4. Fold and flatten ski sack lengthwise and place
folded ski sack inside recess of backrest.
Page 216 of 381
207 Interior equipment
Te ch n i c a l
data Instruments
and controlsOperationDrivingInstrument
cluster displayPractical hints Car care Index Enlarged cargo area (optional)
1. Pull handle (1) located in trunk to unlock backrest.
O n vehicles wi t h op ti onal sp li t fold in g rear seat back rest
you can fold down the two sections separately to enlarge
the cargo area.Split folding rear seat bench
2. Pull handle (2) and fold seat cushion (3) forward.
3. Fully retract and fold down head restraints, see
page 52.
4. Fold backrest (4) forward.
Page 217 of 381
208 Interior equipment
Te ch n i c a l
data Instruments
and controlsOperationDrivingInstrument
cluster displayPractical hints Car care Index
Setting up rear seat bench
1. Pull backrest (4) up until it locks in its upright
position. Check for secure locking by pushing and
pulling on the backrest.
The pop-up indicators (5) (left and right backrest
section) are visible in unlocked position. With
backrest sections in upright and locked position, the
indicators (5) are fully lowered.
2. Fold seat cushion (3) back until it locks in place.
Check for secure locking by pressing on the seat
cushion.Note:
To prevent unauthorized persons from access to the
trunk, always lock backrest in its upright position.
Wa r n i n g !
Always lock backrest in its upright position when
rear seat bench is occupied by passengers, cargo is
being carried in the trunk, or the extended cargo
area is not in use.
Page 218 of 381

209 Interior equipment
Te ch n i c a l
data Instruments
and controlsOperationDrivingInstrument
cluster displayPractical hints Car care Index Loading instructions
(Vehicle with enlarged cargo area)
The total load weight including vehicle occupants and
luggage/cargo should not exceed the vehicle capacity
weight indicated on the certification tag which can be
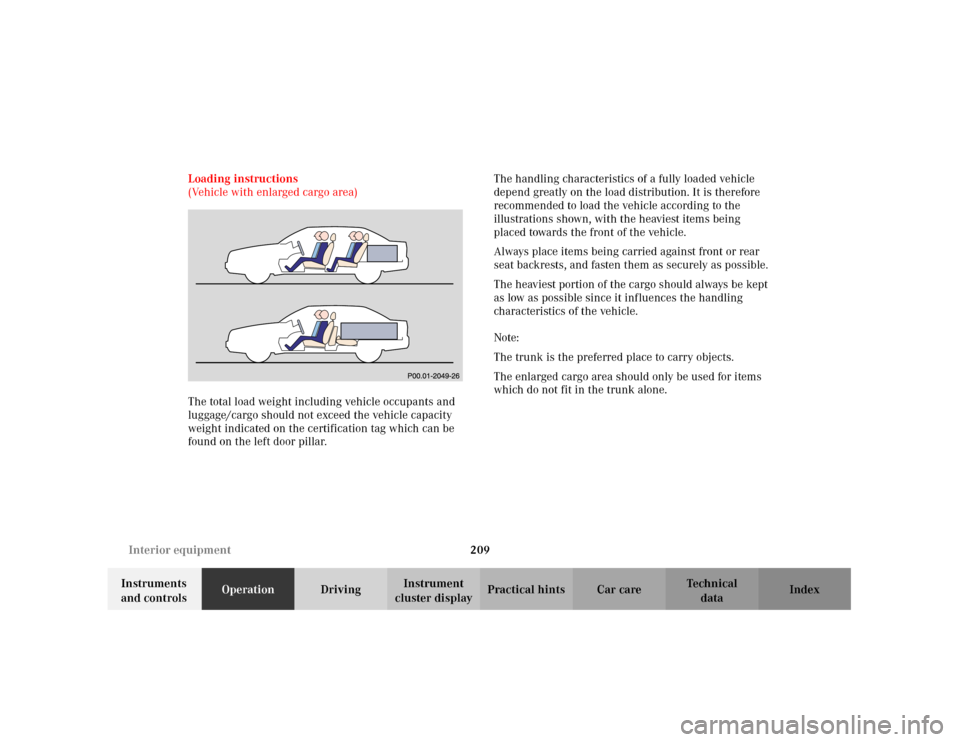
found on the left door pillar.The handling characteristics of a fully loaded vehicle
depend greatly on the load distribution. It is therefore
recommended to load the vehicle according to the
illustrations shown, with the heaviest items being
placed towards the front of the vehicle.
Always place items being carried against front or rear
seat backrests, and fasten them as securely as possible.
The heaviest portion of the cargo should always be kept
as low as possible since it influences the handling
characteristics of the vehicle.
Note:
The trunk is the preferred place to carry objects.
The enlarged cargo area should only be used for items
which do not fit in the trunk alone.