Page 3 of 231
Introduction1
How to use the COMAND operating manual
Before you take your first drive, please make yourself familiar with the COMAND operating unit and the functions it
supports. Read through these operating instructions carefully and, if necessary, refer to the operating instructions of
your vehicle.
The operating instructions are divided into 6 chapters:
• Introduction: An overview of the operating and display elements as well as explanation of the basic functions
• Audio: Information on the radio and CD equipment (CD drive and CD changer) as well as sound settings
• Telephone: Explanation of the telephone functions
• Navigation: How to enter your destination, selecting your route, route guidance, how to use the route memory, and
selecting a detour.
•Info Services and system settings: Information on how to request and display service informations, setting
language, date/time, tones and day/night display
• Index: Search items to help you find exactly what you are looking for
Explanation of symbols used:
Warning notices for the protection of yourself and others
are preceded by a
symbol.
Page 8 of 231
Introduction
6
Contents
Activating Settings menu ........... 209
Selecting the language ............... 210
Set the date and time .................. 211
Switching beep tones
on and off ...................................... 218
Setting changeover between
day and night display ................. 219
Reset all settings to the factory
settings .......................................... 220
Auxiliary audio source ............... 221
IndexIndex ................................................ 223
Page 12 of 231
Introduction
IntroductionTelephone Navigation Index AudioInfo Services and
system settings
10
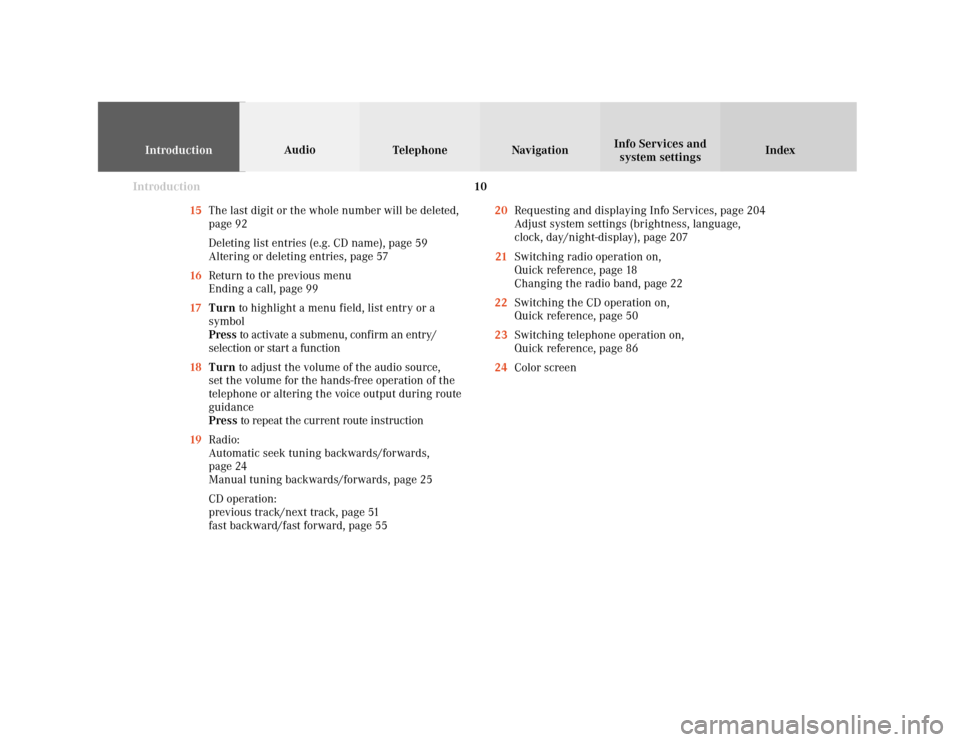
15The last digit or the whole number will be deleted,
page 92
Deleting list entries (e.g. CD name), page 59
Altering or deleting entries, page 57
16Return to the previous menu
Ending a call, page 99
17Turn to highlight a menu field, list entry or a
symbol
Press to activate a submenu, confirm an entry/
selection or start a function
18Turn to adjust the volume of the audio source,
set the volume for the hands-free operation of the
telephone or altering the voice output during route
guidance
Press to repeat the current route instruction
19Radio:
Automatic seek tuning backwards/forwards,
page 24
Manual tuning backwards/forwards, page 25
CD operation:
previous track/next track, page 51
fast backward/fast forward, page 5520Requesting and displaying Info Services, page 204
Adjust system settings (brightness, language,
clock, day/night-display), page 207
21Switching radio operation on,
Quick reference, page 18
Changing the radio band, page 22
22Switching the CD operation on,
Quick reference, page 50
23Switching telephone operation on,
Quick reference, page 86
24Color screen
Page 21 of 231
Introduction
AudioTelephone
Navigation
Index Info Services and
system settings Radio operation
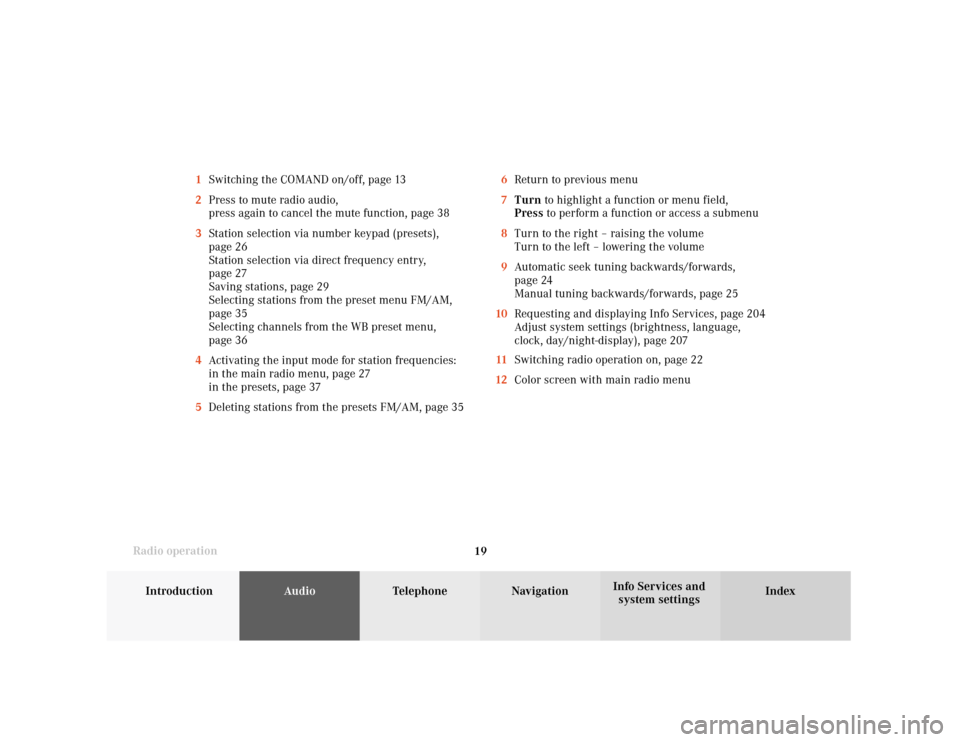
196Return to previous menu
7Turn to highlight a function or menu field,
Press to perform a function or access a submenu
8Turn to the right – raising the volume
Turn to the left – lowering the volume
9Automatic seek tuning backwards/forwards,
page 24
Manual tuning backwards/forwards, page 25
10Requesting and displaying Info Services, page 204
Adjust system settings (brightness, language,
clock, day/night-display), page 207
11Switching radio operation on, page 22
12Color screen with main radio menu 1Switching the COMAND on/off, page 13
2Press to mute radio audio,
press again to cancel the mute function, page 38
3Station selection via number keypad (presets),
page 26
Station selection via direct frequency entry,
page 27
Saving stations, page 29
Selecting stations from the preset menu FM/AM,
page 35
Selecting channels from the WB preset menu,
page 36
4Activating the input mode for station frequencies:
in the main radio menu, page 27
in the presets, page 37
5Deleting stations from the presets FM/AM, page 35
Page 43 of 231
41
Introduction
AudioTelephone
Navigation
Index Info Services and
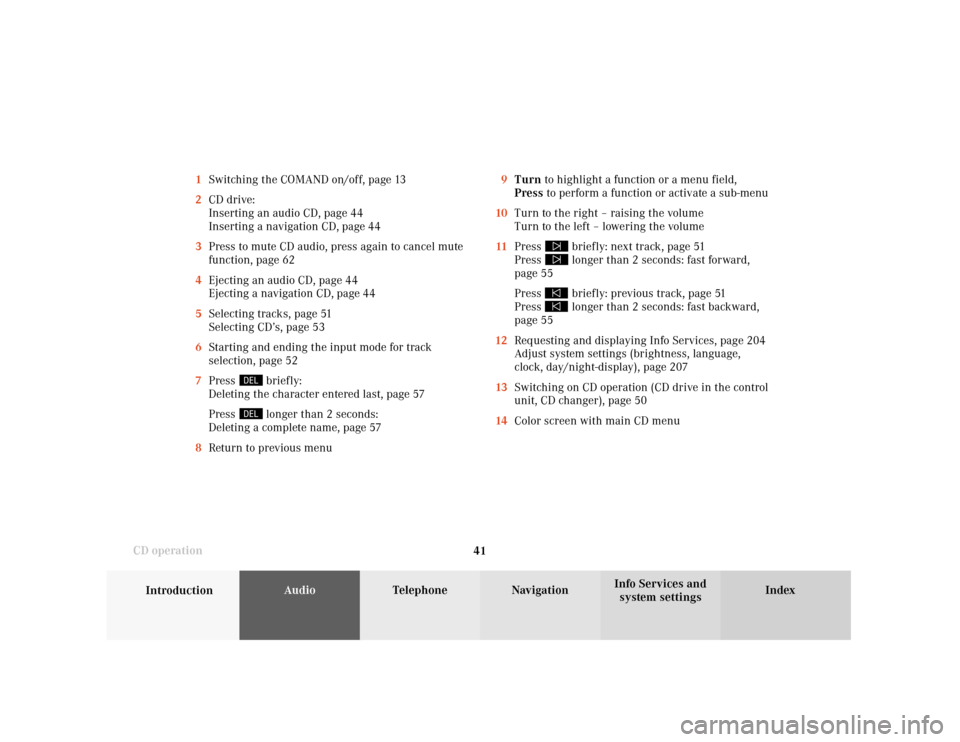
system settings CD operation9Turn to highlight a function or a menu field,
Press to perform a function or activate a sub-menu
10Turn to the right – raising the volume
Turn to the left – lowering the volume
11Press
briefly: next track, page 51
Press longer than 2 seconds: fast forward,
page 55
Press briefly: previous track, page 51
Press longer than 2 seconds: fast backward,
page 55
12Requesting and displaying Info Services, page 204
Adjust system settings (brightness, language,
clock, day/night-display), page 207
13Switching on CD operation (CD drive in the control
unit, CD changer), page 50
14Color screen with main CD menu 1Switching the COMAND on/off, page 13
2CD drive:
Inserting an audio CD, page 44
Inserting a navigation CD, page 44
3Press to mute CD audio, press again to cancel mute
function, page 62
4Ejecting an audio CD, page 44
Ejecting a navigation CD, page 44
5Selecting tracks, page 51
Selecting CD’s, page 53
6Starting and ending the input mode for track
selection, page 52
7Press
briefly:
Deleting the character entered last, page 57
Press longer than 2 seconds:
Deleting a complete name, page 57
8Return to previous menu
Page 73 of 231
71
Introduction
AudioTelephone
Navigation
Index Info Services and
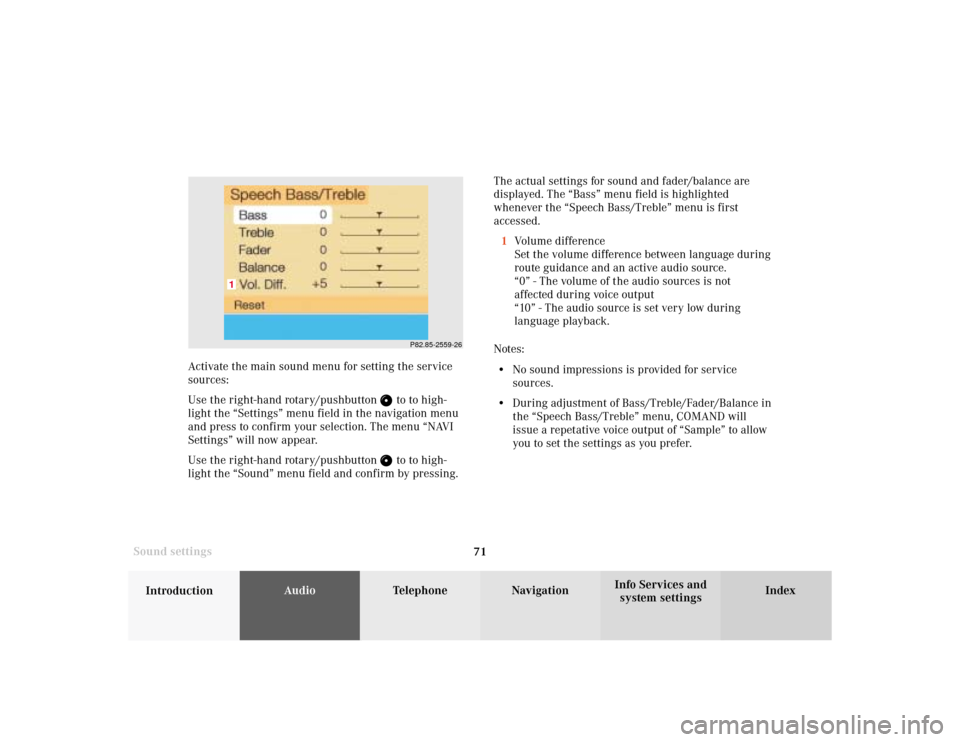
system settings Sound settingsThe actual settings for sound and fader/balance are
displayed. The “Bass” menu field is highlighted
whenever the “Speech Bass/Treble” menu is first
accessed.
1Volume difference
Set the volume difference between language during
route guidance and an active audio source.
“0” - The volume of the audio sources is not
affected during voice output
“10” - The audio source is set very low during
language playback.
Notes:
• No sound impressions is provided for service
sources.
• During adjustment of Bass/Treble/Fader/Balance in
the “Speech Bass/Treble” menu, COMAND will
issue a repetative voice output of “Sample” to allow
you to set the settings as you prefer.
P82.85-2559-26
1
Activate the main sound menu for setting the service
sources:
Use the right-hand rotary/pushbutton
to to high-
light the “Settings” menu field in the navigation menu
and press to confirm your selection. The menu “NAVI
Settings” will now appear.
Use the right-hand rotary/pushbutton to to high-
light the “Sound” menu field and confirm by pressing.
Page 137 of 231
135
Introduction
Audio
Telephone
Navigation
Index Info Services and
system settings Destination input13Return to the previous menu
14Turn:
Highlight a menu field, list entry or symbol
Altering the map scale, page 152 and 179
Press: Confirm an entry/selection, start a function
or activate a submenu
Activate the map scale bar, page 152 and 179
15Turn:
Turn to the left – To lower the volume during voice
output
Turn to the right – To raise the volume during
voice output
Press: To repeat the current route instruction16Requesting and displaying Info Services, page 204
Adjust system settings (brightness, language,
clock, day/night-display), page 207
17Color screen
Page 140 of 231
138
Index Info Services and
system settings IntroductionAudio TelephoneNavigation
Destination input
Navigation
Changing the Navigation CD
Press
to eject an inserted navigation CD.
Insert another navigation CD.
The screen above will be displayed. The program stored
on the navigation CD is being loaded.
Important!
Do not interrupt the loading process. Do not insert
an audio CD until the loading process has been
completed.
P82.85-6094-26
You will then hear a voice output message informing
you that the language is being loaded into memory.
Notes:
If it has not been removed, the navigation CD ejected
will be automatically retrieved by the CD player after
10 seconds.
The CD player can either read navigation CDs (destina-
tion input, route guidance) or play back audio CDs (CD
mode).
During CD mode only the playback modes “Standard”,
“Track repeat” and “Magazine mix” can be selected,
page 61.