Page 154 of 231

152
Index Info Services and
system settings IntroductionAudio TelephoneNavigation
Destination input
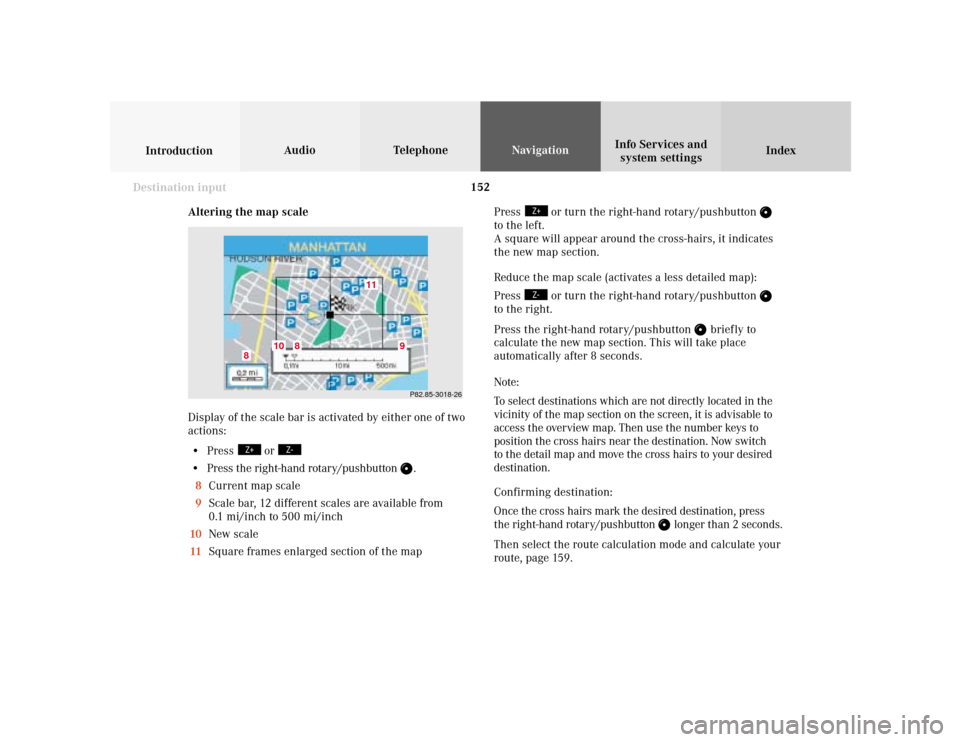
Altering the map scale
Display of the scale bar is activated by either one of two
actions:
• Press
or
• Press the right-hand rotary/pushbutton
.
8Current map scale
9Scale bar, 12 different scales are available from
0.1 mi/inch to 500 mi/inch
10New scale
11Square frames enlarged section of the mapP82.85-3018-26
11
10
8
8
9
Press
or turn the right-hand rotary/pushbutton
to the left.
A square will appear around the cross-hairs, it indicates
the new map section.
Reduce the map scale (activates a less detailed map):
Press
or turn the right-hand rotary/pushbutton
to the right.
Press the right-hand rotary/pushbutton
brief ly to
calculate the new map section. This will take place
automatically after 8 seconds.
Note:
To select destinations which are not directly located in the
vicinity of the map section on the screen, it is advisable to
access the overview map. Then use the number keys to
position the cross hairs near the destination. Now switch
to the detail map and move the cross hairs to your desired
destination.
Confirming destination:
Once the cross hairs mark the desired destination, press
the right-hand rotary/pushbutton
longer than 2 seconds.
Then select the route calculation mode and calculate your
route, page 159.
Page 159 of 231
157
Introduction
Audio
Telephone
Navigation
Index Info Services and
system settings Destination inputUse the right-hand rotary/pushbutton
to highlight
the letters of the desired destination one after the other
in the input menu and press to confirm.
The input line will automatically be populated with the
first matching enry in the list. As subsequent charac-
ters are entered, the system will narrow the available
list.
Structure of the input menu, page 142.
Correcting the entry, page 142.Activating the list:
Press the right-hand rotary/pushbutton
longer than
2 seconds or highlight the “List” menu field and confirm.
Moving to the next/previous page:
Use the right-hand rotary/pushbutton to highlight the
scrolling symbol and turn in the corresponding direction.
Turn the right-hand rotary/pushbutton
to highlight
the desired destination and press to confirm.
Select the route calculation mode and calculate the
route, page 159.
P82.85-3021-26
P82.85-3022-26
Page 161 of 231

159
Introduction
Audio
Telephone
Navigation
Index Info Services and
system settings Destination input
Calculate the routeSelecting the route calculation mode and
calculating the route
After you have entered your destination, select the
route calculation mode and calculate your route.
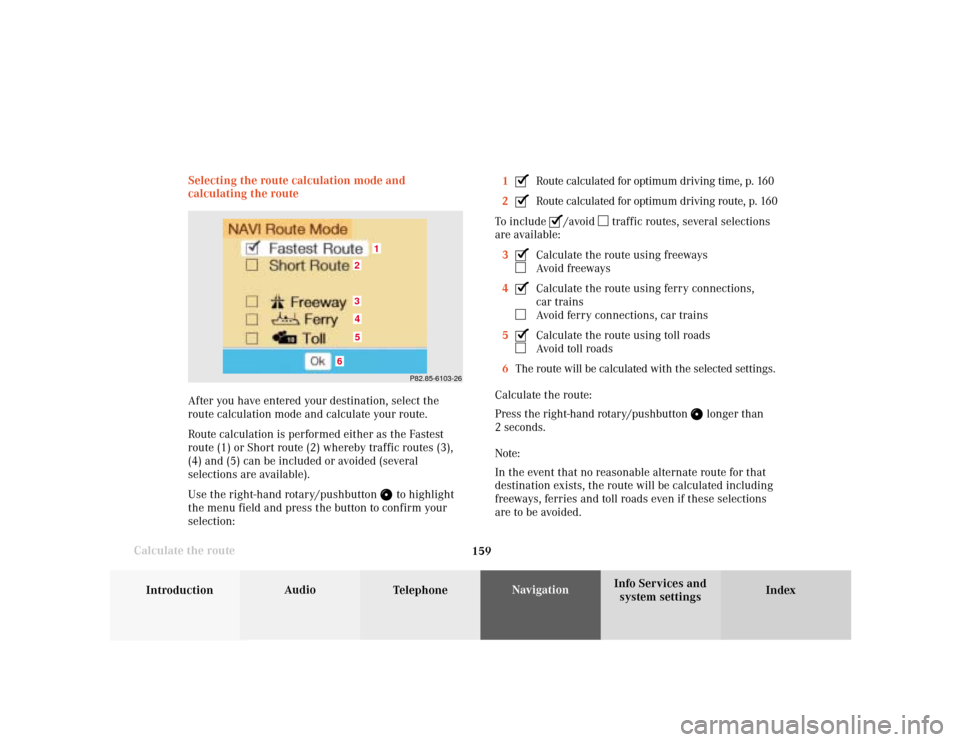
Route calculation is performed either as the Fastest
route (1) or Short route (2) whereby traffic routes (3),
(4) and (5) can be included or avoided (several
selections are available).
Use the right-hand rotary/pushbutton
to highlight
the menu field and press the button to confirm your
selection:1
Route calculated for optimum driving time, p. 160
2Route calculated for optimum driving route, p. 160
To include
/avoid
traffic routes, several selections
are available:
3
Calculate the route using freewaysAvoid freeways
4Calculate the route using ferry connections,
car trainsAvoid ferry connections, car trains
5Calculate the route using toll roadsAvoid toll roads
6The route will be calculated with the selected settings.
Calculate the route:
Press the right-hand rotary/pushbutton
longer than
2 seconds.
Note:
In the event that no reasonable alternate route for that
destination exists, the route will be calculated including
freeways, ferries and toll roads even if these selections
are to be avoided.
P82.85-6103-26
1
6
3452
Page 171 of 231
169
Introduction
Audio Telephone
Navigation
Index Info Services and
system settings Route guidanceRequesting the route mode
Turn the right-hand rotary/pushbutton
to menu
field “Options” (page 164) and press to confirm.17Indicates settings for the route calculation mode
selected for the current route
Selecting the route calculation mode, page 159
Selecting a detour during route guidance, page 184
Marking a way point, page 181
Press
to return to the symbol display or the map.
The screen will return to this display automatically
after 15 seconds.
P82.85-6110-26
17
Page 215 of 231
System settings
Introduction Audio
Telephone NavigationIndex Info Services and
system settings 213 GPS reception: setting the time in 30 minute
increments
Activating the setting mode:
Press the right-hand rotary/pushbutton
. The
minutes will appear in red lettering.
Altering the time to a 30 minute increments:
Setting the clock ahead – Turn the right-hand rotary/
pushbutton
to the right, the time will move back 30
minutes with each click.
Setting the clock back – Turn the right-hand rotary/
pushbutton to the left, the time will move back 30
minutes with each click.Canceling the setting mode:
Press the right-hand rotary/pushbutton
. The
minutes will appear in black lettering.
To activate the main System settings menu, either:
• Press
• Press the right-hand rotary/pushbutton
longer
than 2 seconds.
The new time will appear in the display.
P82.85-2677-26
P82.85-3073-26
Page 218 of 231

216 System settings
Audio Introduction
Telephone Navigation IndexInfo Services and
system settings
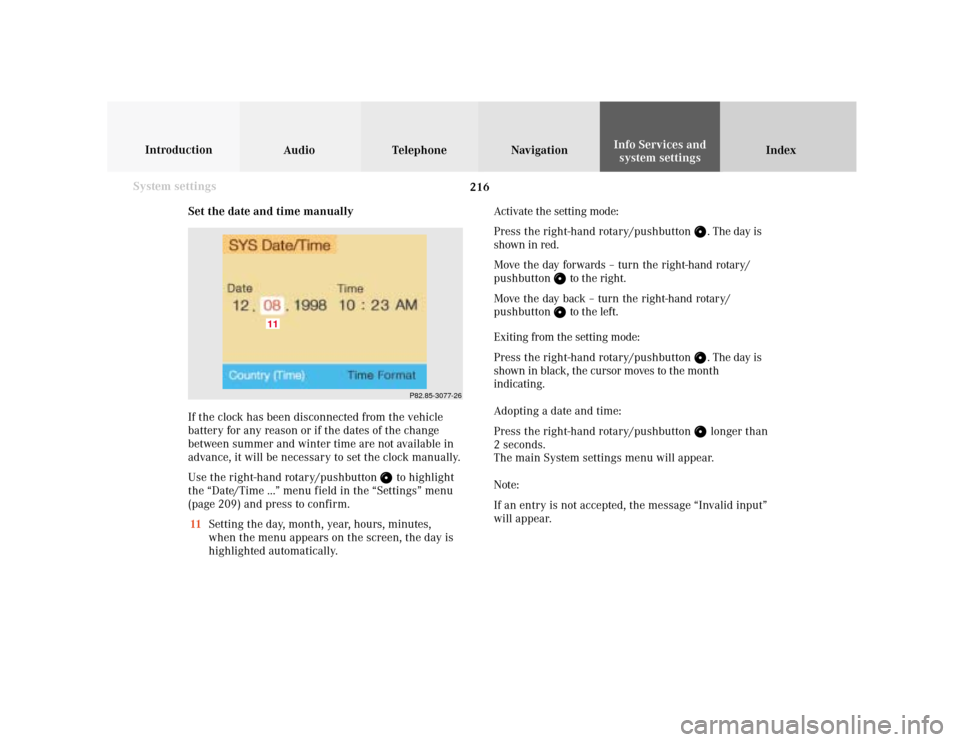
Set the date and time manually
If the clock has been disconnected from the vehicle
battery for any reason or if the dates of the change
between summer and winter time are not available in
advance, it will be necessary to set the clock manually.
Use the right-hand rotary/pushbutton
to highlight
the “Date/Time ...” menu field in the “Settings” menu
(page 209) and press to confirm.
11Setting the day, month, year, hours, minutes,
when the menu appears on the screen, the day is
highlighted automatically.Activate the setting mode:
Press the right-hand rotary/pushbutton
. The day is
shown in red.
Move the day forwards – turn the right-hand rotary/
pushbutton
to the right.
Move the day back – turn the right-hand rotary/
pushbutton to the left.
Exiting from the setting mode:
Press the right-hand rotary/pushbutton
. The day is
shown in black, the cursor moves to the month
indicating.
Adopting a date and time:
Press the right-hand rotary/pushbutton longer than
2 seconds.
The main System settings menu will appear.
Note:
If an entry is not accepted, the message “Invalid input”
will appear.
P82.85-3077-26
11