Page 139 of 301
 AIR CONDITIONING
126If manual fan speed control is desired ±
SS21009
� 1Fan speed at low 2Fan speed at high
The fan speed can be set to your desired speed by turning the
fan speed control dial. Th")
AIR CONDITIONING
126If manual fan speed control is desired ±
SS21009
� 1Fan speed at low 2Fan speed at high
The fan speed can be set to your desired speed by turning the
fan speed control dial. The higher the fan speed is, the more
air is delivered. Turning the dial to ºOFFº turns off the fan.
To remove exterior windshield frost, use the high speed
setting.
If manual switching of air intake is desired ±
SV21003
The air intake control button is used to switch the air intake
between the OUTSIDE AIR mode and RECIRCULATED AIR
mode.
With the bu
tton in the OUTSIDE AIR mode, the OUTSIDE AIR
mode indicator light will come on and the system will take fresh
outside air into the vehicle.
If quick circulation of cooled air is desired, push the air intake
control button for RECIRCULATED AIR. The
RECIRCULATED AIR mode indicator light will come on.
For normal use, it is best to keep the air intake control button
set to OUTSIDE AIR mode. If recirculated air is used during
heating, the windows will fog up more easily.
Page 148 of 301
AUDIO
135
AUDIO SYSTEM
Quick reference for your audio system
SV22030
�You can adjust the brightness of the display. See ºInstrument panel light controlº on page 46 for details.
Page 163 of 301
 AUDIO
150Push
this button on the lower side to skip backward. Push the
button until ºREWº and the number you want to skip appear on
the display.
� If you set ºREW 1º, the player will rewind to")
AUDIO
150Push
this button on the lower side to skip backward. Push the
button until ºREWº and the number you want to skip appear on
the display.
� If you set ºREW 1º, the player will rewind to the beginning
of the current program.
� When counting the number of programs you want to rewind,
remember to count the current program as well. For
example, if you want to rewind to a song that is two before
the song you are listening to, push this button until ºREW
3º appears on the display.
When the beginning of the tape is reached, the player
automatically resumes normal play.
There must be at least 5 seconds of blank space between
programs for this feature to work correctly.
ºRPTº, ºSKIPº or ºAutomatic program selectionº
features: These features may not work well with some spoken
word, live or classical recordings.
Compact disc player operation
This compact disc player can store 6 discs in the player.
The discs can be inserted or ejected while the ignition
switch is at ºACCº or ºONº.
(a) How to insert and eject the compact discs
SV22032
1. Push the ºLOADº button. Push the button briefly for
one disc, and when inserting more than one disc, push
and hold the button until a beep sounds.
2. Insert the disc into the compact disc slot. A maximum
of 6 discs can be inserted into the player.
If the indicator blinking in amber at the next to the compact disc
slot turns into the green light, you can insert the disc into the
slot. The ºLOAD DISC 4º is displayed at that time. (If you push
LOAD, the indicator blinks in amber. ºWAIT DISC 4º is
displayed while the system is being under preparation for
inserting disc.
Page 169 of 301
 AUDIO
156FM
Fading and drifting stations
± Generally, the effective range
of FM is about 40 km (25 miles). Once outside this range, you
may notice fading and drifting, which increase with the
dista")
AUDIO
156FM
Fading and drifting stations
± Generally, the effective range
of FM is about 40 km (25 miles). Once outside this range, you
may notice fading and drifting, which increase with the
distance from the radio transmitter. They are often
accompanied by distortion.
Multi±path ± FM signals are reflective, making it possible for
two signals to reach your antenna at the same time. If this
happens, the signals will cancel each other out, causing a
momentary flutter or loss of reception.
Static and fluttering ± These occur when signals are blocked
by buildings, trees, or other large objects. Increasing the bass
level may reduce static and fluttering.
Station swapping ± If the FM signal you are listening to is
interrupted or weakened, and there is another strong station
nearby on the FM band, your radio may tune in the second
station until the original signal can be picked up again. AM
Fading
± AM broadcasts are reflected by the upper
atmosphere ± especially at night. These reflected signals can
interfere with those received directly from the radio station,
causing the radio station to sound alternately strong and weak.
Station interference ± When a reflected signal and a signal
received directly from a radio station are very nearly the same
frequency, they can interfere with each other, making it dif ficult
to hear the broadcast.
Static ± AM is easily affected by external sources of electrical
noise, such as high tension power lines, lightening, or electrical
motors. This results in static.
Page 170 of 301
 AUDIO
157
Caring for your cassette player and tapes
For the best performance for your cassette player and tapes:
Clean the tape head and other parts regularly.
�
A dirty tape head or tape path can dec")
AUDIO
157
Caring for your cassette player and tapes
For the best performance for your cassette player and tapes:
Clean the tape head and other parts regularly.
�
A dirty tape head or tape path can decrease sound quality
and tangle your cassette tapes. The easiest way to clean
them is by using a cleaning tape. (A wet type is
recommended.) Use high±quality cassettes:
�
Low±quality cassette tapes can cause many problems,
including poor sound, inconsistent playing speed, and
constant auto±reversing. They can also get stuck or
tangled in the cassette player.
� Do not use a cassette if it has been damaged or tangled or
if its label is peeling off.
� Do not leave a cassette in the player if you are not listening
to it, especially if it is hot outside.
� Store cassettes in their cases and out of direct sunlight.
� Avoid using cassettes with a total playing time longer than
100 minutes (50 minutes per side). The tape used in these
cassette is thin and could get stuck or tangled in the
cassette player.
Page 172 of 301
AUDIO
159
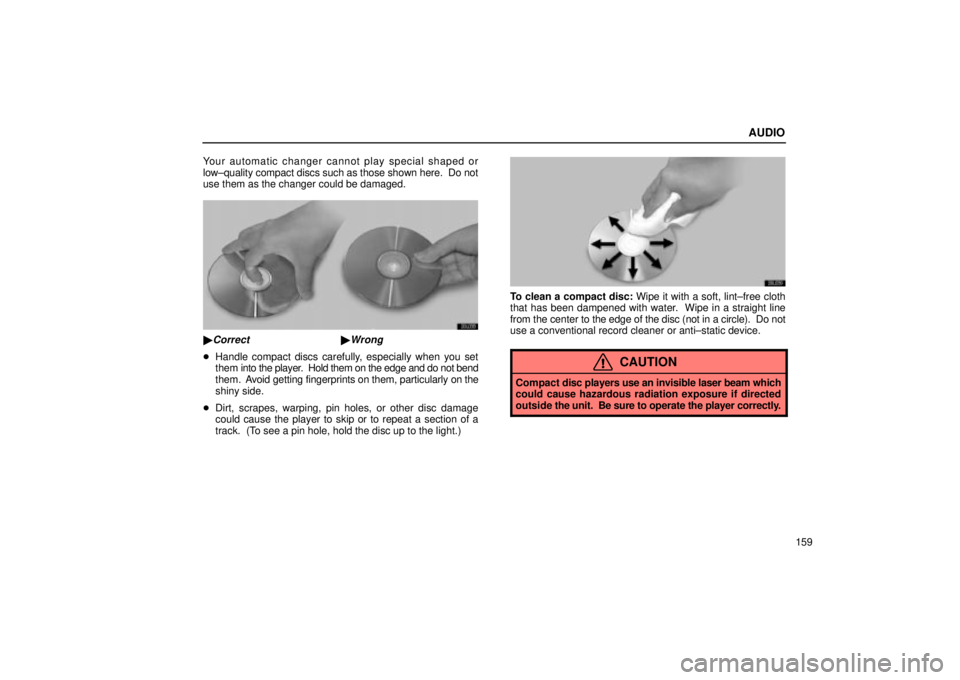
Your automatic changer cannot play special shaped or
low±quality compact discs such as those shown here. Do not
use them as the changer could be damaged.
20L038
�Correct �Wrong
�
Handle compact discs carefully, especially when you set
them into the player. Hold them on the edge and do not bend
them. A void getting fingerprints on them, particularly on the
shiny side.
� Dirt, scrapes, warping, pin holes, or other disc damage
could cause the player to skip or to repeat a section of a
track. (To see a pin hole, hold the disc up to the light.)
20L039
To clean a compact disc: Wipe it with a soft, lint±free cloth
that has been dampened with water. Wipe in a straight line
from the center to the edge of the disc (not in a circle). Do not
use a conventional record cleaner or anti±static device.
CAUTION
Compact disc players use an invisible laser beam which
could cause hazardous radiation exposure if directed
outside the unit. Be sure to operate the player correctly.
Page 177 of 301
 STARTING AND DRIVING
164
IGNITION SWITCH WITH STEERINGLOCK
SS31002
ºSTARTº ± Starter motor on. The key will return to the
ºONº position when released.
For starting tips, see page 165.
ºONº ±")
STARTING AND DRIVING
164
IGNITION SWITCH WITH STEERINGLOCK
SS31002
ºSTARTº ± Starter motor on. The key will return to the
ºONº position when released.
For starting tips, see page 165.
ºONº ± Engine on and all accessories on.
This is the normal driving position.
NOTICE
Do not leave the key in the ºONº position if the engine
is not running. The battery will discharge and theelectronic ignition system could be damaged.
ºACCº ± Accessories such as the radio operate, but the
engine is off. If you leave the key in the ºACCº or ºLOCKº position and open
the driver's door, a buzzer will remind you to remove the key.*
NOTE: *The volume or interval of beep sound can be
changed. Ask your Lexus dealer for details.
SS31003
ºLOCKº ± Engine is off and the steering wheel is locked.
The ignition key can be removed only at this position.
To turn the key from ºACCº to the ºLOCKº position you must put\
the transmission selector lever in the ºPº position and you must
push in the key.
Once you remove the key, the engine immobiliser system is
automatically set. See ºEngine immobiliser systemº on page
10.
When starting the engine, the key may seem stuck at the
ºLOCKº position. To free it, first be sure the key is pushed all
the way in, and then rock the steering wheel slightly while
turning the key gently.
If, in an emergency, you must turn the engine off while the
vehicle is moving, turn the key only to ºACCº.
Page 178 of 301
 STARTING AND DRIVING
165
PARKING BRAKE
SV31017
To set: Pull up the lever. For better holding power, first
depress the brake pedal and hold it while setting the
parking brake.
To release: Pull up th")
STARTING AND DRIVING
165
PARKING BRAKE
SV31017
To set: Pull up the lever. For better holding power, first
depress the brake pedal and hold it while setting the
parking brake.
To release: Pull up the lever slightly (1) , press the lock
release button (2), and lower (3).
To remind you that the parking brake is set, the parking brake
reminder light in the instrument panel remains on until you
release the parking brake.
CAUTION
Before driving, make sure the parking brake is fully
released and that the parking brake reminder light is off.
HOW TO START THE ENGINE
Before cranking
1. Apply the parking brake firmly.
2. Turn off unnecessary lights and accessories.
3. Put the selector lever in ºPº. If you need to restart the engine
while the vehicle is moving, put the selector lever in ºNº. A
starter safety device will prevent the starter from operating if
the selector lever is in any drive position.
4. Depress the brake pedal and hold it to the floor until driving
off.
Starting the engine
Before starting the engine, be sure to follow the instructions in
ºBefore crankingº.
Normal starting procedure
The multiport fuel injection system/sequential multiport fuel
injection system in your engine automatically controls the
proper air±fuel mixture for starting. You can start a cold or hot
engine as follows:
1. With your foot off the accelerator pedal, crank the engine by
turning the key to ºSTARTº. Release it when the engine starts.
2. After the engine runs for about 10 seconds, you are ready
to drive.