Page 107 of 301
 COMFORT ADJUSTMENT
94
SV16021
� 1Hitting a curb, edge of pavement or hard material
2Falling into or jumping over a deep hole
3Landing hard or vehicle falling
The SRS airbags may deploy if a serious")
COMFORT ADJUSTMENT
94
SV16021
� 1Hitting a curb, edge of pavement or hard material
2Falling into or jumping over a deep hole
3Landing hard or vehicle falling
The SRS airbags may deploy if a serious impact occurs to
the underside of your vehicle. Some examples are shown
in the illustration.
SV16022
� 1Side airbag modules (airbag and inflator)
2Airbag module for front passenger (airbag and inflator)
3Side airbag sensor assemblies
4Airbag module for driver (airbag and inflator)
5SRS warning light
6Airbag sensor assembly
7Front airbag sensors
The SRS airbag system consists mainly of the above
components, and their locations are shown in the illustration.
The airbag sensor assembly consists of a safing sensor and
airbag sensors.
In a severe frontal impact, the driver and front passenger
airbag sensors detect deceleration and the system triggers the
front airbag inflators. In a severe side impact, the side airbag
sensor triggers the side airbag inflator. Then a chemical
reaction in the inflators quickly fills the airbags with non±toxic
gas to help restrain the forward or lateral motion of the
occupants.
Page 113 of 301
 COMFORT ADJUSTMENT
100
NOTICE
Do not perform any of the following changes withoutconsulting your Lexus dealer. Such changes caninterfere with proper operation of the SRS airbagsystem in some cases.
�")
COMFORT ADJUSTMENT
100
NOTICE
Do not perform any of the following changes withoutconsulting your Lexus dealer. Such changes caninterfere with proper operation of the SRS airbagsystem in some cases.
�Installation of electronic devices such as a mobiletwo±way radio, cassette tape player or compact disc
player.
�Modification of the suspension system.
�Modification of the front end structure and side structure of the passenger compartment.
�Attachment of a grille guard (bull bar, kangaroo bar,etc.), snowplow, winches or any other equipment tothe front end.
�Repairs made on or near the front fenders, front endstructure, console, steering column, steering wheel,dashboard near the front passenger airbag or frontseats.
SV16061
This SRS airbag system has an indicator to inform the driver
of operating problems. If either of the following conditions
occurs, this indicates a malfunction of the airbags. Contact
your Lexus dealer as soon as possible to service the vehicle.
� When the ignition key is turned to the ºACCº or ºONº
position, the light does not come on, stays on or flashes.
� The light comes on or starts flashing while driving.
If the light stays on, it indicates that the driver and front
passenger airbags fail. If the light flashes, the side airbags fail.
Page 120 of 301
COMFORT ADJUSTMENT
107
SV16033
2. Fully extend the shoulder belt to put it in the lock mode.
When the belt is then retracted even slightly, it cannot be
extended.
To hold the infant seat securely, make sure the belt is in the lock
mode before letting the belt retract.
SV16034
3. While pressing the infant seat firmly against the seat
cushion and seatback, let the shoulder belt retract as far as it
will go to hold the infant seat securely.
Page 124 of 301
COMFORT ADJUSTMENT
111
SV16040
2. Fully extend the shoulder belt to put it in the lock mode.
When the belt is then retracted slightly, it cannot be extended.
To hold the convertible seat securely, make sure the belt is in
the lock mode before letting the belt retract.
SV16041
3. While pressing the convertible seat firmly against the seat
cushion and seatback, let the shoulder belt retract as far as it
will go to hold the convertible seat securely.
Page 131 of 301
 THEFT DETERRENT
11 8
THEFT DETERRENT SYSTEM
To deter theft of the vehicle, this system is designed to
give an alarm if any of the doors, trunk or hood is forcibly
unlocked or the battery terminal is d")
THEFT DETERRENT
11 8
THEFT DETERRENT SYSTEM
To deter theft of the vehicle, this system is designed to
give an alarm if any of the doors, trunk or hood is forcibly
unlocked or the battery terminal is disconnected and then
reconnected while the vehicle is locked.*
NOTE: *The system operating condition can be changed. Ask your Lexus dealer for details.
The alarm blows the horn intermittently and flashes the
headlights, tail lights and other exterior lights.
SV17002
Setting the system
1. Turn the ignition key to the ºLOCKº position and
remove it.
The indicator light flashes by means of the engine immobiliser
system. 2. Close and lock all the doors, trunk and hood using an
ignition key or wireless remote control.
The flashing indicator light will change to stay on when all the
doors, trunk and hood are closed and locked.
3. After 30 seconds, the indicator starts flashing and the
system is set.
Cancelling the system
When you unlock any door or trunk using an ignition key
or wireless remote control, the system is cancelled.
Activating the system
The alarm sounds for 60 seconds if any of the following are
operated:
�
Unlocking any door or trunk without using an ignition key or
wireless remote control.
� Opening the hood forcibly.
� Reconnecting the battery.
If any door is unlocked and the ignition key is not in the ignition
switch during the alarm sounding, its door is automatically
locked.
To stop the alarm: Use either of the following methods.
� Unlock the door or trunk using an ignition key or wireless
remote control.
� Turn the ignition switch on.
Page 132 of 301
 THEFT DETERRENT
11 9
Testing the system
1. Open all the windows.
2. Set the system as described above.
The front doors should be locked with the ignition key or
wireless remote control. Be sure to wa")
THEFT DETERRENT
11 9
Testing the system
1. Open all the windows.
2. Set the system as described above.
The front doors should be locked with the ignition key or
wireless remote control. Be sure to wait until the indicator light
starts flashing.
3. Unlock one of the doors from the inside.
The system should activate the alarm.
4. Unlock any of the doors with a key or the wireless
remote control to cancel the system.
5. Repeat this operation for the other doors and hood.
When testing the hood, also check that the system is activated
when the battery terminal is disconnected and then
reconnected.
If the system does not work properly, have it checked by your
Lexus dealer.
NOTICE
Disconnecting the battery may result in the erasure of information you have set in the computer memory. After
reconnecting the battery, check that the memorized data has been retained. If it has been erased, input it into
the computer once more.
THEFT PREVENTION LABELS
17E002
Your new vehicle carries theft prevention labels which are
approximately 56 mm (2.20 in.) by 16 mm (0.63 in.).
The purpose of these labels is to reduce the incidence of
vehicle thefts by facilitating the tracing and recovery of parts
from stolen vehicles. The label is designed so that once it is
applied to a surface, any attempt to remove it will result in
destroying the integrity of the label. Transferring these labels
intact from one part to another will be impossible.
NOTICE
You should not attempt to remove the theft prevention labels as it may violate certain state or federal laws.
Page 135 of 301
AIR CONDITIONING
122
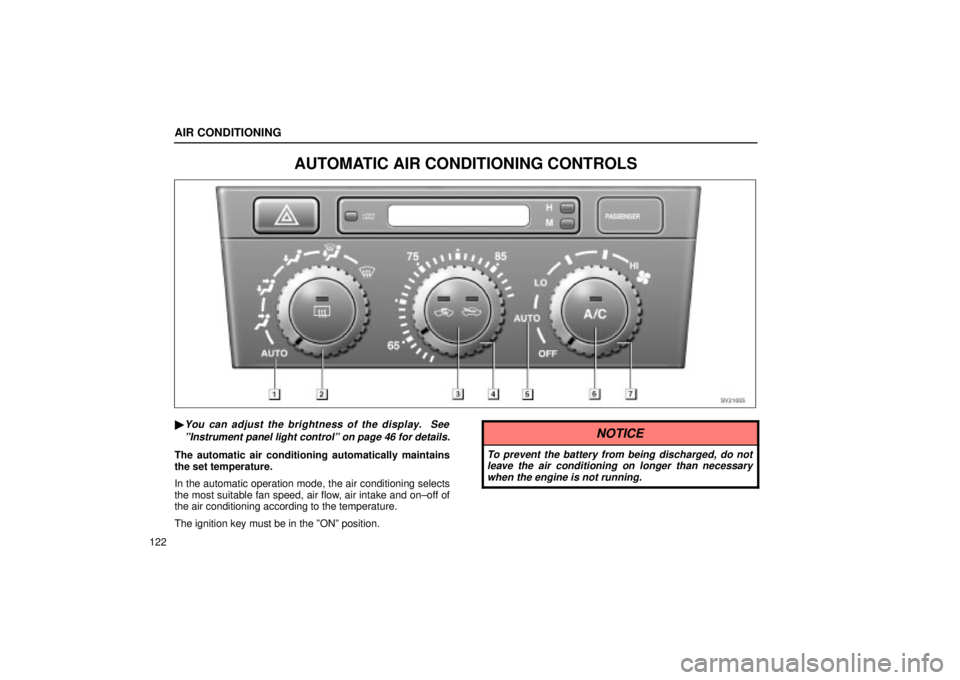
AUTOMATIC AIR CONDITIONING CONTROLS
SV21005
�You can adjust the brightness of the display. SeeºInstrument panel light controlº on page 46 for details.
The automatic air conditioning automatically maintains
the set temperature.
In the automatic operation mode, the air conditioning selects
the most suitable fan speed, air flow, air intake and on±off of
the air conditioning according to the temperature.
The ignition key must be in the ºONº position.
NOTICE
To prevent the battery from being discharged, do notleave the air conditioning on longer than necessarywhen the engine is not running.
Page 136 of 301
SV21006
AIR CONDITIONING
123
1Automatic air flow control position
2Air flow control dial
3Air intake control button
4Temperature control dial
5Automatic fan speed control position
6Air conditioning on±off button
7Fan speed control dial
�Air flow selection
(a) Climate control
SETTING OPERATION ± automatic control
SS21005
1. Set the air flow control dial and the fan speed control
dial to ºAUTOº positions.
An indicator light will illuminate to show that the automatic
operation mode has been selected.
Air flow quantity and switching of the diffusers are
automatically adjusted.
When one of the manual control dials is turned while operating
in automatic mode, the operation corresponding to the dial
turned is set. Other conditions continue to be adjusted
automatically.
When the fan speed control dial is turned to ºOFFº, the fan is
turned off.
 COMFORT ADJUSTMENT
107
SV16033
2. Fully extend the shoulder belt to put it in the lock mode.
When the belt is then retracted even slightly, it cannot be
extended.
To hold the infant seat securely, mak")
 COMFORT ADJUSTMENT
111
SV16040
2. Fully extend the shoulder belt to put it in the lock mode.
When the belt is then retracted slightly, it cannot be extended.
To hold the convertible seat securely, mak")
 SV21006
AIR CONDITIONING
123
1Automatic air flow control position
2Air flow control dial
3Air intake control button
4Temperature control dial
5Automatic fan speed control position
6Air condition")