Page 1115 of 2395
8 DETECT MALFUNCTIONING PART
Check the following.
IEVAP canister for damage
IEVAP hose between EVAP canister and water separator for clogging or poor connection
©Repair hose or replace EVAP canister.
9 CHECK EVAP CONTROL SYSTEM PRESSURE SENSOR HOSE
Check disconnection or improper connection of hose connected to EVAP control system pressure sensor.
OK or NG
OK©GO TO 10.
NG©Repair it.
10 CHECK EVAP CONTROL SYSTEM PRESSURE SENSOR CONNECTOR
1. Disconnect EVAP control system pressure sensor harness connector.
SEF495R
2. Check connectors for water.
Water should not exist.
OK or NG
OK©GO TO 11.
NG©Replace EVAP control system pressure sensor.
DTC P1448 EVAPORATIVE EMISSION (EVAP) CANISTER VENT CONTROL
VALVE (OPEN)
Diagnostic Procedure (Cont'd)
EC-580
Page 1116 of 2395
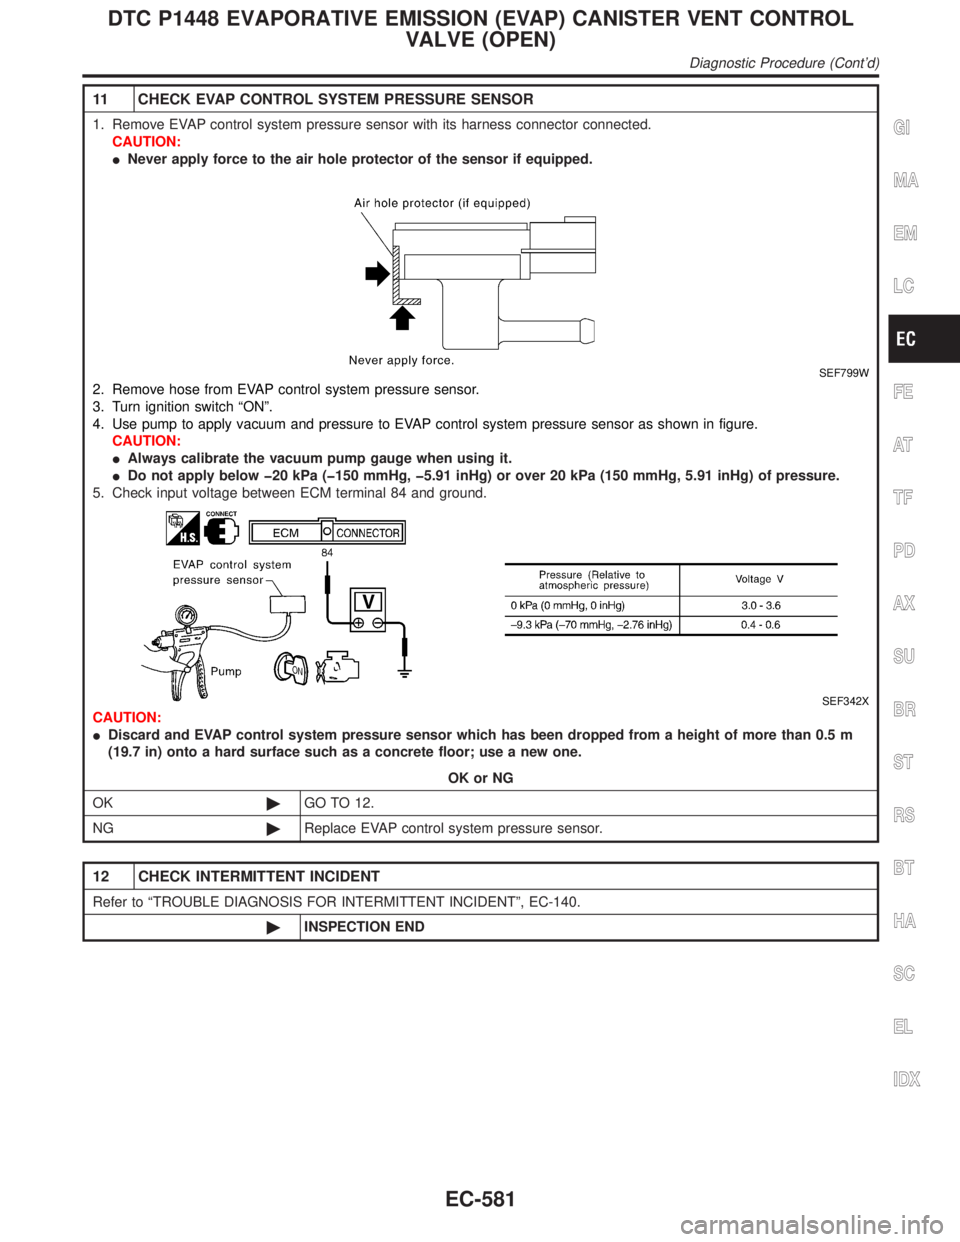
11 CHECK EVAP CONTROL SYSTEM PRESSURE SENSOR
1. Remove EVAP control system pressure sensor with its harness connector connected.
CAUTION:
INever apply force to the air hole protector of the sensor if equipped.
SEF799W
2. Remove hose from EVAP control system pressure sensor.
3. Turn ignition switch ªONº.
4. Use pump to apply vacuum and pressure to EVAP control system pressure sensor as shown in figure.
CAUTION:
IAlways calibrate the vacuum pump gauge when using it.
IDo not apply below þ20 kPa (þ150 mmHg, þ5.91 inHg) or over 20 kPa (150 mmHg, 5.91 inHg) of pressure.
5. Check input voltage between ECM terminal 84 and ground.
SEF342X
CAUTION:
IDiscard and EVAP control system pressure sensor which has been dropped from a height of more than 0.5 m
(19.7 in) onto a hard surface such as a concrete floor; use a new one.
OK or NG
OK©GO TO 12.
NG©Replace EVAP control system pressure sensor.
12 CHECK INTERMITTENT INCIDENT
Refer to ªTROUBLE DIAGNOSIS FOR INTERMITTENT INCIDENTº, EC-140.
©INSPECTION END
GI
MA
EM
LC
FE
AT
TF
PD
AX
SU
BR
ST
RS
BT
HA
SC
EL
IDX
DTC P1448 EVAPORATIVE EMISSION (EVAP) CANISTER VENT CONTROL
VALVE (OPEN)
Diagnostic Procedure (Cont'd)
EC-581
Page 1117 of 2395
SEF018S
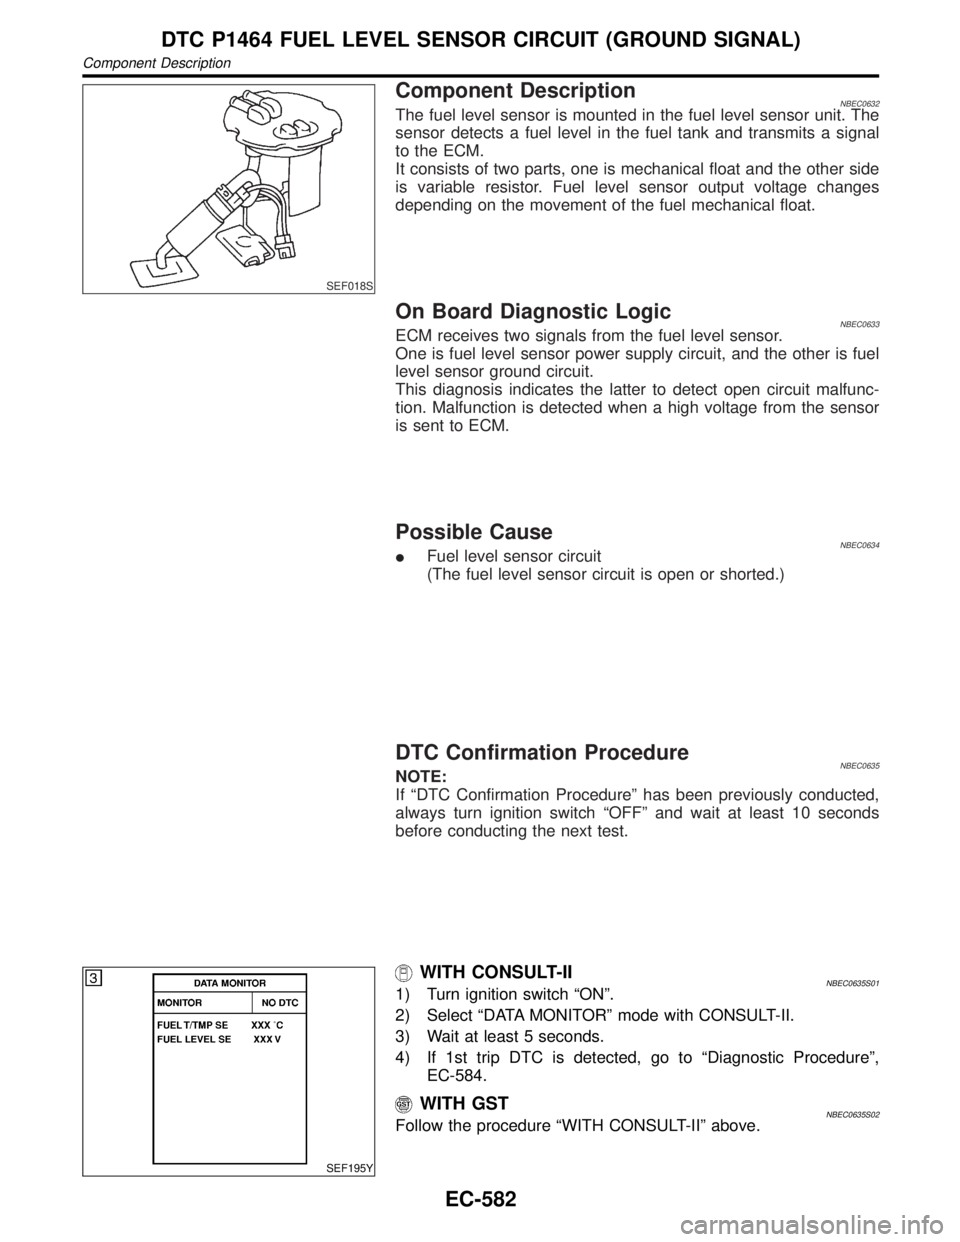
Component DescriptionNBEC0632The fuel level sensor is mounted in the fuel level sensor unit. The
sensor detects a fuel level in the fuel tank and transmits a signal
to the ECM.
It consists of two parts, one is mechanical float and the other side
is variable resistor. Fuel level sensor output voltage changes
depending on the movement of the fuel mechanical float.
On Board Diagnostic LogicNBEC0633ECM receives two signals from the fuel level sensor.
One is fuel level sensor power supply circuit, and the other is fuel
level sensor ground circuit.
This diagnosis indicates the latter to detect open circuit malfunc-
tion. Malfunction is detected when a high voltage from the sensor
is sent to ECM.
Possible CauseNBEC0634IFuel level sensor circuit
(The fuel level sensor circuit is open or shorted.)
DTC Confirmation ProcedureNBEC0635NOTE:
If ªDTC Confirmation Procedureº has been previously conducted,
always turn ignition switch ªOFFº and wait at least 10 seconds
before conducting the next test.
SEF195Y
WITH CONSULT-IINBEC0635S011) Turn ignition switch ªONº.
2) Select ªDATA MONITORº mode with CONSULT-II.
3) Wait at least 5 seconds.
4) If 1st trip DTC is detected, go to ªDiagnostic Procedureº,
EC-584.
WITH GSTNBEC0635S02Follow the procedure ªWITH CONSULT-IIº above.
DTC P1464 FUEL LEVEL SENSOR CIRCUIT (GROUND SIGNAL)
Component Description
EC-582
Page 1118 of 2395
Wiring DiagramNBEC0640
MEC985C
GI
MA
EM
LC
FE
AT
TF
PD
AX
SU
BR
ST
RS
BT
HA
SC
EL
IDX
DTC P1464 FUEL LEVEL SENSOR CIRCUIT (GROUND SIGNAL)
Wiring Diagram
EC-583
Page 1119 of 2395
Diagnostic Procedure=NBEC0641
1 CHECK FUEL LEVEL SENSOR GROUND CIRCUIT FOR OPEN AND SHORT
1. Turn ignition switch ªOFFº.
2. Disconnect ECM harness connector.
3. Check harness continuity between ECM terminal 59 and body ground. Refer to Wiring Diagram.
Continuity should exist.
4. Also check harness for short to ground and short to power.
OK or NG
OK©GO TO 3.
NG©GO TO 2.
2 DETECT MALFUNCTIONING PART
1. Check the following.
IHarness connectors F27, M94
IHarness connectors M2, B1
IHarness for open between ECM and body ground
©Replace open circuit or short to power in harness or connectors.
3 CHECK FUEL LEVEL SENSOR
Refer to EL-108, ªFuel Level Sensor Unit Checkº.
OK or NG
OK©GO TO 4.
NG©Replace fuel level sensor unit.
4 CHECK INTERMITTENT INCIDENT
Refer to ªTROUBLE DIAGNOSIS FOR INTERMITTENT INCIDENTº, EC-140.
OK or NG
©INSPECTION END
DTC P1464 FUEL LEVEL SENSOR CIRCUIT (GROUND SIGNAL)
Diagnostic Procedure
EC-584
Page 1127 of 2395
On Board Diagnosis LogicNBEC0356Malfunction is detected when vacuum cut valve bypass valve does
not operate properly.
Possible CauseNBEC0593IVacuum cut valve bypass valve
IVacuum cut valve
IBypass hoses for clogging
IEVAP control system pressure sensor and circuit
IEVAP canister vent control valve
IHose between fuel tank and vacuum cut valve clogged
IHose between vacuum cut valve and EVAP canister clogged
IEVAP canister
IEVAP purge port of fuel tank for clogging
SEF210Y
SEF211Y
SEF239Y
DTC Confirmation ProcedureNBEC0357CAUTION:
Always drive vehicle at a safe speed.
NOTE:
If ªDTC Confirmation Procedureº has been previously conducted,
always turn ignition switch ªOFFº and wait at least 10 seconds
before conducting the next test.
TESTING CONDITION:
For best results, perform test at a temperature of 5 to 30ÉC (41
to 86ÉF).
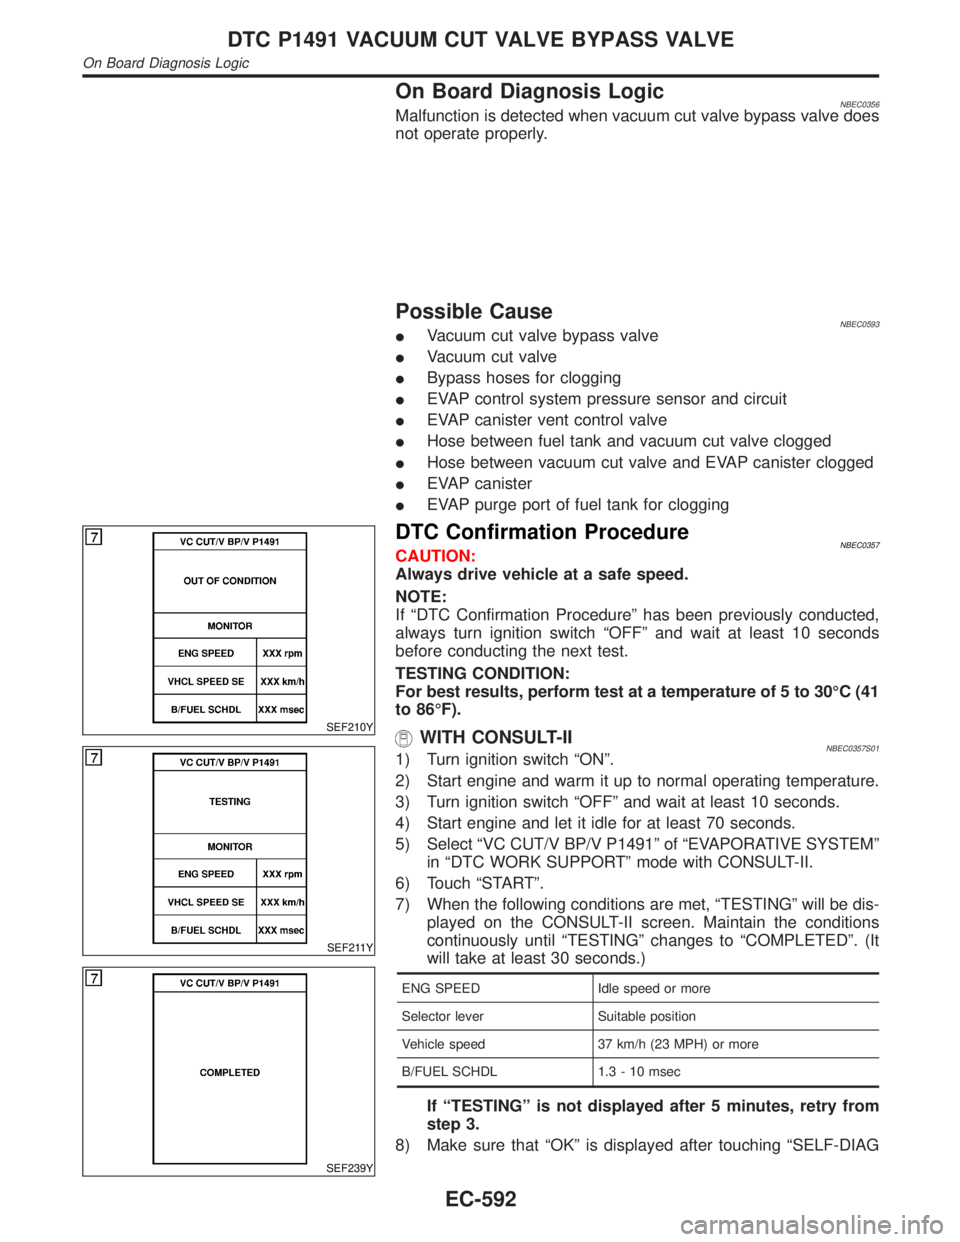
WITH CONSULT-IINBEC0357S011) Turn ignition switch ªONº.
2) Start engine and warm it up to normal operating temperature.
3) Turn ignition switch ªOFFº and wait at least 10 seconds.
4) Start engine and let it idle for at least 70 seconds.
5) Select ªVC CUT/V BP/V P1491º of ªEVAPORATIVE SYSTEMº
in ªDTC WORK SUPPORTº mode with CONSULT-II.
6) Touch ªSTARTº.
7) When the following conditions are met, ªTESTINGº will be dis-
played on the CONSULT-II screen. Maintain the conditions
continuously until ªTESTINGº changes to ªCOMPLETEDº. (It
will take at least 30 seconds.)
ENG SPEED Idle speed or more
Selector lever Suitable position
Vehicle speed 37 km/h (23 MPH) or more
B/FUEL SCHDL 1.3 - 10 msec
If ªTESTINGº is not displayed after 5 minutes, retry from
step 3.
8) Make sure that ªOKº is displayed after touching ªSELF-DIAG
DTC P1491 VACUUM CUT VALVE BYPASS VALVE
On Board Diagnosis Logic
EC-592
Page 1134 of 2395
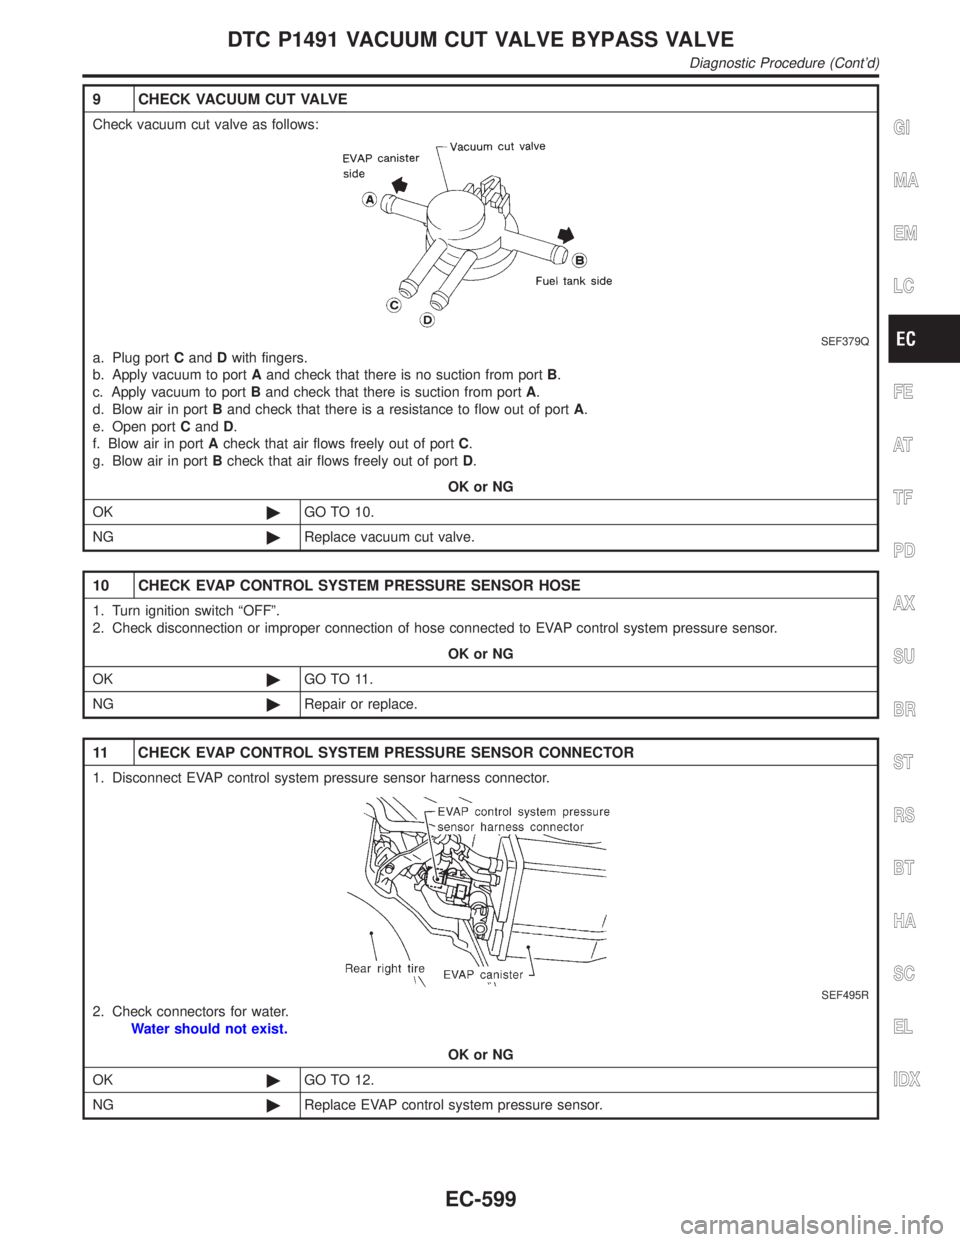
9 CHECK VACUUM CUT VALVE
Check vacuum cut valve as follows:
SEF379Q
a. Plug portCandDwith fingers.
b. Apply vacuum to portAand check that there is no suction from portB.
c. Apply vacuum to portBand check that there is suction from portA.
d. Blow air in portBand check that there is a resistance to flow out of portA.
e. Open portCandD.
f. Blow air in portAcheck that air flows freely out of portC.
g. Blow air in portBcheck that air flows freely out of portD.
OK or NG
OK©GO TO 10.
NG©Replace vacuum cut valve.
10 CHECK EVAP CONTROL SYSTEM PRESSURE SENSOR HOSE
1. Turn ignition switch ªOFFº.
2. Check disconnection or improper connection of hose connected to EVAP control system pressure sensor.
OK or NG
OK©GO TO 11.
NG©Repair or replace.
11 CHECK EVAP CONTROL SYSTEM PRESSURE SENSOR CONNECTOR
1. Disconnect EVAP control system pressure sensor harness connector.
SEF495R
2. Check connectors for water.
Water should not exist.
OK or NG
OK©GO TO 12.
NG©Replace EVAP control system pressure sensor.
GI
MA
EM
LC
FE
AT
TF
PD
AX
SU
BR
ST
RS
BT
HA
SC
EL
IDX
DTC P1491 VACUUM CUT VALVE BYPASS VALVE
Diagnostic Procedure (Cont'd)
EC-599
Page 1135 of 2395
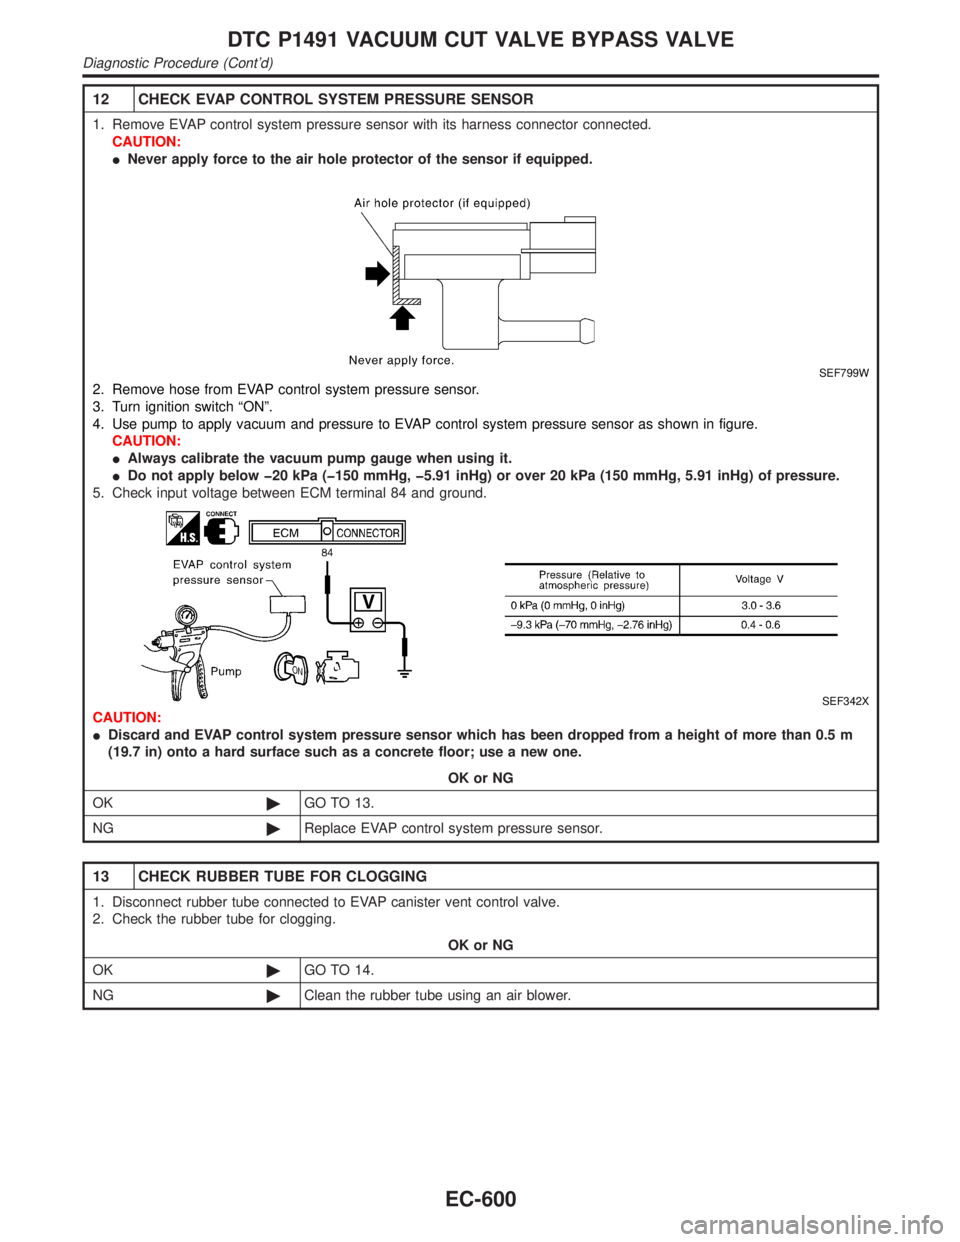
12 CHECK EVAP CONTROL SYSTEM PRESSURE SENSOR
1. Remove EVAP control system pressure sensor with its harness connector connected.
CAUTION:
INever apply force to the air hole protector of the sensor if equipped.
SEF799W
2. Remove hose from EVAP control system pressure sensor.
3. Turn ignition switch ªONº.
4. Use pump to apply vacuum and pressure to EVAP control system pressure sensor as shown in figure.
CAUTION:
IAlways calibrate the vacuum pump gauge when using it.
IDo not apply below þ20 kPa (þ150 mmHg, þ5.91 inHg) or over 20 kPa (150 mmHg, 5.91 inHg) of pressure.
5. Check input voltage between ECM terminal 84 and ground.
SEF342X
CAUTION:
IDiscard and EVAP control system pressure sensor which has been dropped from a height of more than 0.5 m
(19.7 in) onto a hard surface such as a concrete floor; use a new one.
OK or NG
OK©GO TO 13.
NG©Replace EVAP control system pressure sensor.
13 CHECK RUBBER TUBE FOR CLOGGING
1. Disconnect rubber tube connected to EVAP canister vent control valve.
2. Check the rubber tube for clogging.
OK or NG
OK©GO TO 14.
NG©Clean the rubber tube using an air blower.
DTC P1491 VACUUM CUT VALVE BYPASS VALVE
Diagnostic Procedure (Cont'd)
EC-600