Page 2222 of 2395

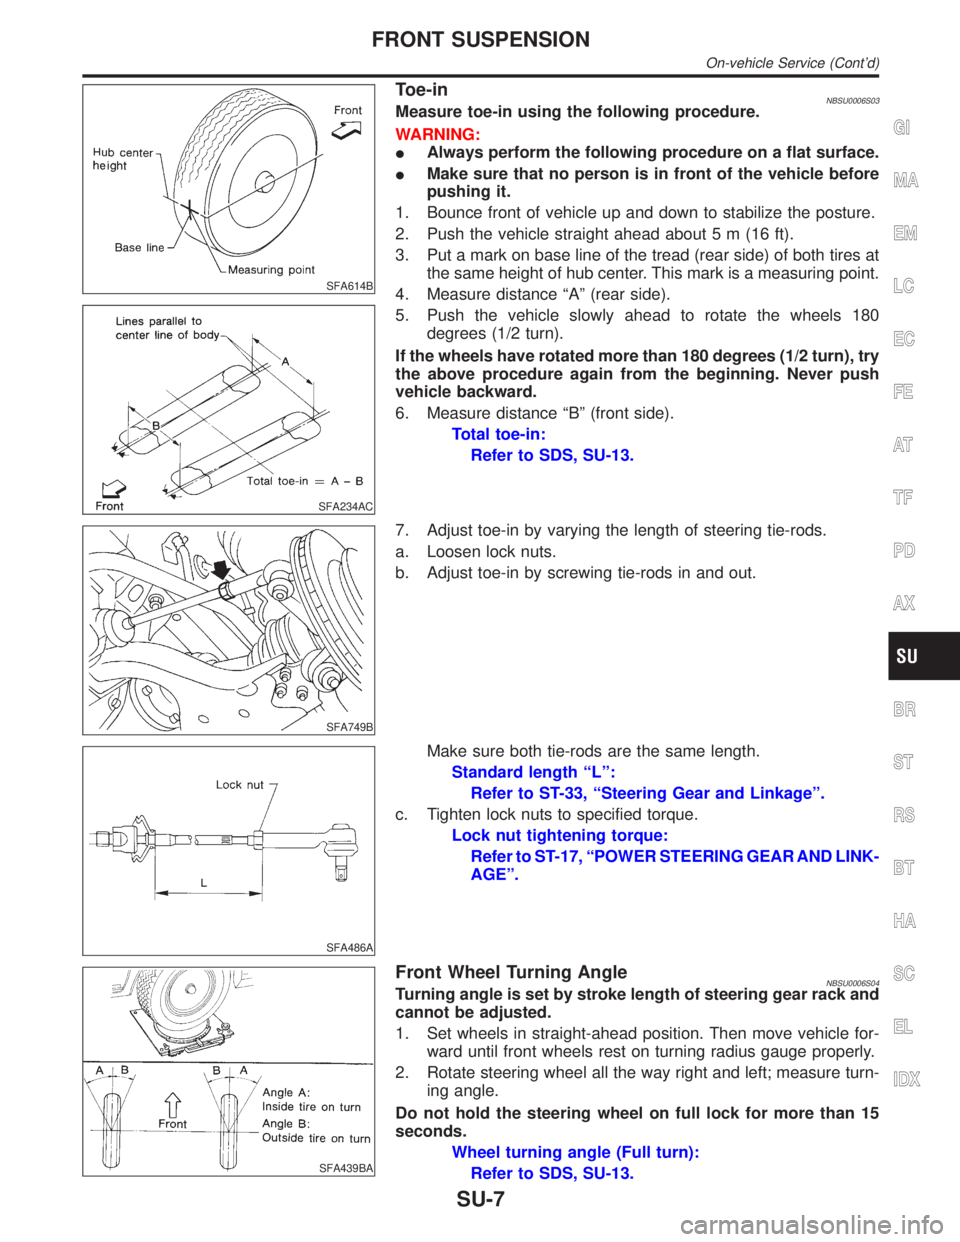
SFA614B
SFA234AC
Toe-inNBSU0006S03Measure toe-in using the following procedure.
WARNING:
IAlways perform the following procedure on a flat surface.
IMake sure that no person is in front of the vehicle before
pushing it.
1. Bounce front of vehicle up and down to stabilize the posture.
2. Push the vehicle straight ahead about 5 m (16 ft).
3. Put a mark on base line of the tread (rear side) of both tires at
the same height of hub center. This mark is a measuring point.
4. Measure distance ªAº (rear side).
5. Push the vehicle slowly ahead to rotate the wheels 180
degrees (1/2 turn).
If the wheels have rotated more than 180 degrees (1/2 turn), try
the above procedure again from the beginning. Never push
vehicle backward.
6. Measure distance ªBº (front side).
Total toe-in:
Refer to SDS, SU-13.
SFA749B
7. Adjust toe-in by varying the length of steering tie-rods.
a. Loosen lock nuts.
b. Adjust toe-in by screwing tie-rods in and out.
SFA486A
Make sure both tie-rods are the same length.
Standard length ªLº:
Refer to ST-33, ªSteering Gear and Linkageº.
c. Tighten lock nuts to specified torque.
Lock nut tightening torque:
Refer to ST-17, ªPOWER STEERING GEAR AND LINK-
AGEº.
SFA439BA
Front Wheel Turning AngleNBSU0006S04Turning angle is set by stroke length of steering gear rack and
cannot be adjusted.
1. Set wheels in straight-ahead position. Then move vehicle for-
ward until front wheels rest on turning radius gauge properly.
2. Rotate steering wheel all the way right and left; measure turn-
ing angle.
Do not hold the steering wheel on full lock for more than 15
seconds.
Wheel turning angle (Full turn):
Refer to SDS, SU-13.
GI
MA
EM
LC
EC
FE
AT
TF
PD
AX
BR
ST
RS
BT
HA
SC
EL
IDX
FRONT SUSPENSION
On-vehicle Service (Cont'd)
SU-7
Page 2228 of 2395

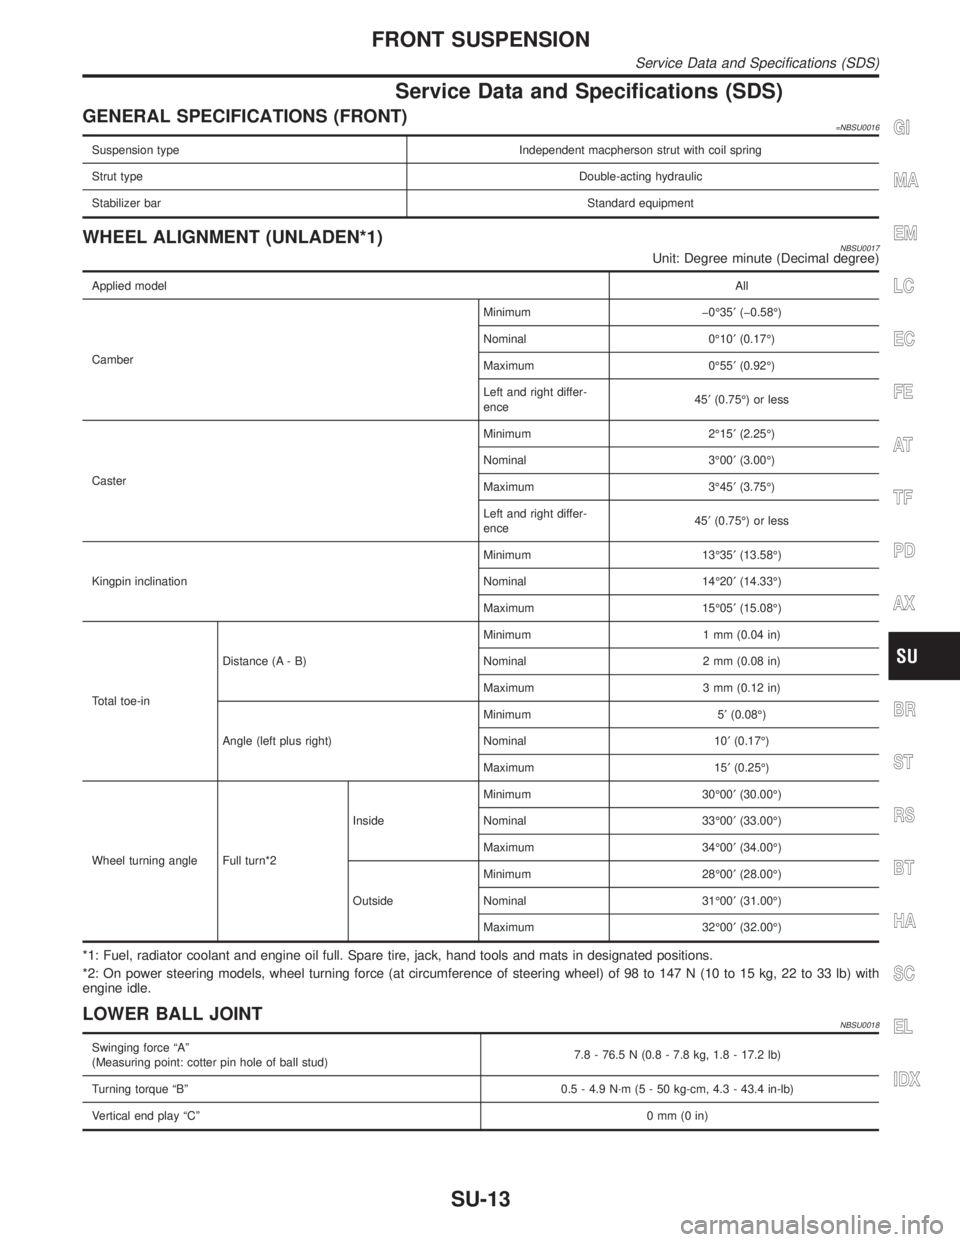
Service Data and Specifications (SDS)
GENERAL SPECIFICATIONS (FRONT)=NBSU0016
Suspension type Independent macpherson strut with coil spring
Strut typeDouble-acting hydraulic
Stabilizer barStandard equipment
WHEEL ALIGNMENT (UNLADEN*1)NBSU0017Unit: Degree minute (Decimal degree)
Applied modelAll
CamberMinimum þ0É35¢(þ0.58É)
Nominal 0É10¢(0.17É)
Maximum 0É55¢(0.92É)
Left and right differ-
ence45¢(0.75É) or less
CasterMinimum 2É15¢(2.25É)
Nominal 3É00¢(3.00É)
Maximum 3É45¢(3.75É)
Left and right differ-
ence45¢(0.75É) or less
Kingpin inclinationMinimum 13É35¢(13.58É)
Nominal 14É20¢(14.33É)
Maximum 15É05¢(15.08É)
Total toe-inDistance (A - B)Minimum 1 mm (0.04 in)
Nominal 2 mm (0.08 in)
Maximum 3 mm (0.12 in)
Angle (left plus right)Minimum 5¢(0.08É)
Nominal 10¢(0.17É)
Maximum 15¢(0.25É)
Wheel turning angle Full turn*2InsideMinimum 30É00¢(30.00É)
Nominal 33É00¢(33.00É)
Maximum 34É00¢(34.00É)
OutsideMinimum 28É00¢(28.00É)
Nominal 31É00¢(31.00É)
Maximum 32É00¢(32.00É)
*1: Fuel, radiator coolant and engine oil full. Spare tire, jack, hand tools and mats in designated positions.
*2: On power steering models, wheel turning force (at circumference of steering wheel) of 98 to 147 N (10 to 15 kg, 22 to 33 lb) with
engine idle.
LOWER BALL JOINTNBSU0018
Swinging force ªAº
(Measuring point: cotter pin hole of ball stud)7.8 - 76.5 N (0.8 - 7.8 kg, 1.8 - 17.2 lb)
Turning torque ªBº 0.5 - 4.9 N´m (5 - 50 kg-cm, 4.3 - 43.4 in-lb)
Vertical end play ªCº0mm(0in)
GI
MA
EM
LC
EC
FE
AT
TF
PD
AX
BR
ST
RS
BT
HA
SC
EL
IDX
FRONT SUSPENSION
Service Data and Specifications (SDS)
SU-13
Page 2287 of 2395

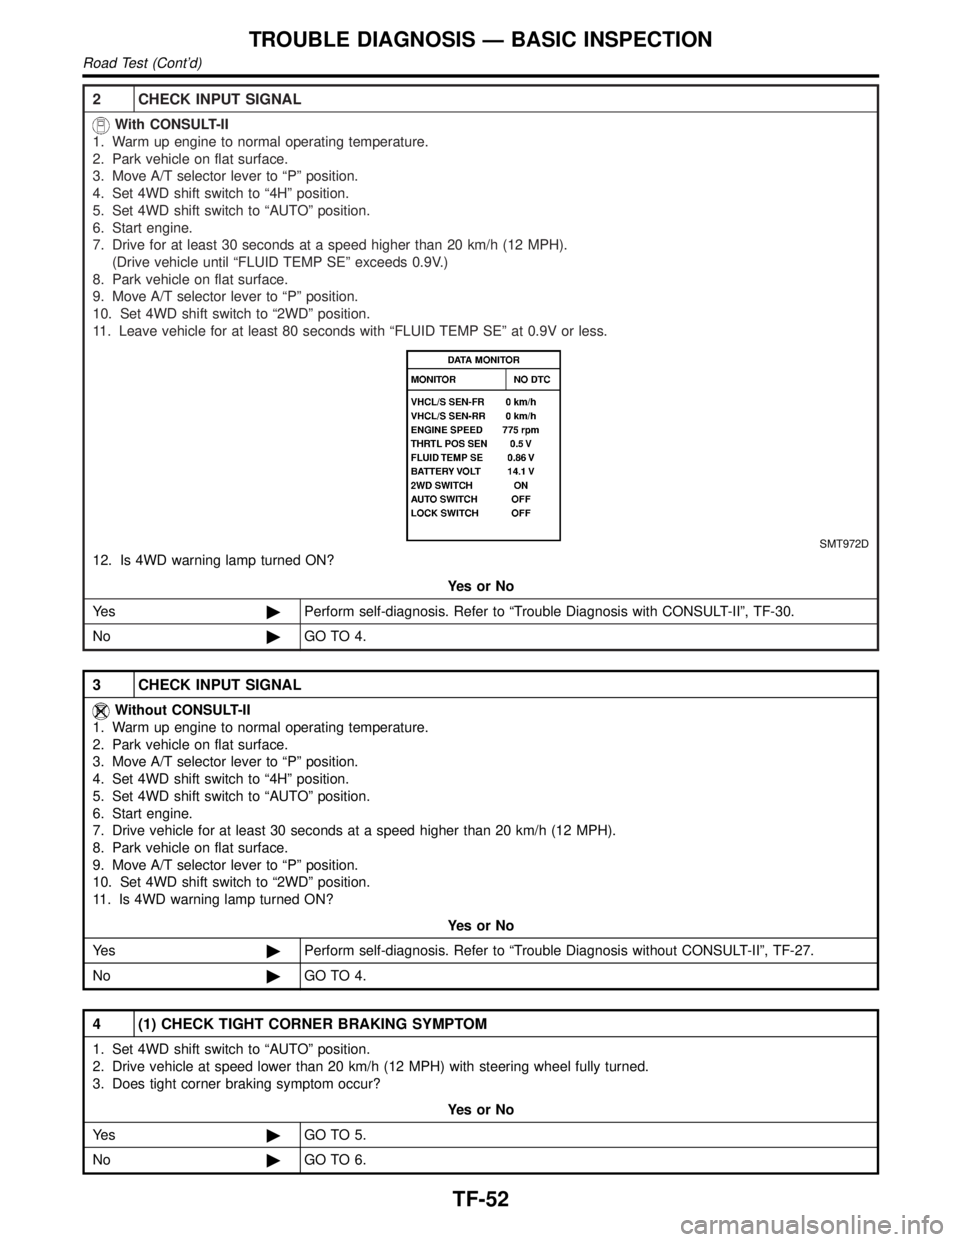
2 CHECK INPUT SIGNAL
With CONSULT-II
1. Warm up engine to normal operating temperature.
2. Park vehicle on flat surface.
3. Move A/T selector lever to ªPº position.
4. Set 4WD shift switch to ª4Hº position.
5. Set 4WD shift switch to ªAUTOº position.
6. Start engine.
7. Drive for at least 30 seconds at a speed higher than 20 km/h (12 MPH).
(Drive vehicle until ªFLUID TEMP SEº exceeds 0.9V.)
8. Park vehicle on flat surface.
9. Move A/T selector lever to ªPº position.
10. Set 4WD shift switch to ª2WDº position.
11. Leave vehicle for at least 80 seconds with ªFLUID TEMP SEº at 0.9V or less.
SMT972D
12. Is 4WD warning lamp turned ON?
YesorNo
Ye s©Perform self-diagnosis. Refer to ªTrouble Diagnosis with CONSULT-IIº, TF-30.
No©GO TO 4.
3 CHECK INPUT SIGNAL
Without CONSULT-II
1. Warm up engine to normal operating temperature.
2. Park vehicle on flat surface.
3. Move A/T selector lever to ªPº position.
4. Set 4WD shift switch to ª4Hº position.
5. Set 4WD shift switch to ªAUTOº position.
6. Start engine.
7. Drive vehicle for at least 30 seconds at a speed higher than 20 km/h (12 MPH).
8. Park vehicle on flat surface.
9. Move A/T selector lever to ªPº position.
10. Set 4WD shift switch to ª2WDº position.
11. Is 4WD warning lamp turned ON?
YesorNo
Ye s©Perform self-diagnosis. Refer to ªTrouble Diagnosis without CONSULT-IIº, TF-27.
No©GO TO 4.
4 (1) CHECK TIGHT CORNER BRAKING SYMPTOM
1. Set 4WD shift switch to ªAUTOº position.
2. Drive vehicle at speed lower than 20 km/h (12 MPH) with steering wheel fully turned.
3. Does tight corner braking symptom occur?
YesorNo
Ye s©GO TO 5.
No©GO TO 6.
TROUBLE DIAGNOSIS Ð BASIC INSPECTION
Road Test (Cont'd)
TF-52
Page 2288 of 2395
5 CONFIRM SYMPTOM AGAIN
Confirm symptom and self-diagnosis again.
Refer to ªTrouble Diagnosis without CONSULT-IIº, TF-27 and ªTrouble Diagnosis with CONSULT-IIº, TF-30.
OK or NG
OK©GO TO 6.
NG©Go to Symptoms 8 and 9. Refer to TF-108, 109.
6 (2) CHECK TIGHT CORNER BRAKING SYMPTOM
1. Set 4WD shift switch to ª4Hº position.
2. Drive vehicle at speed lower than 20 km/h (12 MPH) with steering wheel fully turned.
3. Does tight corner braking symptom occur?
YesorNo
Ye s©INSPECTION END
No©GO TO 7.
7 CONFIRM SYMPTOM AGAIN
Confirm symptom and self-diagnosis again.
Refer to ªTrouble Diagnosis without CONSULT-IIº, TF-27 and ªTrouble Diagnosis with CONSULT-IIº, TF-30.
OK or NG
OK©INSPECTION END
NG©Go to Symptoms 8 and 9. Refer to TF-108, 109.
GI
MA
EM
LC
EC
FE
AT
PD
AX
SU
BR
ST
RS
BT
HA
SC
EL
IDX
TROUBLE DIAGNOSIS Ð BASIC INSPECTION
Road Test (Cont'd)
TF-53
Page 2342 of 2395

Symptom 7. 4WD Shift Indicator Lamp Repeats
Flickering
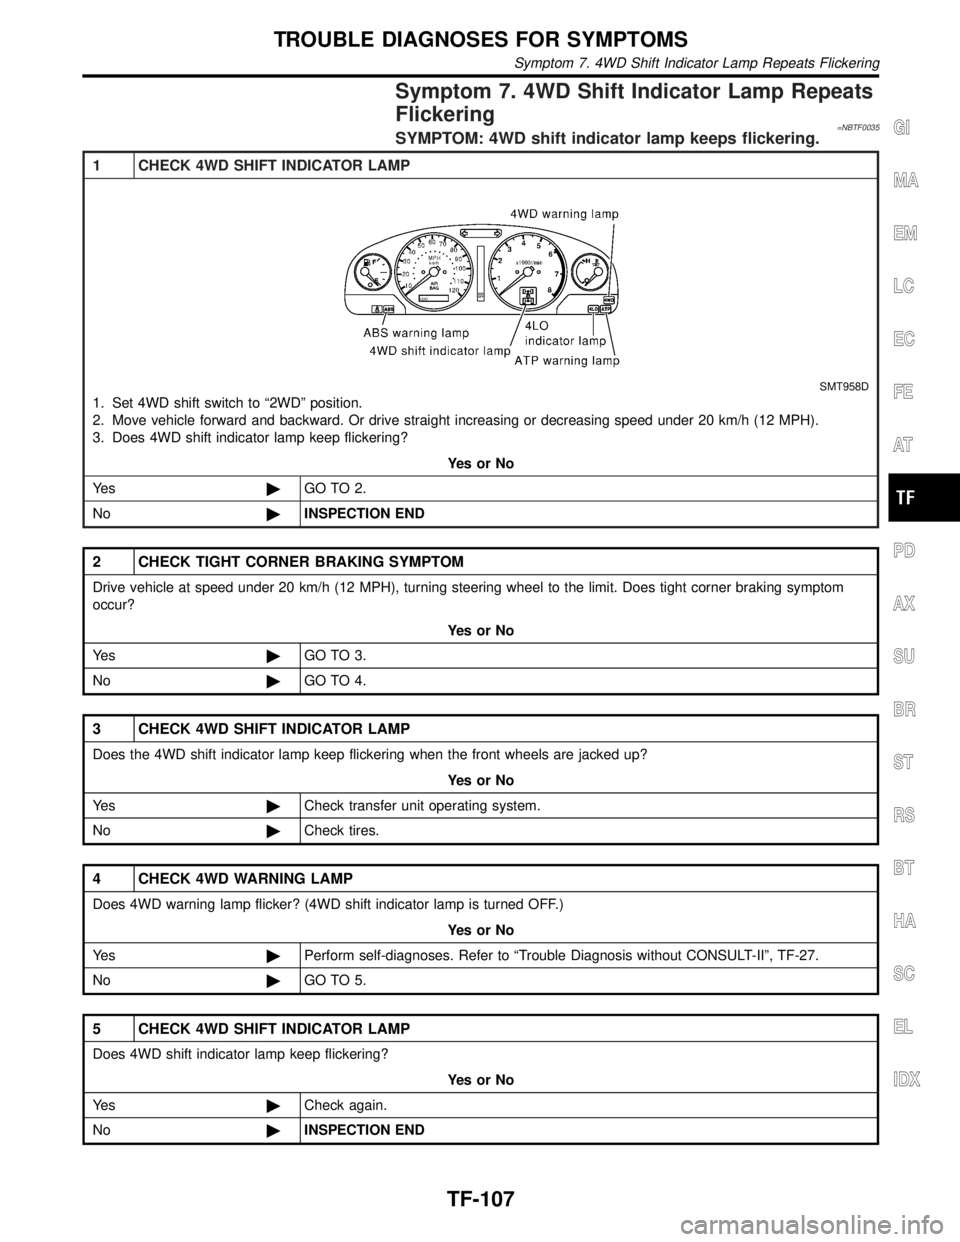
=NBTF0035SYMPTOM: 4WD shift indicator lamp keeps flickering.
1 CHECK 4WD SHIFT INDICATOR LAMP
SMT958D
1. Set 4WD shift switch to ª2WDº position.
2. Move vehicle forward and backward. Or drive straight increasing or decreasing speed under 20 km/h (12 MPH).
3. Does 4WD shift indicator lamp keep flickering?
YesorNo
Ye s©GO TO 2.
No©INSPECTION END
2 CHECK TIGHT CORNER BRAKING SYMPTOM
Drive vehicle at speed under 20 km/h (12 MPH), turning steering wheel to the limit. Does tight corner braking symptom
occur?
YesorNo
Ye s©GO TO 3.
No©GO TO 4.
3 CHECK 4WD SHIFT INDICATOR LAMP
Does the 4WD shift indicator lamp keep flickering when the front wheels are jacked up?
YesorNo
Ye s©Check transfer unit operating system.
No©Check tires.
4 CHECK 4WD WARNING LAMP
Does 4WD warning lamp flicker? (4WD shift indicator lamp is turned OFF.)
YesorNo
Ye s©Perform self-diagnoses. Refer to ªTrouble Diagnosis without CONSULT-IIº, TF-27.
No©GO TO 5.
5 CHECK 4WD SHIFT INDICATOR LAMP
Does 4WD shift indicator lamp keep flickering?
YesorNo
Ye s©Check again.
No©INSPECTION END
GI
MA
EM
LC
EC
FE
AT
PD
AX
SU
BR
ST
RS
BT
HA
SC
EL
IDX
TROUBLE DIAGNOSES FOR SYMPTOMS
Symptom 7. 4WD Shift Indicator Lamp Repeats Flickering
TF-107