�Ø �Ø�Ø�Ø�Ø�Ø�Ø�Ø �Ø �Ø �Ø �Ø�Ø�Ø�Ø
�Ø �Ø
�Ì�Ì
CONT INUED
Maint enance 243
A, B, C, D
Severe Conditions:
A B C
Use this schedule if your vehicle is MAINLY driven in any of the following Severe Conditions, o
r normally driven in Canada; otherwise use the Normal
Schedule. Service at the indicated distance or time, whichever comes first. Do the items in as required for each distance/time.
Driving less than 5 miles (8 km) per trip or, in freezing temperatures, driving less than 10 miles (16 km) p er trip.
Driving in extremely hot (over 90°F/32°C) conditions.
Extensive idling or long periods of stop-and-go driving.
Trailer towing, driving with a roof rack, or driving in mountainous conditions.
Driving on muddy, dusty, or de-iced roads.
3,750 mi/6,000 km/-
7,500 mi/12,000 km/6 mos
11,250 mi/18,000 km/-
15,000 mi/24,000 km/1 yr
18,750 mi/30,000 km/-
22,500 mi/36,000 km/1½ yrs
26,250 mi/42,000 km/-
30,000 mi/48,000 km/2 yrs
33,750 mi/54,000 km/-
37,500 mi/60,000 km/2½ yrs
41,250 mi/66,000 km/-
45,000 mi/72,000 km/3 yrs
48,750 mi/78,000 km/-
52,500 mi/84,000 km/3½ yrs Replace engine oil and filter.
Inspect front and rear brakes.
Rotate tires (follow pattern on page 276 ).
Inspect tie rod ends, steering gearbox and boots.
Inspect suspension components.
Inspect driveshaft boots.
Check parking brake adjustment.
Lubricate all hinges, locks and latches, with
multipurpose grease.
Inspect brake hoses and lines (including ABS).
Check all fluid levels, condition of fluids, and check
for leaks.
Inspect cooling system hoses and connections.
Inspect exhaust system .
Inspect fuel lines and connections .
Check all lights.
Inspect the underbody.
Do items in A.
Do items in A, B.
Do items in A.
Clean air cleaner element. Do items in A, B, C.
Do items in A.
Do items in A, B.
Do items in A.
DoitemsinA,B,C,D.
Do items in A.
Do items in A, B.
Do items in A. Clean air cleaner element.
DoitemsinA,B,C,E.
Do items in A.
Do items in A, B.
·····
Maintenance Schedule for Severe Conditions (listed by distance/time)
Use a f lat-tipped screwdriver to
remove the two holding clips f rom
the inner f ender.
Pull the inner f ender cover away
f rom the f ender and bumper.
If you are changing the bulb on
the driver’s side, start the engine,
turn the steering wheel all the way
to the right, and turn off the
engine. If you are changing the
bulb on the passenger’s side, turn
the steering wheel to the left.
Insert the new bulb into the hole,
making sure the tabs are in their
slots. Pivot the hold-down wire
back in place and clip the end into
the slot.
Install the rubber seal over the
back of the headlight assembly.
Make sure it is right side up; it is
marked ‘‘TOP.’’
Push the electrical connector onto
the new bulb.
Turn on the headlights to test the
new bulb.
(Driver’s side)
Reinstall the air intake cover.
1.
2. 3.
5. 6. 7.8.
CONT INUED
Lights
Maint enance
Replacing the Front Side Marker/
Turn Signal and Parking L ightBulb
283
HHOOLLDDIINNGGCCLLIIPP
�Î�Î
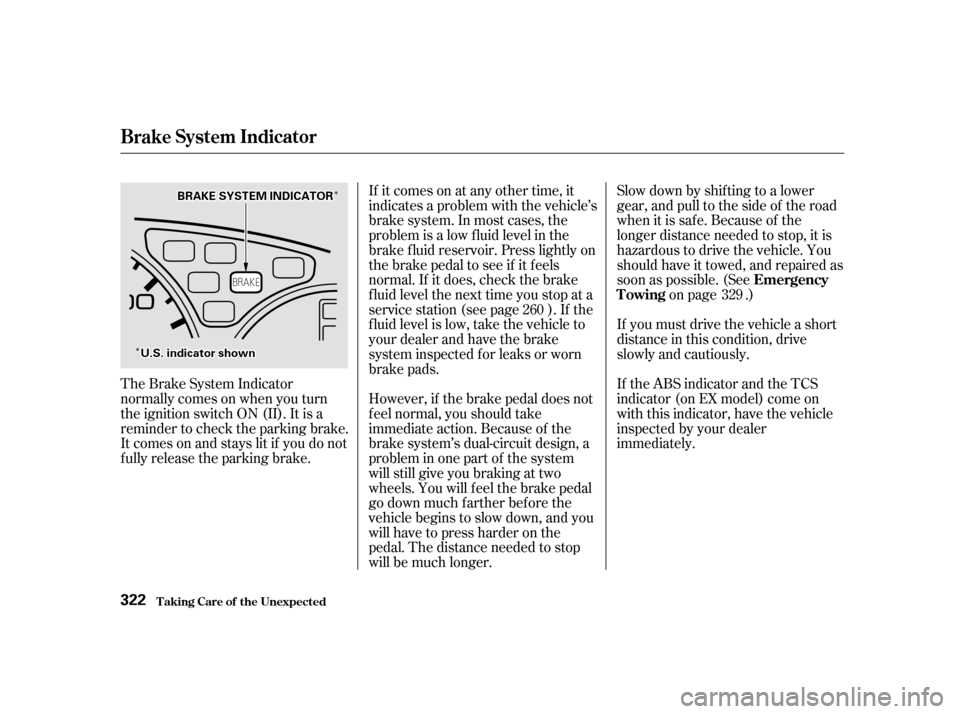
�Î�ÎHowever, if the brake pedal does not
f eel normal, you should take
immediate action. Because of the
brake system’s dual-circuit design, a
problem in one part of the system
will still give you braking at two
wheels. You will f eel the brake pedal
go down much f arther bef ore the
vehicle begins to slow down, and you
will have to press harder on the
pedal. The distance needed to stop
will be much longer.
If it comes on at any other time, it
indicates a problem with the vehicle’s
brake system. In most cases, the
problem is a low f luid level in the
brake f luid reservoir. Press lightly on
the brake pedal to see if it f eels
normal. If it does, check the brake
f luid level the next time you stop at a
service station (see page ). If the
f luid level is low, take the vehicle to
your dealer and have the brake
system inspected f or leaks or worn
brake pads.
Slow down by shif ting to a lower
gear, and pull to the side of the road
when it is saf e. Because of the
longer distance needed to stop, it is
hazardous to drive the vehicle. You
should have it towed, and repaired as
soon as possible. (See
on page .)
If you must drive the vehicle a short
distance in this condition, drive
slowly and cautiously.
If the ABS indicator and the TCS
indicator (on EX model) come on
with this indicator, have the vehicle
inspected by your dealer
immediately.
The Brake System Indicator
normallycomesonwhenyouturn
the ignition switch ON (II). It is a
reminder to check the parking brake.
It comes on and stays lit if you do not
f ully release the parking brake. 260
329
Emergency
Towing
T aking Care of t he Unexpect ed
Brake System Indicator
322
BBRRAAKKEESSYYSSTTEEMMIINNDDIICCAATTOORR
UU..SS..iinnddiiccaattoorrsshhoowwnn