Page 153 of 319

�Û�µ
The tape direction indicator will light
to show you which side of the
cassette is playing. The indicates
thesideyouinsertedfacingupward
is now playing. If you want to play
the other side, press the PROG
button.
Dolby noise reduction turns on when
you insert a cassette. If the tape was
not recorded with Dolby noise
reduction, turn it of f by pressing the
NR button. With a cassette playing, you can use
the FF, REW, SKIP, or REPEAT
f unction to f ind a desired program.
Dolby remains of f until you turn it on
by pressing the button again. If you turn the system of f while a
tape is playing, either with the PWR/
VOL knob or by turning of f the
ignition, the cassette will remain in
the drive. When you turn the system
back on, the cassette player will be in
pause mode. To begin playing, press
the PLAY button.
To switch to the radio or CD player
while a tape is playing, press the
AM/FM, or CD button. To change
back to the cassette player, push the
CD button.
When the system reaches the end of
the tape, it will automatically reverse
direction and play the other side. If
you want to remove the cassette
f rom the drive, press the EJECT
button on the cassette player. Fast Forward and Re-
wind move the tape rapidly. To re-
wind the tape, push the REW button.
You will see REW in the display. To
f ast f orward the tape, push the FF
button. You will see FF displayed.
Press the PLAY button to take the
system out of rewind or f ast f orward.
If the system reaches the end of the
tape while in f ast f orward or rewind,
it automatically stops that function,
reverses direction, and begins to play.
Audio System
Comf ort and Convenience Feat ures T ape Search Functions
FF/REW
154
Page 154 of 319

�µ
�µ The SKIP and REPEAT f unctions
use silent periods on the tape to f ind
the end of a song or passage. These
f eatures may not work to your
satisfaction if there is almost no gap
between selections, a high noise
level between selections, or a silent
period in the middle of a selection.
The Repeat f unction
continuously replays the current
song or passage. Press the RPT
button to activate it; you will see RPT
displayed as a reminder. When the
system reaches the end of the song
or passage currently playing, it will
automatically go into rewind. When
it senses the beginning of the same
song or passage, the system returns
to PLAY mode. It will continue to
repeat this same program until you
deactivate REPEAT by pressing the
button again.
The Skip Function allows
you to f ind the beginning of a song
or passage. To f ind the beginning of
the song or passage currently
playing, push the lower part of the
SKIP bar. You will see REW f lashing
in the display as the tape rewinds. To
f ind the beginning of the next song,
push the upper part of the SKIP bar.
You will see FF f lashing in the
display as the tape f ast f orwards.
When the system finds the
beginning of a song or passage, it
goes back to PLAY mode.
Audio System
Comf ort and Convenience Feat ures
REPEAT
SK IP
155
Page 155 of 319

If you do not clean the cassette
player regularly, it may eventually
become impossible to remove the
contamination with a normal
cleaning kit.
Use 100-minute or shorter cassettes.
Cassettes longer than that use
thinner tape that may break or jam
the drive.Look at the cassette before you
insert it. If the tape is loose, tighten
it by turning a hub with a pencil or
your f inger.
The cassette player picks up dirt and
oxides f rom the tape. This contami-
nation builds up over time and
causes the sound quality to degrade.
To prevent this, you should clean the
player af ter every 30 hours of use.
Your dealer has a cleaning kit
available.
Never try to insert f oreign objects
into the cassette player.
When they are not in use, store
cassettes in their cases to protect
them f rom dust and moisture. Never
place cassettes where they will be
exposed to direct sunlight, high heat,
or high humidity. If a cassette is
exposed to extreme heat or cold, let
it reach a moderate temperature
bef ore inserting it in the player.
If the label is peeling of f , remove it
from the cassette or it could cause
the cassette to jam in the player.
Never try to insert a warped or
damaged cassette in the player.
If you see the error indication
‘‘ ’’ on the display, press
the EJECT button and remove the
cassette from the unit. Make sure
the tape is not damaged. If the
cassette will not eject or the error
indication stays on after the cassette
ejects, take the car to your Honda
dealer.
Audio System
Comf ort and Convenience Feat ures
Caring f or the Cassette Player 156
Page 156 of 319

You will have to store your favorite
stations in the Preset buttons after
the system begins working. Your
original settings were lost when
power was disconnected.
If your car’s battery is disconnected
or goes dead, or the radio f use is
removed, the audio system will
disable itself . If this happens, you
will see ‘‘ ’’ in the f requency
display the next time you turn on the
system. Use the Preset buttons to
enter the f ive-digit code. If it is
entered correctly, the radio will start
playing.
If you make a mistake entering the
code, do not start over or try to
correct your mistake. Complete the
f ive-digit sequence, then enter the
correct code. You have ten tries to
enter the correct code. If you are
unsuccessful in ten attempts, you
must then leave the system on for
one hour bef ore trying again.
Your car’s audio system will disable
itself if it is disconnected f rom
electrical power f or any reason. To
make it work again, the user must
enter a specif ic f ive-digit code in the
Preset buttons. Because there are
hundreds of number combinations
possible f rom f ive digits, making the
system work without knowing the
exact code is nearly impossible.
Youshouldhavereceivedacardthat
lists your audio system’s code
number and serial number. It is best
tostorethiscardinasafeplaceat
home. In addition, you should write
the audio system’s serial number in
this Owner’s Manual. If you should
happen to lose the card, you must
obtain the code number f rom your
Honda dealer. To do this, you will
need the system’s serial number.
On EX model
Audio System
Comf ort and Convenience Feat ures
Thef t Protection
157
Page 178 of 319
�µ
CONT INUED
Do this:
Press the brake pedal and
press the release button.
Press the release button.
Move the lever.
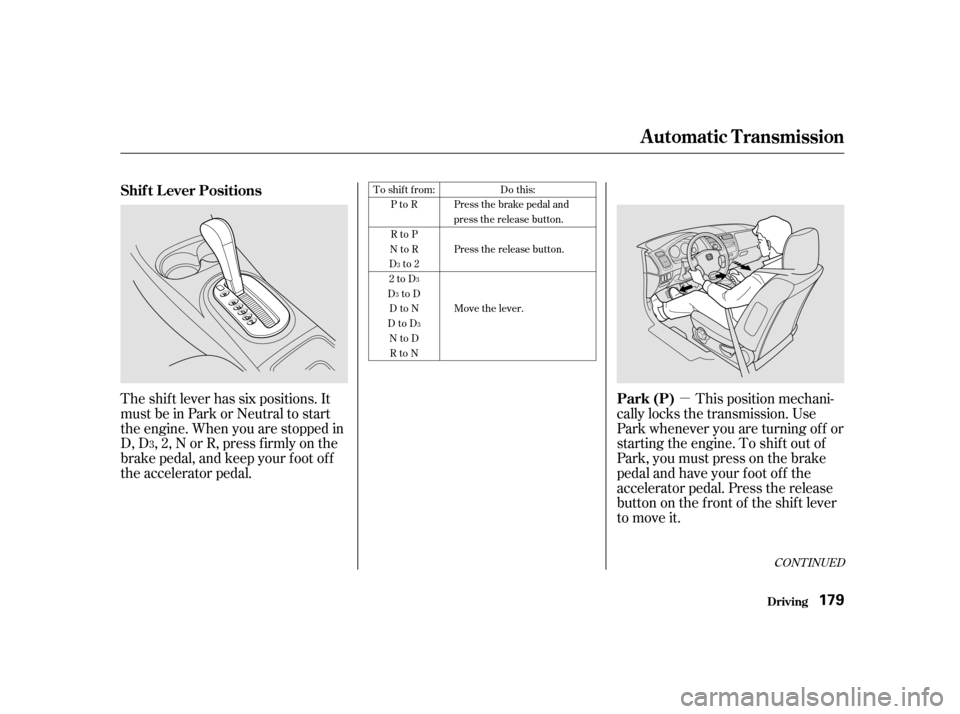
3 To shift from:
PtoR
RtoP
NtoR
Dto2
2toD
DtoD DtoN
DtoD NtoDRtoN
This position mechani-
cally locks the transmission. Use
Park whenever you are turning of f or
starting the engine. To shif t out of
Park, you must press on the brake
pedal and have your f oot of f the
accelerator pedal. Press the release
buttononthefrontof theshiftlever
to move it.
The shif t lever has six positions. It
must be in Park or Neutral to start
the engine. When you are stopped in
D, D , 2, N or R, press f irmly on the
brake pedal, and keep your f oot of f
the accelerator pedal. 3
3
3
3
Automatic Transmission
Driving
Shif t L ever Positions
Park (P)179
Page 179 of 319

�µ
�µ �µ
If you have done all of the above and
still cannot move the lever out of
Park, see Shif t Lock Release on page
.
You must also press the release
button to shift into Park. To avoid
transmission damage, come to a
complete stop bef ore shif ting into
Park. The shif t lever must be in Park
bef ore you can remove the key f rom
the ignition switch. To shif t to Reverse
f rom Park, see the explanation under
Park. To shif t to Reverse f rom
Neutral, come to a complete stop and
then shift. Press the release button
bef ore shif ting into Reverse f rom
Neutral.
Use Neutral if you
need to restart a stalled engine, or if
it is necessary to stop brief ly with
the engine idling. Shif t to Park posi-
tion if you need to leave the car for
any reason. Press on the brake pedal
when you are moving the shif t lever
f rom Neutral to another gear. Use this position f or
your normal driving. The transmis-
sion automatically selects a suitable
gear f or your speed and acceleration.
You may notice the transmission
shif ting up at higher speeds when
the engine is cold. This helps the
engine warm up f aster.
182
Automatic Transmission
Driving Reverse (R)
Neutral (N)
Drive (D)
180
Page 180 of 319

�µ�µThis position is similar
to D , except only the first three
gears are selected. Use D to provide
engine braking when going down a
steep hill. D can also keep the
transmission f rom cycling between
third and f ourth gears in stop-and-go
driving.
ForfasteraccelerationwheninD or
D , you can get the transmission to
automatically downshif t by pushing
the accelerator pedal to the floor.
The transmission will shif t down one
or two gears, depending on your
speed. If you exceed the maximum speed
f or the gear you are in, the engine
speed will enter into the tachometer’s
red zone. If this occurs, you may f eel
the engine cut in and out. This is
caused by a limiter in the engine’s
computer controls. The engine will
run normally when you reduce the
RPM below the red zone.
To shif t to Second,
pressthereleasebuttononthefront
of the shif t lever. This position locks
the transmission in second gear. It
does not downshif t to f irst gear
when you come to a stop. Second
gives you more power when climbing,
and increased engine braking when
going down steep hills. Use second
gear when starting out on a slippery
surf ace or in deep snow. It will help
reduce wheelspin.
If you exceed the maximum speed
f or the gear you are in, you may f eel
the engine cut in and out. This is
caused by a limiter in the engine’s
computer controls. The engine will
run normally when you reduce the
engine speed by upshif ting or
slowing down.
4
3
3
3
4
On EX and LX models
On DX model
Automatic Transmission
Driving
Drive (D )
Engine Speed L imiter
Second (2)
3
181
Page 181 of 319

This allows you to move the shif t
lever out of Park if the normal
method of pushing on the brake
pedal and pressing the release
button does not work.Set the Parking brake.
Remove the key from the ignition
switch.
Push down on the key while you
pressthereleasebuttononthe
shif t lever and move the shif t lever
out of Park to Neutral.
Insert the key in the Shift Lock
Release slot.
Put a cloth on the edge of the Shif t
Lock Release slot cover next to
the shift lever.
Use a small flat-tipped screwdriver
or small metal plate (neither are
included in the tool kit) to remove
the cover. Caref ully pry of f the
edge of the cover. Remove the key from the Shift
Lock Release slot, then reinstall
thecover.Makesurethenotchon
the cover is on the lef t side.
Depress the brake pedal and
restart the engine.
If you need to use the Shif t Lock
Release, it means your car is
developing a problem. Have the car
checked by your Honda dealer.
1. 2. 3.
4.5.6.
Automatic Transmission
Driving
Shif t L ock Release 182
RREELLEEAASSEEBBUUTTTTOONN
SSHHIIFFTTLLOOCCKKRREELLEEAASSEESSLLOOTTCCOOVVEERR