Page 47 of 319
 includes:Two f ront airbags. The driver’s
airbag is stored in the center of
the steering wheel; the f ront
passenger’sairbagisstoredinthe
dashboard. Both")
Your Supplemental Restraint System
(SRS) includes:Two f ront airbags. The driver’s
airbag is stored in the center of
the steering wheel; the f ront
passenger’sairbagisstoredinthe
dashboard. Both are marked ‘‘SRS
AIRBAG.’’
If you ever have a moderate to
severe f rontal collision, the sensors
will detect the vehicle’s rapid
deceleration. If the rate of
deceleration is high enough, the
control unit will instantly inf late the
f ront airbags.
A sophisticated electronic system
that continually monitors and
records inf ormation about the
sensors, the control unit, the
airbag activators, and driver and
passenger seat belt use when the
ignition is ON (II).
Sensors that can detect a
moderate to severe frontal
collision.
Automatic seat belt tensioners
(see page ).
An indicator light on the
instrument panel that alerts you to
a possible problem with the
system (see page ).
Emergency backup power in case
your car’s electrical system is
disconnected in a crash.
45
51
SRS Components
How Your Front A irbags Work
Additional Inf ormation About Your Airbags
Driver and Passenger Saf ety
48
Page 54 of 319
These labels are in the locations
shown. They warn you of potential
hazards that could cause serious
injury. Read these labels caref ully.
If a label comes of f or becomes hard
to read, contact your Honda dealer
f or a replacement.
CONT INUED
U.S. modelsCanadian models
Saf ety L abels
Driver and Passenger Saf ety 55
RADIATOR CAP SUN VISOR
DASHBOARD
Page 68 of 319
�Î
�Î�Î
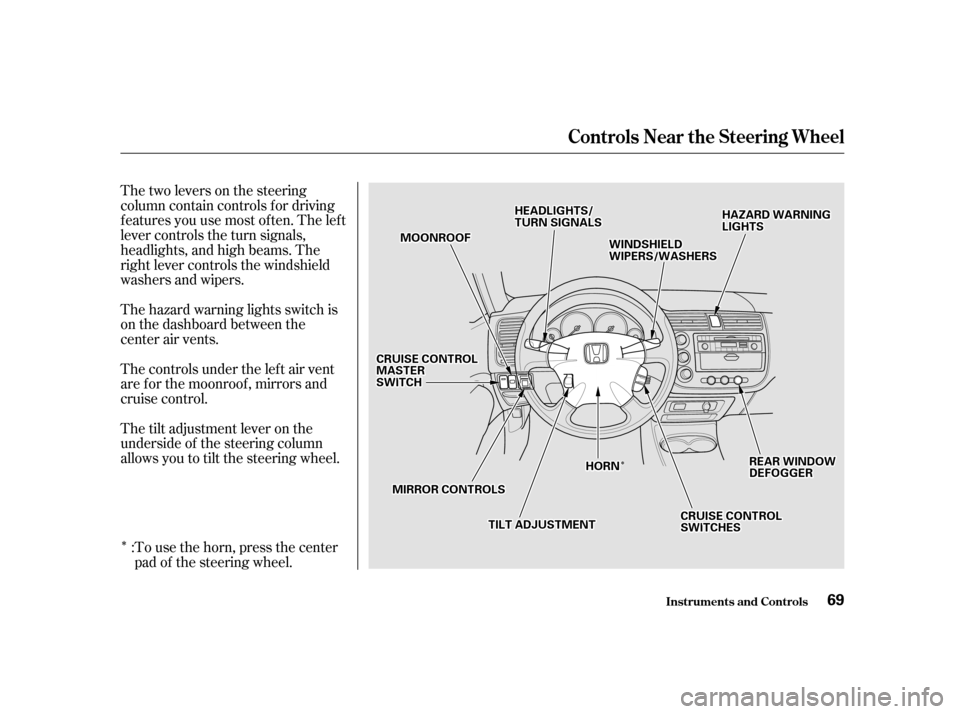
Thetwoleversonthesteering
column contain controls f or driving
f eatures you use most of ten. The lef t
lever controls the turn signals,
headlights, and high beams. The
right lever controls the windshield
washers and wipers.
The hazard warning lights switch is
on the dashboard between the
center air vents.
The controls under the lef t air vent
are f or the moonroof , mirrors and
cruise control.
The tilt adjustment lever on the
underside of the steering column
allows you to tilt the steering wheel.
To use the horn, press the center
pad of the steering wheel.
:
Controls Near the Steering Wheel
Inst rument s and Cont rols
69
HHAAZZAARRDDWWAARRNNIINNGGLLIIGGHHTTSSMMOOOONNRROOOOFF
TTIILLTTAADDJJUUSSTTMMEENNTT
WWIINNDDSSHHIIEELLDDWWIIPPEERRSS//WWAASSHHEERRSS
MMIIRRRROORRCCOONNTTRROOLLSS
RREEAARRWWIINNDDOOWWDDEEFFOOGGGGEERR
HHEEAADDLLIIGGHHTTSS//TTUURRNNSSIIGGNNAALLSS
CCRRUUIISSEECCOONNTTRROOLLSSWWIITTCCHHEESS
CCRRUUIISSEECCOONNTTRROOLLMMAASSTTEERRSSWWIITTCCHH
HHOORRNN
Page 96 of 319
Usetheswitchesonthedashboard
under the lef t vent to operate the
moonroof . The ignition must be ON
(II).To lif t the rear of the moonroof f or
ventilation, push the button.
To slide the moonroof back, push
the switch. Hold it until the
moonroof reaches the desired
position, then release the switch.
To close the moonroof , press and
hold the switch.
On U.S. EX model
Inst rument s and Cont rols
Moonroof
97
Opening or closing the
moonroof on someone’s hands
or fingers can cause seriousinjury.
Make sure all hands and fingers
are clear of the moonroof
before opening or closing it.
If you try to open the moonroof in
below-f reezing temperatures, or when
it is covered with snow or ice, you can
damage the moonroof panel or motor.
Page 97 of 319

position. This turns of f the
adjustment sw")
Push the appropriate edge of the
adjustment switch to move the
mirrorright,left,up,ordown.
When you f inish, move the
selector switch to the center (off)
position. This turns of f the
adjustment switch so you can’t
move a mirror out of position by
accidentally bumping the switch.
Adjust the outside mirrors with the
adjustment switch on the lef t side of
the dashboard:
Turn the ignition switch ON (II).
Move the selector switch to L
(driver’s side) or R (passenger’s
side).
Keeptheinsideandoutsidemirrors
clean and adjusted f or best visibility.
Be sure to adjust the mirrors bef ore
you start driving.
The inside mirror has day and night
positions. The night position reduces
glare f rom headlights behind you.
Flip the tab on the bottom edge of
the mirror to select the day or night
position.
3. 4.
1. 2.OnLXandEXmodelsintheU.S.,and LX model in Canada
Inst rument s and Cont rols
Mirrors
Adjusting the Power Mirrors
98
SSEELLEECCTTOORRSSWWIITTCCHH
TTAABB
AADDJJUUSSTTMMEENNTTSSWWIITTCCHH
Page 106 of 319
Air f lows f rom the def roster
vents at the base of the windshield. Air f low is divided between
the f loor vents and the def roster
vents at the base of the windshield. Air f lows f rom the f loor
vents. Air f low is divided between
the vents in the dashboard and the
f loor vents. Air flows from the center
and corner vents in the dashboard.
Use the MODE control dial to select
the vents the air flows from. Some
air will f low f rom the dashboard
vents in all modes.
When you select , the system
automatically switches to Fresh Air
mode.When you select or ,
the system automatically switches to
Fresh Air mode and turns on the
A/C.
Heating and Cooling
Comf ort and Convenience Feat ures
Mode Control Dial
107
Page 107 of 319
This section covers how to set up the
system controls f or ventilation,
heating, cooling, dehumidif ying, and
def rosting.
The engine must be running f or the
heater and air conditioning to
generate hot and cold air. The heater
uses engine coolant to warm the air.
If the engine is cold, it will be several
minutes bef ore you f eel warm air
coming from the system.
You can adjust the direction of the
air coming f rom the dashboard vents
by moving the tab in the center of
each vent up-and-down and side-to-
side. The air conditioning does not rely on
engine temperature.
The vents in the corners of the
dashboard can be opened and closed
with the dials underneath them.
Heating and Cooling
Comf ort and Convenience Feat ures
Vent Controls
How to Use the System
108
CCEENNTTEERRVVEENNTTSSIIDDEEVVEENNTT
OOppeennCClloossee
Page 161 of 319
Shift to Park or Neutral and set
the parking brake. Pull the hood
release handle located under the
lower lef t corner of the dashboard.
The hood will pop up slightly.Standing in f ront of the car, put
your f ingers under the f ront edge
of the hood to the right of center.
Slide your hand to the lef t until
you f eel the hood latch handle.
Push this handle up until it
releases the hood. Lif t the hood.
Screw the f uel f ill cap back on,
tighten it until it clicks several
times. If you do not properly
tighten the cap, the Malfunction
Indicator Lamp may come on (see
page ).
Push the f uel f ill door closed until
it latches.
1. 2.
5. 6.
277
Service Station Procedures
Bef ore Driving Opening the Hood
162
HHOOOODDRREELLEEAASSEEHHAANNDDLLEE
LLAATTCCHH

.To lif t the rear of the moonroof f or
ventilation, push the button.
To slide the moonroof bac")


