Page 5 of 394
iii
Section
3
Comfort Controls and Audio Systems
Section
4
Your Driving and the Road
Section
5
Table of Contents (cont'd)
Your Driving, the Road and Your Vehicle
Defensive Driving
Drunken Driving
Control of a Vehicle
Braking
SteeringDriving Tips for Various Road Conditions
Off-Road Driving
Recreational Vehicle Towing
Loading Your Vehicle
Towing a Trailer Heating and Air Conditioning
Setting the Radio ClockRadio/Cassette Player/CD Player
Radio Theft-Deterrent Feature
Hazard Warning Flashers
Jump Starting
Towing Your VehicleEngine Overheating
Changing a Flat Tire
If You're Stuck
Problems on the Road
Page 141 of 394

2-54
OnStar Services Button: Press this button once to
contact an advisor who will be able to assist you with
these services. If you are not quickly connected, the
system will automatically reset and redial. This ensures
connection to the center; there is no additional action
required. Press the Call Answer/End button to cancel the
automatic redial.
Emergency Button: In an emergency situation,
press the emergency service button. Upon receiving the
call, an advisor at the center will locate your vehicle and
assess the situation. If necessary, the advisor will alert
the nearest emergency service provider.
Call ANSWER/END Button: Use this button
to answer a call. (If you are receiving a call, the audio
system will mute, and the ring will be heard). Press this
button at the end of a call to disconnect and return the
audio system to its previous settings. This button will
also cancel a call if one of the buttons is accidentally
pressed or if the automatic redial function is activated.Volume Control: You can control the volume of the
OnStar System using either the volume control knob
on the radio or using the steering wheel controls,
if equipped.
Telltale Light: This light will indicate the status of
the system. A solid green light will come on when you
start the vehicle to let you know that the system is on
and is ready to make or receive calls.
If the light blinks green it means that an incoming or
outgoing call is in progress. Press the Call
ANSWER/END button if you notice the light blinking
and you are not on a call.
The light will be red in the event of an OnStar system
malfunction. If this occurs press the OnStar button to
attempt to contact an advisor. If the connection is made,
the advisor will assist you with steps to take to make
sure that the system is functioning properly. If you
cannot contact the advisor, take your vehicle to your
dealership as soon as possible for assistance.
Page 150 of 394
2-63
The main components of your instrument panel are the following:
A. Dome Lamp Override Switch
B. Lamp Controls
C. Air Outlets
D. Storage Compartment
E. Multifunction Lever
F. Instrument Panel Cluster
G. Shift Lever
H. Tow/Haul Switch
I. Audio System
J. Comfort Control System
K. Instrument Panel Fuse BlockL. Hood Release
M. Audio Steering Wheel Controls
N. Center Instrument Panel Utility Block
O. Tilt Lever
P. Parking Brake Release
Q. Secondary Information Center (SIC)
R. Rear Window Defogger Switch
S. Compact Disc Changer
T. Ashtray
U. Accessory Power Outlet
V. Glovebox
Page 176 of 394
3-
3-1
Section 3 Comfort Controls and Audio Systems
In this section, you'll find out how to operate the comfort control and audio systems offered with your vehicle.
Be sure to read about the particular systems supplied with your vehicle.
3
-2 Comfort Controls
3
-2 Electronic Climate Control System
3
-8 Air Conditioning
3
-8 Heating
3
-9 Defogging and Defrosting
3
-9 Rear Window Defogger
3
-10 Ventilation System
3
-11 Audio Systems
3
-11 Setting the Clock
3
-11 AM-FM Stereo with Cassette Tape Player3
-16 Rear Seat Audio (RSA)
3
-18 Compact Disc Changer
3
-21 Theft-Deterrent Feature
3
-23 Audio Steering Wheel Control
3
-24 Understanding Radio Reception
3
-24 Tips About Your Audio System
3
-25 Care of Your Cassette Tape Player
3
-26 Care of Your Compact Discs
3
-26 Care of Your Compact Disc Changer
3
-26 Fixed Mast Antenna
Page 186 of 394

3-11
Ventilation Tips
�Keep the hood and front air inlet free of ice, snow or
any other obstruction (such as leaves). The heater
and defroster will work far better, reducing the
chance of fogging the inside of your windows.
�When you enter a vehicle in cold weather, turn the
fan knob all the way to the right for a few moments
before driving. This helps clear the intake ducts of
snow and moisture, and reduces the chance of
fogging the inside of your windows.
�Keep the air path under the front seats clear of
objects. This helps air to circulate throughout
your vehicle.
�The use of hood air deflectors may adversely
affect the performance of the heating and air
conditioning system.Audio Systems
Your audio system has been designed to operate easily
and give years of listening pleasure. You will get the
most enjoyment out of it if you acquaint yourself with it
first. Find out what your audio system can do and how
to operate all its controls, to be sure you're getting the
most out of the advanced engineering that went into it.
Your vehicle has a feature called Retained Accessory
Power (RAP). With RAP, you can play your audio
system even after the ignition is off. See ªRetained
Accessory Powerº in the Index.
Setting the Clock
Press and hold HR until the correct hour appears on the
display. Press and hold MN until the correct minute
appears on the display. To display the clock with the
ignition off, press RECALL or HR/MN and the time
will be displayed for a few seconds. There is an initial
two
-second delay before the clock goes into the
time
-set mode.
Page 187 of 394

3-12 AM-FM Stereo with Cassette Tape Player
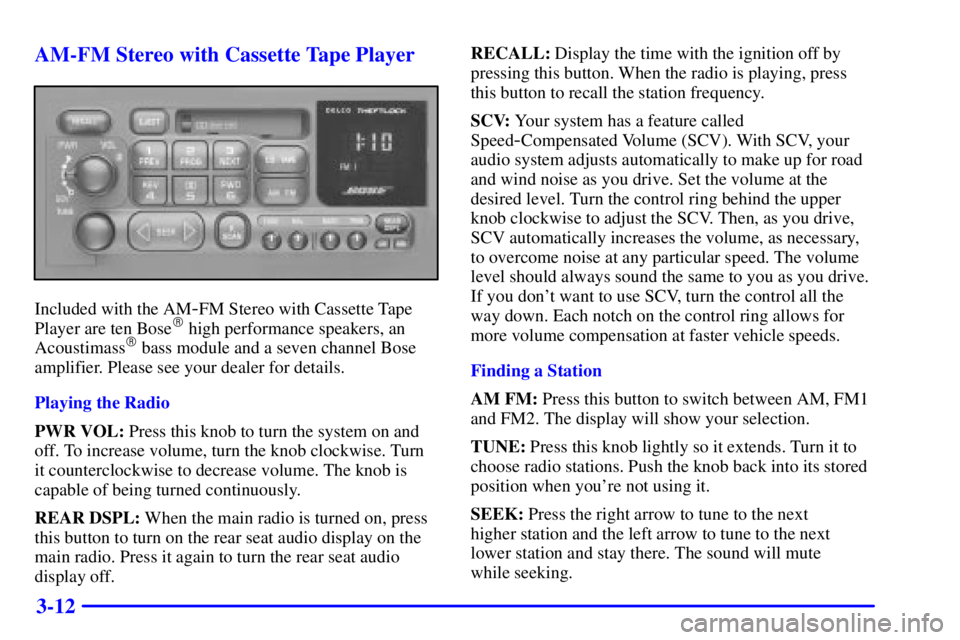
Included with the AM-FM Stereo with Cassette Tape
Player are ten Bose� high performance speakers, an
Acoustimass� bass module and a seven channel Bose
amplifier. Please see your dealer for details.
Playing the Radio
PWR VOL: Press this knob to turn the system on and
off. To increase volume, turn the knob clockwise. Turn
it counterclockwise to decrease volume. The knob is
capable of being turned continuously.
REAR DSPL: When the main radio is turned on, press
this button to turn on the rear seat audio display on the
main radio. Press it again to turn the rear seat audio
display off.RECALL: Display the time with the ignition off by
pressing this button. When the radio is playing, press
this button to recall the station frequency.
SCV: Your system has a feature called
Speed
-Compensated Volume (SCV). With SCV, your
audio system adjusts automatically to make up for road
and wind noise as you drive. Set the volume at the
desired level. Turn the control ring behind the upper
knob clockwise to adjust the SCV. Then, as you drive,
SCV automatically increases the volume, as necessary,
to overcome noise at any particular speed. The volume
level should always sound the same to you as you drive.
If you don't want to use SCV, turn the control all the
way down. Each notch on the control ring allows for
more volume compensation at faster vehicle speeds.
Finding a Station
AM FM: Press this button to switch between AM, FM1
and FM2. The display will show your selection.
TUNE: Press this knob lightly so it extends. Turn it to
choose radio stations. Push the knob back into its stored
position when you're not using it.
SEEK: Press the right arrow to tune to the next
higher station and the left arrow to tune to the next
lower station and stay there. The sound will mute
while seeking.
Page 191 of 394

3-16 Rear Seat Audio (RSA)
This feature allows rear seat passengers to listen to and
control any of the music sources, including AM FM,
cassette tapes and CDs, through the Rear Seat Audio
(RSA) controller. However, the rear seat passengers
can only control the music sources that the front seat
passengers are not listening to. For example, rear seat
passengers may listen to a cassette tape through
headphones and have control over the cassette tape
playing while the driver listens to the radio through the
front speakers. If rear seat passengers choose to listen
to the radio while the driver is listening to the radio they
will not be able to control the radio.The rear seat passengers have control of the volume for
each set of headphones. Be aware that the front seat
audio controls always have priority over the RSA
controls. If the front seat passengers switch the source
for the main radio to a remote source, the RSA will play
the same remote source. The rear speakers will be muted
when the RSA power is turned on. You may operate the
RSA functions even when the main radio is off.
The following function is controlled by the knob on the
main radio:
PWR VOL: Push this knob twice to turn RSA off.
The following functions are controlled by the RSA
system buttons:
PWR: Press this button to turn RSA on or off.
VOL: Press this knob lightly so it extends. Turn
the knob clockwise to increase volume and
counterclockwise to decrease volume. Push the knob
back into its stored position when you're not using it.
The upper VOL knob controls the upper headphone and
the lower VOL knob controls the lower headphone.
Page 198 of 394
3-23 Audio Steering Wheel Controls
If your vehicle has this feature, you can control certain
radio functions using the buttons on your steering wheel.
PROG: Press this
button to play a station
you have programmed
on the radio preset
buttons on the selected
band. If a cassette tape
is playing, press this
button to play the
other side of the tape.
If a compact disc is playing in the console
-mounted CD
changer, press this button to go to the next available CD.SEEK: Press the up arrow to tune to the next radio
station and the down arrow to tune to the previous
radio station.
If a cassette tape or compact disc is playing, the player
will advance forward with the up arrow to the next track
or backward with the down arrow to the previous track.
MUTE: Press this
button to silence the
system. Press it again
to turn on the sound.
VOL: Press the up or down arrow to increase or
decrease volume.