Page 1 of 24
Quick Start Ð How to get going 2
Introduction 4
Description 7
Operating Instructions 16
Videocassette Player Display Messages 20
In-Home Use 23
All rights reserved. Reproduction by any means, electronic or mechanical
including photocopying, recording or by any information storage and retrieval
system or translation in whole or part is not permitted without written
authorization from Ford Motor Company. Ford may change the contents without
notice and without incurring obligation.
Copyright 2000 Ford Motor Company
Table of contents
1
Page 4 of 24

Your AutoVisiontSystem allows you to watch movie rentals and your
favorite home videocassettes. It also allows you to plug in and play a
variety of standard video games. Please review this user manual to
become familiar with the AutoVisiontfeatures and controls as well as
the very important safety information.
Should you have any questions regarding your AutoVisiontSystem, please
feel free to call the toll free assistance hotline at 1 (877) 848±6434.
SAFETY INFORMATION
Read all of the safety and operating instructions before operating the
system and retain for future reference.
Do not attempt to service, repair or modify the AutoVisiontSystem. See
your Ford or Lincoln Mercury dealer.
Do not insert foreign objects into the videocassette player (VCP) tape
cassette compartment.
The front glass on the liquid crystal display may break when hit
with a hard surface. If the glass breaks, do not touch the liquid
crystalline material. In case of contact with skin, wash immediately
with soap and water.
The driver must not attempt to operate any function of the floor
console mounted VCP while the vehicle is in motion. Give full
attention to driving and to the road. Pull off the road and park in a
safe place before inserting or extracting video tapes from the VCP. A
remote control is included in the system to allow the rear seat
occupants to operate the VCP functions without distracting the driver.
Be sure to review User Manuals for video games and video game
equipment when used as auxiliary inputs for your AutoVisiontSystem.
Do not operate video games or video equipment if the power cords
and/or cables are broken, split or damaged. Carefully place cords and/or
cables where they will not be stepped on or interfere with the operation
of seats and/or compartments.
Disconnect video games and video equipment power cords and/or cables
when not in use.
Avoid touching auxiliary input jacks with your fingers. Do not blow on
them or allow them to get wet or dirty.
Introduction
4
Page 7 of 24

AUTOVISIONTSYSTEM
Features
²2±head hi-fi playback
²AutoPlay feature
²Digital auto tracking
²Dual stereo headphone with electric volume control
²Self docking connection for easy mobile installation
²Latching system for secure safety
²Carrying handle for portability
²Water resistant tape door
²On screen display
²Protection circuits
Playback and format
²The videocassette player of your AutoVisiontsystem can only be used
in the ªplaybackº mode. You are not able to record with your system.
²The system plays standard videocassettes marked ªVHSº (or ªS-VHS).
VCP PROTECTION CIRCUITS
Tape protection circuit
²When the system is in PAUSE mode, the tape mechanism will
continue to create tension on the tape.
²When the VCP is in still playback, FFWD (fast forward) or REW
(reverse) mode for more than five minutes, the tape protection circuit
automatically returns the system to PLAY mode to avoid damage to
the tape.
Your AutoVision System is also equipped with a Dew sensor circuit and a
High/low temperature sensor circuit. For more information on these
circuits, please refer toHumidity and moisture condensationand
Temperature extremesin the Introduction chapter.
Description
7
Page 8 of 24
VCP CONTROLS
1.LEDdisplay
The display lamp will light up in green when power is supplied to the
videocassette player.
2.POWERkey
Press to toggle between ON/OFF. When the power is ON, other keys
(PLAY, FF, REW, STOP) will illuminate.
3.PLAYkey
Press to playback a videocassette tape.
4.REWIND/REVIEWbutton
Press to enter the reverse picture mode when in PLAYBACK mode. If in
STOP mode, the tape will rewind at a high speed.
5.FAST FORWARD/CUEbutton
Press to enter forward picture search mode when in PLAYBACK mode. If
in STOP mode, the tape will fast-forward at a high speed.
6.STOPbutton
Press to stop the tape.
7.HEADPHONE VOLUME UP/DOWN KEYSbutton
For home use only, please refer to theIn-Home Usesection.
8.EJECTbutton
Located inside the videocassette cover. Press to eject the tape.
18
3
54672
Description
8
Page 11 of 24

When replacing batteries, use two new batteries (alkaline recommended)
and install with correct orientation (+ and þ polarities). Ensure that you
use only new batteries of the same brand.
If you will not be using the remote control for a considerably long time,
remove the batteries.
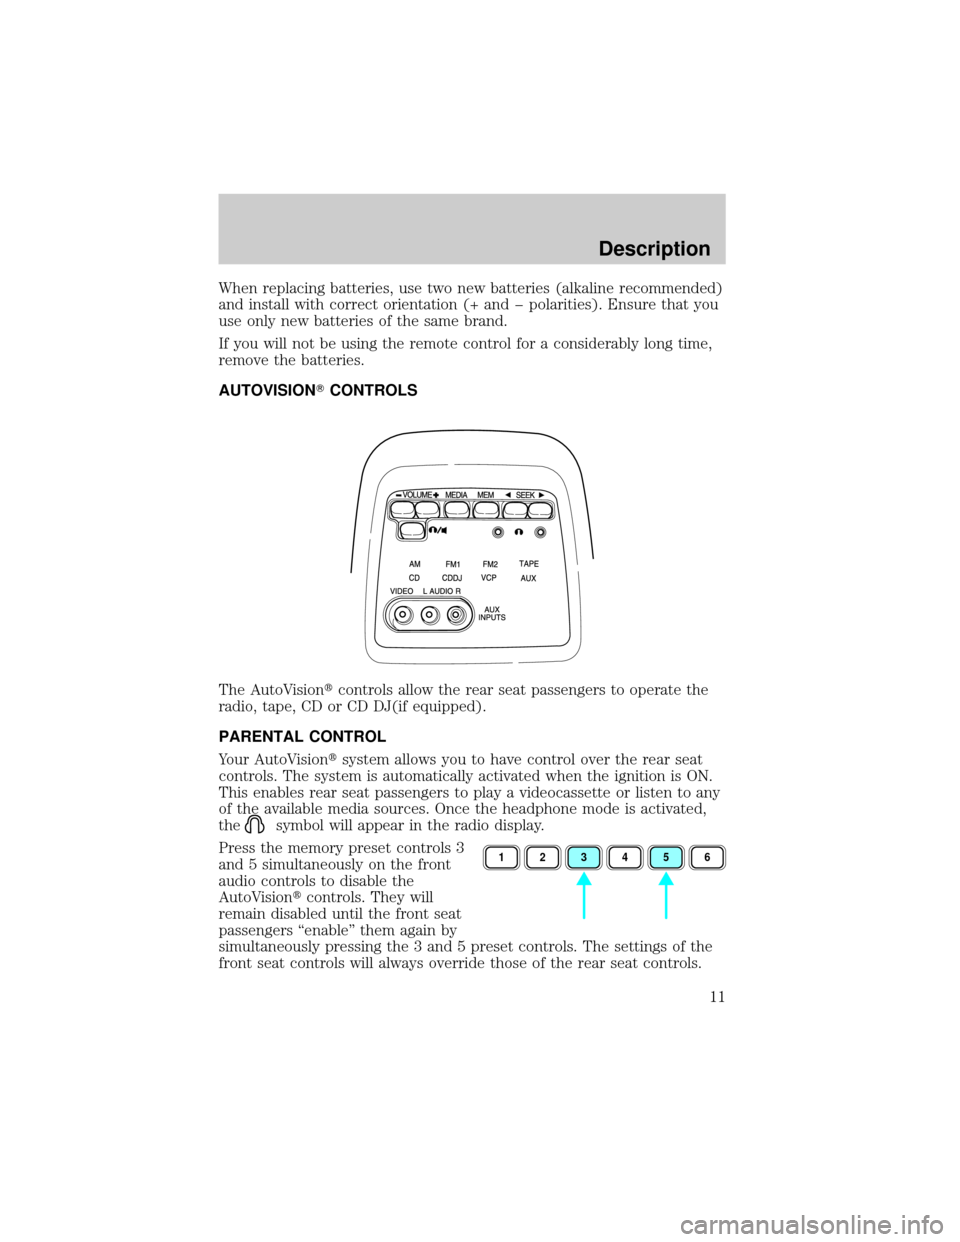
AUTOVISIONTCONTROLS
The AutoVisiontcontrols allow the rear seat passengers to operate the
radio, tape, CD or CD DJ(if equipped).
PARENTAL CONTROL
Your AutoVisiontsystem allows you to have control over the rear seat
controls. The system is automatically activated when the ignition is ON.
This enables rear seat passengers to play a videocassette or listen to any
of the available media sources. Once the headphone mode is activated,
the
symbol will appear in the radio display.
Press the memory preset controls 3
and 5 simultaneously on the front
audio controls to disable the
AutoVisiontcontrols. They will
remain disabled until the front seat
passengers ªenableº them again by
simultaneously pressing the 3 and 5 preset controls. The settings of the
front seat controls will always override those of the rear seat controls.
123456
Description
11
Page 15 of 24
FLIP-DOWN SCREEN
The screen rotates down to view
and up into the housing to store
when not in use. Ensure that the
screen is latched into the housing
when being stored.
1. 6.4º (diagonal) color liquid crystal display (LCD) screen.
2. Screen housing.
3. Dimmer switch. Rotate to increase/decrease the brightness of the
screen.
13
2
Description
15
Page 20 of 24
INDICATIONS ON THE VCP
The operation and status of the VCP can be checked by the indications
appearing on the LED display.
1. ThePower indicatorflashes on
during POWER ON and will blink
when in emergency mode.
2. TheHI-FI indicatorilluminates
when a HI-FI tape is loaded.
3. TheHP1 inciatorilluminates
when the headphone jack 1 is
plugged in.
4. TheHP2 indicatorilluminates
when the headphone jack 2 is
plugged in.
5. TheOperation indicatorsilluminate when the system is powered
ON, a HIFI tape is being played, or headphones are being used.
The following are some possible messages that may illuminate on your
LED display and their meanings.
Illuminates when there is a
videocassestte in the system during
power off.
Illuminates when there is a
videocassette in the system during
power on.
Illuminates when a videocassette is
ejected from the system.
Flashes during emergency mode.
43
215
Videocassette Player Display Messages
20
Page 21 of 24
Illuminates during power on when
there is not a videocassette present
in the system.
Illuminates during power off when
there is not a cassette present in
the system.
Illuminates when the videocassette
is in REW (rewind) mode.
Illuminates when the videocassette
is in FF (fast forward) mode.
Illuminates when the videocassette
is in STIL (pause) mode.
Illuminates when the videocassette
is in PLAY mode.
Illuminates when the videocassette
is in REV (review) mode.
Illuminates when the videocassette
is in CUE mode.
Videocassette Player Display Messages
21