Page 17 of 24

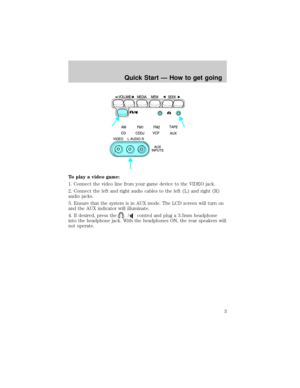
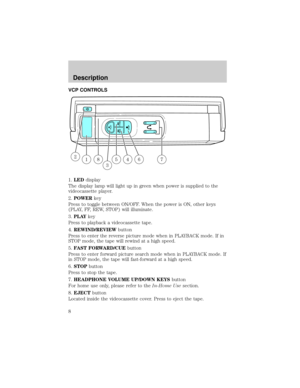
To play a video game
1. Connect the video line from your video game device to the YELLOW
jack.
2. Connect the left and right audio cables to the WHITE and RED jacks
respectively.
3. Ensure that the system is in AUX mode. The LCD screen will turn on
and the AUX indicator will illuminate.
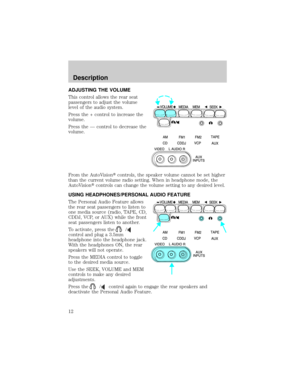
On-screen indicators
Playback operation
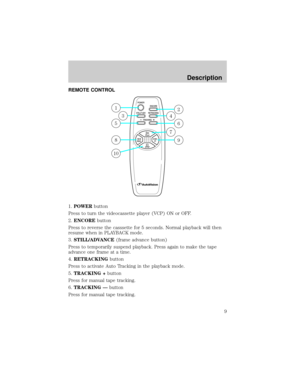
1. Press the POWER control on the VCP.
2. Insert a videocassette into the VCP.
3. The videocassette should automatically begin playback, and the
picture will appear within approximately nine seconds.
4. Press the STOP control to stop playback or press EJECT to remove
the cassette.
Fast-forward or rewind (no picture)
1. Press the FF/REW control on the VCP.
2. Press the STOP control to stop or press EJECT to remove the
cassette.
The tape will fast forward or rewind until it has reached the end or the
beginning.
Fast-forward or rewind (with picture)
1. While in playback mode, momentarily press the FF/REW key. The VCP
will search the playback direction five times faster than normal playback
mode.
2. Press the PLAY key to resume normal playback.
Operating Instructions
17
Page 18 of 24

1. Press the STILL/F.ADV key while in playback mode. The playback
picture becomes still.
2. Press the STILL/F.ADV k")
Special effects playback
Still playback/ Frame-to-frame playback (on remote control)
1. Press the STILL/F.ADV key while in playback mode. The playback
picture becomes still.
2. Press the STILL/F.ADV key again. Each time the control is pressed,
the pictures are played back one frame at a time.
The still playback feature can also be used in REW (reverse) mode.
If still playback/or frame-to-frame playback is engaged for five minutes or
longer, the VCP will automatically begin playback to protect the tape.
Automatic tracking is automatically activated the moment the VCP is
turned ON or a cassette is inserted.
If a videocassette is in poor shape (i.e., badly recorded), any tracking
adjustment may result in failure. The VCP will eject the videocassette.
Encore (on remote control)
²Press the ENCORE control while in playback mode.
The VCP will reverse to the previous five seconds of the selection and
then operate at normal playback mode.
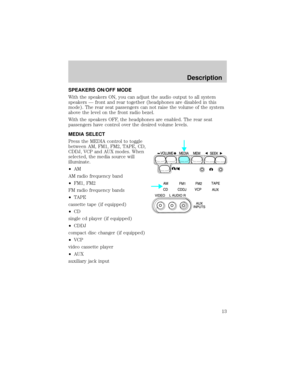
AUXILIARY INPUT JACKS
The auxiliary input jacks on the
AutoVisiontcontrol panel accepts
video and audio connectors for all
standard video games (Nintendot,
PlayStationt, etc.) Other compatible
devices such as DVD players,
camcorders and portable CD players
can also be connected to the
auxiliary jacks.
The auxiliary jack is color-coded for
identification purposes. They are as
follows:
²YELLOW (1)Ð video input
²WHITE (2)Ð left channel audio
input
²RED (3)Ð right channel audio
input
321
Operating Instructions
18
Page 19 of 24
Press the MEDIA control until AUX is illuminated in the control panel.
This will allow you to view the video and listen to the audio from the
auxiliary input.
To listen to another audio source while viewing video from the auxiliary
input, press the MEDIA control until the desired media source is
illuminated.
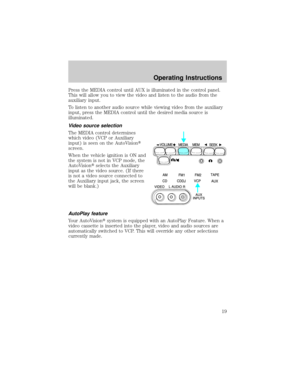
Video source selection
The MEDIA control determines
which video (VCP or Auxiliary
input) is seen on the AutoVisiont
screen.
When the vehicle ignition is ON and
the system is not in VCP mode, the
AutoVisiontselects the Auxiliary
input as the video source. (If there
is not a video source connected to
the Auxiliary input jack, the screen
will be blank.)
AutoPlay feature
Your AutoVisiontsystem is equipped with an AutoPlay Feature. When a
video cassette is inserted into the player, video and audio sources are
automatically switched to VCP. This will override any other selections
currently made.
Operating Instructions
19
Page 20 of 24
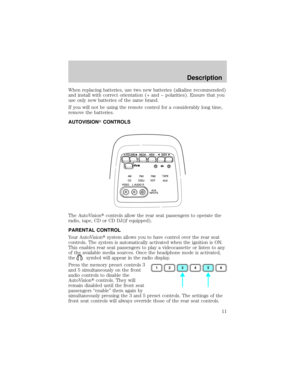
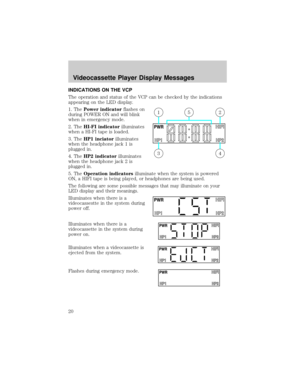
INDICATIONS ON THE VCP
The operation and status of the VCP can be checked by the indications
appearing on the LED display.
1. ThePower indicatorflashes on
during POWER ON and will blink
when in emergency mode.
2. TheHI-FI indicatorilluminates
when a HI-FI tape is loaded.
3. TheHP1 inciatorilluminates
when the headphone jack 1 is
plugged in.
4. TheHP2 indicatorilluminates
when the headphone jack 2 is
plugged in.
5. TheOperation indicatorsilluminate when the system is powered
ON, a HIFI tape is being played, or headphones are being used.
The following are some possible messages that may illuminate on your
LED display and their meanings.
Illuminates when there is a
videocassestte in the system during
power off.
Illuminates when there is a
videocassette in the system during
power on.
Illuminates when a videocassette is
ejected from the system.
Flashes during emergency mode.
43
215
Videocassette Player Display Messages
20
Page 21 of 24
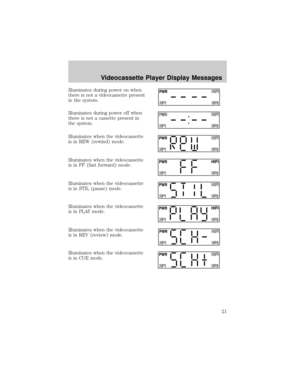
Illuminates during power on when
there is not a videocassette present
in the system.
Illuminates during power off when
there is not a cassette present in
the system.
Illuminates when the videocassette
is in REW (rewind) mode.
Illuminates when the videocassette
is in FF (fast forward) mode.
Illuminates when the videocassette
is in STIL (pause) mode.
Illuminates when the videocassette
is in PLAY mode.
Illuminates when the videocassette
is in REV (review) mode.
Illuminates when the videocassette
is in CUE mode.
Videocassette Player Display Messages
21
Page 22 of 24
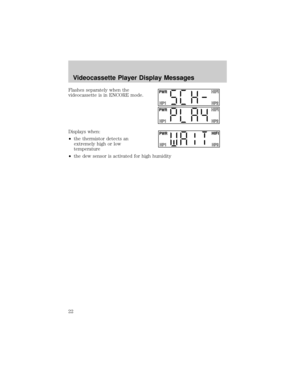
Flashes separately when the
videocassette is in ENCORE mode.
Displays when:
²the thermistor detects an
extremely high or low
temperature
²the dew sensor is activated for high humidity
Videocassette Player Display Messages
22
Page 23 of 24

IN-HOME USE
Your AutoVisiontsystem is UL registered for in-home use. This system
has the unique feature of also being a completely portable and able to be
used in your home.
To remove your AutoVisiontsystem from your vehicle, depress the lever
on the center console labeled VCP RELEASE. This will release the VCP
and enable you to remove the system from the vehicle. If pressing the
lever does not release your system, please contact your dealer.
To re-install the VCP in your vehicle, insert the VCP into the console and
push lightly until the VCP clicks into place.
To use the AutoVisiontsystem in your home, you will need:
²12 V DC power converter rated for 1.5 amps/min
²Patch cords with RCA style connectors
These parts are available in your local electronics store or call toll free
1 (877) 848±6434 for assistance.
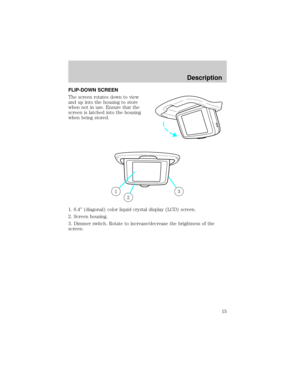
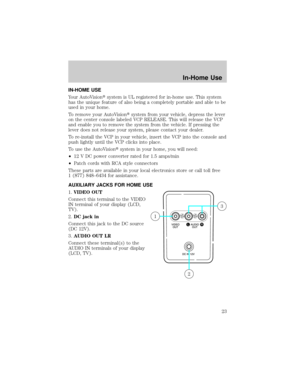
AUXILIARY JACKS FOR HOME USE
1.VIDEO OUT
Connect this terminal to the VIDEO
IN terminal of your display (LCD,
TV).
2.DC jack in
Connect this jack to the DC source
(DC 12V).
3.AUDIO OUT LR
Connect these terminal(s) to the
AUDIO IN terminals of your display
(LCD, TV).
2
1
3
In-Home Use
23
Page 24 of 24
1.VIDEO IN
Connect this terminal to the AUDIO
OUT terminal of your other
apparatus (DVD, game machine,
etc.).
2.AUDIO IN LR
Connect these terminal(s) to the
AUDIO OUT terminals of your other
apparatus (DVD, game machine,
etc.).
3.
Plug headphones into these jacks.
2
1
3
In-Home Use
24
Page:
< prev 1-8 9-16 17-24


.
2.AUDIO IN LR
Connect these terminal(s) to the
AUDIO OUT terminals of your other
apparatus")