Page 170 of 240
Transmission fluid level should be checked by your dealer or a qualified
service technician.
If you must add transmission fluid, make sure the correct type of fluid is
being used. The type of fluid used is indicated in your Allison Automatic
Transmission Operator's Manual.
Use of a non-approved automatic transmission fluid may cause
internal transmission component damage.
Manual transmission fluid
Refer to your scheduled maintenance guide for transmission fluid level
checks and fluid change intervals.
Your manual transmission may be filled with an optional synthetic fluid
which allows the use of extended service intervals. A tag on the filler
plug will identify the use of the synthetic fluid.
Use only fluid that meets Ford specifications (refer toLubricant
specificationsin theCapacities and specificationchapter).
Use of a non-approved transmission fluid may cause internal
transmission component damage.
For location of the transmission filler plug, refer to your transmission
operator's manual orTransmission Refill Capacitiesin theCapacities
and specificationschapter.
Check your transmission fluid level using the following procedure:
1. Park the vehicle on level ground.
2. Set the parking brake and shift into 1 (First) and turn the engine off.
3. Clean any dirt from around the filler plug.
4. Remove the filler plug and inspect the fluid level.
5. The fluid level should be up to the bottom of the filler plug opening.
6. If necessary, add enough fluid through the filler plug opening so that
the fluid level is at the bottom of the opening.
7. Clean and install the filler plug securely.
Drain and refill your transmission fluid using the following procedure:
1. Drain the transmission while the fluid is warm.
2. Park the vehicle on level ground.
3. Set the parking brake and shift into 1 (First) and turn the engine off.
Maintenance and care
170
Page 171 of 240
4. Clean any dirt from around the filler and drain plugs.
5. Remove the filler and drain plugs and drain the fluid into a suitable
container. Dispose all used automotive fluids in a responsible manner
following your local authorized standards.
6. Clean and install the drain plug securely.
7. Add enough fluid through the filler plug opening so that the fluid level
is up to the bottom of the opening.
8. Clean and install the filler plug securely.
REAR AXLE LUBRICANT
Refer to your Scheduled Maintenance Guide for rear axle lubricant level
checks and lubricant change intervals.
Your rear axle may be filled with an optional synthetic lubricant which
allows the use of extended service intervals. A tag on the filler plug will
identify the use of the synthetic lubricant.
Use only a lubricant that meets Ford specifications (refer toLubricant
specificationsin theCapacities and specificationchapter).
Use of a non-approved rear axle lubricant may cause internal axle
component damage.
Check your rear axle lubricant level using the following procedure:
1. Park the vehicle on level ground.
2. Set the parking brake and shift into N (Neutral) (automatic
transmission) or 1 (First) (manual transmission) and turn the engine off.
3. Clean any dirt from around the rear axle filler plug.
4. Remove the filler plug and inspect the lubricant level.
5. The lubricant level should be up to the bottom of the filler plug
opening.
6. If necessary, add enough lubricant through the filler plug opening so
that the lubricant level is at the bottom of the opening.
7. Clean and install the filler plug securely.
Drain and refill your rear axle lubricant using the following procedure:
1. Drain the rear axle while the lubricant is warm.
2. Park the vehicle on level ground.
Maintenance and care
171
Page 172 of 240
3. Set the parking brake and shift into N (Neutral) (automatic
transmission) or 1 (First) (manual transmission) and turn the engine off.
4. Clean any dirt from around the rear axle filler and drain plugs.
5. Remove the filler and drain plugs and drain the lubricant into a
suitable container. Dispose all used automotive fluids in a responsible
manner following your local authorized standards.
6. Clean and install the drain plug securely.
7. Add enough lubricant through the filler plug opening so that the
lubricant level is up to the bottom of the opening.
8. Clean and install the filler plug securely.
BATTERY
Your vehicle is equipped with two Motorcraft maintenance-free batteries
which are mounted in a covered tray and located on the left frame rail.
The covered battery tray, depending upon application, may also have one
or two steps attached.
²Covered battery tray shown.
Battery tray with steps similar.
Maintenance and care
172
Page 176 of 240
²Caterpillar 3126 B engine
Replace the air filter element using the following procedure:
1. Set the parking brake and shift into N (Neutral) (automatic
transmission) or 1 (First) (manual transmission) and turn the engine off.
2. Open the hood. Protect yourself from engine heat.
3. Push in and turn the latches that retain the air filter housing cover
counterclockwise 90 degrees, then carefully remove the cover.
4. Carefully remove the air filter element.Use caution to keep dirt
and debris from falling into the engine.A twisting rocking motion
may be needed to break the seal between the filter element and the filter
housing.
Maintenance and care
176
Page 180 of 240
Tires are one of the weaker weight carrying components of the
vehicle. Do not overload the vehicle beyond safe load carrying
capacity.
Avoid hammering rim with steel hammers.
Never run the engine with one wheel off the ground.
Failure to retighten wheel lug nuts as required could allow the
wheel to come off while the vehicle is in motion, possibly causing
loss of vehicle control and collision. Loose wheel studs may also cause
shimmy and vibration.
Use of aftermarket wheel assemblies is not recommended; they
may be incompatible with your vehicle and may result in
equipment failure and possible injury. Replacement with used wheels is
not advised; they may have been treated harshly or have high mileage
and could fail without warning.
A wheel or tire of the wrong size or type may adversely affect
such things as load carrying capacity, wheel and bearing life,
brake cooling, speedometer/odometer calibration, stopping ability,
headlight aim, bumper height, vehicle ground clearance and tire or tire
chain clearance to the body and chassis.
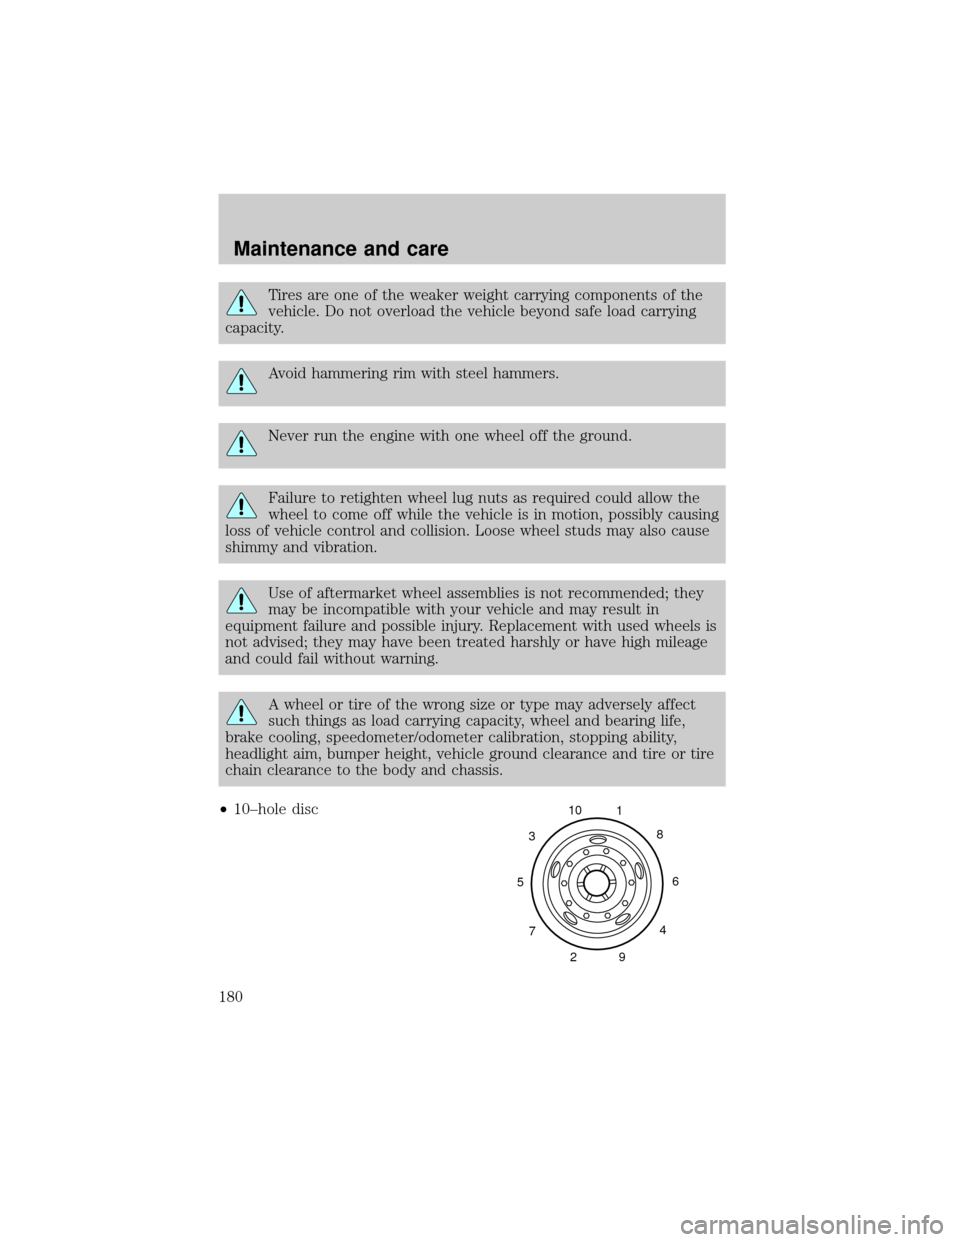
²10±hole disc
5310
1
8
6
4
9 2 7
Maintenance and care
180
Page 182 of 240
Tire inflation pressure must not exceed the recommendations of
the axle, tire and/or wheel rim manufacturer for the specific
load, speed and application. The inflation pressures on the tire sidewall
do not take the wheel rim capabilities into consideration.
Never use a rim of different manufacture or any different size or
type than original rims.
Try to replace tires in pairs on the same axle shaft. Tires larger or
smaller than originally installed may affect the accuracy of the
speedometer. Consult your dealer about the need to change the switch
setting on the back of the speedometer.
Front wheel alignment
If abnormal tire wear or ride and handling characteristics such as vehicle
lead or wander are experienced with properly inflated tires, the front
end alignment should be checked.
Wheel bearing care
Front and rear wheel bearings are adjustable to correct for bearing and
spindle wear. Long bearing life depends upon proper adjustment and
correct lubrication. If bearings are adjusted too tightly (preloaded) they
will overheat and wear rapidly. Loose adjustment will cause pounding
and will contribute to uneven tire wear, steering difficulties and
inefficient brake operation.
Refer to the Ford Service Manual applicable to your vehicle for proper
tightening procedures and torque specifications.
Periodically check the oil level on oil filled front bearing hubs. If
necessary, add oil through the filler plug so the oil level is between the
ADD and FULL marks indicated on the hub. Do not overfill. Overfilling
can result in oil on brake linings.
Refer to your Scheduled Maintenance Guide for fluid level checks and
change intervals for the front hubs.
Your front hubs may be filled with an optional synthetic fluid which
allows use of the extended service intervals. A green colored filler plug
identifies use of the synthetic fluid.
Maintenance and care
182
Page 191 of 240
Keep a record for at least one month and record the type of driving (city
or highway). This will provide an accurate estimate of the vehicle's fuel
economy under current driving conditions. Additionally, keeping records
during summer and winter will show how temperature impacts fuel
economy. In general, lower temperatures give lower fuel economy.
Driving style Ð good driving and fuel economy habits
Give consideration to the lists that follow and you may be able to change
a number of variables and improve your fuel economy.
Habits
²Smooth, moderate operation can yield up to 10% savings in fuel.
²
Steady speeds without stopping will usually give the best fuel economy.
²Anticipate stopping; slowing down may eliminate the need to stop.
²Sudden or hard accelerations may reduce fuel economy.
²Slow down gradually.
²Driving at reasonable speeds (traveling at 88 km/h [55 mph] uses 15%
less fuel than traveling at 105 km/h [65 mph]).
²Using the air conditioner or defroster may reduce fuel economy.
²Resting your foot on the brake pedal while driving may reduce fuel
economy.
Conditions
²Carrying unnecessary weight may reduce fuel economy.
²Fuel economy may decrease with lower temperatures during the first
12±16 km (8±10 miles) of driving.
²Flat terrain driving improves fuel economy over hilly roads.
²Transmissions give their best fuel economy when operated in the top
cruise gear and with steady pressure on the accelerator.
²Close windows for highway driving.
Maintenance and care
191
Page 194 of 240
Replacing brake/tail/backup lamp bulbs
The brake/tail/backup lamp bulbs
are located in the same portion of
the tail lamp assembly. Follow the
same steps to replace either bulb:
1. Remove the four screws and the
lamp lens from lamp assembly.
2. Carefully pull the bulb straight
out of the socket and push in the
new bulb.
3. Install the lens on the lamp
assembly with the four screws.
Replacing foglamp bulbs (if equipped)
1. Remove the bulb socket from the
foglamp by turning
counterclockwise.
2. Disconnect the electrical
connector from the foglamp bulb.
3. Connect the new foglamp bulb to the electrical connector.
4. Install the bulb socket in the foglamp by turning clockwise.
Maintenance and care
194