Page 168 of 240

Adding and replacing engine coolant-Caterpillar 3126 B engine
Refer to the engine operator's manual for additional engine cooling
system information.
FAN CLUTCHES
Your vehicle's cooling system is equipped with a viscous variable speed
fan clutch.
²The fan clutch helps control cooling, increase performance, improve
fuel economy and reduce noise.
²The fan clutch is controlled by bimetallic spring sensors. Do not
tamper with these sensors as this may change their calibration or keep
the fan clutch from operating at all.
Stay clear of the fan/fan area while the engine is running or
possible personal injury may occur.
CHECKING AND ADDING POWER STEERING FLUID
Checking power steering fluid level
Check the power steering fluid level using the following procedure. Refer
to the scheduled maintenance guide for the recommended service
intervals. If adding fluid is necessary, use only MERCONtAT F.
1. Set the parking brake, shift into N
(Neutral) (automatic transmission)
or 1 (First) (manual transmission)
and turn the engine off.
2. Open the hood.
3. Clean the top of the power
steering fluid reservoir.
4. Remove the dipstick from the
reservoir and wipe the dipstick clean.
Maintenance and care
168
Page 170 of 240

Transmission fluid level should be checked by your dealer or a qualified
service technician.
If you must add transmission fluid, make sure the correct type of fluid is
being used. The type of fluid used is indicated in your Allison Automatic
Transmission Operator's Manual.
Use of a non-approved automatic transmission fluid may cause
internal transmission component damage.
Manual transmission fluid
Refer to your scheduled maintenance guide for transmission fluid level
checks and fluid change intervals.
Your manual transmission may be filled with an optional synthetic fluid
which allows the use of extended service intervals. A tag on the filler
plug will identify the use of the synthetic fluid.
Use only fluid that meets Ford specifications (refer toLubricant
specificationsin theCapacities and specificationchapter).
Use of a non-approved transmission fluid may cause internal
transmission component damage.
For location of the transmission filler plug, refer to your transmission
operator's manual orTransmission Refill Capacitiesin theCapacities
and specificationschapter.
Check your transmission fluid level using the following procedure:
1. Park the vehicle on level ground.
2. Set the parking brake and shift into 1 (First) and turn the engine off.
3. Clean any dirt from around the filler plug.
4. Remove the filler plug and inspect the fluid level.
5. The fluid level should be up to the bottom of the filler plug opening.
6. If necessary, add enough fluid through the filler plug opening so that
the fluid level is at the bottom of the opening.
7. Clean and install the filler plug securely.
Drain and refill your transmission fluid using the following procedure:
1. Drain the transmission while the fluid is warm.
2. Park the vehicle on level ground.
3. Set the parking brake and shift into 1 (First) and turn the engine off.
Maintenance and care
170
Page 171 of 240

4. Clean any dirt from around the filler and drain plugs.
5. Remove the filler and drain plugs and drain the fluid into a suitable
container. Dispose all used automotive fluids in a responsible manner
following your local authorized standards.
6. Clean and install the drain plug securely.
7. Add enough fluid through the filler plug opening so that the fluid level
is up to the bottom of the opening.
8. Clean and install the filler plug securely.
REAR AXLE LUBRICANT
Refer to your Scheduled Maintenance Guide for rear axle lubricant level
checks and lubricant change intervals.
Your rear axle may be filled with an optional synthetic lubricant which
allows the use of extended service intervals. A tag on the filler plug will
identify the use of the synthetic lubricant.
Use only a lubricant that meets Ford specifications (refer toLubricant
specificationsin theCapacities and specificationchapter).
Use of a non-approved rear axle lubricant may cause internal axle
component damage.
Check your rear axle lubricant level using the following procedure:
1. Park the vehicle on level ground.
2. Set the parking brake and shift into N (Neutral) (automatic
transmission) or 1 (First) (manual transmission) and turn the engine off.
3. Clean any dirt from around the rear axle filler plug.
4. Remove the filler plug and inspect the lubricant level.
5. The lubricant level should be up to the bottom of the filler plug
opening.
6. If necessary, add enough lubricant through the filler plug opening so
that the lubricant level is at the bottom of the opening.
7. Clean and install the filler plug securely.
Drain and refill your rear axle lubricant using the following procedure:
1. Drain the rear axle while the lubricant is warm.
2. Park the vehicle on level ground.
Maintenance and care
171
Page 172 of 240
3. Set the parking brake and shift into N (Neutral) (automatic
transmission) or 1 (First) (manual transmission) and turn the engine off.
4. Clean any dirt from around the rear axle filler and drain plugs.
5. Remove the filler and drain plugs and drain the lubricant into a
suitable container. Dispose all used automotive fluids in a responsible
manner following your local authorized standards.
6. Clean and install the drain plug securely.
7. Add enough lubricant through the filler plug opening so that the
lubricant level is up to the bottom of the opening.
8. Clean and install the filler plug securely.
BATTERY
Your vehicle is equipped with two Motorcraft maintenance-free batteries
which are mounted in a covered tray and located on the left frame rail.
The covered battery tray, depending upon application, may also have one
or two steps attached.
²Covered battery tray shown.
Battery tray with steps similar.
Maintenance and care
172
Page 176 of 240
²Caterpillar 3126 B engine
Replace the air filter element using the following procedure:
1. Set the parking brake and shift into N (Neutral) (automatic
transmission) or 1 (First) (manual transmission) and turn the engine off.
2. Open the hood. Protect yourself from engine heat.
3. Push in and turn the latches that retain the air filter housing cover
counterclockwise 90 degrees, then carefully remove the cover.
4. Carefully remove the air filter element.Use caution to keep dirt
and debris from falling into the engine.A twisting rocking motion
may be needed to break the seal between the filter element and the filter
housing.
Maintenance and care
176
Page 177 of 240

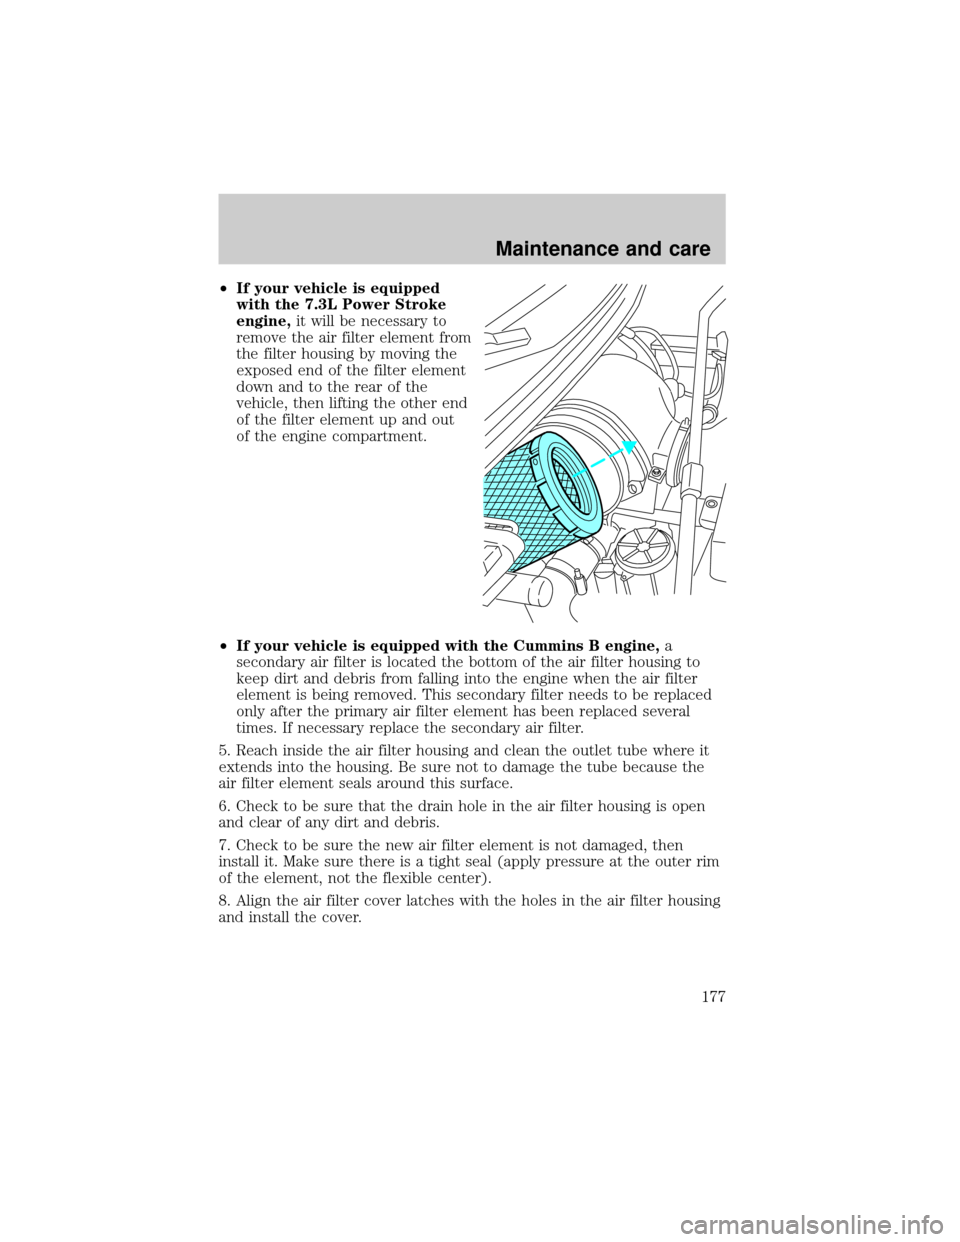
²If your vehicle is equipped
with the 7.3L Power Stroke
engine,it will be necessary to
remove the air filter element from
the filter housing by moving the
exposed end of the filter element
down and to the rear of the
vehicle, then lifting the other end
of the filter element up and out
of the engine compartment.
²If your vehicle is equipped with the Cummins B engine,a
secondary air filter is located the bottom of the air filter housing to
keep dirt and debris from falling into the engine when the air filter
element is being removed. This secondary filter needs to be replaced
only after the primary air filter element has been replaced several
times. If necessary replace the secondary air filter.
5. Reach inside the air filter housing and clean the outlet tube where it
extends into the housing. Be sure not to damage the tube because the
air filter element seals around this surface.
6. Check to be sure that the drain hole in the air filter housing is open
and clear of any dirt and debris.
7. Check to be sure the new air filter element is not damaged, then
install it. Make sure there is a tight seal (apply pressure at the outer rim
of the element, not the flexible center).
8. Align the air filter cover latches with the holes in the air filter housing
and install the cover.
Maintenance and care
177
Page 184 of 240

Observe the following guidelines when handling fuel:
²Extinguish all smoking materials
and any open flames before
fueling your vehicle.
²Always turn off the vehicle before
fueling.
²Automotive fuels can be harmful
or fatal if swallowed. If fuel is
swallowed, call a physician
immediately, even if no symptoms
are immediately apparent. The
toxic effects of fuel may not be visible for hours.
²Avoid inhaling fuel vapors. Inhaling too much fuel vapor of any kind
can lead to eye and respiratory tract irritation. In severe cases,
excessive or prolonged breathing of fuel vapor can cause serious
illness and permanent injury.
²Avoid getting fuel liquid in your eyes. If fuel is splashed in the eyes,
remove contact lenses (if worn), flush with water for 15 minutes and
seek medical attention. Failure to seek proper medical attention could
lead to permanent injury.
²Fuels can also be harmful if absorbed through the skin. If fuel is
splashed on the skin and/or clothing, promptly remove contaminated
clothing and wash skin thoroughly with soap and water. Repeated or
prolonged skin contact with fuel liquid or vapor causes skin irritation.
If you must replace the fuel filler cap, replace it with a genuine
Ford or Motorcraft part. The customer warranty may be void for
any damage to the fuel tank or fuel system if a genuine Ford or
Motorcraft fuel filler cap is not used.
If you do not use the proper fuel filler cap, excessive pressure or
vacuum in the fuel tank may damage the fuel system or cause
the fuel system to work improperly in a collision, which may result in
possible personal injury.
Maintenance and care
184
Page 186 of 240
Fuel filter/water separator
The fuel filter/water separator removes any contaminated particles
and/or water from the fuel before the fuel enters the engine.
The fuel filter/water separator should be drained as recommended in the
Scheduled Maintenance Guide.
Draining the fuel filter/water separatorÐCaterpillar 3126 B engine
1. With the engine off, open the
drain valve located at the bottom of
the fuel filter/water separator by
turning it counterclockwise.
2. Drain the filter until clear fuel is visible.
3. Turn the drain valve clockwise to close the valve. Do not overtighten the
drain valve as this could cause damage to the fuel filter/water separator.
Draining the fuel filter/water separatorÐ7.3L Power Stoke engine
1. With the engine off, open the
drain valve located on the side of
the fuel filter/water separator using
your hand.
2. Drain the filter until clear fuel is visible.
3. Close the drain valve completely.
Maintenance and care
186