2001 FORD F650 service interval
[x] Cancel search: service intervalPage 169 of 240
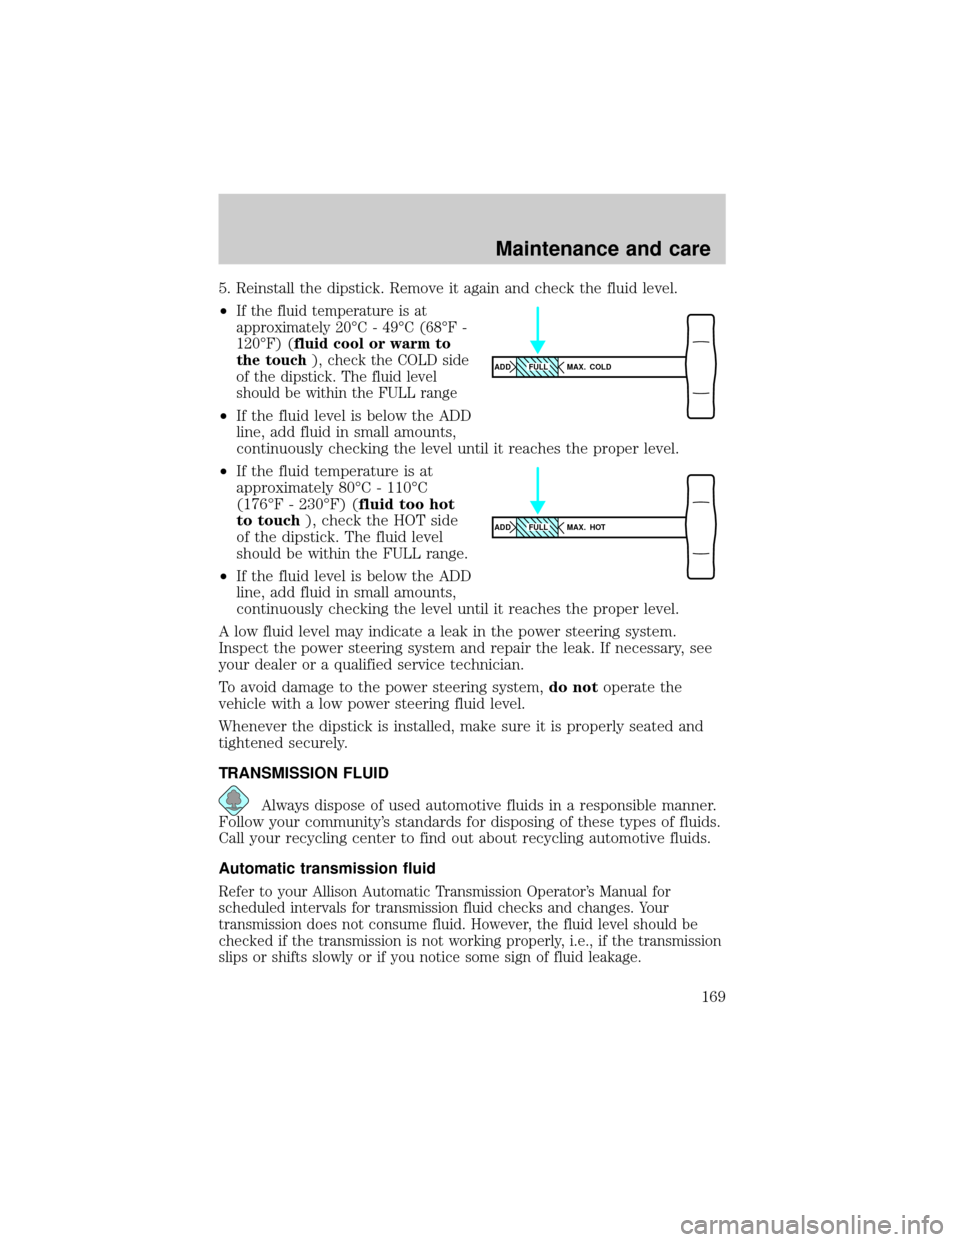
5. Reinstall the dipstick. Remove it again and check the fluid level.
²
If the fluid temperature is at
approximately 20ÉC - 49ÉC (68ÉF -
120ÉF) (fluid cool or warm to
the touch), check the COLD side
of the dipstick. The fluid level
should be within the FULL range
²If the fluid level is below the ADD
line, add fluid in small amounts,
continuously checking the level until it reaches the proper level.
²If the fluid temperature is at
approximately 80ÉC - 110ÉC
(176ÉF - 230ÉF) (fluid too hot
to touch), check the HOT side
of the dipstick. The fluid level
should be within the FULL range.
²If the fluid level is below the ADD
line, add fluid in small amounts,
continuously checking the level until it reaches the proper level.
A low fluid level may indicate a leak in the power steering system.
Inspect the power steering system and repair the leak. If necessary, see
your dealer or a qualified service technician.
To avoid damage to the power steering system,do notoperate the
vehicle with a low power steering fluid level.
Whenever the dipstick is installed, make sure it is properly seated and
tightened securely.
TRANSMISSION FLUID
Always dispose of used automotive fluids in a responsible manner.
Follow your community's standards for disposing of these types of fluids.
Call your recycling center to find out about recycling automotive fluids.
Automatic transmission fluid
Refer to your Allison Automatic Transmission Operator's Manual for
scheduled intervals for transmission fluid checks and changes. Your
transmission does not consume fluid. However, the fluid level should be
checked if the transmission is not working properly, i.e., if the transmission
slips or shifts slowly or if you notice some sign of fluid leakage.
ADD MAX. COLDFULL
ADD MAX. HOTFULL
Maintenance and care
169
Page 170 of 240

Transmission fluid level should be checked by your dealer or a qualified
service technician.
If you must add transmission fluid, make sure the correct type of fluid is
being used. The type of fluid used is indicated in your Allison Automatic
Transmission Operator's Manual.
Use of a non-approved automatic transmission fluid may cause
internal transmission component damage.
Manual transmission fluid
Refer to your scheduled maintenance guide for transmission fluid level
checks and fluid change intervals.
Your manual transmission may be filled with an optional synthetic fluid
which allows the use of extended service intervals. A tag on the filler
plug will identify the use of the synthetic fluid.
Use only fluid that meets Ford specifications (refer toLubricant
specificationsin theCapacities and specificationchapter).
Use of a non-approved transmission fluid may cause internal
transmission component damage.
For location of the transmission filler plug, refer to your transmission
operator's manual orTransmission Refill Capacitiesin theCapacities
and specificationschapter.
Check your transmission fluid level using the following procedure:
1. Park the vehicle on level ground.
2. Set the parking brake and shift into 1 (First) and turn the engine off.
3. Clean any dirt from around the filler plug.
4. Remove the filler plug and inspect the fluid level.
5. The fluid level should be up to the bottom of the filler plug opening.
6. If necessary, add enough fluid through the filler plug opening so that
the fluid level is at the bottom of the opening.
7. Clean and install the filler plug securely.
Drain and refill your transmission fluid using the following procedure:
1. Drain the transmission while the fluid is warm.
2. Park the vehicle on level ground.
3. Set the parking brake and shift into 1 (First) and turn the engine off.
Maintenance and care
170
Page 171 of 240

4. Clean any dirt from around the filler and drain plugs.
5. Remove the filler and drain plugs and drain the fluid into a suitable
container. Dispose all used automotive fluids in a responsible manner
following your local authorized standards.
6. Clean and install the drain plug securely.
7. Add enough fluid through the filler plug opening so that the fluid level
is up to the bottom of the opening.
8. Clean and install the filler plug securely.
REAR AXLE LUBRICANT
Refer to your Scheduled Maintenance Guide for rear axle lubricant level
checks and lubricant change intervals.
Your rear axle may be filled with an optional synthetic lubricant which
allows the use of extended service intervals. A tag on the filler plug will
identify the use of the synthetic lubricant.
Use only a lubricant that meets Ford specifications (refer toLubricant
specificationsin theCapacities and specificationchapter).
Use of a non-approved rear axle lubricant may cause internal axle
component damage.
Check your rear axle lubricant level using the following procedure:
1. Park the vehicle on level ground.
2. Set the parking brake and shift into N (Neutral) (automatic
transmission) or 1 (First) (manual transmission) and turn the engine off.
3. Clean any dirt from around the rear axle filler plug.
4. Remove the filler plug and inspect the lubricant level.
5. The lubricant level should be up to the bottom of the filler plug
opening.
6. If necessary, add enough lubricant through the filler plug opening so
that the lubricant level is at the bottom of the opening.
7. Clean and install the filler plug securely.
Drain and refill your rear axle lubricant using the following procedure:
1. Drain the rear axle while the lubricant is warm.
2. Park the vehicle on level ground.
Maintenance and care
171
Page 173 of 240
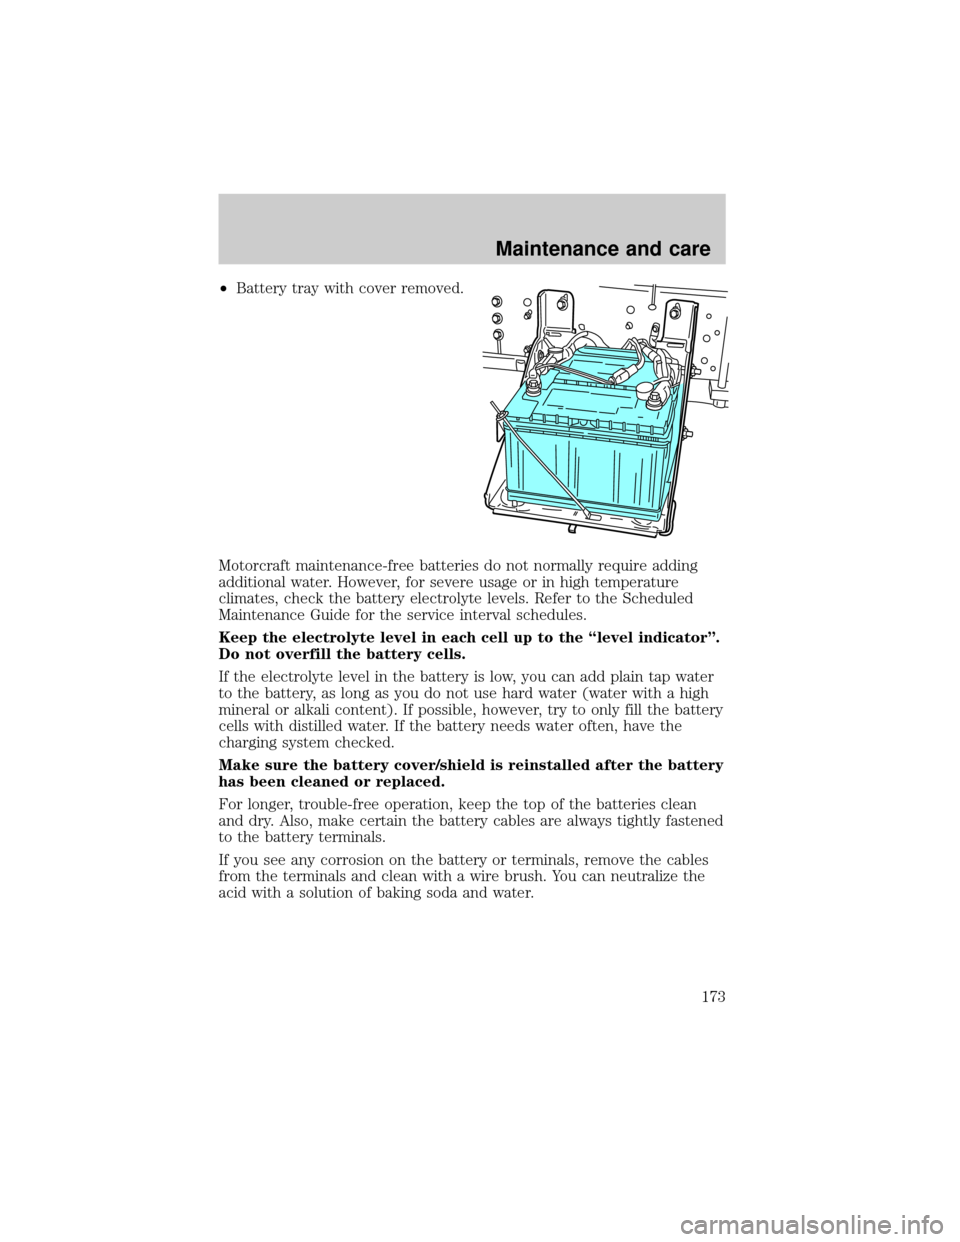
²Battery tray with cover removed.
Motorcraft maintenance-free batteries do not normally require adding
additional water. However, for severe usage or in high temperature
climates, check the battery electrolyte levels. Refer to the Scheduled
Maintenance Guide for the service interval schedules.
Keep the electrolyte level in each cell up to the ªlevel indicatorº.
Do not overfill the battery cells.
If the electrolyte level in the battery is low, you can add plain tap water
to the battery, as long as you do not use hard water (water with a high
mineral or alkali content). If possible, however, try to only fill the battery
cells with distilled water. If the battery needs water often, have the
charging system checked.
Make sure the battery cover/shield is reinstalled after the battery
has been cleaned or replaced.
For longer, trouble-free operation, keep the top of the batteries clean
and dry. Also, make certain the battery cables are always tightly fastened
to the battery terminals.
If you see any corrosion on the battery or terminals, remove the cables
from the terminals and clean with a wire brush. You can neutralize the
acid with a solution of baking soda and water.
Maintenance and care
173
Page 182 of 240
Tire inflation pressure must not exceed the recommendations of
the axle, tire and/or wheel rim manufacturer for the specific
load, speed and application. The inflation pressures on the tire sidewall
do not take the wheel rim capabilities into consideration.
Never use a rim of different manufacture or any different size or
type than original rims.
Try to replace tires in pairs on the same axle shaft. Tires larger or
smaller than originally installed may affect the accuracy of the
speedometer. Consult your dealer about the need to change the switch
setting on the back of the speedometer.
Front wheel alignment
If abnormal tire wear or ride and handling characteristics such as vehicle
lead or wander are experienced with properly inflated tires, the front
end alignment should be checked.
Wheel bearing care
Front and rear wheel bearings are adjustable to correct for bearing and
spindle wear. Long bearing life depends upon proper adjustment and
correct lubrication. If bearings are adjusted too tightly (preloaded) they
will overheat and wear rapidly. Loose adjustment will cause pounding
and will contribute to uneven tire wear, steering difficulties and
inefficient brake operation.
Refer to the Ford Service Manual applicable to your vehicle for proper
tightening procedures and torque specifications.
Periodically check the oil level on oil filled front bearing hubs. If
necessary, add oil through the filler plug so the oil level is between the
ADD and FULL marks indicated on the hub. Do not overfill. Overfilling
can result in oil on brake linings.
Refer to your Scheduled Maintenance Guide for fluid level checks and
change intervals for the front hubs.
Your front hubs may be filled with an optional synthetic fluid which
allows use of the extended service intervals. A green colored filler plug
identifies use of the synthetic fluid.
Maintenance and care
182
Page 189 of 240
Installation
The engine will not run properly if the fuel filter is not installed
in housing.
1. Apply a coating of clean diesel fuel to the new bevel gasket and install
it onto the fuel filter housing.
2. Install the new fuel filter element onto the cap. Place the new fuel
filter element and cap into the fuel filter housing. Allow fuel to soak into
the fuel filter element.
3. Tighten cap onto the fuel filter housing until cap contacts the housing.
4. Start the engine and check for fuel leaks.
After changing the fuel filter, the engine will purge the trapped air as it
runs. Engine may run roughly and smoke until the air is completely
eliminated.
Fuel filter replacementÐCummins B engine
Refer to your engine operator's manual for service intervals and
procedures.
ESSENTIALS OF GOOD FUEL ECONOMY
Measuring techniques
Your best source of information about actual fuel economy is you, the
driver. You must gather information as accurately and consistently as
possible. Fuel expense, frequency of fillups or fuel gauge readings are NOT
accurate as a measure of fuel economy. We do not recommend taking fuel
economy measurements during the first 1 600 km (1 000 miles) of driving
(engine break-in period). You will get a more accurate measurement after
3 000 km±5 000 km (2 000 miles-3 000 miles).
The advertised fuel capacity of the fuel tank(s) on your vehicle is equal
to the rated refill capacity of the fuel tank(s) as listed inFuel Tank
Capacitiesin theCapacities and Specificationschapter. The
advertised capacity is the amount of the Indicated Capacity and the
Empty Reserve combined. Indicated Capacity is the difference in the
amount of fuel in a full tank and a tank when the fuel gauge indicates
empty. Empty Reserve is the small amount of usable fuel remaining in
the fuel tank after the fuel gauge indicates empty.
Maintenance and care
189
Page 204 of 240
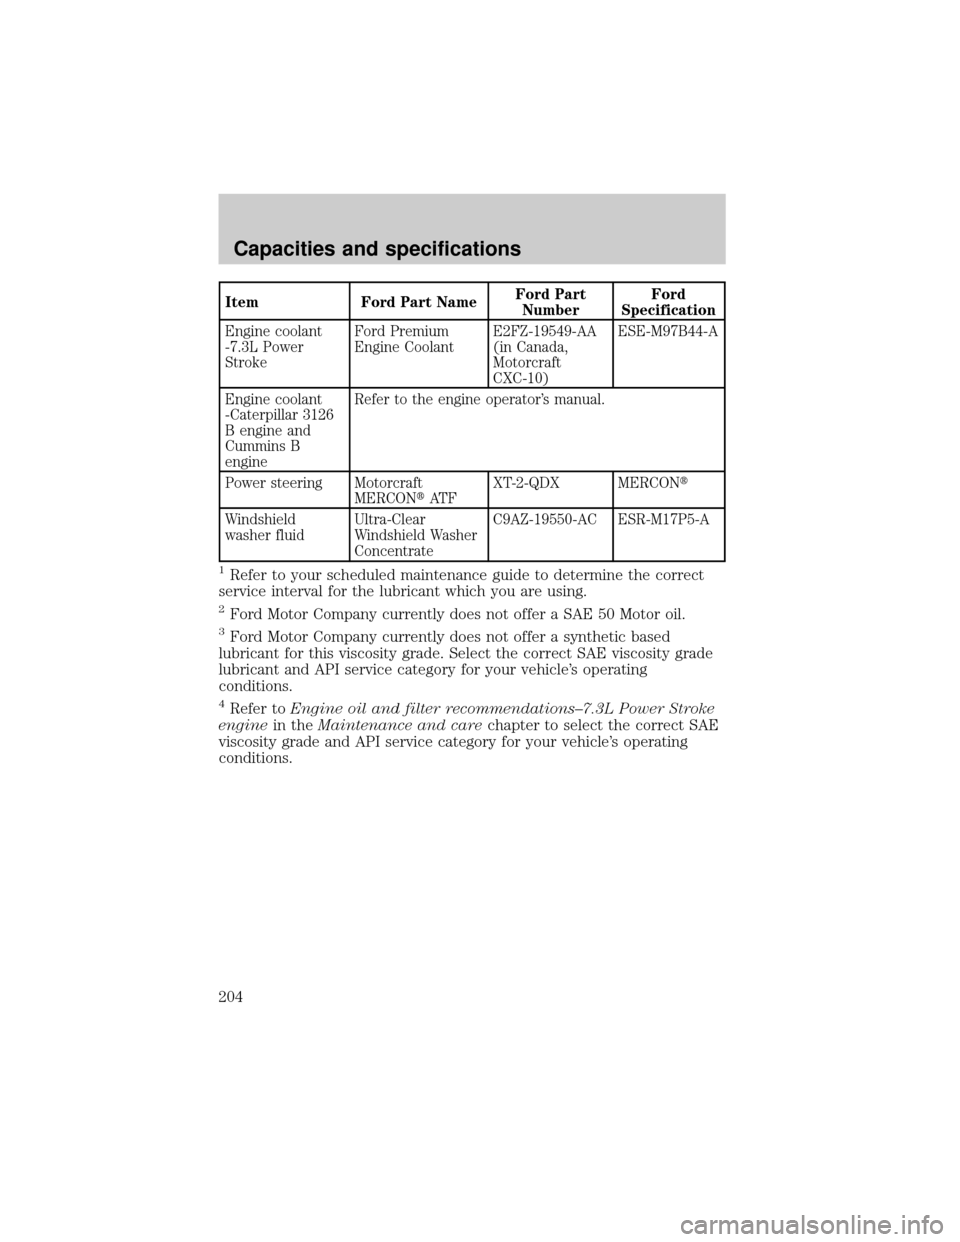
Item Ford Part NameFord Part
NumberFord
Specification
Engine coolant
-7.3L Power
StrokeFord Premium
Engine CoolantE2FZ-19549-AA
(in Canada,
Motorcraft
CXC-10)ESE-M97B44-A
Engine coolant
-Caterpillar 3126
B engine and
Cummins B
engineRefer to the engine operator's manual.
Power steering Motorcraft
MERCONtAT FXT-2-QDX MERCONt
Windshield
washer fluidUltra-Clear
Windshield Washer
ConcentrateC9AZ-19550-AC ESR-M17P5-A
1Refer to your scheduled maintenance guide to determine the correct
service interval for the lubricant which you are using.
2Ford Motor Company currently does not offer a SAE 50 Motor oil.
3Ford Motor Company currently does not offer a synthetic based
lubricant for this viscosity grade. Select the correct SAE viscosity grade
lubricant and API service category for your vehicle's operating
conditions.
4Refer toEngine oil and filter recommendations±7.3L Power Stroke
enginein theMaintenance and carechapter to select the correct SAE
viscosity grade and API service category for your vehicle's operating
conditions.
Capacities and specifications
204
Page 208 of 240
OWNER MAINTENANCE
You can do much of the maintenance your vehicle requires yourself, if
you have the time and a reasonable amount of mechanical ability. If you
prefer to have this work done professionally, your authorized dealer
stands ready to help you.
All mechanical components and attachments are important in that they
could affect the performance of vital components and systems. If
replacement becomes necessary, they must be replaced with parts having
the same part number or with equivalent parts. Torque values of the
attaching parts must be used as specified during any reassembly
procedure to assure proper retention.
EMISSIONS CONTROL SYSTEM
To assure the emissions control systems operate effectively, you should
have the services listed in the maintenance schedule performed at the
specified time and km/mileage intervals. You should avoid running out of
fuel or turning off the ignition while the vehicle is in motion, especially
at high speeds.
Because of high engine compartment and exhaust system
temperatures resulting from emissions equipment, do not park,
idle or operate your vehicle in dry grass or other dry ground cover
where the possibility of ground fire exists.
Do not make unauthorized modifications to the engine or vehicle.
Modifications causing increased amounts of unburned fuel to reach the
exhaust system can significantly increase the temperature of the engine
compartment and/or the exhaust system.
Avoid driving your vehicle if it does not operate properly. If the engine
diesels (more than five seconds of engine run-on after shut-off), misfires,
surges, stalls or backfires, see your dealer. Be alert for fluid leakage,
odor, smoke, loss of oil pressure, or charge indicator or over temperature
warning.
Do NOT use diesel fuel blended with waste oil in engines equipped with
a CATALYTIC CONVERTER-MUFFLER. Waste lube oil blending in fuel
will plug the CATALYTIC CONVERTER-MUFFLER, resulting in a
significant loss of engine power.
General maintenance information
208