Page 127 of 224
Replace the rear axle lubricant anytime the axle has been submerged in
water. Rear axle lubricant quantities are not to be checked or changed
unless a leak is suspected or repair required.
Disconnect the wiring to the trailer before backing the trailer into the
water. Reconnect the wiring to the trailer after the trailer is removed
from the water.
Recreational towing (all wheels on the ground)
An example of recreational towing would be towing your vehicle behind
a Motorhome. Follow these guidelines if you have the need for
recreational towing your vehicle with all four wheels on the ground.
These guidelines are designed to ensure that your transmission is not
damaged.
2WD vehicles (with automatic transmissions)
²Place the transmission in N (Neutral)
²Maximum speed is 56 km (35 mph)
²Maximum distance is 80 km (50 miles)
If a distance of 80 km (50 miles) or a speed of 56 km (35 mph) must be
exceeded, the drive shaft will have to be removed until the vehicle is
being towed.
Ford recommends the driveshaft be removed/installed only by a qualified
technician. See your local dealer for driveshaft removal/installation.
Improper removal/installation of the driveshaft can cause
transmission fluid loss, damage to the driveshaft and internal
transmission components.
4WD vehicles electronic shift transfer case (with automatic
transmissions)
4x4 vehicles with electronic shift on the fly cannot be towed with any
wheels on the ground.
Driving
127
Page 128 of 224

GETTING ROADSIDE ASSISTANCE
To fully assist you should you have a vehicle concern, Ford offers a
complimentary roadside assistance program. This program is separate
from the New Vehicle Limited Warranty. The service is available:
²24±hours, seven days a week
²for the Basic warranty period (Canada) or New Vehicle Limited
Warranty period (U.S.) of three years or 60,000 km (36,000 miles),
whichever comes first on Ford and Mercury vehicles, and four years or
80,000 km (50,000 miles) on Lincoln vehicles
Roadside assistance will cover:
²changing a flat tire
²jump-starts
²lock-out assistance
²fuel delivery
²towing of your disabled vehicle to the nearest Ford dealership, or your
selling dealer if within 25 kms (15.5 miles) of the nearest Ford
Dealership (one tow per disablement). Even non-warranty related
tows, like accidents or getting stuck in the mud or snow, are covered
(some exclusions apply, such as impound towing or repossession).
Using roadside assistance
Complete the roadside assistance identification card and place it in your
wallet for quick reference. In the United States, this card is found in the
Owner Guide portfolio in the glove compartment in Ford vehicles and is
mailed to you if you own a Mercury or Lincoln. In Canada, it is found in
the Roadside Assistance book in the glove compartment.
To receive roadside assistance in the United States for Ford or Mercury
vehicles, call 1-800-241-3673 or if you own a Lincoln vehicle, call
1±800±521±4140. In Canada call 1±800±665±2006.
Should you need to arrange roadside assistance for yourself, Ford will
reimburse a reasonable amount. To obtain information about
reimbursement, call 1-800-241-3673 in the United States for Ford or
Mercury vehicles; or if you own a Lincoln vehicle, call 1±800±521±4140.
Call 1±800±665±2006 in Canada.
Roadside emergencies
128
Page 133 of 224
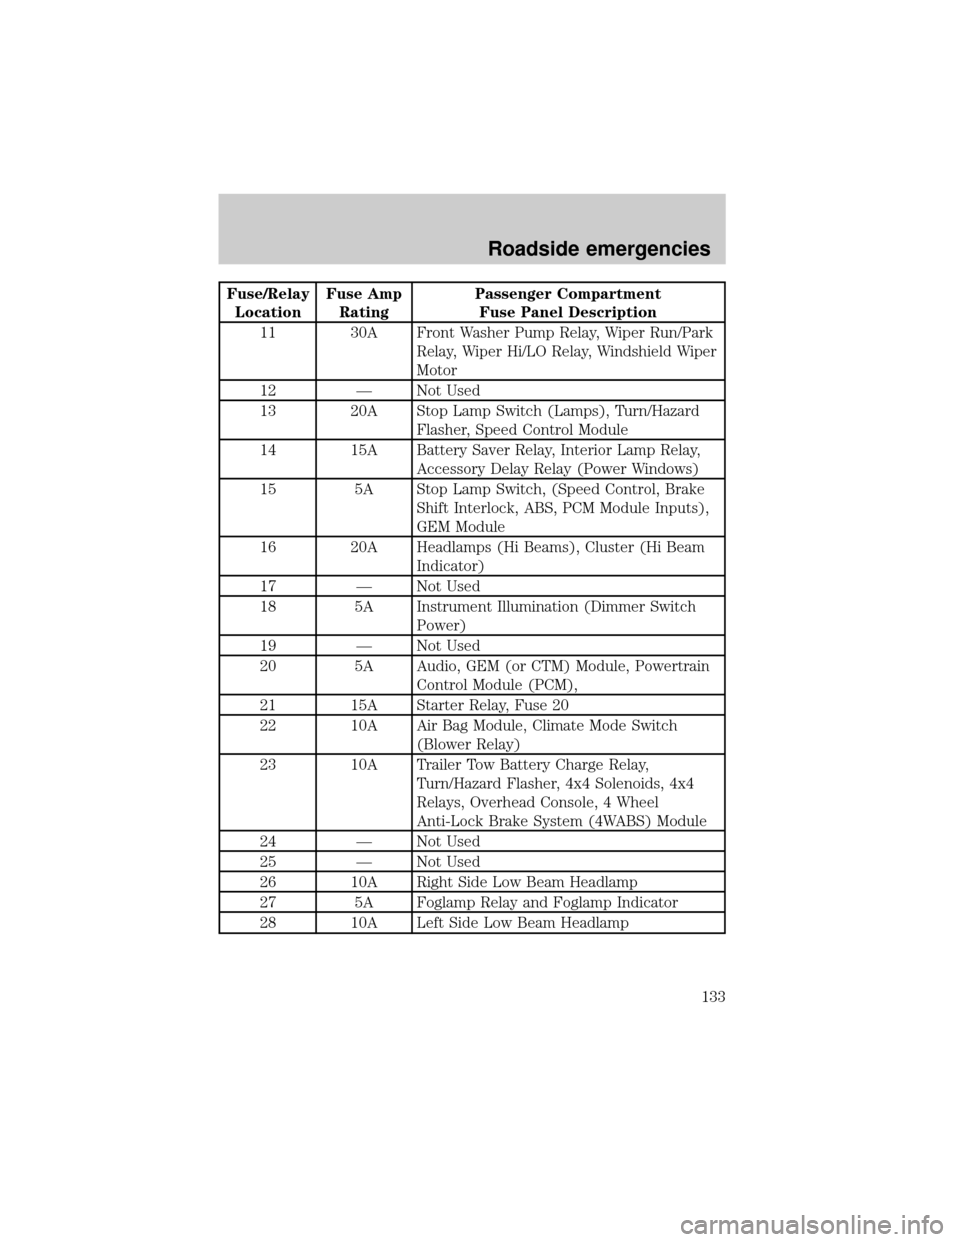
Fuse/Relay
LocationFuse Amp
RatingPassenger Compartment
Fuse Panel Description
11 30A Front Washer Pump Relay, Wiper Run/Park
Relay, Wiper Hi/LO Relay, Windshield Wiper
Motor
12 Ð Not Used
13 20A Stop Lamp Switch (Lamps), Turn/Hazard
Flasher, Speed Control Module
14 15A Battery Saver Relay, Interior Lamp Relay,
Accessory Delay Relay (Power Windows)
15 5A Stop Lamp Switch, (Speed Control, Brake
Shift Interlock, ABS, PCM Module Inputs),
GEM Module
16 20A Headlamps (Hi Beams), Cluster (Hi Beam
Indicator)
17 Ð Not Used
18 5A Instrument Illumination (Dimmer Switch
Power)
19 Ð Not Used
20 5A Audio, GEM (or CTM) Module, Powertrain
Control Module (PCM),
21 15A Starter Relay, Fuse 20
22 10A Air Bag Module, Climate Mode Switch
(Blower Relay)
23 10A Trailer Tow Battery Charge Relay,
Turn/Hazard Flasher, 4x4 Solenoids, 4x4
Relays, Overhead Console, 4 Wheel
Anti-Lock Brake System (4WABS) Module
24 Ð Not Used
25 Ð Not Used
26 10A Right Side Low Beam Headlamp
27 5A Foglamp Relay and Foglamp Indicator
28 10A Left Side Low Beam Headlamp
Roadside emergencies
133
Page 135 of 224
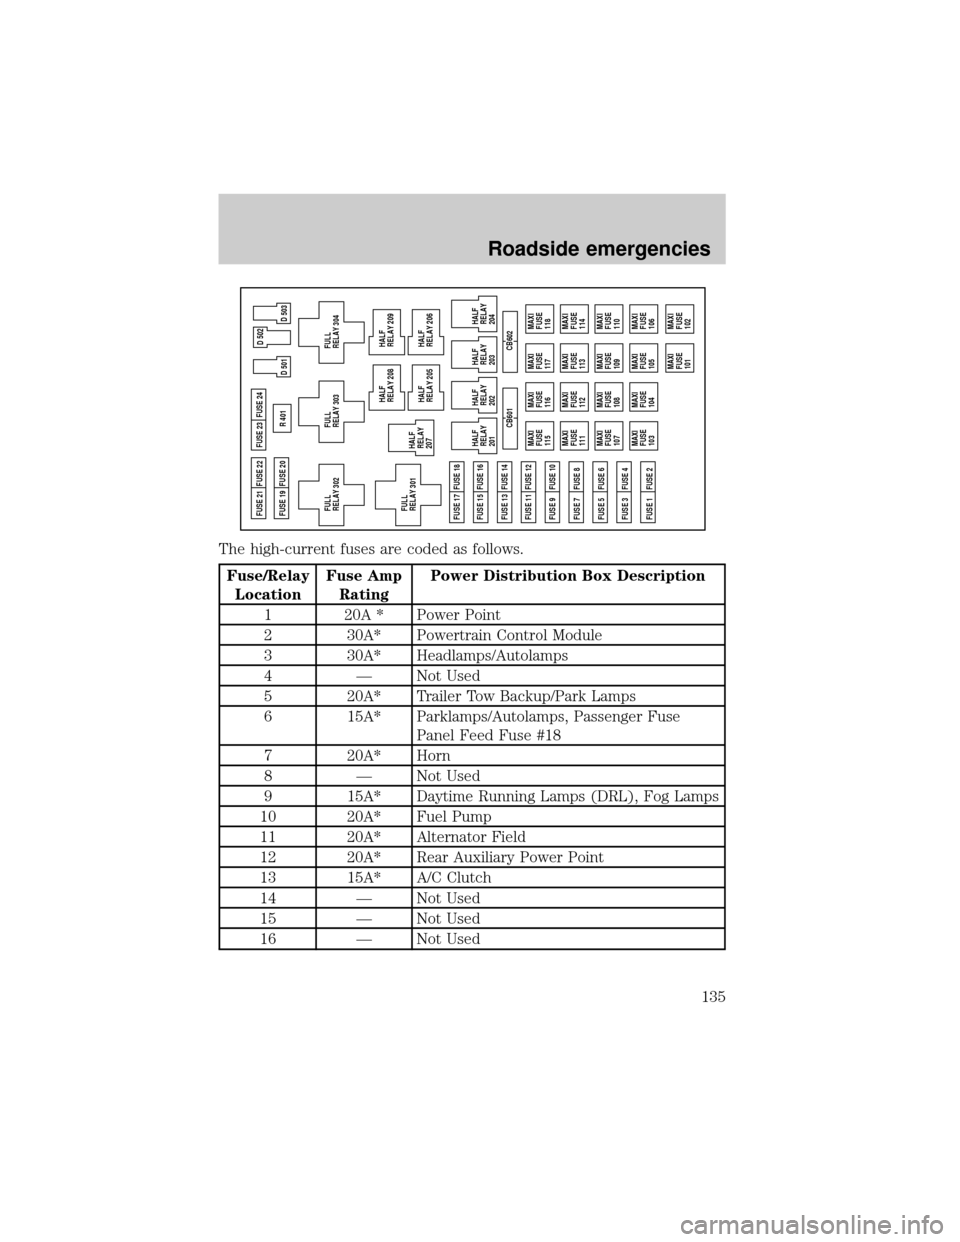
The high-current fuses are coded as follows.
Fuse/Relay
LocationFuse Amp
RatingPower Distribution Box Description
1 20A * Power Point
2 30A* Powertrain Control Module
3 30A* Headlamps/Autolamps
4 Ð Not Used
5 20A* Trailer Tow Backup/Park Lamps
6 15A* Parklamps/Autolamps, Passenger Fuse
Panel Feed Fuse #18
7 20A* Horn
8 Ð Not Used
9 15A* Daytime Running Lamps (DRL), Fog Lamps
10 20A* Fuel Pump
11 20A* Alternator Field
12 20A* Rear Auxiliary Power Point
13 15A* A/C Clutch
14 Ð Not Used
15 Ð Not Used
16 Ð Not Used
MAXI
FUSE
115MAXI
FUSE
116MAXI
FUSE
117
MAXI
FUSE
118
MAXI
FUSE
111MAXI
FUSE
112MAXI
FUSE
113
MAXI
FUSE
114
MAXI
FUSE
107MAXI
FUSE
108MAXI
FUSE
109
MAXI
FUSE
110
MAXI
FUSE
103MAXI
FUSE
104MAXI
FUSE
105
MAXI
FUSE
106
MAXI
FUSE
101MAXI
FUSE
102 CB601 CB602 FUSE 17 FUSE 18FUSE 21 FUSE 22
FUSE 19 FUSE 20FUSE 23
FULL
RELAY 302R 401
D 501 FUSE 24
FUSE 15 FUSE 16
FUSE 13 FUSE 14
FUSE 11 FUSE 12
FUSE 9 FUSE 10
FUSE 7 FUSE 8
FUSE 5 FUSE 6
FUSE 3 FUSE 4
FUSE 1 FUSE 2
D 503 D 502
FULL
RELAY 301HALF
RELAY
207
FULL
RELAY 303
FULL
RELAY 304
HALF
RELAY
201
HALF
RELAY
202HALF
RELAY 208
HALF
RELAY 209
HALF
RELAY 205
HALF
RELAY 206
HALF
RELAY
203
HALF
RELAY
204
Roadside emergencies
135
Page 136 of 224

Fuse/Relay
LocationFuse Amp
RatingPower Distribution Box Description
17 Ð Not Used
18 15A* Powertrain Control Module, Fuel Injectors,
Fuel Pump Relay, Idle Air Control, Mass Air
Flow Sensor
19 10A* Trailer Tow Stop and Right Turn Lamp
20 10A* Trailer Tow Stop and Left Turn Lamp
21 Ð Not Used
22 Ð Not Used
23 15A* HEGO Sensor, Canister Vent, Automatic
Transmission, CMS Sensor
24 Ð Not Used
101 30A** Trailer Tow Battery Charge
102 50A** Four Wheel Antilock Brake Module
103 50A** Junction Block Battery Feed
104 30A** 4x4 Shift Motor & Clutch
105 40A** Climate Control Front Blower
106 Ð Not Used
107 Ð Not Used
108 30A** Trailer Tow Electric Brake
109 Ð Not Used
110 Ð Not Used
111 40A** Ignition Switch Battery Feed (Start and
Run Circuits)
112 30A** Drivers Power Seat, Adjustable Pedals
113 40A** Ignition Switch Battery Feed (Run and
Accessory Circuits)
114 Ð Not Used
115 20A** Power Door Locks
116 Ð Not Used
117 Ð Not Used
118 Ð Not Used
201 Ð Trailer Tow Park Lamp Relay
Roadside emergencies
136
Page 137 of 224
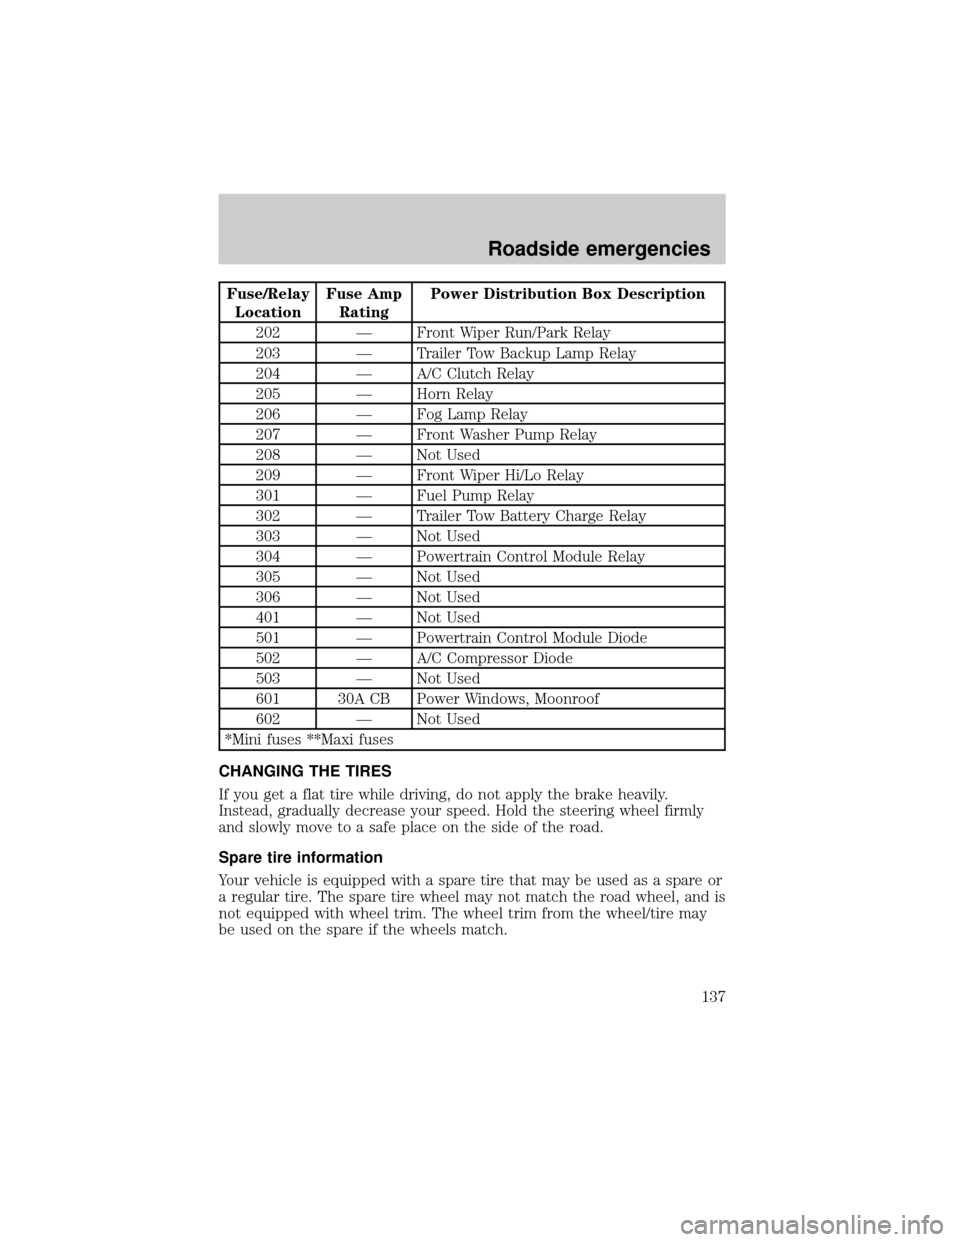
Fuse/Relay
LocationFuse Amp
RatingPower Distribution Box Description
202 Ð Front Wiper Run/Park Relay
203 Ð Trailer Tow Backup Lamp Relay
204 Ð A/C Clutch Relay
205 Ð Horn Relay
206 Ð Fog Lamp Relay
207 Ð Front Washer Pump Relay
208 Ð Not Used
209 Ð Front Wiper Hi/Lo Relay
301 Ð Fuel Pump Relay
302 Ð Trailer Tow Battery Charge Relay
303 Ð Not Used
304 Ð Powertrain Control Module Relay
305 Ð Not Used
306 Ð Not Used
401 Ð Not Used
501 Ð Powertrain Control Module Diode
502 Ð A/C Compressor Diode
503 Ð Not Used
601 30A CB Power Windows, Moonroof
602 Ð Not Used
*Mini fuses **Maxi fuses
CHANGING THE TIRES
If you get a flat tire while driving, do not apply the brake heavily.
Instead, gradually decrease your speed. Hold the steering wheel firmly
and slowly move to a safe place on the side of the road.
Spare tire information
Your vehicle is equipped with a spare tire that may be used as a spare or
a regular tire. The spare tire wheel may not match the road wheel, and is
not equipped with wheel trim. The wheel trim from the wheel/tire may
be used on the spare if the wheels match.
Roadside emergencies
137
Page 138 of 224
If your vehicle is equipped with 4WD, a spare tire of a different
size than the road tires should not be used. Such a tire could
result in damage to driveline components and make the vehicle
difficult to control.
Location of the spare tire and tools
The spare tire and tools for your vehicle are stowed in the following
locations:
Tool Location
Spare tire Under the vehicle, just forward of the rear
bumper
Jack, lug nut wrench In the passenger side rear storage
compartment
Jack handle On top of the radiator support at the front of
the engine compartment
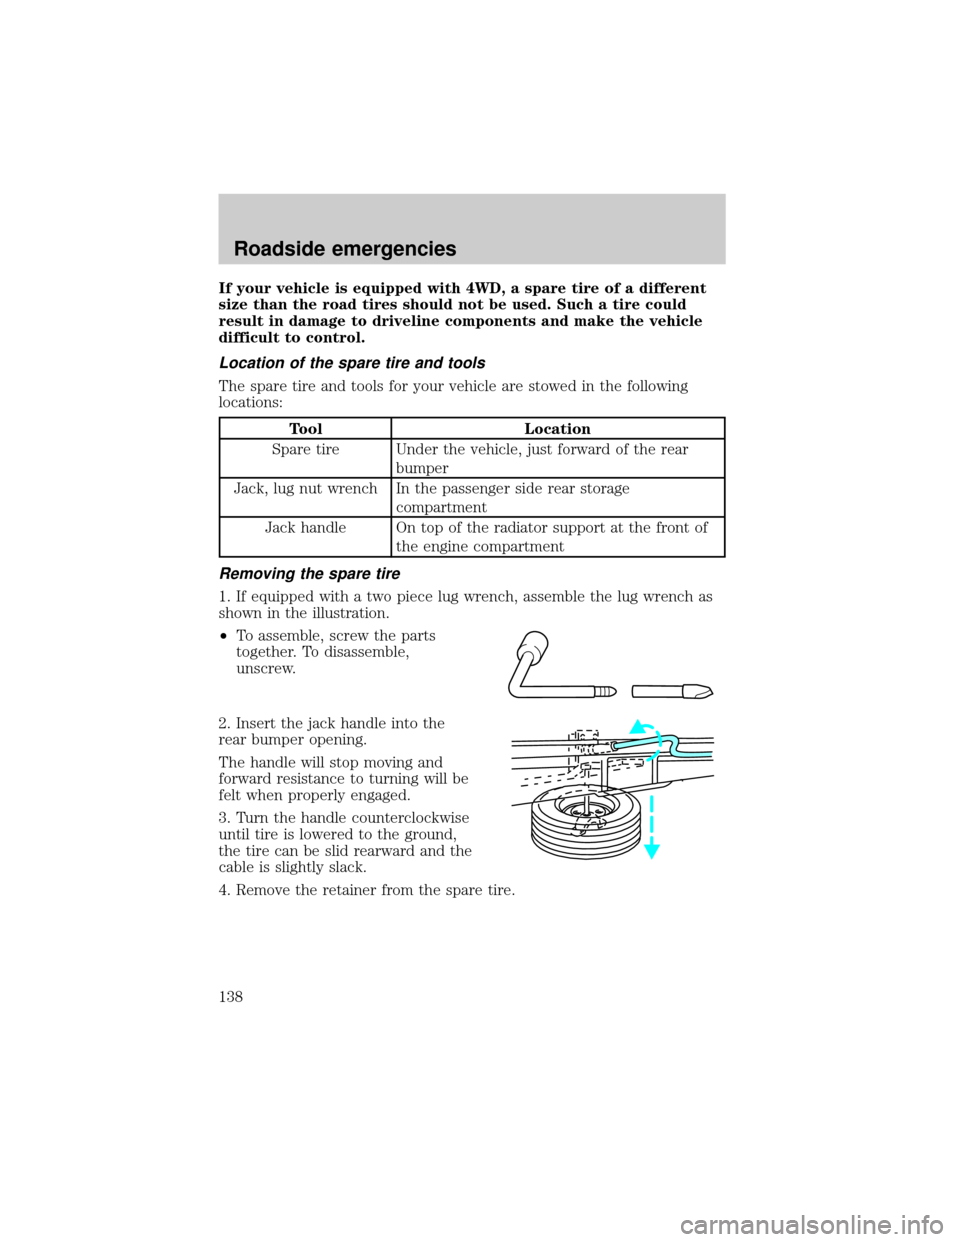
Removing the spare tire
1. If equipped with a two piece lug wrench, assemble the lug wrench as
shown in the illustration.
²To assemble, screw the parts
together. To disassemble,
unscrew.
2. Insert the jack handle into the
rear bumper opening.
The handle will stop moving and
forward resistance to turning will be
felt when properly engaged.
3. Turn the handle counterclockwise
until tire is lowered to the ground,
the tire can be slid rearward and the
cable is slightly slack.
4. Remove the retainer from the spare tire.
Roadside emergencies
138
Page 139 of 224
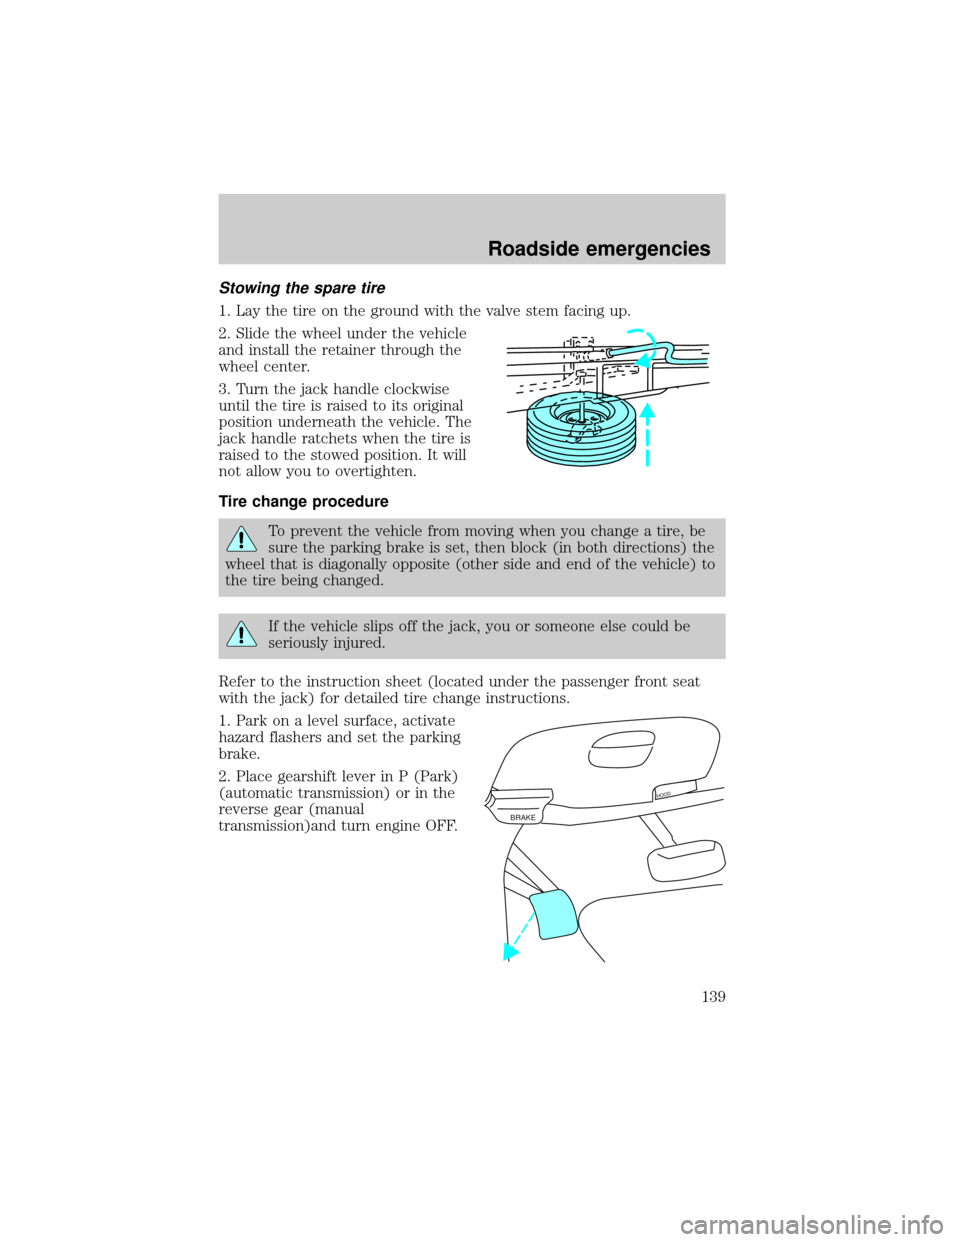
Stowing the spare tire
1. Lay the tire on the ground with the valve stem facing up.
2. Slide the wheel under the vehicle
and install the retainer through the
wheel center.
3. Turn the jack handle clockwise
until the tire is raised to its original
position underneath the vehicle. The
jack handle ratchets when the tire is
raised to the stowed position. It will
not allow you to overtighten.
Tire change procedure
To prevent the vehicle from moving when you change a tire, be
sure the parking brake is set, then block (in both directions) the
wheel that is diagonally opposite (other side and end of the vehicle) to
the tire being changed.
If the vehicle slips off the jack, you or someone else could be
seriously injured.
Refer to the instruction sheet (located under the passenger front seat
with the jack) for detailed tire change instructions.
1. Park on a level surface, activate
hazard flashers and set the parking
brake.
2. Place gearshift lever in P (Park)
(automatic transmission) or in the
reverse gear (manual
transmission)and turn engine OFF.
BRAKE
HOOD
Roadside emergencies
139