Page 123 of 224

Towing a trailer places an additional load on your vehicle's engine,
transmission, axle, brakes, tires and suspension. Inspect these
components carefully after any towing operation.
Exceeding the maximum GCWR could result in extensive damage
to your vehicle and personal injury.
Do not exceed the GVWR or the GAWR specified on the
certification label.
Towing trailers beyond the maximum recommended gross trailer
weight could result in engine damage, transmission/axle damage,
structural damage, loss of control, and personal injury.
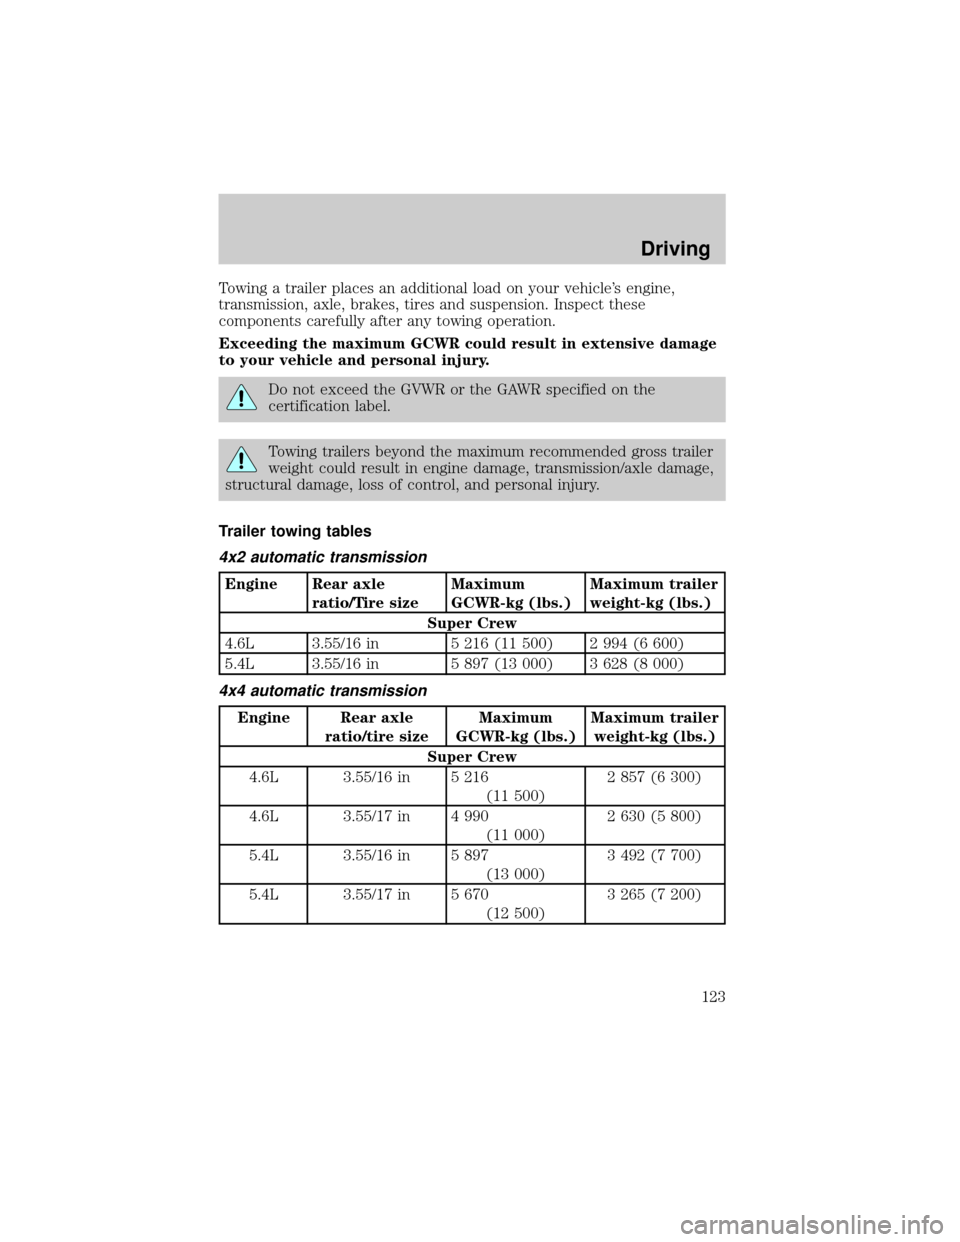
Trailer towing tables
4x2 automatic transmission
Engine Rear axle
ratio/Tire sizeMaximum
GCWR-kg (lbs.)Maximum trailer
weight-kg (lbs.)
Super Crew
4.6L 3.55/16 in 5 216 (11 500) 2 994 (6 600)
5.4L 3.55/16 in 5 897 (13 000) 3 628 (8 000)
4x4 automatic transmission
Engine Rear axle
ratio/tire sizeMaximum
GCWR-kg (lbs.)Maximum trailer
weight-kg (lbs.)
Super Crew
4.6L 3.55/16 in 5 216
(11 500)2 857 (6 300)
4.6L 3.55/17 in 4 990
(11 000)2 630 (5 800)
5.4L 3.55/16 in 5 897
(13 000)3 492 (7 700)
5.4L 3.55/17 in 5 670
(12 500)3 265 (7 200)
Driving
123
Page 127 of 224

Replace the rear axle lubricant anytime the axle has been submerged in
water. Rear axle lubricant quantities are not to be checked or changed
unless a leak is suspected or repair required.
Disconnect the wiring to the trailer before backing the trailer into the
water. Reconnect the wiring to the trailer after the trailer is removed
from the water.
Recreational towing (all wheels on the ground)
An example of recreational towing would be towing your vehicle behind
a Motorhome. Follow these guidelines if you have the need for
recreational towing your vehicle with all four wheels on the ground.
These guidelines are designed to ensure that your transmission is not
damaged.
2WD vehicles (with automatic transmissions)
²Place the transmission in N (Neutral)
²Maximum speed is 56 km (35 mph)
²Maximum distance is 80 km (50 miles)
If a distance of 80 km (50 miles) or a speed of 56 km (35 mph) must be
exceeded, the drive shaft will have to be removed until the vehicle is
being towed.
Ford recommends the driveshaft be removed/installed only by a qualified
technician. See your local dealer for driveshaft removal/installation.
Improper removal/installation of the driveshaft can cause
transmission fluid loss, damage to the driveshaft and internal
transmission components.
4WD vehicles electronic shift transfer case (with automatic
transmissions)
4x4 vehicles with electronic shift on the fly cannot be towed with any
wheels on the ground.
Driving
127
Page 136 of 224

Fuse/Relay
LocationFuse Amp
RatingPower Distribution Box Description
17 Ð Not Used
18 15A* Powertrain Control Module, Fuel Injectors,
Fuel Pump Relay, Idle Air Control, Mass Air
Flow Sensor
19 10A* Trailer Tow Stop and Right Turn Lamp
20 10A* Trailer Tow Stop and Left Turn Lamp
21 Ð Not Used
22 Ð Not Used
23 15A* HEGO Sensor, Canister Vent, Automatic
Transmission, CMS Sensor
24 Ð Not Used
101 30A** Trailer Tow Battery Charge
102 50A** Four Wheel Antilock Brake Module
103 50A** Junction Block Battery Feed
104 30A** 4x4 Shift Motor & Clutch
105 40A** Climate Control Front Blower
106 Ð Not Used
107 Ð Not Used
108 30A** Trailer Tow Electric Brake
109 Ð Not Used
110 Ð Not Used
111 40A** Ignition Switch Battery Feed (Start and
Run Circuits)
112 30A** Drivers Power Seat, Adjustable Pedals
113 40A** Ignition Switch Battery Feed (Run and
Accessory Circuits)
114 Ð Not Used
115 20A** Power Door Locks
116 Ð Not Used
117 Ð Not Used
118 Ð Not Used
201 Ð Trailer Tow Park Lamp Relay
Roadside emergencies
136
Page 139 of 224

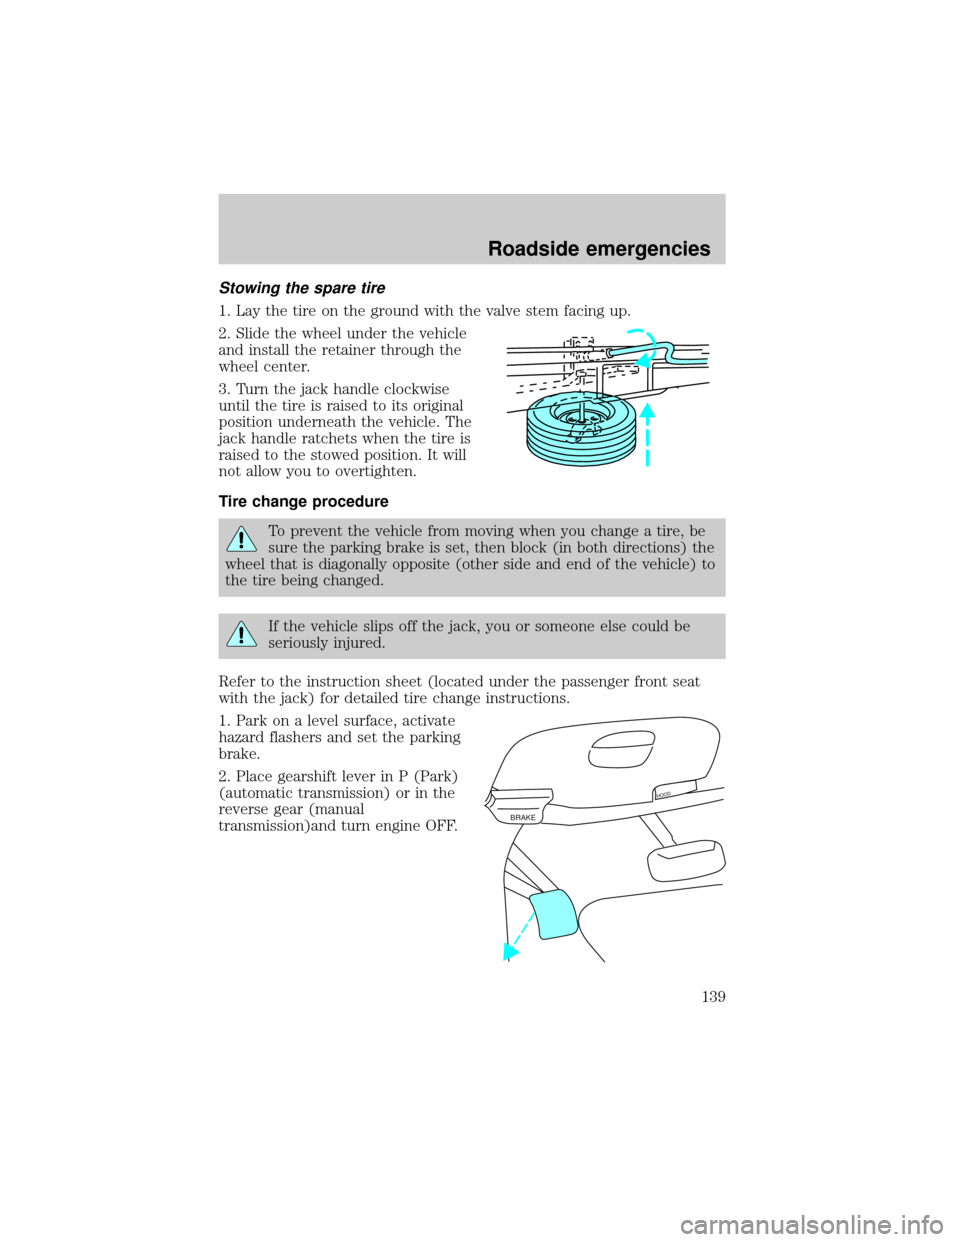
Stowing the spare tire
1. Lay the tire on the ground with the valve stem facing up.
2. Slide the wheel under the vehicle
and install the retainer through the
wheel center.
3. Turn the jack handle clockwise
until the tire is raised to its original
position underneath the vehicle. The
jack handle ratchets when the tire is
raised to the stowed position. It will
not allow you to overtighten.
Tire change procedure
To prevent the vehicle from moving when you change a tire, be
sure the parking brake is set, then block (in both directions) the
wheel that is diagonally opposite (other side and end of the vehicle) to
the tire being changed.
If the vehicle slips off the jack, you or someone else could be
seriously injured.
Refer to the instruction sheet (located under the passenger front seat
with the jack) for detailed tire change instructions.
1. Park on a level surface, activate
hazard flashers and set the parking
brake.
2. Place gearshift lever in P (Park)
(automatic transmission) or in the
reverse gear (manual
transmission)and turn engine OFF.
BRAKE
HOOD
Roadside emergencies
139
Page 143 of 224

Do not attempt to push start your vehicle. Automatic
transmissions do not have push-start capability.
Preparing your vehicle
1.Use only a 12±volt supply to start your vehicle.
2. Do not disconnect the battery of the disabled vehicle as this could
damage the vehicle's electrical system.
3. Park the booster vehicle close to the hood of the disabled vehicle
making sure the two vehiclesdo nottouch. Set the parking brake on
both vehicles and stay clear of the engine cooling fan and other moving
parts.
4. Check all battery terminals and remove any excessive corrosion before
you attach the battery cables. Ensure that vent caps are tight and level.
5. Turn the heater fan on in both vehicles to protect any electrical
surges. Turn all other accessories off.
Connecting the jumper cables
1. Connect the positive (+) booster cable to the positive (+) terminal of
the discharged battery.
Note:In the illustrations,lightning boltsare used to designate the
assisting (boosting) battery.
+–+–
Roadside emergencies
143
Page 150 of 224
IDENTIFYING COMPONENTS IN THE ENGINE COMPARTMENT
4.6L V8 and 5.4L V8 engines
1. Battery
2. Automatic transmission fluid dipstick
3. Engine oil filler cap
4. Engine oil dipstick
5. Power steering fluid reservoir
6. Brake fluid reservoir
7. Power distribution box
8. Air filter assembly
9. Engine coolant reservoir
10. Windshield washer fluid reservoir
ENGINE OIL
Checking the engine oil
Refer to the Scheduled Maintenance Guide for the appropriate intervals
for checking the engine oil.
1. Make sure the vehicle is on level ground.
109
123456
8
7
Maintenance and care
150
Page 161 of 224

2. While the engine idles, turn the steering wheel left and right several
times.
3. Turn the engine off.
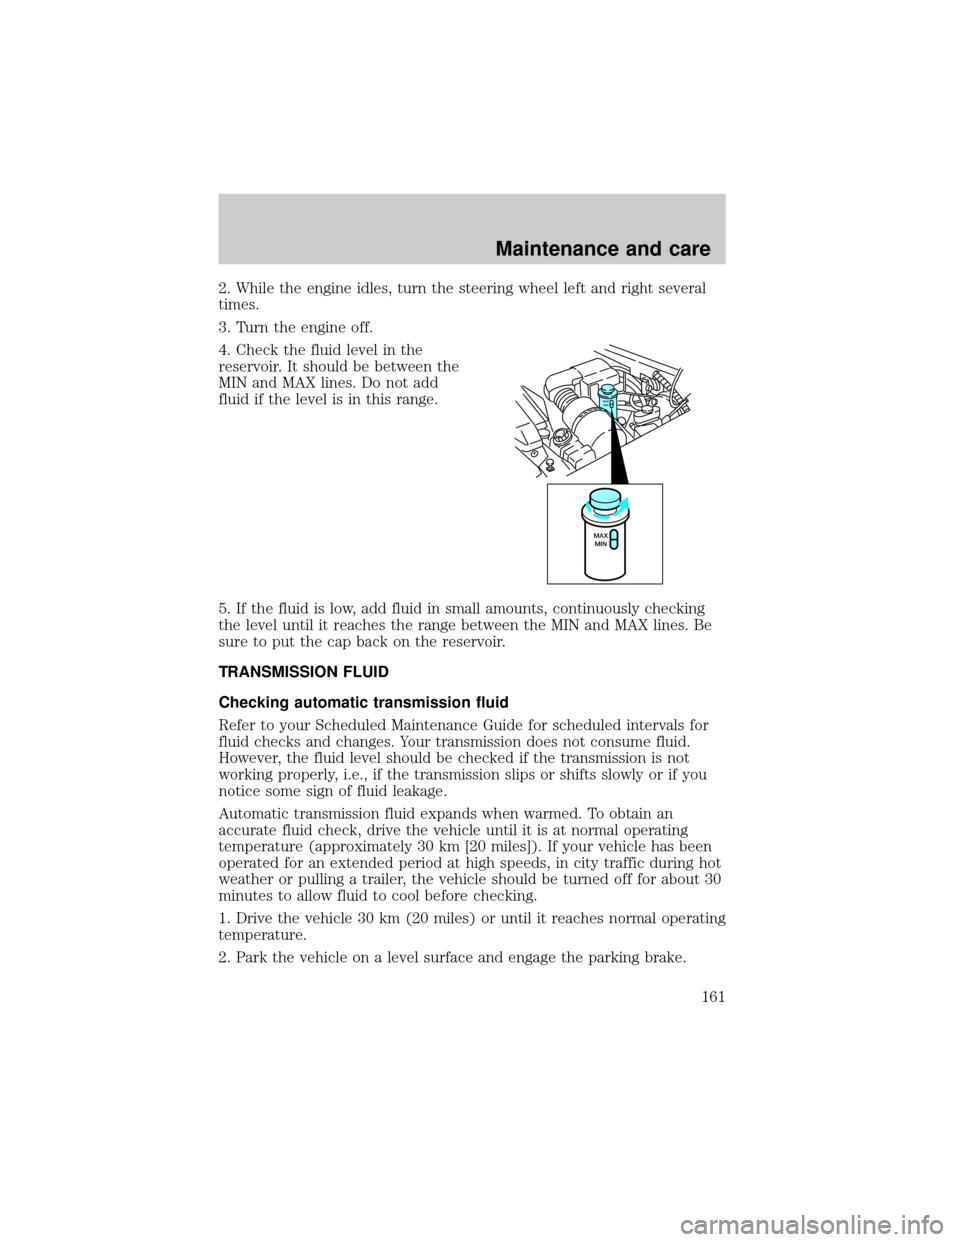
4. Check the fluid level in the
reservoir. It should be between the
MIN and MAX lines. Do not add
fluid if the level is in this range.
5. If the fluid is low, add fluid in small amounts, continuously checking
the level until it reaches the range between the MIN and MAX lines. Be
sure to put the cap back on the reservoir.
TRANSMISSION FLUID
Checking automatic transmission fluid
Refer to your Scheduled Maintenance Guide for scheduled intervals for
fluid checks and changes. Your transmission does not consume fluid.
However, the fluid level should be checked if the transmission is not
working properly, i.e., if the transmission slips or shifts slowly or if you
notice some sign of fluid leakage.
Automatic transmission fluid expands when warmed. To obtain an
accurate fluid check, drive the vehicle until it is at normal operating
temperature (approximately 30 km [20 miles]). If your vehicle has been
operated for an extended period at high speeds, in city traffic during hot
weather or pulling a trailer, the vehicle should be turned off for about 30
minutes to allow fluid to cool before checking.
1. Drive the vehicle 30 km (20 miles) or until it reaches normal operating
temperature.
2. Park the vehicle on a level surface and engage the parking brake.
MAX
MIN
MAX
MIN
Maintenance and care
161
Page 163 of 224
High fluid level
Fluid levels above the safe range
may result in transmission failure.
An overfill condition of transmission
fluid may cause shift and/or
engagement concerns and/or
possible damage.
High fluid levels can be caused by an overheating condition.
Adjusting automatic transmission fluid levels
Before adding any fluid, make sure the correct type is used. The type of
fluid used is normally indicated on the dipstick and also in the
Lubricant specificationssection in theCapacities and specifications
chapter.
Use of a non-approved automatic transmission fluid may cause
internal transmission component damage.
If necessary, add fluid in 250 mL (1/2 pint) increments through the filler
tube until the level is correct.
If an overfill occurs, excess fluid
should be removed by a qualified
technician.
An overfill condition of
transmission fluid may cause shift and/or engagement concerns
and/or possible damage.
DON’T ADD
DON’T ADD
Maintenance and care
163