Page 60 of 224
POWER SIDE VIEW MIRRORS
The ignition can be in any position to adjust the power side view mirrors.
To adjust your mirrors:
1. Select L to adjust the left mirror
or R to adjust the right mirror.
2. Move the control in the direction
you wish to tilt the mirror.
3. Return to the center position to lock mirrors in place.
Signal mirrors (if equipped)
When the turn signal is activated,
the outer portion of the appropriate
mirror housing will blink red.
This provides an additional warning
to other drivers that your vehicle is
about to turn.
MIRRORS
L R
MIRRORS
L R
Controls and features
60
Page 61 of 224
Fold-away mirrors
Pull the side mirrors in carefully
when driving through a narrow
space, like an automatic car wash.
POSITIVE RETENTION FLOOR MAT
Position the floor mat so that the
eyelet is over the pointed end of the
retention post and rotate forward to
lock in. Make sure that the mat does
not interfere with the operation of
the accelerator or the brake pedal.
To remove the floor mat, reverse the
installation procedure.
TAILGATE LOCK
Your vehicle is equipped with a
tailgate lock designed to prevent
theft of the tailgate.
²Insert ignition key and turn to the
right to engage lock.
²Turn ignition key to the left to
unlock.
Controls and features
61
Page 132 of 224
The fuses are coded as follows.
Fuse/Relay
LocationFuse Amp
RatingPassenger Compartment
Fuse Panel Description
1 15A Audio
2 5A Powertrain Control Module (PCM), Cluster
3 20A Cigar Lighter, OBD-II Scan Tool Connector
4 5A Remote Entry Module, Mirrors
5 15A Speed Control Module, Reverse Lamp,
Climate Mode Switch, Daytime Running
Lamp Relay
6 5A Cluster, Brake Shift Interlock Solenoid,
GEM Module
7 Ð Not Used
8 5A Radio, Remote Entry Module, GEM Module
9 Ð Not Used
10 Ð Not Used
FUSE1 12 22
21323
617 27
718 28
819 29
930
20
31 21 11 10
RELAY
5 RELAY
4 RELAY
3 RELAY
2 RELAY
1
31424
41525
51626
Roadside emergencies
132
Page 187 of 224

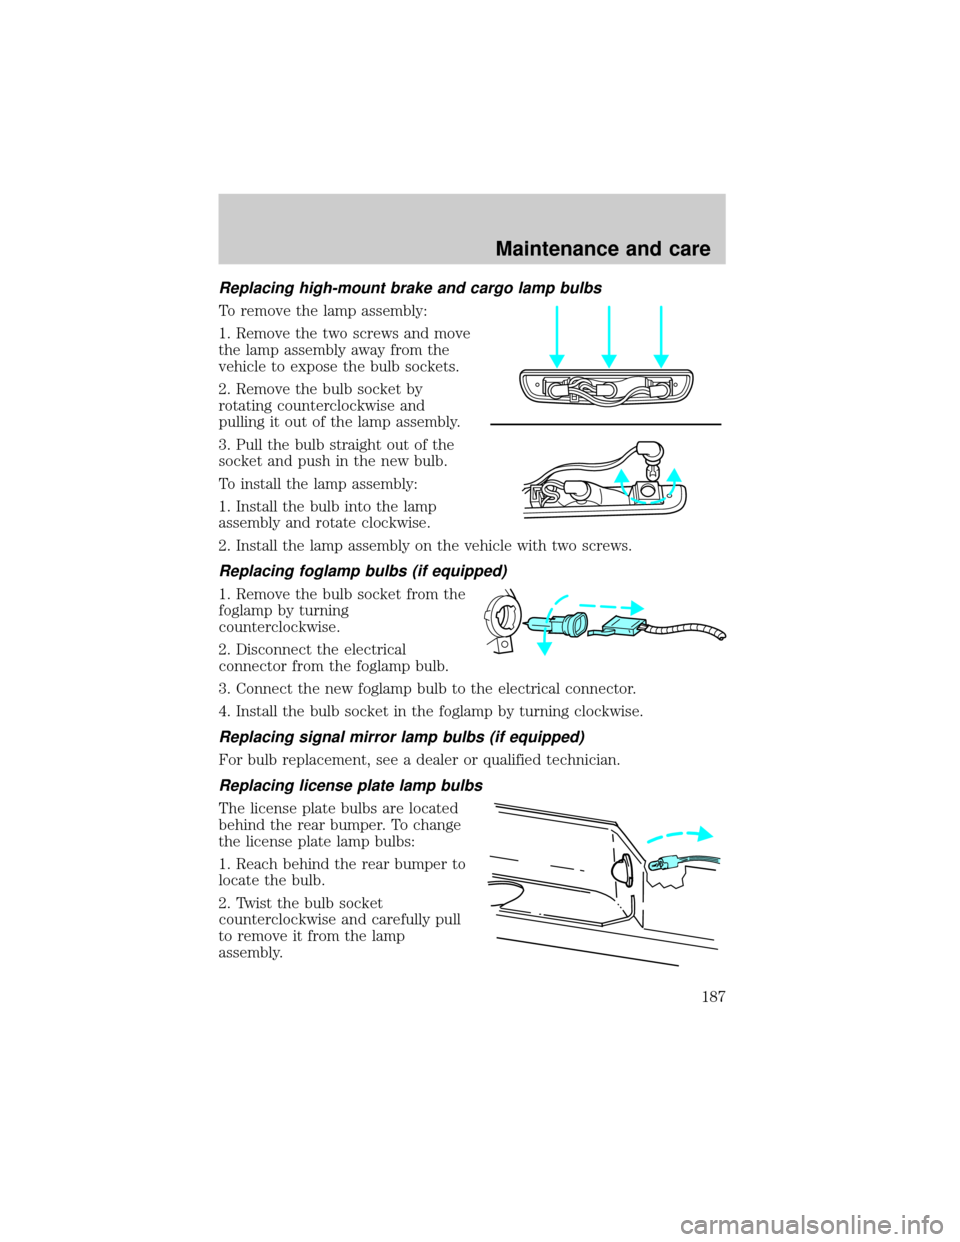
Replacing high-mount brake and cargo lamp bulbs
To remove the lamp assembly:
1. Remove the two screws and move
the lamp assembly away from the
vehicle to expose the bulb sockets.
2. Remove the bulb socket by
rotating counterclockwise and
pulling it out of the lamp assembly.
3. Pull the bulb straight out of the
socket and push in the new bulb.
To install the lamp assembly:
1. Install the bulb into the lamp
assembly and rotate clockwise.
2. Install the lamp assembly on the vehicle with two screws.
Replacing foglamp bulbs (if equipped)
1. Remove the bulb socket from the
foglamp by turning
counterclockwise.
2. Disconnect the electrical
connector from the foglamp bulb.
3. Connect the new foglamp bulb to the electrical connector.
4. Install the bulb socket in the foglamp by turning clockwise.
Replacing signal mirror lamp bulbs (if equipped)
For bulb replacement, see a dealer or qualified technician.
Replacing license plate lamp bulbs
The license plate bulbs are located
behind the rear bumper. To change
the license plate lamp bulbs:
1. Reach behind the rear bumper to
locate the bulb.
2. Twist the bulb socket
counterclockwise and carefully pull
to remove it from the lamp
assembly.
Maintenance and care
187
Page 188 of 224

3. Pull out the old bulb from the socket and push in the new bulb.
4. Install the bulb socket in lamp assembly by turning it clockwise.
USING THE RIGHT BULBS
Replacement bulbs are specified in the chart below. Headlamp bulbs
must be marked with an authorized ªD.O.T.º for North America and an
ªEº for Europe to assure lamp performance, light brightness and pattern
and safe visibility. The correct bulbs will not damage the lamp assembly
or void the lamp assembly warranty and will provide quality bulb burn
time.
Function Number of
bulbsTrade number
Headlamps 2 9007
Front park/turn lamps 2 3157 NAK
(amber)
Foglamps 2 9145
Backup lamp 2 3156K
Rear stop/turn/sidemarker/tail
lamp2 3457K
High-mount brakelamp 1 912
Cargo lamp 2 912
License plate lamp 2 168
Signal mirror lamp (if equipped) 2 906/921
All replacement bulbs are clear in color except where noted.
To replace all instrument panel lights - see your dealer
AIMING THE HEADLAMPS
The headlamps on your vehicle are properly aimed at the assembly plant.
If your vehicle has been in an accident the alignment of your headlamps
should be checked by a qualified service technician.
CLEANING AND CARING FOR YOUR VEHICLE
Refer to the Customer Assistance chapter for a list of Ford-approved
cleaners, polishes and waxes.
Maintenance and care
188
Page 199 of 224
ENGINE DATA
Engine 4.6L V8 engine 5.4L V8 engine
Cubic inches 281 330
Required fuel 87 octane 87 octane
Firing order 1-3-7-2-6-5-4-8 1-3-7-2-6-5-4-8
Spark plug gap1.3-1.4 mm
(0.052-0.056 inch)1.3-1.4 mm
(0.052-0.056 inch)
Ignition system Coil on plug Coil on plug
Compression ratio 9.0:1 9.0:1
VEHICLE DIMENSIONS
DimensionBody Style
Super Crew 4x2 mm
(in)Super Crew 4x4mm
(in)
(1) Overall length5 739
(225.9)5 739
(225.9)
(2) Overall width2 030
(79.9)
12 030
(79.9)1
(3) Overall height1 878
(73.9)1 953
(76.9)
(4) Wheel base3 518
(138.5)3 518
(138.5)
(5)Track front/rear1 661
(65.4)1 661
(65.4)
1Vehicle width, including mirrors: 2 293 mm (90.3 in)
Capacities and specifications
199
Page 211 of 224
Comfort and convenience
Air conditioner
Air filtration systems
Automatic Headlamp System with Daytime Running Lights (DRL)
Cargo nets
Cargo organizers (interior)
Cargo storage bin (regular cab)
Cargo trays (interior)
Celluar phone holder
Dash trim (wood grain)
Engine block heaters
Manual sliding rear window
Power sliding rear window
Tire step
Travel equipment
Bed extender
Bed mount bike carrier
Bed tent
Lumber mount bike carrier
Daytime running lights (DRL)
Fog lights
Heavy-duty battery
Hitch mount bike carrier
Inside mirror with compass display
Inside mirror with compass and temperature display
Off road lights
Outside signal mirror (available only with power mirrors)
Pickup box rails
Retractable bed hooks
Running boards (molded, diamond plate, tubular and stirrup step)
Customer assistance
211
Page 212 of 224
Seatback organizer
Signal mirror
Speed control
Towing mirrors
Trailer hitch (Class III)
Trailer hitch bars and balls
Trailer hitch wiring adaptor
Trailer swivel hitch
TV/video system
Winter front
Protection and appearance equipment
Air bag anti-theft locks
Battery warmer/blanket
Bed mat/bedliner tailgate covers
Bed mats
Bedliners
Cargo cover
Cargo liner
Chrome grill insert
Diamond plate, bed rail caps
Diamond plate, front box protector
Diamond plate, splash guards
Diamond plate, tool box
Door edge guards
Carpet floor mats
Fender flares
Flat splash guards
Front end covers (full)
Grill guard/brush guard
Homelink in sun visor
Customer assistance
212