2001 FORD EXPEDITION warning
[x] Cancel search: warningPage 68 of 280
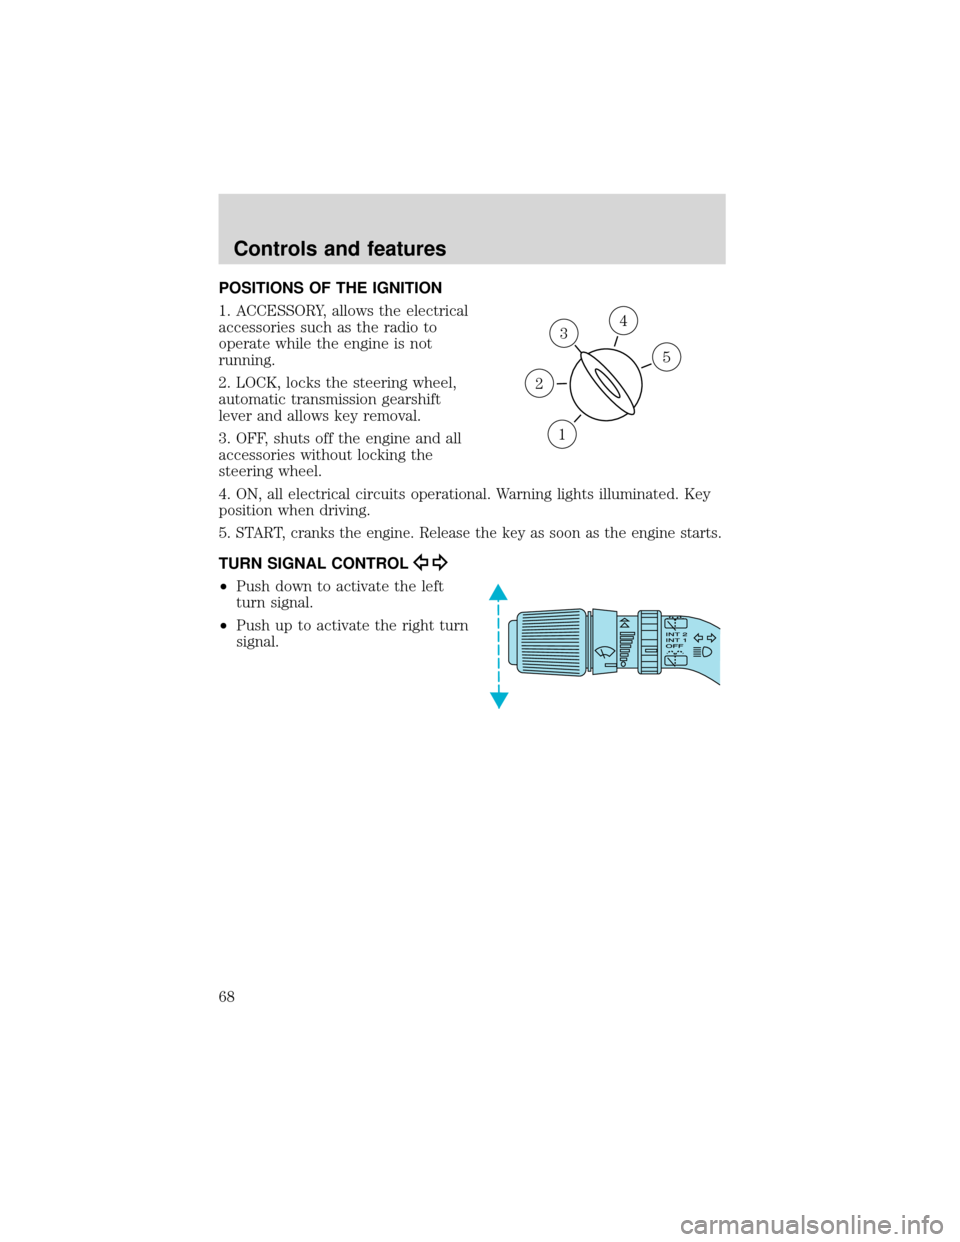
POSITIONS OF THE IGNITION
1. ACCESSORY, allows the electrical
accessories such as the radio to
operate while the engine is not
running.
2. LOCK, locks the steering wheel,
automatic transmission gearshift
lever and allows key removal.
3. OFF, shuts off the engine and all
accessories without locking the
steering wheel.
4. ON, all electrical circuits operational. Warning lights illuminated. Key
position when driving.
5.
START, cranks the engine. Release the key as soon as the engine starts.
TURN SIGNAL CONTROL
•Push down to activate the left
turn signal.
•Push up to activate the right turn
signal.
3
1
2
5
4
Controls and features
68
Page 91 of 280
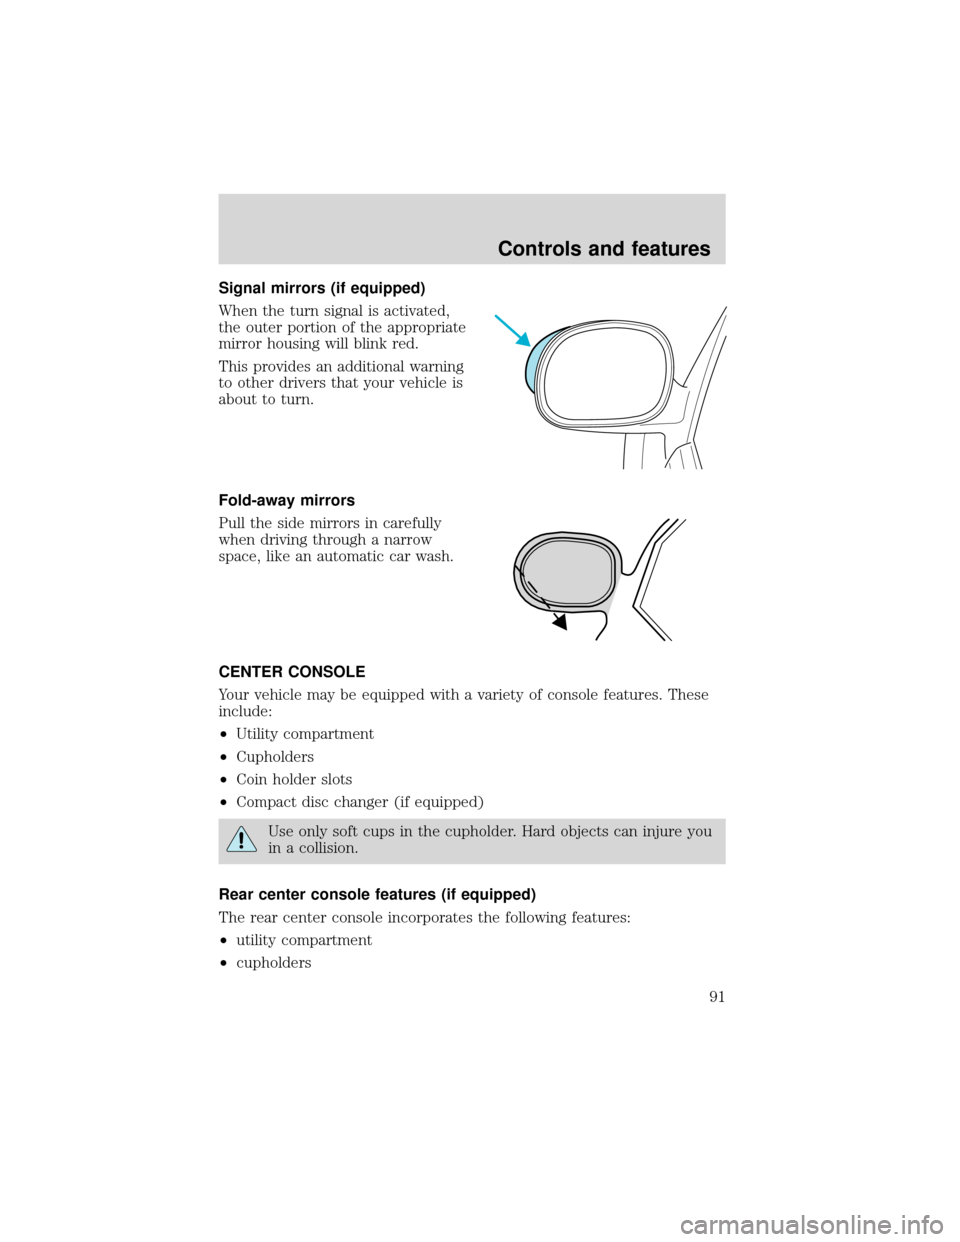
Signal mirrors (if equipped)
When the turn signal is activated,
the outer portion of the appropriate
mirror housing will blink red.
This provides an additional warning
to other drivers that your vehicle is
about to turn.
Fold-away mirrors
Pull the side mirrors in carefully
when driving through a narrow
space, like an automatic car wash.
CENTER CONSOLE
Your vehicle may be equipped with a variety of console features. These
include:
•Utility compartment
•Cupholders
•Coin holder slots
•Compact disc changer (if equipped)
Use only soft cups in the cupholder. Hard objects can injure you
in a collision.
Rear center console features (if equipped)
The rear center console incorporates the following features:
•utility compartment
•cupholders
Controls and features
91
Page 114 of 280
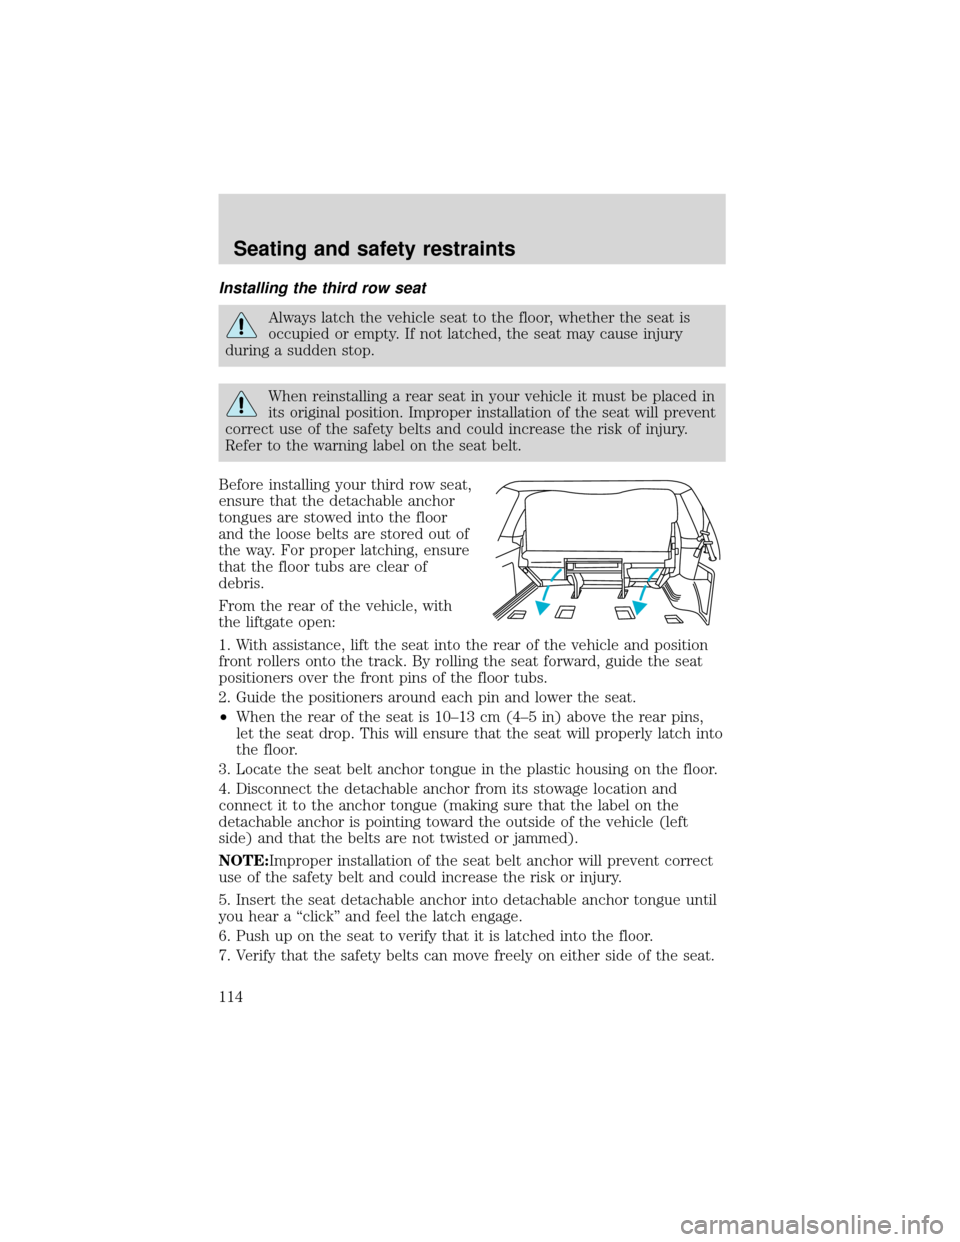
Installing the third row seat
Always latch the vehicle seat to the floor, whether the seat is
occupied or empty. If not latched, the seat may cause injury
during a sudden stop.
When reinstalling a rear seat in your vehicle it must be placed in
its original position. Improper installation of the seat will prevent
correct use of the safety belts and could increase the risk of injury.
Refer to the warning label on the seat belt.
Before installing your third row seat,
ensure that the detachable anchor
tongues are stowed into the floor
and the loose belts are stored out of
the way. For proper latching, ensure
that the floor tubs are clear of
debris.
From the rear of the vehicle, with
the liftgate open:
1. With assistance, lift the seat into the rear of the vehicle and position
front rollers onto the track. By rolling the seat forward, guide the seat
positioners over the front pins of the floor tubs.
2. Guide the positioners around each pin and lower the seat.
•When the rear of the seat is 10–13 cm (4–5 in) above the rear pins,
let the seat drop. This will ensure that the seat will properly latch into
the floor.
3. Locate the seat belt anchor tongue in the plastic housing on the floor.
4. Disconnect the detachable anchor from its stowage location and
connect it to the anchor tongue (making sure that the label on the
detachable anchor is pointing toward the outside of the vehicle (left
side) and that the belts are not twisted or jammed).
NOTE:Improper installation of the seat belt anchor will prevent correct
use of the safety belt and could increase the risk or injury.
5. Insert the seat detachable anchor into detachable anchor tongue until
you hear a“click”and feel the latch engage.
6. Push up on the seat to verify that it is latched into the floor.
7. Verify that the safety belts can move freely on either side of the seat.
Seating and safety restraints
114
Page 123 of 280
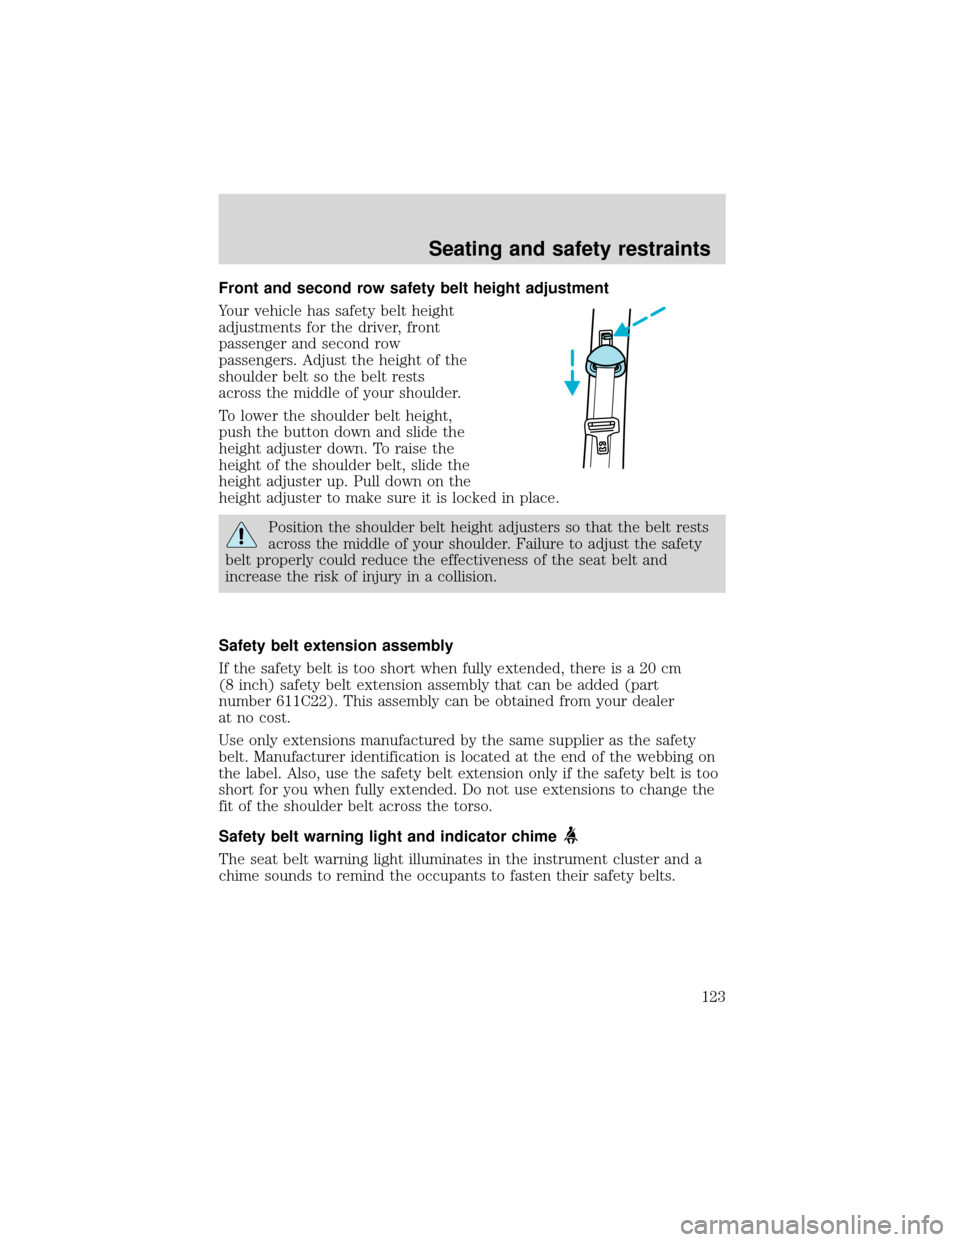
Front and second row safety belt height adjustment
Your vehicle has safety belt height
adjustments for the driver, front
passenger and second row
passengers. Adjust the height of the
shoulder belt so the belt rests
across the middle of your shoulder.
To lower the shoulder belt height,
push the button down and slide the
height adjuster down. To raise the
height of the shoulder belt, slide the
height adjuster up. Pull down on the
height adjuster to make sure it is locked in place.
Position the shoulder belt height adjusters so that the belt rests
across the middle of your shoulder. Failure to adjust the safety
belt properly could reduce the effectiveness of the seat belt and
increase the risk of injury in a collision.
Safety belt extension assembly
If the safety belt is too short when fully extended, there is a 20 cm
(8 inch) safety belt extension assembly that can be added (part
number 611C22). This assembly can be obtained from your dealer
at no cost.
Use only extensions manufactured by the same supplier as the safety
belt. Manufacturer identification is located at the end of the webbing on
the label. Also, use the safety belt extension only if the safety belt is too
short for you when fully extended. Do not use extensions to change the
fit of the shoulder belt across the torso.
Safety belt warning light and indicator chime
The seat belt warning light illuminates in the instrument cluster and a
chime sounds to remind the occupants to fasten their safety belts.
Seating and safety restraints
123
Page 124 of 280
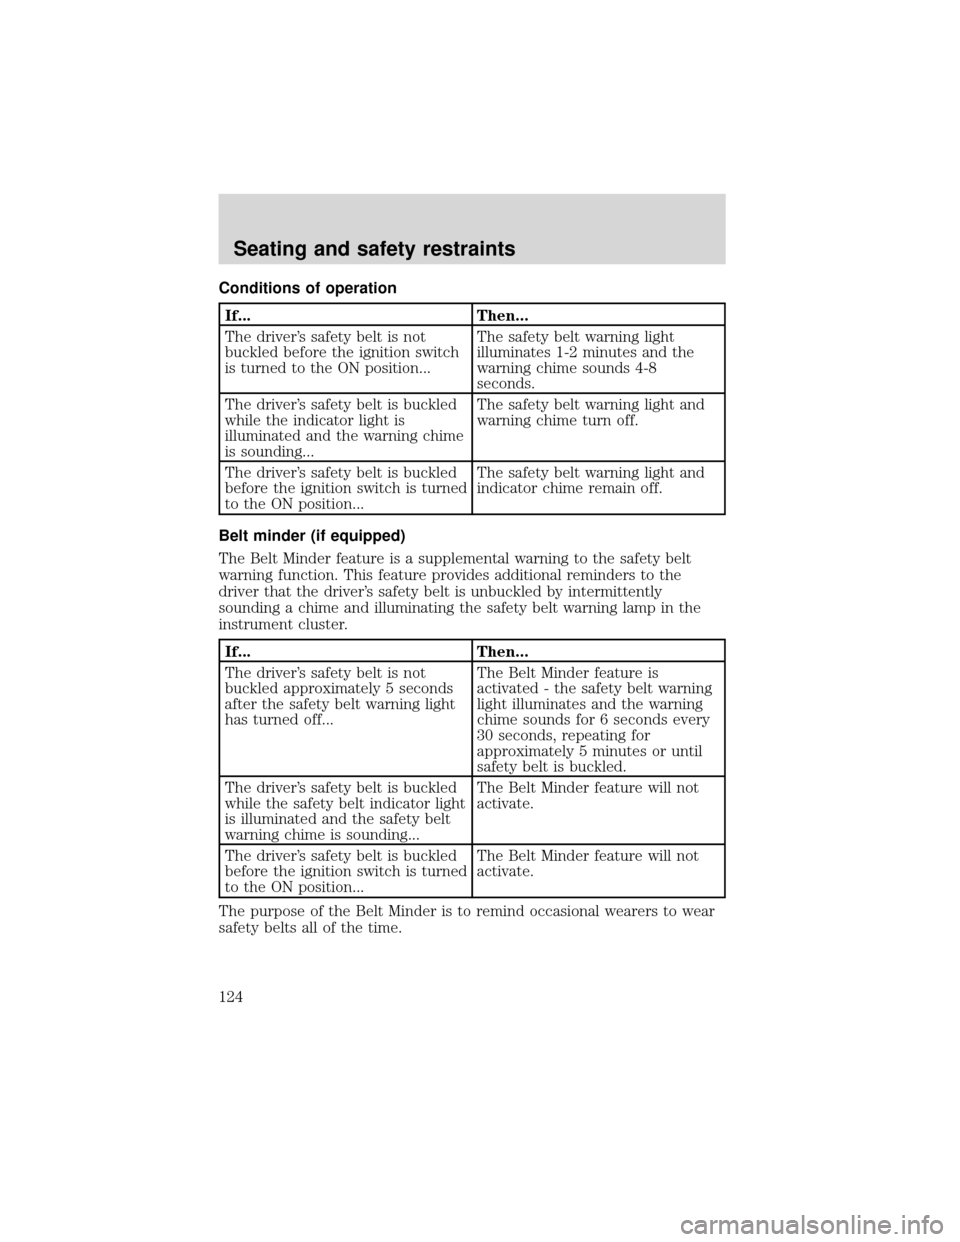
Conditions of operation
If... Then...
The driver’s safety belt is not
buckled before the ignition switch
is turned to the ON position...The safety belt warning light
illuminates 1-2 minutes and the
warning chime sounds 4-8
seconds.
The driver’s safety belt is buckled
while the indicator light is
illuminated and the warning chime
is sounding...The safety belt warning light and
warning chime turn off.
The driver’s safety belt is buckled
before the ignition switch is turned
to the ON position...The safety belt warning light and
indicator chime remain off.
Belt minder (if equipped)
The Belt Minder feature is a supplemental warning to the safety belt
warning function. This feature provides additional reminders to the
driver that the driver’s safety belt is unbuckled by intermittently
sounding a chime and illuminating the safety belt warning lamp in the
instrument cluster.
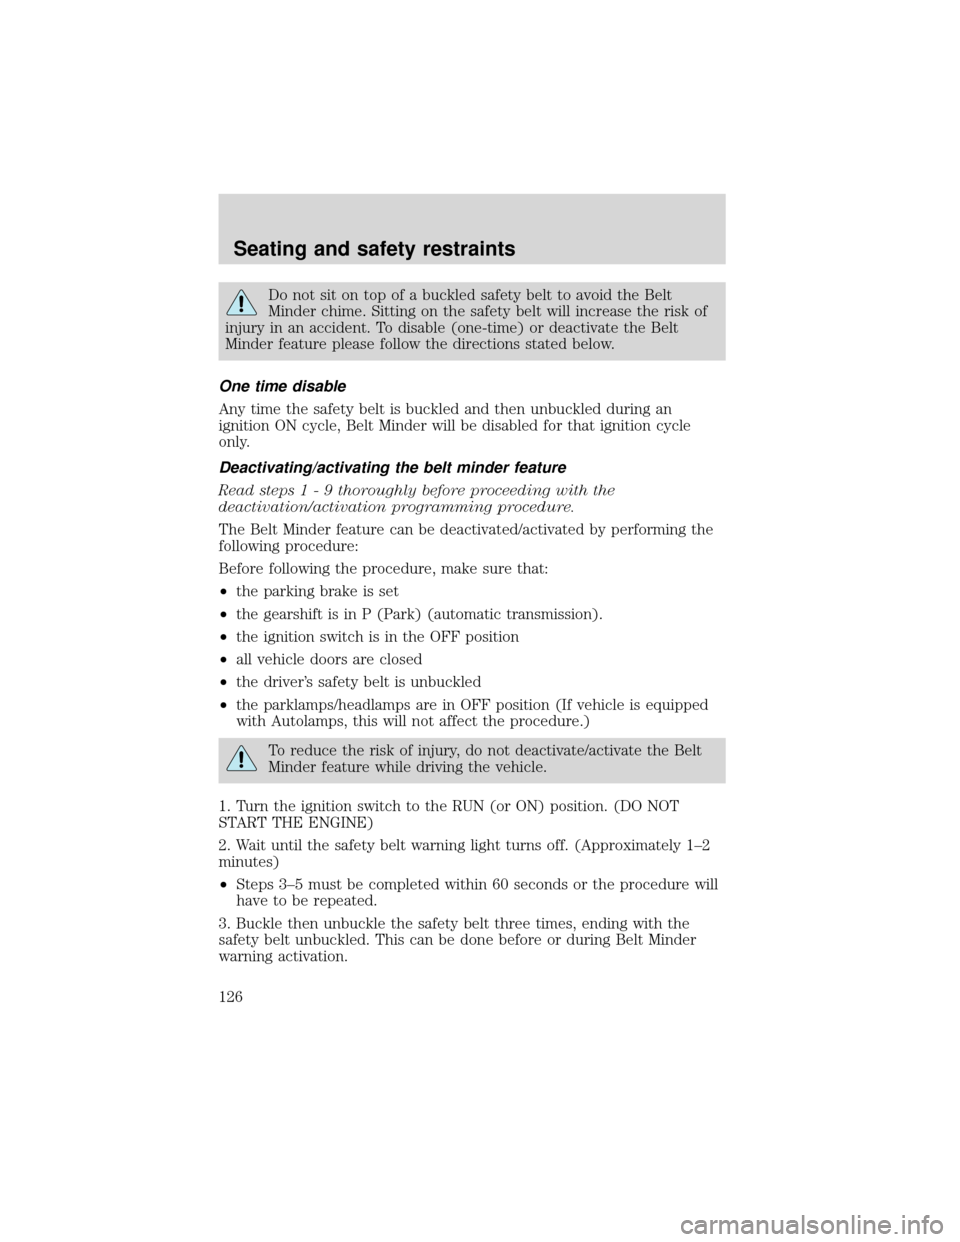
If... Then...
The driver’s safety belt is not
buckled approximately 5 seconds
after the safety belt warning light
has turned off...The Belt Minder feature is
activated - the safety belt warning
light illuminates and the warning
chime sounds for 6 seconds every
30 seconds, repeating for
approximately 5 minutes or until
safety belt is buckled.
The driver’s safety belt is buckled
while the safety belt indicator light
is illuminated and the safety belt
warning chime is sounding...The Belt Minder feature will not
activate.
The driver’s safety belt is buckled
before the ignition switch is turned
to the ON position...The Belt Minder feature will not
activate.
The purpose of the Belt Minder is to remind occasional wearers to wear
safety belts all of the time.
Seating and safety restraints
124
Page 126 of 280
Do not sit on top of a buckled safety belt to avoid the Belt
Minder chime. Sitting on the safety belt will increase the risk of
injury in an accident. To disable (one-time) or deactivate the Belt
Minder feature please follow the directions stated below.
One time disable
Any time the safety belt is buckled and then unbuckled during an
ignition ON cycle, Belt Minder will be disabled for that ignition cycle
only.
Deactivating/activating the belt minder feature
Read steps1-9thoroughly before proceeding with the
deactivation/activation programming procedure.
The Belt Minder feature can be deactivated/activated by performing the
following procedure:
Before following the procedure, make sure that:
•the parking brake is set
•the gearshift is in P (Park) (automatic transmission).
•the ignition switch is in the OFF position
•all vehicle doors are closed
•the driver’s safety belt is unbuckled
•the parklamps/headlamps are in OFF position (If vehicle is equipped
with Autolamps, this will not affect the procedure.)
To reduce the risk of injury, do not deactivate/activate the Belt
Minder feature while driving the vehicle.
1. Turn the ignition switch to the RUN (or ON) position. (DO NOT
START THE ENGINE)
2. Wait until the safety belt warning light turns off. (Approximately 1–2
minutes)
•Steps 3–5 must be completed within 60 seconds or the procedure will
have to be repeated.
3. Buckle then unbuckle the safety belt three times, ending with the
safety belt unbuckled. This can be done before or during Belt Minder
warning activation.
Seating and safety restraints
126
Page 127 of 280
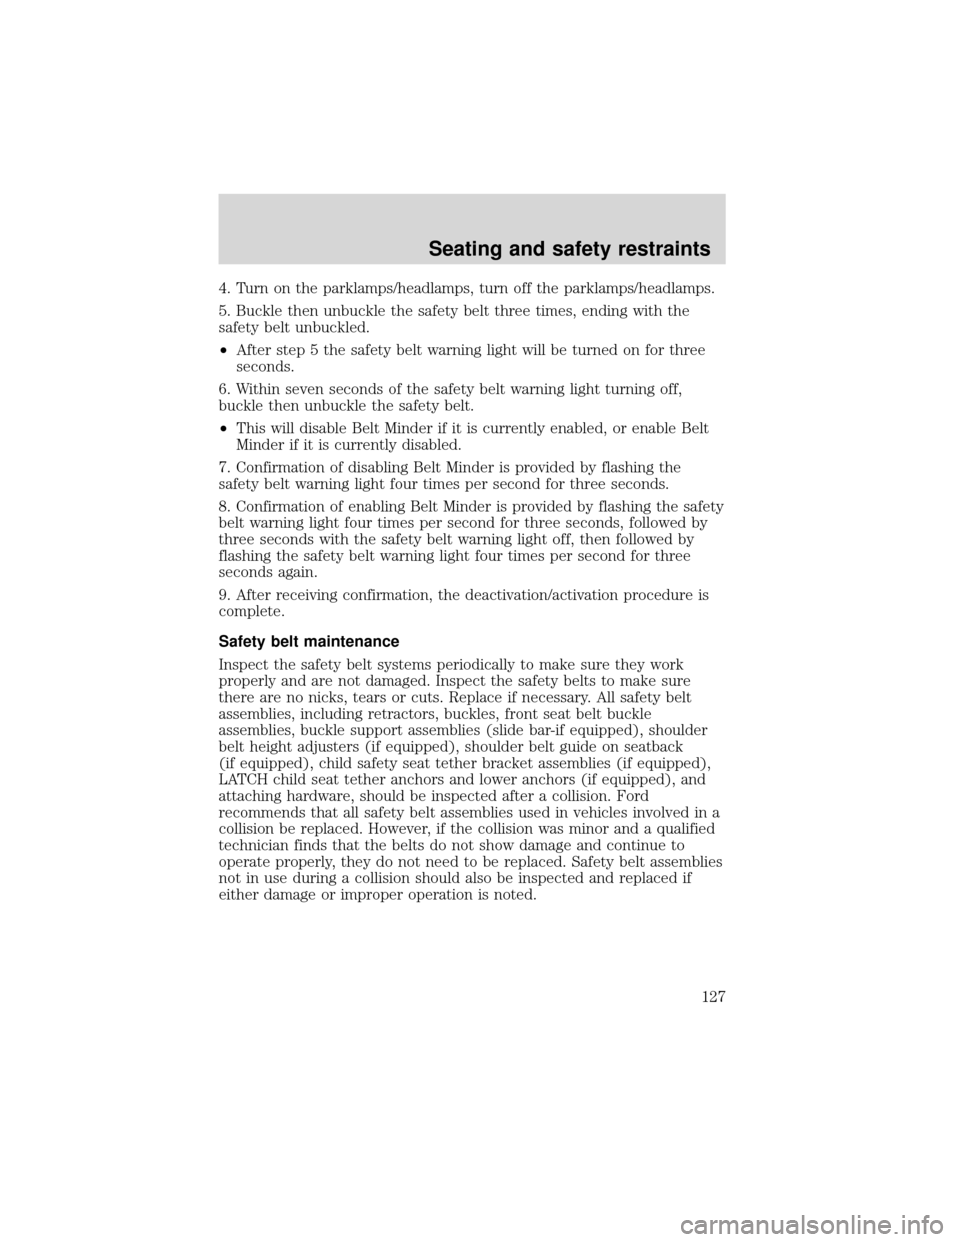
4. Turn on the parklamps/headlamps, turn off the parklamps/headlamps.
5. Buckle then unbuckle the safety belt three times, ending with the
safety belt unbuckled.
•After step 5 the safety belt warning light will be turned on for three
seconds.
6. Within seven seconds of the safety belt warning light turning off,
buckle then unbuckle the safety belt.
•This will disable Belt Minder if it is currently enabled, or enable Belt
Minder if it is currently disabled.
7. Confirmation of disabling Belt Minder is provided by flashing the
safety belt warning light four times per second for three seconds.
8. Confirmation of enabling Belt Minder is provided by flashing the safety
belt warning light four times per second for three seconds, followed by
three seconds with the safety belt warning light off, then followed by
flashing the safety belt warning light four times per second for three
seconds again.
9. After receiving confirmation, the deactivation/activation procedure is
complete.
Safety belt maintenance
Inspect the safety belt systems periodically to make sure they work
properly and are not damaged. Inspect the safety belts to make sure
there are no nicks, tears or cuts. Replace if necessary. All safety belt
assemblies, including retractors, buckles, front seat belt buckle
assemblies, buckle support assemblies (slide bar-if equipped), shoulder
belt height adjusters (if equipped), shoulder belt guide on seatback
(if equipped), child safety seat tether bracket assemblies (if equipped),
LATCH child seat tether anchors and lower anchors (if equipped), and
attaching hardware, should be inspected after a collision. Ford
recommends that all safety belt assemblies used in vehicles involved in a
collision be replaced. However, if the collision was minor and a qualified
technician finds that the belts do not show damage and continue to
operate properly, they do not need to be replaced. Safety belt assemblies
not in use during a collision should also be inspected and replaced if
either damage or improper operation is noted.
Seating and safety restraints
127
Page 133 of 280
The RCM (restraints control module) monitors its own internal circuits
and the supplemental air bag electrical system warning (including the
impact sensors, the system wiring, the air bag system readiness light, the
air bag back up power and the air bag ignitors).
Determining if the system is operational
The SRS uses a readiness light in the instrument cluster or a tone to
indicate the condition of the system. Refer to theAir bag readiness
section in theInstrumentationchapter. Routine maintenance of the air
bag is not required.
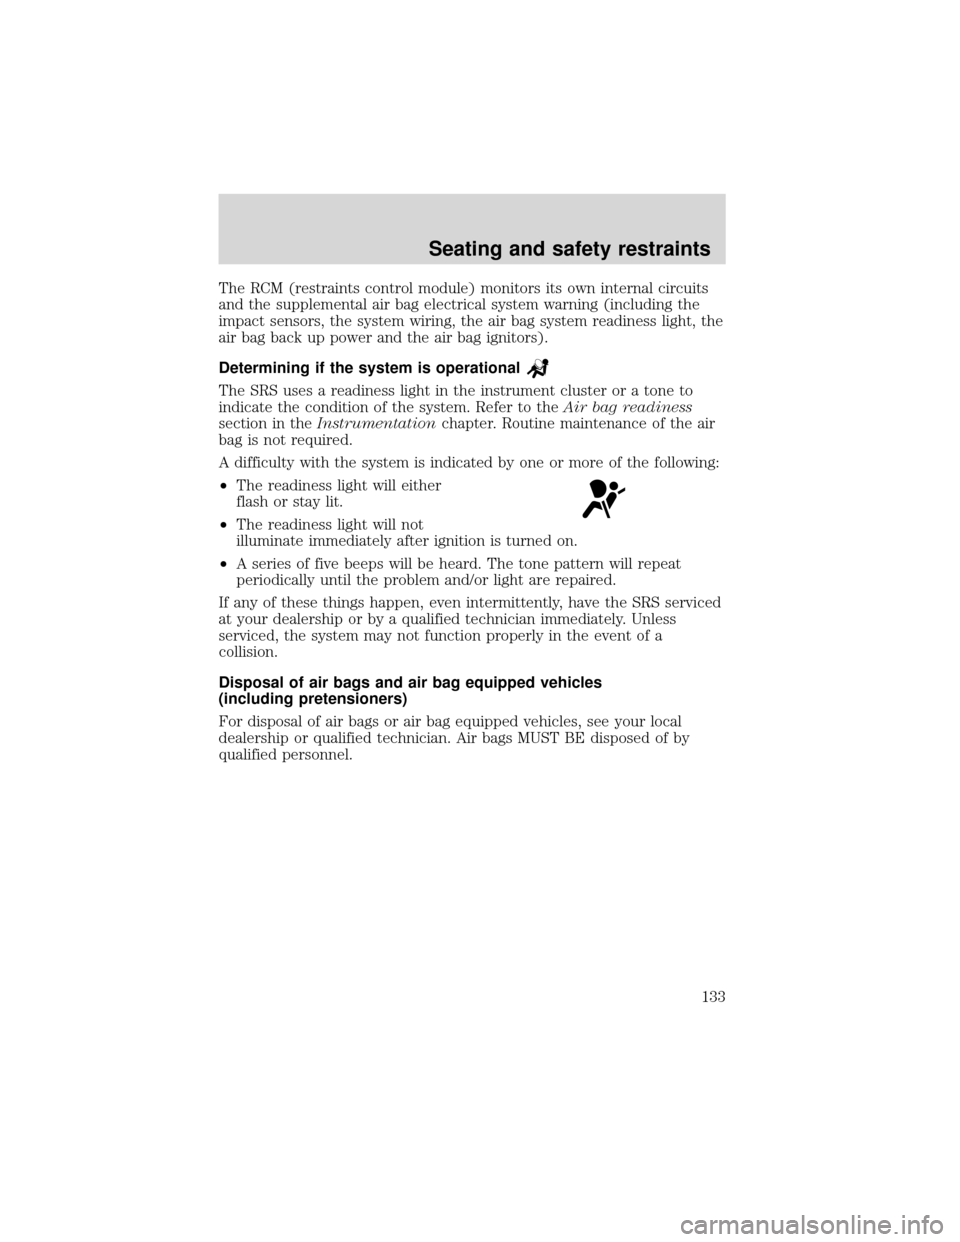
A difficulty with the system is indicated by one or more of the following:
•The readiness light will either
flash or stay lit.
•The readiness light will not
illuminate immediately after ignition is turned on.
•A series of five beeps will be heard. The tone pattern will repeat
periodically until the problem and/or light are repaired.
If any of these things happen, even intermittently, have the SRS serviced
at your dealership or by a qualified technician immediately. Unless
serviced, the system may not function properly in the event of a
collision.
Disposal of air bags and air bag equipped vehicles
(including pretensioners)
For disposal of air bags or air bag equipped vehicles, see your local
dealership or qualified technician. Air bags MUST BE disposed of by
qualified personnel.
Seating and safety restraints
133