Page 126 of 224
The fuses are coded as follows.
Fuse/Relay
LocationFuse Amp
RatingPassenger Compartment
Fuse Panel Description
1 20A 4WABS Module
2 15A Brake Warning Lamp, Instrument
Cluster, Warning Chime, 4WABS Relay,
Warning Indicators, Low Vacuum
Warning Switch (Diesel Only)
3 15A Main Light Switch, RKE Module, Radio,
Instrument Illumination, E Traveler VCP
and video screen.
4 15A Power Locks w/RKE, Illuminated Entry,
Warning Chime, Modified Vehicle, Main
Light Switch, Courtesy Lamps
5 20A RKE Module, Power Lock Switches,
Memory Lock, Power Locks with RKE
1234
5
7
689101142
43
44 13 12 14
15 16 17
19 18
2021 22 23
25 24
26 27 28 29
31 30 32 33 3435
37
3638 3940
41
Roadside emergencies
126
ProCarManuals.com
Page 127 of 224

Fuse/Relay
LocationFuse Amp
RatingPassenger Compartment
Fuse Panel Description
6 10A Brake Shift Interlock, Speed Control,
DRL Module
7 10A Multi-Function Switch, Turn Signals
8 30A Radio Capacitor(s), Ignition Coil, PCM
Diode, PCM Power Relay, Fuel Heater
(Diesel Only), Glow Plug Relay (Diesel
Only)
9 30A Wiper Control Module, Windshield Wiper
Motor
10 20A Main Light Switch, Park Lamps, License
Lamp,(External Lamps) Multi-Function
Switch (Flash-to-pass)
11 15A Brake Pressure Switch, Multi-Function
Switch (Hazards), Brake Lamp Switch,
Brake Lamps
12 15A Transmission Range (TR) Sensor,
Backup Lamps, Auxiliary Battery Relay
13 15A Blend Door Actuator, A/C Heater,
Function Selector Switch
14 5A Instrument Cluster (Air Bag and Charge
Indicator)
15 5A Trailer Battery Charge Relay
16 30A Power Seats
17 Ð Not Used
18 Ð Not Used
19 10A Air Bag Diagnostic Monitor
20 5A Overdrive Cancel Switch
21 30A Power Windows*
22 15A Memory Power Radio, E Traveler Radio
23 20A Cigar Lighter, Data Link Connector
(DLC)
24 Ð Not Used
25 10A Left Headlamp (Low Beam)
26 20A Rear Power Point
Roadside emergencies
127
ProCarManuals.com
Page 130 of 224

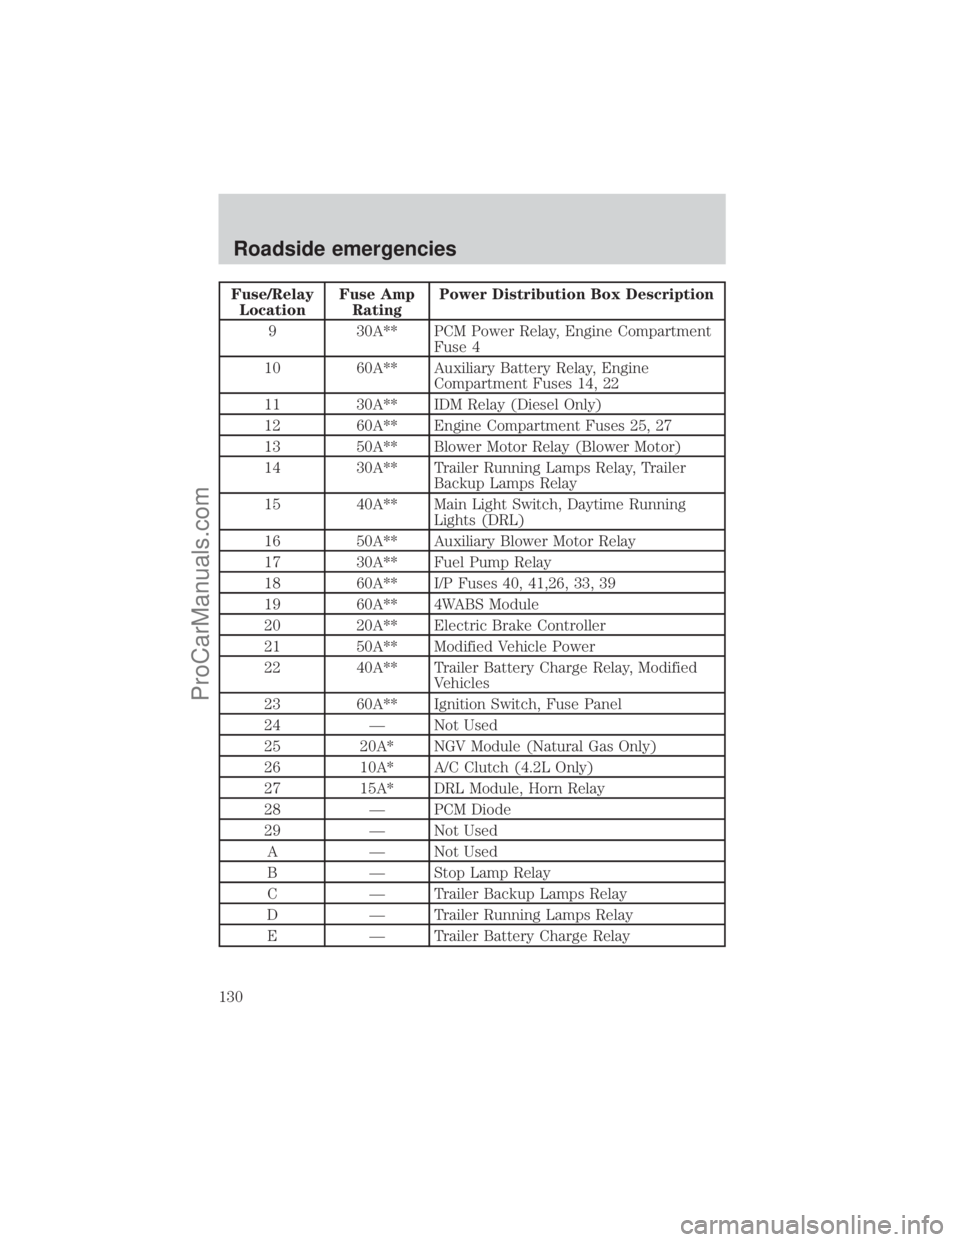
Fuse/Relay
LocationFuse Amp
RatingPower Distribution Box Description
9 30A** PCM Power Relay, Engine Compartment
Fuse 4
10 60A** Auxiliary Battery Relay, Engine
Compartment Fuses 14, 22
11 30A** IDM Relay (Diesel Only)
12 60A** Engine Compartment Fuses 25, 27
13 50A** Blower Motor Relay (Blower Motor)
14 30A** Trailer Running Lamps Relay, Trailer
Backup Lamps Relay
15 40A** Main Light Switch, Daytime Running
Lights (DRL)
16 50A** Auxiliary Blower Motor Relay
17 30A** Fuel Pump Relay
18 60A** I/P Fuses 40, 41,26, 33, 39
19 60A** 4WABS Module
20 20A** Electric Brake Controller
21 50A** Modified Vehicle Power
22 40A** Trailer Battery Charge Relay, Modified
Vehicles
23 60A** Ignition Switch, Fuse Panel
24 Ð Not Used
25 20A* NGV Module (Natural Gas Only)
26 10A* A/C Clutch (4.2L Only)
27 15A* DRL Module, Horn Relay
28 Ð PCM Diode
29 Ð Not Used
A Ð Not Used
B Ð Stop Lamp Relay
C Ð Trailer Backup Lamps Relay
D Ð Trailer Running Lamps Relay
E Ð Trailer Battery Charge Relay
Roadside emergencies
130
ProCarManuals.com
Page 139 of 224
Connecting the jumper cables
1. Connect the positive (+) booster cable to the positive (+) terminal of
the discharged battery.
Note:In the illustrations,lightning boltsare used to designate the
assisting (boosting) battery.
2. Connect the other end of the positive (+) cable to the positive (+)
terminal of the assisting battery.
+–+–
+–+–
Roadside emergencies
139
ProCarManuals.com
Page 141 of 224
Jump starting
1. Start the engine of the booster vehicle and run the engine at
moderately increased speed.
2. Start the engine of the disabled vehicle.
3. Once the disabled vehicle has been started, run both engines for an
additional three minutes before disconnecting the jumper cables.
Removing the jumper cables
Remove the jumper cables in the reverse order that they were
connected.
1. Remove the jumper cable from thegroundmetal surface.
Note:In the illustrations,lightning boltsare used to designate the
assisting (boosting) battery.
2. Remove the jumper cable on the negative (-) connection of the
booster vehicle's battery.
+–+–
+–+–
Roadside emergencies
141
ProCarManuals.com
Page 144 of 224

SERVICE RECOMMENDATIONS
To help you service your vehicle:
²We highlight do-it-yourself items in the engine compartment for easy
location.
²We provide a scheduled maintenance guide which makes tracking
routine service easy.
If your vehicle requires professional service, your dealership can provide
the necessary parts and service. Check your ªWarranty Guideº to find out
which parts and services are covered.
Use only recommended fuels, lubricants, fluids and service parts
conforming to specifications. Motorcraft parts are designed and built to
provide the best performance in your vehicle.
PRECAUTIONS WHEN SERVICING YOUR VEHICLE
Be especially careful when inspecting or servicing your vehicle.
²Do not work on a hot engine.
²When the engine is running, make sure that loose clothing, jewelry or
long hair does not get caught up in moving parts.
²Do not work on a vehicle with the engine running in an enclosed
space, unless you are sure you have enough ventilation.
²Keep all lit cigarettes, open flames and other lit material away from
the battery and all fuel related parts.
If you disconnect the battery, the engine must ªrelearnº its idle
conditions before your vehicle will drive properly, as explained inBattery
in this chapter.
Working with the engine off
1. Set the parking brake and ensure the gearshift is securely latched in P
(Park).
2. Turn off the engine and remove the key.
3. Block the wheels to prevent the vehicle from moving unexpectedly.
Working with the engine on
1. Set the parking brake and ensure the gearshift is securely latched in P
(Park).
2. Block the wheels to prevent the vehicle from moving unexpectedly.
Maintenance and care
144
ProCarManuals.com
Page 151 of 224

Do not let the reservoir for the master cylinder run dry. This
may cause the brakes to fail.
WINDSHIELD WASHER FLUID
Checking and adding washer fluid
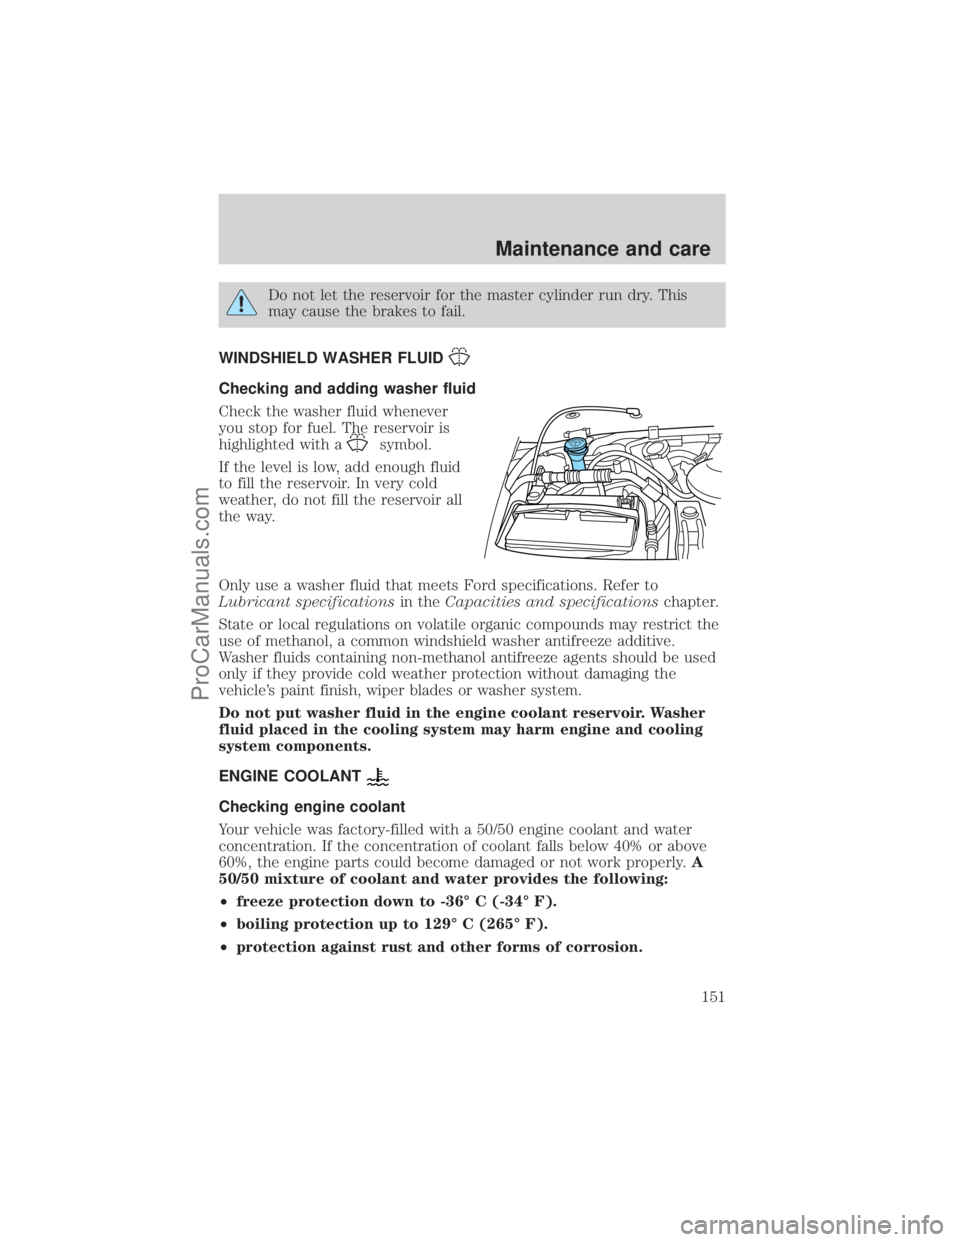
Check the washer fluid whenever
you stop for fuel. The reservoir is
highlighted with a
symbol.
If the level is low, add enough fluid
to fill the reservoir. In very cold
weather, do not fill the reservoir all
the way.
Only use a washer fluid that meets Ford specifications. Refer to
Lubricant specificationsin theCapacities and specificationschapter.
State or local regulations on volatile organic compounds may restrict the
use of methanol, a common windshield washer antifreeze additive.
Washer fluids containing non-methanol antifreeze agents should be used
only if they provide cold weather protection without damaging the
vehicle's paint finish, wiper blades or washer system.
Do not put washer fluid in the engine coolant reservoir. Washer
fluid placed in the cooling system may harm engine and cooling
system components.
ENGINE COOLANT
Checking engine coolant
Your vehicle was factory-filled with a 50/50 engine coolant and water
concentration. If the concentration of coolant falls below 40% or above
60%, the engine parts could become damaged or not work properly.A
50/50 mixture of coolant and water provides the following:
²freeze protection down to -36É C (-34É F).
²boiling protection up to 129É C (265É F).
²protection against rust and other forms of corrosion.
Maintenance and care
151
ProCarManuals.com
Page 154 of 224

²Do not add extra inhibitors or additives to the coolant.These
can be harmful and compromise the corrosion protection of the engine
coolant.
²Do not mix with recycled coolant unless from a Ford-approved
recycling process (seeUse of Recycled Engine Coolantsection.
For vehicles with overflow coolant systems with a non-pressurized cap
on the coolant recovery system, add coolant to the coolant recovery
reservoir when the engine is cool. Add the proper mixture of coolant and
water to the ªcold fullº level. For all other vehicles, which have a coolant
degas system with a pressurized cap, or if it is necessary to remove the
coolant pressure relief cap on the radiator of a vehicle with an overflow
system, follow these steps to add engine coolant.
To avoid personal injury, make sure the engine is cool before
unscrewing the coolant pressure relief cap. The cooling system is
under pressure; steam and hot liquid can come out forcefully when the
cap is loosened slightly.
1. Before you begin, turn the engine off and let it cool.
2. When the engine is cool, wrap a thick cloth around the coolant
pressure relief cap on the coolant reservoir (an opaque plastic bottle).
Slowly turn cap counterclockwise (left) until pressure begins to release.
3. Step back while the pressure releases.
4. When you are sure that all the pressure has been released, use the
cloth to turn it counterclockwise and remove the cap.
5. Fill the coolant reservoir slowly with the proper coolant mixture (see
above), to within the ªcold fill rangeº or the ªcold fullº level on the
reservoir. If you removed the radiator cap in an overflow system, fill the
radiator until the coolant is visible and radiator is almost full.
6. Replace the cap. Turn until tightly installed. (Cap must be tightly
installed to prevent coolant loss.)
After any coolant has been added, run the engine for a few minutes to
mix the coolant. Check the coolant concentration. Make sure the engine
is off and cool before removing the coolant pressure relief cap (see
preceding steps on cap removal). Check the concentration per the
Checking Engine Coolantsection. If the concentration is not 50/50
(protection to ±34ÉF/±36ÉC), drain some coolant and adjust the
concentraction. It may take several drains and additions to obtain a 50/50
coolant concentration.
Maintenance and care
154
ProCarManuals.com