Page 18 of 460
1-6 Head Restraints
Head restraints are fixed on some models and adjustable
on others. Slide an adjustable head restraint up or down
so that the top of the restraint is closest to the top of
your ears. This position reduces the chance of a neck
injury in a crash.
Rear Seats
Seat Controls
The rear seats in your vehicle have levers and straps
used to adjust, remove and reinstall the seats. By using
the levers and straps, in the correct order, you can easily
remove the seats from your vehicle.
Floor Seat Pin Diagram
Page 20 of 460

1-8 Split Bench Seats
If you have the split bench seat (50/50 or 40/60), the
seatbacks can be folded down individually and the
sections can be removed individually. The 40/60 sections
can also be adjusted forward or rearward individually.
The second row (40/60) split bench may be equipped
with a built
-in child restraint. See ªBuilt-In Child
Restraintº in the Index.
Folding or Reclining the Seatbacks
The seatbacks on each section of the split bench seat
can be either folded down or reclined. The following
explains how to use either the nylon strap or the lever
to fold or recline the seatbacks.
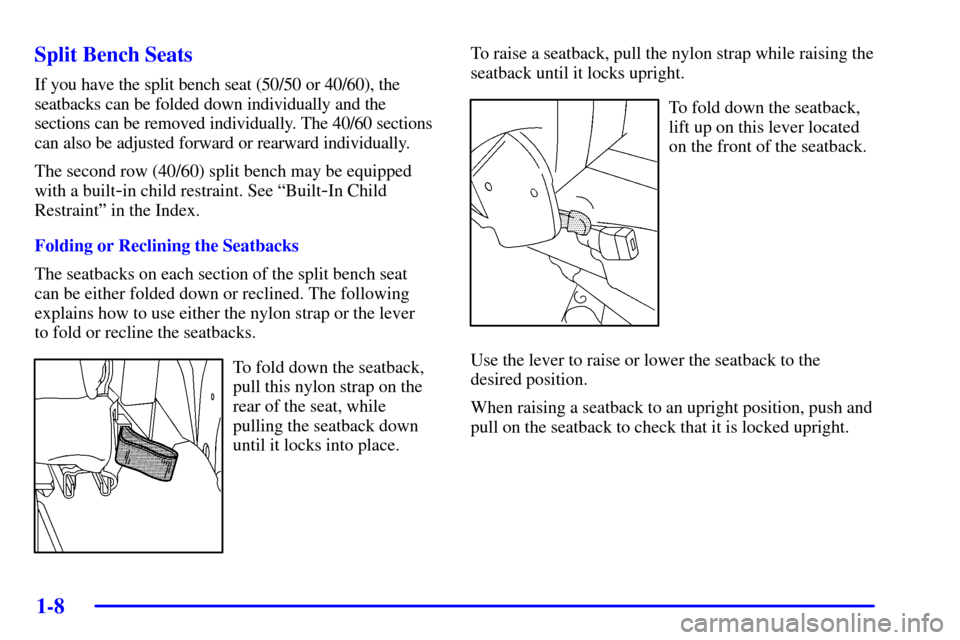
To fold down the seatback,
pull this nylon strap on the
rear of the seat, while
pulling the seatback down
until it locks into place.To raise a seatback, pull the nylon strap while raising the
seatback until it locks upright.
To fold down the seatback,
lift up on this lever located
on the front of the seatback.
Use the lever to raise or lower the seatback to the
desired position.
When raising a seatback to an upright position, push and
pull on the seatback to check that it is locked upright.
Page 23 of 460

1-11
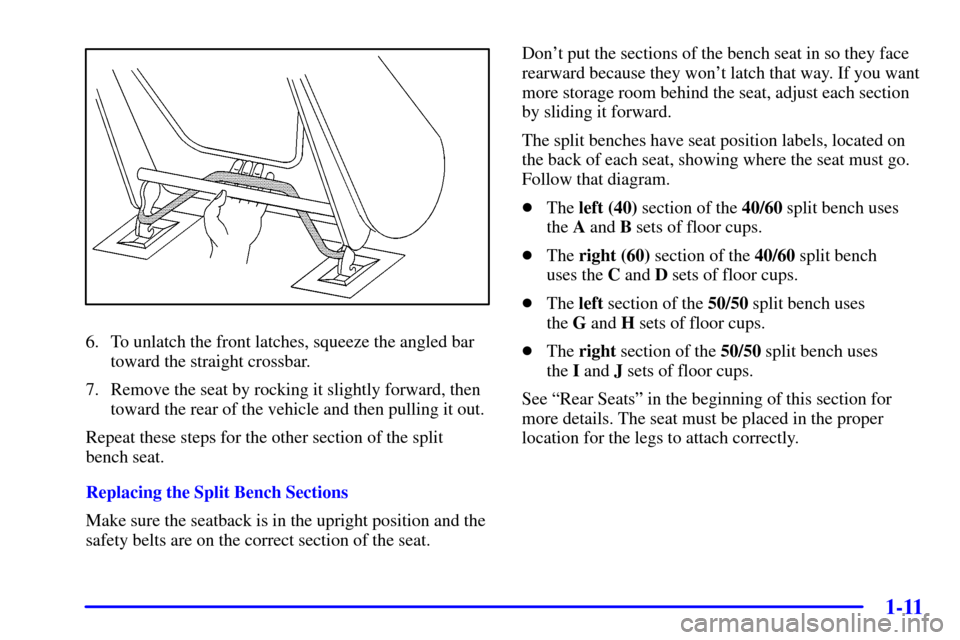
6. To unlatch the front latches, squeeze the angled bar
toward the straight crossbar.
7. Remove the seat by rocking it slightly forward, then
toward the rear of the vehicle and then pulling it out.
Repeat these steps for the other section of the split
bench seat.
Replacing the Split Bench Sections
Make sure the seatback is in the upright position and the
safety belts are on the correct section of the seat.Don't put the sections of the bench seat in so they face
rearward because they won't latch that way. If you want
more storage room behind the seat, adjust each section
by sliding it forward.
The split benches have seat position labels, located on
the back of each seat, showing where the seat must go.
Follow that diagram.
�The left (40) section of the 40/60 split bench uses
the A and B sets of floor cups.
�The right (60) section of the 40/60 split bench
uses the C and D sets of floor cups.
�The left section of the 50/50 split bench uses
the G and H sets of floor cups.
�The right section of the 50/50 split bench uses
the I and J sets of floor cups.
See ªRear Seatsº in the beginning of this section for
more details. The seat must be placed in the proper
location for the legs to attach correctly.
Page 26 of 460

1-14
7. If you have the 40/60 seat, attach the mini-buckle so
that the safety belt is ready for use when a passenger
uses the seat.
The buckle reattaches by pushing the latch into the
buckle until the red center pops out again.
Repeat these steps for the other section of the split
bench seat.
CAUTION:
A safety belt that is improperly routed, not
properly attached, or twisted won't provide
the protection needed in a crash. The person
wearing the belt could be seriously injured.
After installing the seat, always check to be sure
that the safety belts are properly routed and
attached, and are not twisted.
Bucket Seats
If you have the rear bucket seats, the seatbacks can be
folded down or reclined. The seats can also be adjusted
forward or rearward and removed.
Folding or Reclining the Seatbacks
The seatback on a bucket seat can be either folded down
or reclined. The following explains how to use either the
nylon strap or the lever to fold or recline the seatback.
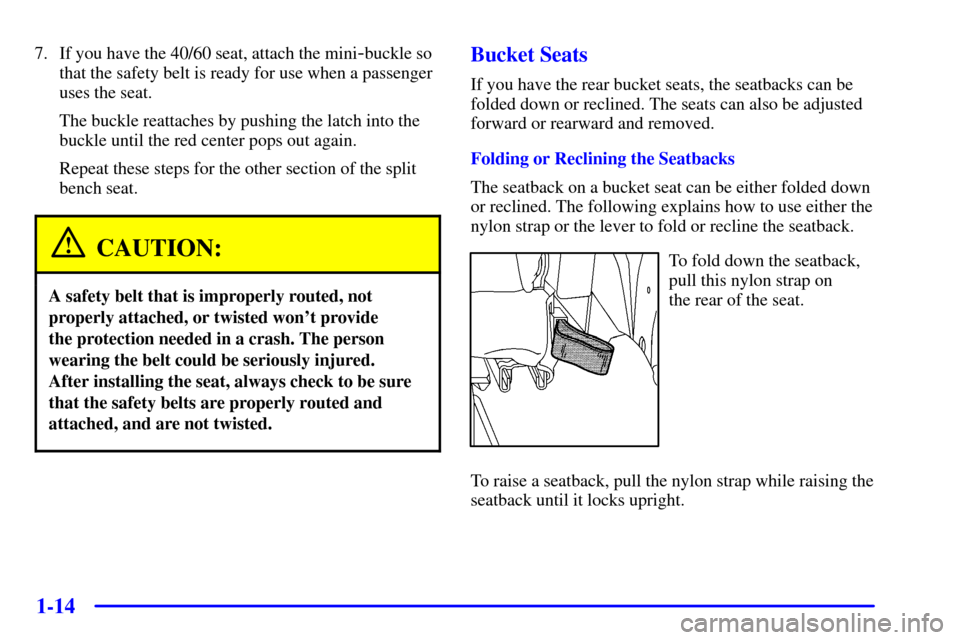
To fold down the seatback,
pull this nylon strap on
the rear of the seat.
To raise a seatback, pull the nylon strap while raising the
seatback until it locks upright.
Page 32 of 460
1-20 Captain's Chairs
If your vehicle has the captain's chairs, the seatbacks
can be folded forward or reclined and the seats can
be removed.
To recline the seatback, lift up on the recliner lever
located on the outboard side of the seat. Use the recliner
lever to move the seatback to the desired position.It is easier to raise or lower the seatback if you lean
forward, taking the weight off the seatback.
The armrests can be lowered or raised for entering or
exiting the vehicle.
The seatbacks on the captain's chairs also fold forward
to put items behind the left and right seats.
Lift up on the recliner lever and fold the seatback
forward. The seatback will lock into place when you
push it back to the upright position.
CAUTION:
If the seatback isn't locked, it could move
forward in a sudden stop or crash. That could
cause injury to the person sitting there. Always
press rearward on the seatback to be sure it
is locked.
Page 34 of 460
1-22
2. The seat can then be lifted off the front floor pins
and removed from the vehicle.Replacing the Captain's Chairs
The captain's chairs have seat position labels, located on
the back of the seat, showing where the seat must go.
Follow that diagram. The seat must be placed in the
proper location for the legs to attach correctly. See ªRear
Seatsº in the beginning of this section for more details.
The left chair goes in the A and C sets of floor pins.
The right chair goes in the D and F sets of floor pins.
1. Hook the front latches over the front floor pins.
Page 67 of 460
1-55
Rear Safety Belt Comfort Guides for
Children and Small Adults
Your vehicle may have rear shoulder belt comfort
guides. This feature will provide added safety belt
comfort for older children who have outgrown booster
seats and for small adults. When installed on a shoulder
belt, the comfort guide better positions the belt away
from the neck and head.
If your vehicle has bucket seats in the second row, there
is one guide for each outside passenger position. If your
vehicle has a bench seat in the second row, there is one
guide for the left
-hand outside passenger position.
To provide added safety belt comfort for children
who have outgrown child restraints and for smaller
adults, the comfort guides may be installed on the
shoulder belts. Here's how to install a comfort guide and use the
safety belt:
1. Remove the guide from its storage clip on the side of
the seatback.
Page 410 of 460

6-59
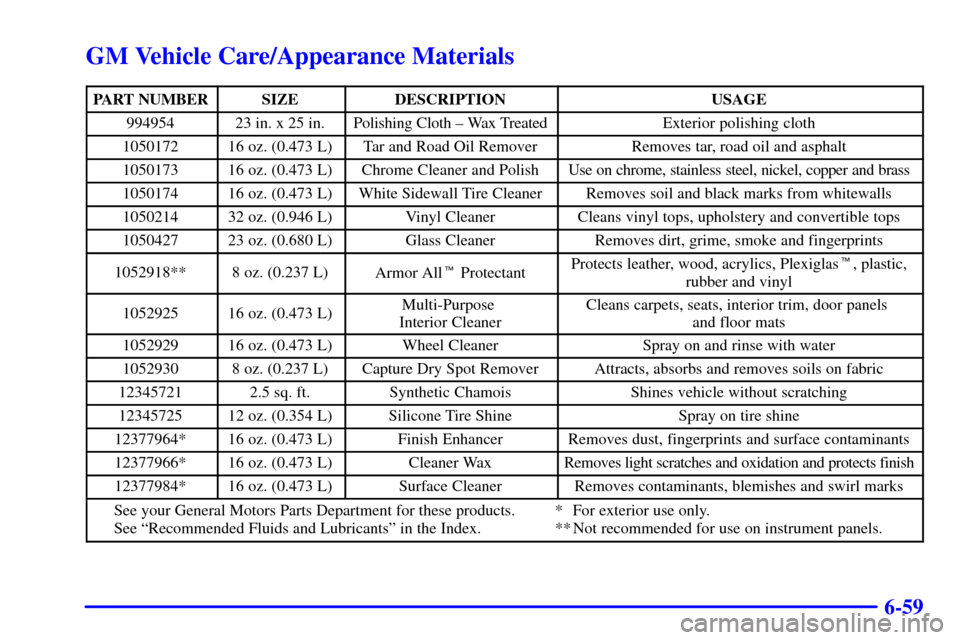
GM Vehicle Care/Appearance Materials
PART NUMBERSIZEDESCRIPTIONUSAGE
99495423 in. x 25 in.Polishing Cloth ± Wax TreatedExterior polishing cloth
105017216 oz. (0.473 L)Tar and Road Oil RemoverRemoves tar, road oil and asphalt
105017316 oz. (0.473 L)Chrome Cleaner and PolishUse on chrome, stainless steel, nickel, copper and brass
105017416 oz. (0.473 L)White Sidewall Tire CleanerRemoves soil and black marks from whitewalls
105021432 oz. (0.946 L)Vinyl CleanerCleans vinyl tops, upholstery and convertible tops
105042723 oz. (0.680 L)Glass CleanerRemoves dirt, grime, smoke and fingerprints
1052918**8 oz. (0.237 L)Armor All� ProtectantProtects leather, wood, acrylics, Plexiglas�, plastic,
rubber and vinyl
105292516 oz. (0.473 L)Multi-Purpose
Interior CleanerCleans carpets, seats, interior trim, door panels
and floor mats
105292916 oz. (0.473 L)Wheel CleanerSpray on and rinse with water
10529308 oz. (0.237 L)Capture Dry Spot RemoverAttracts, absorbs and removes soils on fabric
123457212.5 sq. ft.Synthetic ChamoisShines vehicle without scratching
1234572512 oz. (0.354 L)Silicone Tire ShineSpray on tire shine
12377964*16 oz. (0.473 L)Finish EnhancerRemoves dust, fingerprints and surface contaminants
12377966*16 oz. (0.473 L)Cleaner WaxRemoves light scratches and oxidation and protects finish
12377984*16 oz. (0.473 L)Surface CleanerRemoves contaminants, blemishes and swirl marks
See your General Motors Parts Department for these products. * For exterior use only.
See ªRecommended Fluids and Lubricantsº in the Index. ** Not recommended for use on instrument panels.